
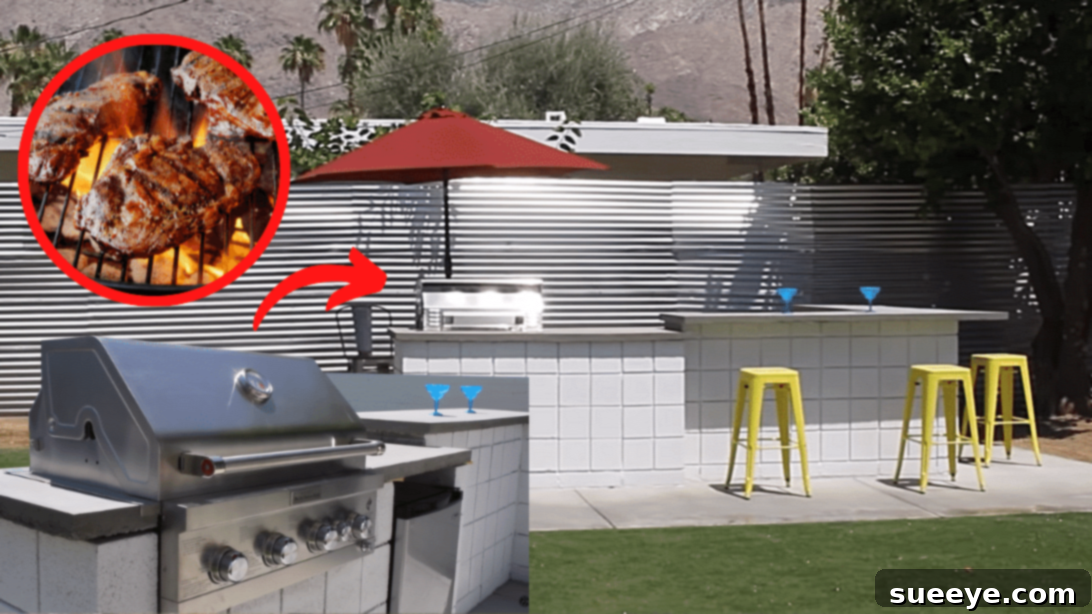
Build Your Dream Outdoor Kitchen: DIY Cinder Block BBQ Grill & Fire Pit
Elevate your backyard entertaining with a spectacular custom cinder block BBQ grill and fire pit. This comprehensive DIY tutorial, inspired by DCLA Universe, guides you through creating a durable, functional, and aesthetically pleasing outdoor cooking and relaxation hub. Perfect for summer gatherings, family cookouts, or simply unwinding with friends, this project provides a dedicated space for unforgettable memories. Unlike granite, concrete countertops offer superior heat resistance, making them an ideal choice for a BBQ area, especially during peak summer temperatures. Dive into the details below to envision and construct your very own personalized outdoor kitchen.
Embarking on a DIY outdoor kitchen project like this cinder block BBQ grill is more than just a construction task; it’s an investment in your home’s value and your lifestyle. Imagine sizzling steaks, perfectly grilled vegetables, and warm, inviting fires, all within steps of your backdoor. This project empowers you to design a space that perfectly suits your needs, whether you’re a seasoned grill master or simply love hosting outdoor get-togethers. With careful planning and execution, you’ll create a focal point for all your future outdoor activities, adding immense functionality and charm to your living space.
Essential Materials for Your Cinder Block BBQ Grill
Before you begin, gathering all the necessary materials is crucial for a smooth and efficient building process. Quality materials ensure durability and a professional finish for your outdoor kitchen. Here’s a detailed list of what you’ll need:
- Cinder Blocks (Concrete Blocks): The primary building material for the structure. Calculate the number needed based on your design and desired height. Consider standard gray blocks, or look into decorative options for a unique look.
- Portland Cement: The binding agent for your mortar and concrete countertop. Ensure it’s fresh and stored in a dry place.
- All-Purpose Sand: Essential for mixing with cement to create mortar for laying blocks and concrete for the countertop. Look for masonry sand if available, as it’s finer and easier to work with.
- Water: For mixing mortar and concrete. Have a hose or large buckets readily available.
- Mortar Mix (Optional): Pre-mixed mortar can be a convenient alternative to mixing cement and sand yourself, saving time and ensuring consistent ratios.
- Trowel (Brick Trowel and Pointing Trowel): Indispensable tools for applying and shaping mortar. A brick trowel is for spreading, and a pointing trowel is for finishing joints.
- Wood for Mold (Plywood, 2x4s): For constructing the formwork for your concrete countertop. Use sturdy, smooth lumber to ensure a clean finish. Melamine-faced plywood can provide an exceptionally smooth surface.
- Reinforcing Steel (Rebar or Wire Mesh): Crucial for adding strength and preventing cracks in your concrete countertop. Rebar should be cut to size, and wire mesh can be trimmed with bolt cutters.
- String Line and Line Blocks: Essential for ensuring straight and level courses of blocks. Accuracy here prevents a crooked structure.
- Level (Spirit Level, Laser Level): Used constantly to check plumb and level as you lay blocks and construct the countertop mold. A long level (4-6 feet) is highly recommended.
- Measuring Tape: For accurate layout and cutting.
- Wheelbarrow or Mortar Mixer: For mixing larger batches of mortar and concrete efficiently.
- Shovel and Hoe: For mixing and transferring materials.
- Rubber Mallet: For gently tapping blocks into place and ensuring proper seating in the mortar bed.
- Safety Gear: Gloves, safety glasses, and dust mask are vital when working with cement and masonry.
- Sandpaper or Concrete Grinder: For smoothing and refining the concrete countertop surface after curing. Various grits may be needed.
- Paint or Concrete Sealer: For finishing and protecting your concrete countertop. Choose exterior-grade paints or sealers designed for concrete.
- Cleaning Supplies: Sponges, brushes, and buckets for cleaning tools and any mortar spills.
Step-by-Step Guide to Building Your Custom Cinder Block BBQ Grill
Step 1: Meticulous Planning and Layout Design
The foundation of any successful DIY project lies in thorough planning. Before laying a single block, dedicate ample time to conceptualizing your outdoor kitchen’s layout. Begin by selecting the ideal location in your backyard. Consider proximity to your home for convenience, access to water and electricity, and ensure the ground is level or can be easily leveled. Safety is paramount; keep the BBQ area a safe distance from flammable structures, fences, and overhanging trees.
Next, sketch out your design. This initial layout should encompass all elements you wish to include. Think about the primary grill area – will it be charcoal, gas, or a smoker? Allocate adequate space for your chosen equipment. If you envision an integrated fire pit, determine its size and placement in relation to the grill for both functionality and aesthetic appeal. Consider incorporating counter space, not just for food preparation, but also as a potential bar area where guests can sit and socialize. If so, plan for an overhang on the countertop. Don’t forget storage solutions for grilling tools, charcoal, or propane tanks. You might also want to factor in space for outdoor appliances like a mini-fridge or a sink. Measure your chosen appliances precisely to ensure they fit seamlessly into your design.
When planning countertop heights, personal ergonomics are key. Design the height of your grill and prep areas to be comfortable for the primary user. A typical comfortable working height is around 32-36 inches, but adjust this based on your own height to prevent back strain during long cooking sessions. Use chalk or spray paint to mark the footprint of your entire structure directly onto the ground. This visual aid will help you confirm the scale and flow of your design, allowing you to make adjustments before any permanent construction begins. This detailed planning phase minimizes errors and ensures your final outdoor kitchen meets all your expectations.
Step 2: Constructing the Cinder Block Base Structure
With your design finalized and marked, it’s time to lay the groundwork for your robust outdoor kitchen. Site preparation is critical: clear the area of any debris, grass, or loose soil. Ensure the ground is compacted and perfectly level. If necessary, dig a shallow trench and fill it with compacted gravel to create a stable, well-drained foundation for your blocks. This preventative step helps in preventing settling and cracking over time.
Begin laying your first course of cinder blocks. This initial layer is the most important as it sets the alignment for your entire structure. Mix your cement mortar according to the manufacturer’s instructions – aim for a consistency similar to thick peanut butter, not too wet, not too dry. Apply a bed of mortar approximately 1/2 to 3/4 inch thick to your foundation using a brick trowel. Carefully place the first block, ensuring it is level and plumb. For the subsequent blocks, apply mortar to the ends (head joints) before butting them against the previous block.
As you build upwards, usually to a height just above your waistline (around 32-36 inches), constantly refer to your design for integrated features like grill openings or fire pit dimensions. The key to straight, professional-looking block walls is the consistent use of a string line. Run a tight string line from one end of your block wall to the other at the top edge of each new course. This string acts as a visual guide, ensuring every block is laid evenly and perfectly straight. Use a rubber mallet to gently tap blocks into perfect alignment with the string and to ensure full mortar contact. Regularly check each block and course with a spirit level to ensure both horizontal (level) and vertical (plumb) accuracy. Scrape off excess mortar as you go, and tool the joints for a neat finish. Allow the mortar to cure sufficiently, typically 24-48 hours, before proceeding to the next step, ensuring the structure is stable and strong.
Step 3: Crafting and Finishing Your Concrete Countertop
Once your cinder block base has fully cured and stands strong, it’s time to create the durable and attractive concrete countertop that will define your outdoor kitchen. This step requires precision and attention to detail. Start by constructing a robust mold for your countertop using smooth plywood for the top surface and 2x4s for the side forms and support. Ensure the mold is perfectly level and securely braced to withstand the weight of the wet concrete. If your design includes a bar area, meticulously plan for the desired overhang, incorporating it into your mold dimensions. This overhang not only provides comfortable seating but also adds a stylish architectural element.
Before pouring, place steel reinforcement within the mold. This could be rebar, steel mesh, or a combination, depending on the size and shape of your countertop. Reinforcement is critical for adding tensile strength to the concrete, significantly reducing the risk of cracking, especially with temperature fluctuations common in outdoor environments. Mix your concrete according to product specifications, aiming for a consistent, workable slump. Avoid making it too wet, as this weakens the final product. Pour the concrete evenly into the mold, ensuring it fully encapsulates the reinforcement. Use a vibrating tool or gently tap the sides of the mold with a hammer to release any trapped air bubbles, which can create voids and weaken the surface.
Once poured, use a straight edge (screed board) to level the concrete surface, moving it back and forth to remove excess and ensure an even plane. Follow with a bull float or hand float to bring the cream to the surface and smooth out any irregularities. For a truly smooth, polished finish, you can use a steel trowel after the concrete has started to set but is still workable. Carefully round or chamfer the edges using an edger tool for a professional look and to prevent chipping.
Curing is the most critical stage for concrete strength and durability. After the initial set, cover the countertop with plastic sheeting and keep it consistently damp for at least 7 days, or longer in hot, dry climates. This slow, controlled drying process allows the concrete to achieve its maximum strength. Once fully cured (typically 28 days for full strength, but forms can often be removed sooner), carefully remove the mold. Any rough spots or imperfections can then be smoothed down using sandpaper or a concrete grinder for a refined finish. Finally, paint the countertop with an exterior-grade concrete paint or apply a high-quality concrete sealer. Sealing is highly recommended as it protects the surface from stains, moisture, and UV damage, extending its lifespan and keeping it looking pristine for years to come. Choose a color that complements your outdoor aesthetic, or opt for a clear sealer to showcase the natural beauty of the concrete.
Custom Cinder Block BBQ Grill: Elevate Your Outdoor Living
Your custom cinder block BBQ grill is more than just a cooking station; it’s the centerpiece of an enhanced outdoor living experience. This DIY project offers immense satisfaction and a unique opportunity to personalize your space. With the robust foundation of cinder blocks and the versatility of a concrete countertop, you’ve built a durable, low-maintenance structure designed to withstand the elements and provide countless hours of enjoyment.
Enhancing Your Outdoor Kitchen
Once the basic structure is complete, consider further customizations to make your outdoor kitchen truly spectacular. Integrate built-in storage solutions with doors to keep grilling essentials tidy and protected from the weather. Add ambient lighting – string lights, solar-powered path lights, or even integrated LED strips – to extend your entertaining well into the evening. For the ultimate convenience, you might even plumb in a small sink for easy cleanup or add outlets for blenders and other appliances. Landscaping around your new BBQ area with heat-tolerant plants or pavers can further define the space and integrate it beautifully into your backyard design. Always keep safety in mind, ensuring a fire extinguisher is easily accessible and that the area is clear of any combustible materials.
Maintenance Tips for Longevity
To ensure your cinder block BBQ grill and concrete countertop remain in pristine condition for years, a little maintenance goes a long way. Regularly clean the concrete countertop with a mild soap and water solution to prevent stain buildup. If your countertop is painted or sealed, reapply the sealer every 1-3 years, depending on wear and exposure, to maintain its protective qualities. For the cinder block walls, occasional scrubbing can remove dirt or mildew. Inspect mortar joints annually for any cracks and repair them promptly to prevent moisture intrusion. By following these simple maintenance steps, your DIY outdoor kitchen will continue to be a source of pride and enjoyment for many seasons to come.
Congratulations on building your custom cinder block BBQ grill! This project showcases ingenuity, craftsmanship, and a commitment to creating an inviting outdoor oasis. Enjoy countless delicious meals and cherished moments with family and friends in your beautifully crafted outdoor kitchen.