
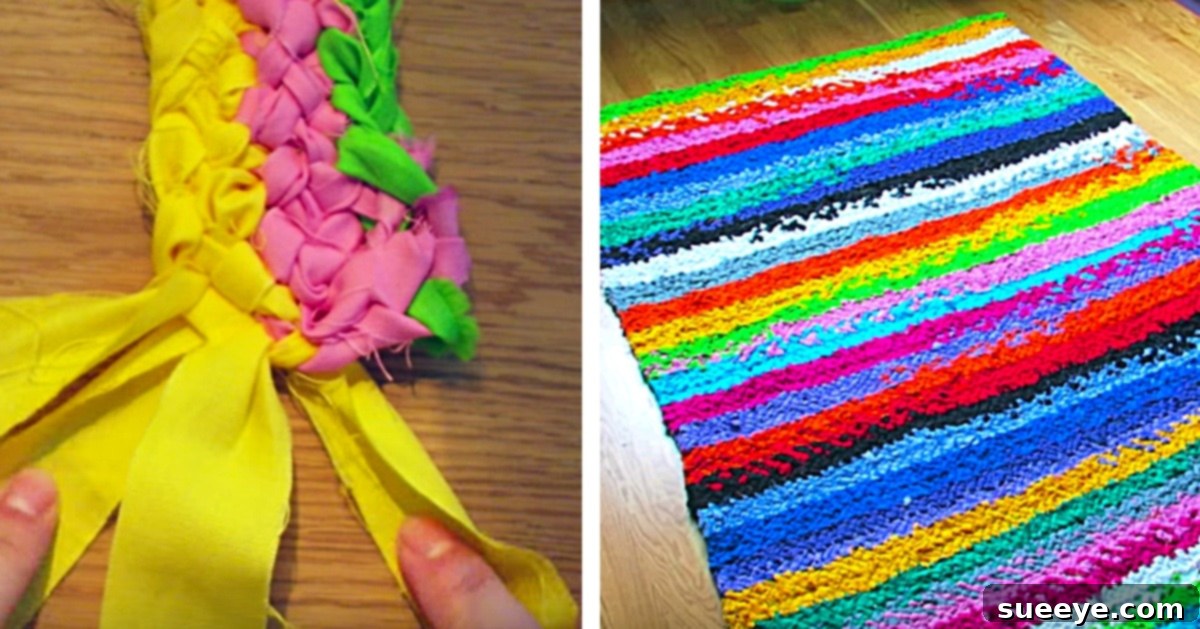
DIY No-Sew Rag Rug: Crafting Cozy Comfort from Fabric Scraps
Ever admired the rustic charm and cozy appeal of a rag rug, imagining one gracing your home but feeling intimidated by the thought of creating it yourself? For years, I shared that very sentiment. The idea of crafting something so seemingly intricate, something I typically only found in specialty stores, felt like a distant dream. However, my perception was wonderfully shattered when I stumbled upon a truly game-changing tutorial that promised a beautiful, durable rag rug with absolutely no sewing or gluing required. It was proof that even projects I considered immensely difficult could be conquered right in my craft room, using just my own two hands and a bit of creativity.
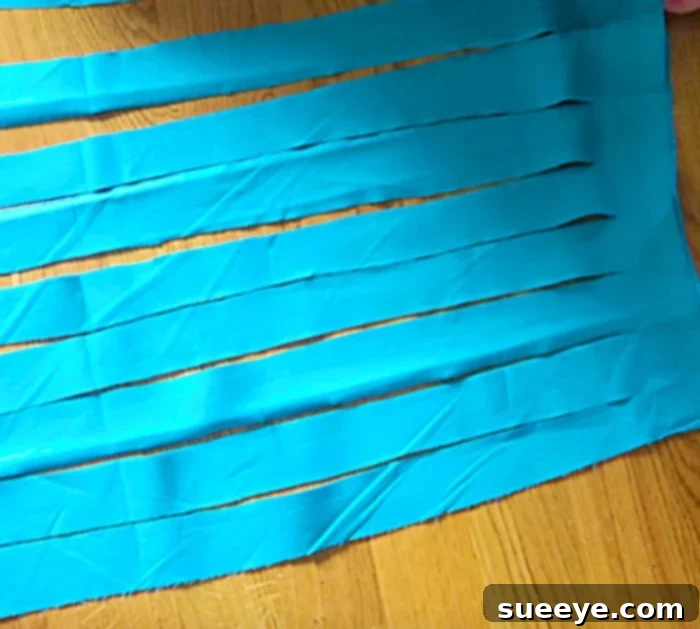
My vision was clear: a vibrant, primary-colored rainbow rug to bring a burst of joy and warmth to my kitchen. With this goal in mind, I patiently waited for the perfect opportunity. When Symphony Cotton Broadcloth, known for being one of the more affordable quilting cottons, went on a spectacular sale for just $1.00 a yard, I knew it was time. I seized the moment, buying every color they had in stock. A strange, intuitive feeling told me that this wouldn’t be my only rag rug project; I just knew I’d want to make more once I mastered the first. This foresight proved invaluable, as you’ll soon discover. With my colorful bounty of fabric ready, the first step was to lay it all out and meticulously cut it into consistent strips, precisely as the tutorial directed.
Why Choose a No-Sew Rag Rug? The Benefits of Fabric Crafting
The allure of a no-sew rag rug goes far beyond its charming appearance. This craft offers a multitude of benefits, making it an ideal project for crafters of all skill levels:
- Unmatched Simplicity and Accessibility: Forget about complex patterns, expensive sewing machines, or sticky glues. This method relies on basic braiding techniques, making it incredibly beginner-friendly. If you can braid hair, you can make this rug!
- Eco-Friendly and Sustainable Decor: Rag rugs are the epitome of upcycling. They provide a fantastic opportunity to repurpose old clothes, bedsheets, towels, or fabric scraps that might otherwise end up in a landfill. It’s a beautiful way to give new life to forgotten textiles and reduce waste.
- Cost-Effective Home Enhancement: By utilizing fabric scraps or taking advantage of fabric sales, you can create a unique piece of home decor at a fraction of the cost of store-bought rugs. Your wallet and the planet will thank you.
- Unique and Personalized Home Decor: Unlike mass-produced items, a handmade rag rug is a truly unique statement piece. You have complete control over the colors, patterns, and size, allowing you to perfectly match it to your existing decor or create a bold focal point.
- Therapeutic and Rewarding Process: The repetitive motion of braiding can be incredibly meditative and relaxing. There’s immense satisfaction in watching strips of fabric transform into a functional, beautiful object right before your eyes, fostering a deep sense of accomplishment.
Gathering Your Materials: The Foundation of Your Dream Rug
The right materials are the starting point for any successful craft project. For your DIY no-sew rag rug, the fabric choice is paramount.
Choosing Your Fabric Wisely
While I opted for Symphony Cotton Broadcloth due to its excellent sale price and ease of use, the world of fabric for rag rugs is vast and forgiving. Don’t limit your imagination; experiment with different textures and weights to achieve unique results:
- Cotton Broadcloth (Like Mine): Easy to cut, holds its shape well, and comes in a wide array of colors. It’s perfect for vibrant, soft rugs suitable for kitchens, bedrooms, or playrooms.
- Old T-shirts: Soft, stretchy, and comfortable underfoot, T-shirt material is excellent for bath mats or plush bedroom rugs. Its natural curl when cut makes it easy to work with.
- Denim: Extremely durable and robust, old jeans can be transformed into hard-wearing rugs perfect for high-traffic areas like entryways or mudrooms. Denim adds a fantastic rustic texture.
- Flannel: Warm and cozy, flannel scraps from old shirts or blankets make wonderfully soft rugs, ideal for adding warmth to a nursery or bedroom.
- Bed Sheets: Old cotton sheets are a treasure trove of large fabric pieces, often in attractive patterns or solid colors, and are typically very soft and pliable.
When selecting your fabric, consider the room the rug will inhabit. For my kitchen, I wanted bright, primary colors – red, orange, yellow, green, blue, and purple – to create a cheerful, rainbow effect. You might prefer a monochromatic scheme for elegance, a mix of muted tones for a farmhouse feel, or even themed patterns to complement a specific room’s design. The key is to visualize the finished product and choose colors that resonate with you.
Estimating Fabric Quantity and Essential Tools
It’s always prudent to err on the side of caution when estimating fabric needs. While my initial purchase of extra fabric was based on a hunch, it’s a solid strategy. For a medium-sized rug (approximately 2×3 feet), you might need anywhere from 5 to 10 yards of fabric, depending on the width of your strips and the fabric’s weight. It’s always better to have a little extra for practice strips or for future projects than to run out mid-way. In addition to your chosen fabric, you’ll need:
- Sharp Fabric Scissors: Essential for clean cuts.
- Rotary Cutter, Self-Healing Mat, and Ruler (Highly Recommended): For speed and precision, a rotary cutter set is a game-changer when cutting numerous strips.
Preparation is Key: Transforming Fabric into Usable Strips
The first crucial step in your rug-making journey is transforming your chosen fabric into usable strips. While this stage can be time-consuming, it’s also quite meditative and lays the groundwork for the entire rug. Precision here contributes significantly to a professional-looking finished product.
Cutting Your Fabric Strips
Lay your fabric out flat and smooth on a clean surface. If using a rotary cutter, place it on your self-healing mat. Using a long ruler as a guide, begin cutting strips. For a sturdy and visually appealing rag rug, aim for strips that are consistent in width, typically between 1 to 2 inches. Thinner strips will yield a denser, finer braid and a more intricate look, while wider strips will result in a chunkier, more rustic, and quicker-to-make rug. Don’t worry too much about the length of individual strips at this stage, as you’ll be joining them seamlessly as you braid. Focus on cutting as many long strips as possible from your fabric.
Tips for Efficient Cutting:
- Fold Your Fabric: If your fabric is wide, fold it lengthwise several times (ensuring edges are aligned) to cut multiple strips simultaneously, saving considerable time.
- Stay Sharp: Dull scissors or rotary blades will fray fabric and make cutting difficult. Keep your tools sharp for clean edges.
- Create a Template: If you’re struggling with consistency, cut a small cardboard template to the desired width and use it as a guide.
- Set the Mood: Put on some music, a podcast, or an audiobook to make the repetitive task of cutting more enjoyable.
The Art of Braiding: Bringing Your Fabric to Life
Once your fabric is meticulously cut into strips, the real magic begins: the braiding process. This is where your rug starts to take form, and it’s a wonderfully repetitive, almost hypnotic task that lends itself perfectly to social crafting.
Starting Your Braid
Take three fabric strips of varying colors (or the same, if you prefer a solid-colored braid) and align their ends. Tie them together with a simple overhand knot, leaving a short tail of about 1-2 inches. This knot will become the very center point of your rug. Secure this knotted end to something stable, such as a doorknob, a sturdy clip, or even have a friend hold it firmly for you. This stability will make braiding much easier.
The Basic 3-Strand Braid
Begin braiding as you would a hair braid: take the rightmost strip and cross it over the middle strip, then take the leftmost strip and cross it over the new middle strip. Continue this pattern, pulling each strand taut but not overly tight, to create an even, consistent braid. The consistency in tension is crucial; it will give your rug a beautiful, uniform texture and prevent it from looking lumpy or uneven.
Joining New Strips Seamlessly: The No-Sew Secret
As you near the end of a fabric strip, simply take a new strip of the desired color, overlap its end with the expiring strip by about an inch, and continue braiding as if it were one continuous piece. The tension of the braid will hold the new strip securely in place, eliminating the need for any sewing, gluing, or knotting at each join. This ingenious “no-sew” technique is what makes this project so appealing and results in a remarkably clean, seamless finish that enhances the overall professional look of your rug.
Continue braiding until you have several very long, individual braided ropes. The longer you make them, the fewer joins you’ll need when assembling the rug, which contributes to a smoother finish.
Assembling Your Rug: The Innovative No-Glue, No-Sew Method
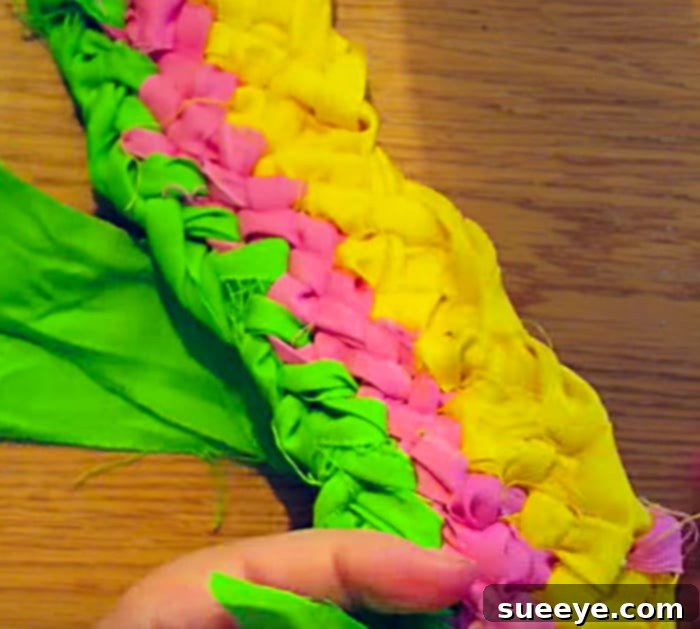
This is perhaps the most innovative and satisfying aspect of this DIY rag rug project. Unlike many tutorials that rely on hot glue or extensive hand-stitching to join the braids into a rug shape, this method allows you to intricately weave and “braid” the individual braided ropes directly into the main body of the rug. This creates an incredibly durable, flexible, and professional-looking finished product without a single drop of adhesive or a stitch of thread. As the original tutorial perfectly stated, “You simply braid the braids back into the main body of the rug,” and this technique is truly transformative.
Starting the Coil
Take your longest braided rope. Begin by coiling the initial knotted end tightly in on itself to form the very center of your rug. This first coil should be relatively small, perhaps 1-2 inches in diameter, and should be as flat as possible.
The Interlocking Braid Technique for Assembly
Now, instead of merely coiling your braided rope and laying it next to the previous row (which would require glue or thread to secure), you will actively interlock each new coil with the existing structure. As you coil the next section of your long braid around the central coil, you will use a small, blunt tool (like a crochet hook or even your fingers) to gently pry open a small loop or gap in the *edge* of the previously formed coil. Then, you will feed a loop of your *current* braided rope through that opening. After pulling that loop through, you will then feed the *next section* of your current braid through that newly formed loop, effectively creating a continuous chain stitch or a “crocheted” effect using the braided rope itself, directly into the rug’s existing structure.
This method forms a continuous, self-securing spiral. It might take a little practice to get the hang of maintaining even tension and a consistent pattern, but the result is an incredibly strong, seamless, and flat rug that will not unravel. You are literally ‘braiding’ the new rows into the previous ones, creating an integral, sturdy whole.
Maintaining Shape and Finishing Touches
Work slowly and deliberately, constantly checking your rug’s shape. If you desire a perfectly round rug, ensure your coils are concentric and your tension is even throughout. For an oval rug, you’ll need to slightly elongate your initial coiling. Keep the tension consistent as you join the rows; too tight in one area can cause the rug to pucker or warp, while too loose can make it flimsy.
Once your rug reaches the desired size, you’ll need to neatly secure the end of your final braided rope. This can be done by carefully tucking the end into the last few loops of the rug’s edge and then using a few small, tight knots that are hidden within the weave to secure it invisibly. Trim any stray ends that might pop out for a clean, finished appearance.
The Stunning Result & Future Endeavors
The satisfaction of stepping back and admiring your finished, handmade, no-sew rag rug is truly unparalleled. My primary-colored rainbow rug instantly brightened my kitchen, becoming a vibrant focal point and a testament to what can be achieved with a little patience and ingenuity. The absence of glue or visible stitching truly gives it a professional, high-quality appearance that completely belies its simple construction. We all loved how this DIY no-sew rag rug did not require any glue, a common and often messy requirement in many other tutorials, which definitely elevates its professional look.
My neighbors, who had so graciously lent their hands and company throughout the braiding process, were equally enamored with the outcome. Their enthusiasm led me to happily donate all my leftover Symphony Cotton fabric to them, ensuring they could embark on their own rug-making adventures. We are already planning another delightful crafting session next week, eager to create two more rugs – one for each of their kitchens, so they can enjoy the same handmade charm. It’s a wonderful way to share the joy of crafting and create lasting memories.
This project is a resounding ‘yes’ in my book. It’s accessible, rewarding, and produces a beautiful, functional piece of home decor that looks amazing. Whether you’re a seasoned crafter looking for a new challenge or a curious beginner taking your first steps into fabric arts, I wholeheartedly recommend diving into the world of DIY no-sew rag rugs. It’s more than just making a rug; it’s about creating something unique with your own hands, fostering community, and adding a touch of personalized warmth and vibrancy to your home.
Caring for Your Handmade Rag Rug
One of the many advantages of crafting a cotton rag rug is how easy it is to care for, ensuring its longevity and continued beauty in your home.
- Spot Cleaning: For minor spills or stains, simply spot clean the affected area with a mild soap and a damp cloth. Gently blot the area, avoiding harsh scrubbing that could disrupt the weave.
- Machine Washing: For a deeper clean, most cotton rag rugs can be machine washed. Place your rug in a large mesh laundry bag or a pillowcase to protect it, and wash on a gentle cycle with cold water. Use a mild detergent and avoid bleach, which can damage fabric fibers and fade colors.
- Drying: Air drying is always the best option for handmade rugs. Lay your rug flat on a clean surface or hang it over a clothesline, ensuring it’s completely dry before placing it back on your floor. If using a dryer, select a very low heat setting or an air-fluff cycle to prevent shrinkage or damage, and remove it while still slightly damp to finish air drying.
- Maintenance: Regularly shake out your rug outdoors to remove loose dust and debris. If any small loops or ends appear over time, gently tuck them back into the weave or carefully trim them with sharp scissors to maintain a tidy appearance.