
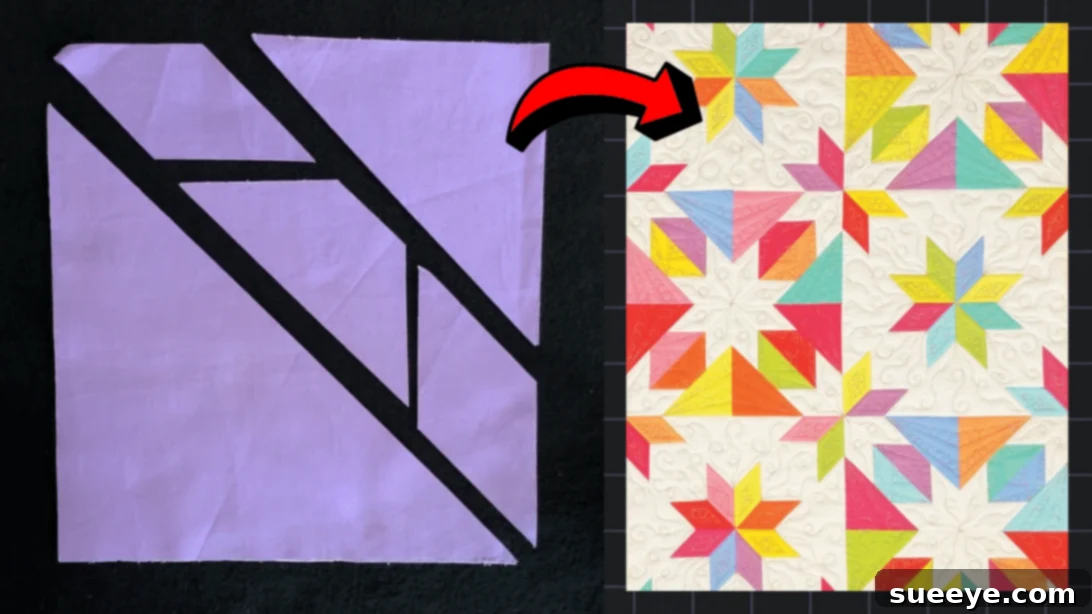
Embark on a delightful quilting journey with the enchanting Confetti Star Quilt Block, a design that promises both ease and spectacular visual appeal. Crafted and shared by the talented Material Girlfriends Patterns on YouTube, this tutorial stands out as one of the most accessible and engaging guides available for quilters of all skill levels. Whether you’re taking your very first stitches or are a seasoned pro seeking a quick and satisfying project, the simplified process ensures a seamless and enjoyable experience. The beauty of this particular quilt block lies in its straightforward construction, making it an ideal choice for beginners eager to dive into the world of quilting without being overwhelmed by complex techniques.
The Confetti Star Quilt Block is not just easy; it’s also incredibly versatile. One of its most appealing features is the freedom it offers in fabric selection. You can unleash your creativity by choosing any fabrics that inspire you, whether they are vibrant prints, subtle solids, or a harmonious blend of both. For those who love efficiency and coordinated fabric collections, this pattern is wonderfully “layer cake-friendly.” Layer cakes, pre-cut fabric squares typically 10×10 inches, make preparation a breeze and open up a world of design possibilities. This means less cutting and more sewing, allowing you to focus on the joy of creation. If you’re ready to transform fabric into a dazzling star, dive into the comprehensive guide below and discover how simple and rewarding this project can be.
Why the Confetti Star Quilt Block is Perfect for You
Beyond its beginner-friendly nature, the Confetti Star Quilt Block offers numerous advantages that make it a cherished pattern among quilters. Its design, while appearing intricate, is cleverly constructed from basic shapes, leading to a stunning finished product that belies its simple origins. This makes it an excellent project for building confidence and mastering fundamental quilting techniques like accurate cutting, precise piecing, and effective pressing.
The “confetti” aspect of the star allows for a vibrant, scrappy look, making it an excellent way to utilize your fabric stash and turn smaller pieces into a cohesive and beautiful design. Imagine a quilt alive with a kaleidoscope of colors and patterns, each star unique, yet harmoniously part of a larger masterpiece. This block is not only a fantastic standalone project but also a brilliant component for larger quilts, table runners, placemats, or even decorative pillows. Its adaptability ensures that your creative vision can truly take flight. Furthermore, the quick turnaround time for each block means you can see progress rapidly, which is incredibly motivating for new quilters and satisfying for experienced ones.
Essential Materials for Your Confetti Star Quilt Block
Gathering your supplies is the first exciting step in any quilting project. For the Confetti Star Quilt Block, you’ll find that most items are standard quilting tools, making it accessible even if your supplies are modest. Precision in quilting is key, so investing in good quality tools will make your experience much smoother and your results more professional.
- 2 Contrasting Fabrics (or Assorted Scraps): The magic of the Confetti Star often comes from the interplay of light and dark, or vibrant and subtle colors. Choosing two contrasting fabrics will make your star pop. Alternatively, embrace a “scrappy” look by using an assortment of coordinating fabrics for a truly unique and dynamic design. For layer cake enthusiasts, this is the perfect opportunity to use those pre-cut squares.
- Marking Pen, Pencil, or Chalk: Accuracy starts with clear markings. Whether you prefer a fine-tipped fabric pen, a trusty pencil, or tailor’s chalk, ensure your chosen tool makes visible lines that are easy to follow and, ideally, disappear or wash out without a trace.
- Ruler: A clear acrylic quilting ruler with precise markings is indispensable. Look for one that’s easy to handle and has distinct lines for accurate measurements and cuts.
- Scissors or Rotary Cutter and a Cutting Mat: While sharp fabric scissors are always useful, a rotary cutter paired with a self-healing cutting mat will revolutionize your cutting process, offering speed, precision, and efficiency. Always use a fresh blade for the cleanest cuts and practice safe handling techniques.
- Fabric Pins: Essential for holding fabric pieces together before stitching, preventing shifting and ensuring accurate seams. Choose sharp, fine pins to avoid snagging your fabric.
- Needle and Thread: A good quality polyester or cotton thread that matches or complements your fabric colors is crucial. Ensure your sewing machine needle is sharp and appropriate for the fabric weight you are using.
- Iron, for Pressing: A hot iron and a sturdy ironing board are your best friends in quilting. Proper pressing is as important as accurate sewing, helping your blocks lie flat and seams nest perfectly.
- Sewing Machine: A reliable sewing machine with a straight stitch capability is all you need. Ensure it’s in good working order and you have a supply of bobbins wound with your chosen thread.
- Pattern: The downloadable pattern from Material Girlfriends is your blueprint for success. It provides the exact dimensions and cutting instructions needed to create the Confetti Star Block. (Click here to download the pattern)
How to Make the Confetti Star Quilt Block: A Step-by-Step Guide
Creating the Confetti Star Quilt Block is a rewarding experience, and by following these detailed steps, you’ll find the process smooth and enjoyable. Remember, patience and precision are your allies in quilting.
Step 1: Pattern Preparation and Precise Cutting
The foundation of a beautiful quilt block lies in accurate cutting. Begin by downloading the official Confetti Star Quilt Pattern from Material Girlfriends. This pattern is your essential guide, providing all the necessary measurements and cutting diagrams. Carefully read through the pattern instructions to familiarize yourself with the process before making any cuts.
- Cutting Initial Squares: Following the pattern, cut your chosen fabrics into the specified square dimensions. For instance, if you’re using layer cake squares (10×10 inches), you might start with these, or cut new squares from yardage. Use your rotary cutter and ruler with a firm, even pressure to ensure straight edges and perfect 90-degree corners.
- First Diagonal Cut: Take each square and cut it in half diagonally, from one corner to the opposite corner. This will yield two large triangles from each square. This cut should be clean and precise, as these triangles form the initial building blocks of your star.
- Second Diagonal Cut (Parallel): Now, select one of these large triangles. Using your ruler, make another diagonal cut that runs parallel to the first cut, approximately 2½ inches away from the initial diagonal line. This cut will create a smaller triangle and a trapezoidal strip. This precision is crucial for the “confetti” effect.
- Trimming the Diagonal Strip: Focus on the trapezoidal strip you just created. Trim both ends of this strip. One end will be trimmed horizontally, and the other vertically, both at 2½ inches away from the diagonal line, as expertly demonstrated in the video tutorial. This process will result in a distinctive diamond-like shape and two smaller rectangular pieces.
- Repeat for All Triangles: Apply these exact same cutting steps to all your large triangles to create the necessary components for your Confetti Star. Consistency in cutting will ensure your blocks come together seamlessly.
Step 2: Piecing the Star and Assembling the Block
With your pieces precisely cut, it’s time to bring your star to life through careful stitching and pressing.
- Trading and Arranging Diamonds: Identify the diamond-shaped pieces you created in Step 1. These are central to your star’s design. The pattern will guide you to “trade” these diamonds, typically swapping a diamond from a darker fabric set with one from a lighter fabric set, or vice-versa. This creates the contrasting star points. Lay out your pieces on a design board or flat surface to visualize the arrangement before you begin sewing. This allows you to correct any mistakes in placement.
- Stitching the Center Outward: Begin stitching these swapped diamond units back together. The Material Girlfriends Patterns tutorial recommends starting your stitching at the center of the unit and working your way outward. This technique can help maintain accuracy and prevent distortion. Use a consistent ¼-inch seam allowance throughout your piecing. This standard quilting allowance is vital for blocks to fit together correctly. Pin your pieces securely before sewing to prevent them from shifting.
- Pressing for Flatness: After stitching each seam, take your block unit to the iron. Pressing is not ironing; instead of pushing the iron back and forth, you gently lift and place it. Press your seams open or to one side (typically towards the darker fabric to prevent shadowing). The goal is to make your block lie perfectly flat. Well-pressed seams contribute significantly to the overall flatness and professional appearance of your finished quilt.
- Trimming to Square: Once stitched and pressed, your block unit may need a slight trim to ensure it is a perfect square according to the pattern’s final block dimension. Use your quilting ruler and rotary cutter to carefully square up the block, making sure all corners are 90 degrees and all sides are the correct length. This step is critical for ensuring your blocks fit together neatly when you assemble the full quilt top.
- Creating Additional Sets: The Confetti Star is often composed of multiple units that come together to form the full star. Make two or more additional sets of these diamond-swapped, stitched, and trimmed units as instructed by the pattern. The total number will depend on the size and complexity of the star design.
- Piecing the Confetti Star: Finally, piece these completed units together to form the full Confetti Star. Carefully align seams, using pins to hold everything in place. Sew with your consistent ¼-inch seam allowance. Press all final seams thoroughly, again ensuring your completed Confetti Star Quilt Block is crisp and flat.
Tips for a Perfect Confetti Star Quilt Block
To ensure your Confetti Star Quilt Block turns out beautifully, here are some additional tips that will elevate your quilting game:
- Pre-wash Your Fabrics: While not always necessary for small blocks, pre-washing your fabrics can prevent future shrinkage and color bleeding, especially if you’re mixing different fabric types or colors.
- Use a New Needle: A sharp, new needle in your sewing machine makes a huge difference in stitch quality and prevents skipped stitches or fabric pulls. Change your needle every 8-10 hours of sewing or at the start of a new project.
- Check Your Seam Allowance: Before starting your project, sew a test strip to ensure your ¼-inch seam allowance is accurate. A slight deviation can throw off the entire block.
- Chain Piecing: For efficiency, especially if making multiple blocks, consider chain piecing. This involves feeding units through your sewing machine one after another without lifting the presser foot or cutting threads in between.
- Nest Your Seams: When joining two units, if you’ve pressed seams in opposite directions, they will “nest” together perfectly at the intersection. This helps to reduce bulk and create crisp points.
- Stay Organized: Keep your cut pieces organized, perhaps in small piles or on a design wall, to avoid confusion and ensure you’re picking up the correct pieces for each step.
- Embrace Imperfection: Especially for beginners, remember that quilting is a skill developed over time. Don’t let minor imperfections deter you. Each stitch is a step in your learning journey!
Creative Variations and Project Ideas
The Confetti Star Quilt Block is more than just a pattern; it’s a springboard for your creativity. Once you’ve mastered the basic block, consider these ideas to make your projects truly unique:
- Color Palettes: Experiment with different color combinations. A monochromatic scheme can be strikingly elegant, while a vibrant rainbow assortment can be playful and energetic. Consider seasonal themes – reds and greens for Christmas, pastels for spring.
- Background Fabrics: The background fabric can dramatically change the look of your star. A light, solid background makes the star pop, while a patterned or darker background can create a more subtle or dramatic effect.
- Scrappy Stars: If you have a collection of fabric scraps, this block is an ideal way to use them up. Each star can be a unique combination of fabrics, creating a truly “confetti” look.
- Beyond the Block: While perfect for a full quilt, a single Confetti Star block can be transformed into a beautiful placemat, a charming pillow cover, or a decorative pot holder. Multiple blocks can form a stunning table runner or a baby quilt.
- Combine with Other Blocks: Integrate the Confetti Star with other complementary quilt blocks to create a more complex and varied quilt design.
The journey of creating a Confetti Star Quilt Block is one of discovery, skill-building, and immense satisfaction. The clear instructions from Material Girlfriends Patterns make this project accessible to everyone, ensuring that even those new to quilting can achieve stunning results. So grab your fabrics, fire up your sewing machine, and prepare to create something truly beautiful. Happy quilting!
*All these amazing images are thanks to Material Girlfriends Patterns via YouTube. Do visit her channel for more fantastic quilting tutorials and inspiration!
Related Quilt Tutorials
If you’ve enjoyed making the Confetti Star, you might be interested in exploring other beginner-friendly quilt block patterns to expand your skills. A great next step could be learning how to create a classic and versatile block like the Sugar Bowl Quilt Block. Each new pattern you tackle not only adds a unique design to your repertoire but also reinforces fundamental quilting techniques, preparing you for more complex projects down the line. Keep building your quilting confidence one beautiful block at a time!
RELATED: How to Make a Sugar Bowl Quilt Block