
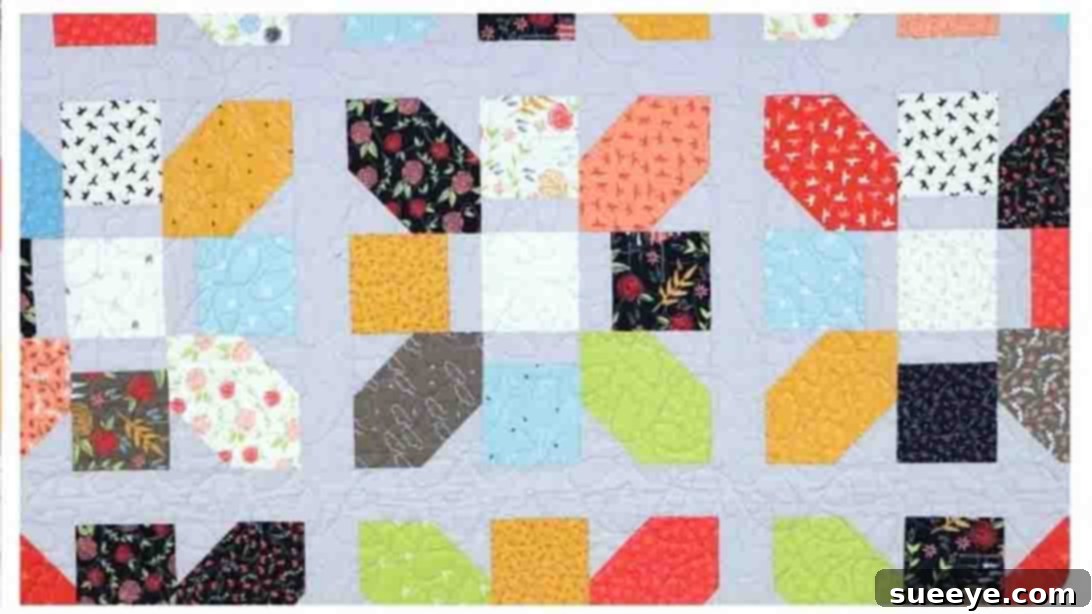
Are you searching for a delightful and rewarding new quilting project that promises both beauty and satisfaction? Look no further! The Jolly Bar Jazz Shortcut Quilt, a fantastic tutorial brought to you by the experts at Fat Quarter Shop on YouTube, offers an engaging and approachable experience for quilters of all skill levels. Whether you’re just starting your quilting journey or you’re a seasoned fabric artist, this pattern is designed to deliver stunning results with ease.
The charm of the Jolly Bar Jazz Quilt lies in its elegant design and the clever “shortcut” construction method, making it an ideal choice for creating personalized gifts for your loved ones. Imagine the joy of gifting a handmade quilt that’s not only beautiful but also infused with your personal touch and effort. This project is perfect for birthdays, holidays, or simply as a token of affection. Get ready to transform carefully selected fabrics into a cherished keepsake!
This comprehensive guide will walk you through every stage of creating your very own Jolly Bar Jazz Shortcut Quilt. From gathering your materials and mastering precise cutting techniques to assembling each unique block and completing the quilt top, we’ll cover it all. Dive into the detailed step-by-step instructions below and prepare to embark on your next favorite quilting adventure!
RELATED: Jolly Bar Bakewell Shortcut Quilt Tutorial
Jolly Bar Jazz Shortcut Quilt Tutorial: Master This Charming Project
The Jolly Bar Jazz Shortcut Quilt is more than just a pattern; it’s an opportunity to create something truly special without the complexity often associated with quilting. Its “shortcut” nature refers to efficient cutting and assembly methods that significantly reduce the time investment, allowing you to enjoy the creative process more and see your beautiful quilt come to life sooner. This quilt finishes at a generous size, making it suitable for a cozy throw, a bed accent, or a thoughtful gift.
One of the many reasons to love this project is its adaptability. The design allows for endless color combinations and fabric choices, ensuring that each quilt you make will be unique. You can opt for vibrant, contrasting prints for a bold statement or choose serene, coordinating fabrics for a more classic and subtle aesthetic. The versatility of the Jolly Bar Jazz pattern means it can truly reflect your personal style or the preferences of the lucky recipient.
Essential Materials for Your Quilt Project
Gathering all your materials before you begin is a crucial first step for a smooth quilting process. This section details not only the fabric requirements but also the general tools you’ll need to successfully complete your Jolly Bar Jazz Shortcut Quilt. Remember that using good quality materials will always enhance the final look and durability of your quilt.
Getting Started with Fabric Selection
For this project, the primary fabric components are specific rectangles, which can be cut from yardage or sourced from pre-cut bundles like Jolly Bars (though the pattern specifies individual rectangle dimensions). The pattern brilliantly utilizes different fabric designations (A, B, C) to create visual interest and depth within each block. Carefully selecting these fabrics is key to the quilt’s overall appeal.
- Click here for the free Jolly Bar Jazz Shortcut Quilt pattern. This PDF download will provide all the detailed diagrams and instructions.
- Seventy-eight 5″ x 10″ rectangles: These are the foundational pieces of your quilt. The original pattern typically uses Jolly Bar pre-cuts, which consist of 5″ x 10″ rectangles. If you’re cutting from yardage, ensure precision.
Set Aside These Fabric Quantities:
48 – 5″ x 10″ rectangles (Fabric A): These will form the core of your corner units. Choose a fabric that complements your overall color scheme.
24 – 5″ x 10″ rectangles (Fabric B): Used in the center units, this fabric can be a contrasting or coordinating print to Fabric A and C.
5 1/2 yards of background fabric: The background fabric provides a visual “resting place” and helps the pattern elements stand out. A neutral solid or a subtle tone-on-tone print often works best, allowing your patterned fabrics to shine.
7/8 yard binding: The binding frames your quilt and protects its edges. It can be a contrasting color to add a pop, or a coordinating one to blend seamlessly.
5 1/4 yards backing: The backing fabric is important for comfort and stability. While it’s the underside, don’t overlook its potential to add another layer of beauty to your quilt. Wide-back fabrics can minimize seams.
Essential Tools for Quilting Success:
Beyond the fabrics, a few standard quilting tools will make your project significantly easier and more enjoyable. These are worth investing in if you don’t already own them:
- Rotary Cutter: A sharp 45mm or 60mm rotary cutter is indispensable for quick and accurate cutting.
- Self-Healing Cutting Mat: Protects your work surface and your rotary cutter blade.
- Quilting Rulers: A variety of acrylic rulers (e.g., 6″ x 24″ for strips, and a square-up ruler like 17″ x 17″ or larger) are essential for precise cuts and trimming.
- Sewing Machine: A reliable sewing machine with a consistent 1/4-inch seam allowance foot is ideal.
- Good Quality Thread: 100% cotton thread is generally recommended for piecing quilts.
- Iron and Pressing Mat: Proper pressing is just as important as accurate sewing for flat, well-aligned blocks.
- Fabric Scissors: For any small snips or thread cutting.
- Pins or Fabric Clips: To hold fabric pieces together before sewing.
Precision Cutting: The Foundation of a Beautiful Quilt
Accuracy in cutting is paramount in quilting; even slight discrepancies can lead to misaligned blocks and a wavy quilt top. Take your time with this step, use a sharp rotary blade, and double-check your measurements. The phrase “measure twice, cut once” is a quilter’s mantra for good reason!
From your initial 78 – 5″ x 10″ rectangles, you have set aside 48 of Fabric A and 24 of Fabric B. Now, cut the remaining six 5″ x 10″ rectangles into:
- 12 – 5″ squares (Fabric C): These will serve as the center focal point of your main quilt blocks.
Next, cut your background fabric into these precise dimensions:
- 96 – 3″ x 10″ rectangles (Fabric D): These strips will frame Fabric A in your corner units, contributing to the “jazz” effect of the pattern.
- 24 – 2″ x 10″ rectangles (Fabric E): Used in conjunction with Fabric B to create the center units of your blocks.
- 8 – 3″ x 17″ rectangles (Fabric F): These longer strips will be used as sashing between your completed quilt blocks to define the rows.
- 5 – 3″ x WOF strips (Fabric G): WOF stands for “Width of Fabric.” These strips will be used for the outer border of your quilt, adding a finished edge.
- 9 – 5 1/2″ x WOF strips (Fabric H): These wider strips are typically used for the inner border or another section of the outer border, depending on the pattern’s final design.
Finally, cut your binding fabric:
- 9 – 2 1/2″ WOF strips (Fabric I): These strips will be sewn together to create one continuous piece for the binding, which will neatly finish the edges of your quilt.
Step-by-Step Directions: Assembling Your Jolly Bar Jazz Quilt
With all your fabrics precisely cut and organized, you’re ready for the exciting part: bringing your quilt to life! Follow these directions carefully, paying close attention to seam allowances and pressing instructions for the best results. A consistent 1/4-inch seam allowance is crucial for blocks to fit together perfectly.
Step 1: Crafting the Corner Units (48 Blocks)
To begin, we’ll create the foundational corner units. Take one 5″ x 10″ rectangle of Fabric A and position two 3″ x 10″ rectangles of Fabric D, one at the top edge and one at the bottom edge of Fabric A. Carefully align the raw edges and stitch them together using a precise 1/4-inch seam allowance. After sewing, press your seams towards the darker fabric (typically Fabric D, if it’s darker than Fabric A) to reduce bulk and ensure your blocks lie flat.
Once sewn, your combined unit needs to be squared up. To do this, gently fold the block in half lengthwise and then crosswise to find its approximate center. Place a square ruler on top, carefully centering it so that the lines on your ruler align with the seams and the center crease. Trim all four sides to achieve a perfectly squared block of a consistent size (refer to your pattern for the exact dimensions, typically 5″ x 5″ or slightly larger at this stage before final trimming). Precision here is vital for seamless assembly later. You will need to make 48 of these corner units for your quilt.
Step 2: Creating the Center Units (48 Blocks)
Next, let’s assemble the center units. Take one 5″ x 10″ rectangle of Fabric B and one 2″ x 10″ rectangle of Fabric E. Sew these two pieces together along one long edge, again using a 1/4-inch seam allowance. Press the seam towards the darker fabric to ensure a flat and crisp unit.
Once pressed, carefully cut the combined unit in half, yielding two smaller, identical units. This precise cut ensures that your central blocks will have symmetrical components. You will need to create 48 of these finished center units in total, which means you’ll repeat this process for 24 sets of Fabric B and Fabric E.
Step 3: Assembling the Main Quilt Block (12 Blocks)
Now it’s time to bring all the individual units together to form your main quilt block. Imagine a classic nine-patch layout for this step, as it helps visualize the placement. Lay out one 5″ square of Fabric C in the very center. Then, position four of your newly created center units (from Step 2) around each side of Fabric C. Finally, place four of your completed corner units (from Step 1) into each of the four corners of this arrangement. Refer to the image provided in the original pattern for an exact visual guide to the placement of each unit.
Once your layout is satisfactory, begin sewing the units together into three horizontal rows. First, sew the three units of the top row together, then the three units of the middle row, and finally, the three units of the bottom row. Press the seams for the top and bottom rows in one direction (e.g., towards the outer edges) and the middle row in the opposite direction (e.g., towards the center). This technique, known as “nesting seams,” will help your rows join smoothly with minimal bulk. Finally, sew these three rows together to complete your main quilt block.
After assembling the block, it’s crucial to trim it down to a precise 17″ square. Use your large square-up ruler, aligning its lines with the seams and edges of your block. This step, often called “squaring up,” ensures that all your blocks are uniform in size, which is essential for a flat and even quilt top. You will need to make 12 of these perfectly squared 17″ blocks for the quilt top.
Step 4: Bringing Your Quilt Top Together
With all 12 of your magnificent 17″ main quilt blocks complete, it’s time to assemble them into the full quilt top. Arrange your blocks into four horizontal rows, with three blocks in each row. Between each block within a row, you will insert one 3″ x 17″ rectangle of Fabric F, which acts as sashing. Sashing not only separates your blocks but also adds another layer of design and can help with overall quilt stability.
First, sew the sashing strips between your blocks for each of the four rows. Press seams towards the sashing. Then, once all four rows are complete, sew these rows together. Take extra care to align the sashing strips and block corners precisely as you join the rows. Pins are your best friend here! Once all rows are sewn, press the final seams flat, and your stunning Jolly Bar Jazz Shortcut Quilt top is complete!
Beyond the Quilt Top: Finishing Your Project
While this tutorial primarily focuses on assembling the quilt top, remember that your quilt journey doesn’t end there! The next steps typically involve:
- Adding Borders: If desired, attach the Fabric G and H strips as outer borders to further enhance and enlarge your quilt.
- Basting: Create a quilt sandwich by layering your backing fabric (Fabric B), batting, and the completed quilt top. Secure these layers together with pins, basting spray, or thread.
- Quilting: Stitch through all three layers. This can be simple straight-line quilting, free-motion quilting, or a professional long-arm service.
- Binding: Finish the raw edges of your quilt using your Fabric I strips. This provides a clean, durable, and attractive edge.
Tips for Quilting Success
To ensure your Jolly Bar Jazz Shortcut Quilt, and indeed all your future quilting projects, turn out beautifully, keep these invaluable tips in mind:
- Consistent Seam Allowance: The 1/4-inch seam allowance is critical in quilting. Invest in a 1/4-inch foot for your sewing machine if you don’t have one, or use a piece of painter’s tape as a guide.
- Pressing vs. Ironing: In quilting, we generally “press” seams rather than “iron” them. Pressing means lifting and placing the iron down, while ironing involves pushing the iron across the fabric, which can distort your pieces.
- Squaring Up: Don’t skip squaring up your blocks at each crucial stage. This seemingly small step prevents major headaches later on and ensures your quilt top lies flat.
- Test Stitches: Before starting on your main project, always test your stitch length and tension on a scrap piece of your fabric.
- Take Breaks: Quilting should be enjoyable, not stressful. If you feel frustrated, step away for a bit and return with fresh eyes.
- Read Ahead: Always read through the entire pattern instructions before you begin sewing. This helps you understand the flow of the project and anticipate any tricky parts.
- Fabric Pre-washing: While some quilters skip this, pre-washing your fabrics can prevent future color bleeding and pre-shrink the fabric to avoid unexpected distortion after the first wash of the finished quilt.
Your Finished Jolly Bar Jazz Quilt Awaits!
Congratulations on embarking on or completing your Jolly Bar Jazz Shortcut Quilt! This project is a fantastic way to hone your quilting skills while creating a vibrant and functional piece of art. The “shortcut” methods make it approachable, but the finished product boasts a sophisticated look that will impress.
We encourage you to experiment with different fabric combinations to truly make this quilt your own. Share your finished creation online using relevant hashtags, and inspire other quilters with your unique fabric choices. Remember, every stitch tells a story, and your handmade quilt carries a piece of your creativity and dedication. Enjoy the warmth and beauty of your new Jolly Bar Jazz Quilt!