
Master the Diamond Spools Quilt: A Unique Take on Grecian Patterns
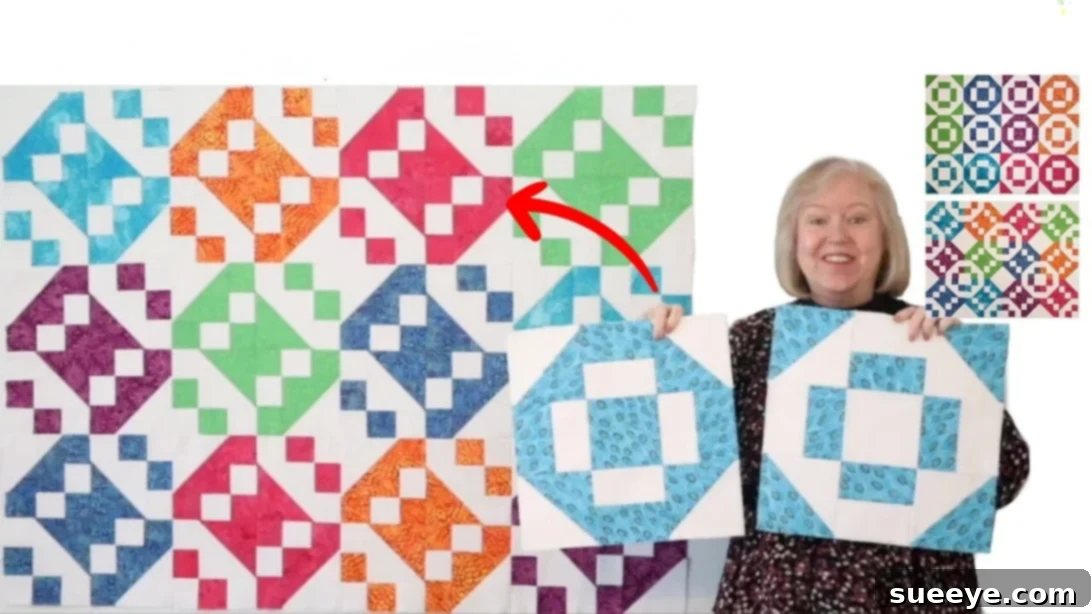
Embark on a delightful quilting journey with this incredibly clever Diamond Spools Quilt pattern, a design that beautifully incorporates both positive and negative Grecian patterns. It’s a truly mesmerizing concept, originally brought to light by the ingenious Brita Nelson, the Questioning Quilter. Her innovative approach to block construction makes this project not only rewarding but also surprisingly approachable. Whether you’re a seasoned quilter looking for a fresh challenge or a beginner eager to expand your skills, this tutorial will guide you through every step of creating a stunning piece that’s perfect as a cherished gift for a fellow sewing enthusiast or a beautiful addition to your home decor. Get ready to transform simple fabric pieces into a dynamic and elegant quilt that showcases intricate details and a truly unique aesthetic. This design is sure to impress, offering a blend of traditional quilting techniques with a modern, eye-catching twist.
The beauty of this Diamond Spools Quilt lies in its duality – the “positive and negative” space creates an optical illusion that makes the Grecian-inspired patterns truly pop. You’ll learn how to manipulate fabric colors and block arrangements to achieve this striking effect, resulting in a quilt that looks far more complex than it actually is to construct. The process is enjoyable, the instructions are clear, and the outcome is a masterpiece you’ll be proud to display. Let’s gather our materials and dive into the wonderful world of quilting with Brita Nelson’s brilliant design. Happy quilting!
Materials for Your Diamond Spools Quilt
Before you begin, ensure you have all the necessary materials and tools ready. High-quality fabrics will make a significant difference in the final look and longevity of your quilt. Pre-washing your fabrics is highly recommended to prevent shrinkage and color bleeding later on.
- Fat Quarters or 18″ x 21″ Fabric Pieces: You will need several fat quarters (or similar sized fabric scraps) in a variety of colors or prints for the “colored” sections of your spool blocks. The exact number will depend on the desired size of your quilt, but for a single block, you’ll need at least one fat quarter. Choose colors that contrast well with your background fabric to highlight the Grecian patterns effectively.
- Background Fabric: A solid or subtly patterned fabric (e.g., white, cream, light grey) is crucial for creating the negative space that allows the spool and Grecian designs to emerge. You will need a significant amount of this fabric, depending on your quilt’s size. Consider purchasing extra to ensure continuity.
- Basic Quilting Tools:
- Rotary Cutter: Essential for precise and efficient cutting.
- Cutting Mat: Protects your work surface and provides a stable base for cutting.
- Quilting Rulers: Various sizes, especially a long ruler for strip cutting and a square ruler for trimming half-square triangles, will be invaluable.
- Sewing Machine: A well-maintained machine with a good 1/4-inch foot attachment.
- Matching Thread: High-quality cotton or polyester thread that blends with your fabrics.
- Iron and Ironing Board: Crucial for pressing seams flat and accurately.
- Fabric Scissors: For minor trims and thread snipping.
- Pins or Fabric Clips: To hold fabric pieces together securely before sewing.
Step-by-Step Guide to Crafting Your Diamond Spools Quilt
Accuracy in cutting and a consistent 1/4-inch seam allowance are key to a successful quilting project. Take your time with each step, and don’t hesitate to press your fabric frequently to ensure flat, precise blocks.
Step 1: Preparing Your Fabric Pieces
Begin by carefully cutting your primary colored fabric (from your fat quarter). Precision here is paramount, as it will directly impact the alignment of your finished block. From your chosen fat quarter, you will need to cut the following pieces:
- Two strips: Each measuring 2 3/4 inches by 21 inches. These strips will form parts of the outer border of your spool and contribute to the “positive” space.
- One square: Measuring 11 inches by 11 inches. This larger square will be used to create your half-square triangles, which are fundamental to the Grecian pattern.
- One square: Measuring 5 inches by 5 inches. This smaller square will be incorporated into the center of your block design.
Ensure your cuts are straight and accurate. Using a rotary cutter, a good quality quilting ruler, and a self-healing mat will help you achieve the best results.
Step 2: Creating Half-Square Triangles (HSTs)
Half-Square Triangles (HSTs) are a cornerstone of many quilt designs, including this one. They are essential for forming the dynamic angles of the Grecian patterns. This method creates eight HSTs efficiently.
- First, cut an 11-inch by 11-inch square from your chosen background fabric. This white or neutral fabric will provide the necessary contrast.
- Place this background square directly on top of your previously cut 11-inch by 11-inch colored square, ensuring their right sides are together and all edges are perfectly aligned.
- On the wrong side of the lighter fabric (usually the background fabric), draw a diagonal line from one corner to its opposite corner. Then, draw a second diagonal line from the remaining two corners. You should now have an “X” marked across your square.
- Using your sewing machine, sew a seam 1/4 inch away from *both sides* of each of the two drawn diagonal lines. This means you will sew a total of four seam lines parallel to your drawn lines.
- Once all four seams are sewn, carefully cut the large square into halves twice – first horizontally, then vertically. This will yield four smaller squares.
- Next, cut each of these four smaller squares along the original drawn diagonal lines. You will now have eight individual half-square triangles.
- Open each HST carefully, pressing the seam allowance towards the darker fabric to minimize bulk.
- Finally, trim each half-square triangle to a precise square measurement (e.g., 4.5 inches or 5 inches, depending on your desired final block size and a practice piece). Trimming is critical for accuracy and ensuring your blocks will fit together perfectly. Use a square-up ruler for the best results.
Step 3: Preparing Background Fabric Strips
Now, let’s prepare the background strips that will complement your colored strips.
- From your background fabric, cut a strip 2 3/4 inches wide across the entire Width Of Fabric (WOF). A standard WOF is typically 42-44 inches.
- Take this long strip and cut it in half, creating two strips that each measure 2 3/4 inches by approximately 21 inches (assuming a standard WOF). These dimensions will match the colored strips you cut in Step 1, preparing them for assembly.
Step 4: Assembling Strip Units
This step creates a crucial component for your spool block, combining the colored and background fabric strips.
- Take one of your 2 3/4-inch by 21-inch colored strips and one of your 2 3/4-inch by 21-inch background strips.
- Place them right sides together, aligning one of the long edges.
- Sew them together along this aligned long edge using a consistent 1/4-inch seam allowance.
- Once sewn, open the joined strips and press the seam flat. You can press the seam open, or press it towards the darker fabric to reduce bulk. Consistency in pressing direction across your quilt is a good practice.
- From this newly created strip unit, accurately cut four 5-inch squares. These squares, which now consist of two colors, will be instrumental in forming the unique “spool” shape and the positive/negative Grecian patterns.
Step 5: Arranging and Assembling Grecian Blocks
This is where the magic of the positive and negative Grecian patterns begins to take shape. You will create two distinct blocks in this step.
- Gather your newly cut 5-inch squares from Step 4, your 5-inch colored square from Step 1, and your eight half-square triangles from Step 2.
- First Block (Positive Pattern): Arrange these pieces on your design wall or a flat surface according to the first layout shown in the accompanying image. The goal is to create a block where the spool shape is clearly defined by your primary color, and the background fabric forms the Grecian pattern in the negative space. Sew these arranged pieces together into rows, then sew the rows together to form a complete block. Press all seams flat, again maintaining consistency in your pressing direction.
- Second Block (Negative Pattern): Now, repeat the entire arrangement and assembly process, but this time, you will alternate the colors. This means where you used a colored piece in the first block, you’ll use a background piece (or a piece where the background is dominant), and vice versa. This clever reversal creates the “negative” Grecian square, where the background fabric forms the spool and the primary color defines the Grecian pattern. It’s this contrast that truly makes the quilt dynamic. Ensure your seams are pressed flat.
Step 6: Constructing the Spool Four-Patch Block
This is the ingenious step where your “spools” truly materialize by swapping and rotating parts of your two Grecian blocks.
- Take your first assembled block (the positive Grecian pattern block) and carefully cut it in half both horizontally and vertically. This will yield four equal quarter pieces from the block.
- Similarly, take your second assembled block (the negative Grecian pattern block) and cut it in half both horizontally and vertically, also yielding four quarter pieces.
- Now, from the first block’s quarter pieces, identify and remove two specific pieces: the top-right quarter and the bottom-left quarter. Set these two pieces aside for the moment.
- From the second block’s quarter pieces, retrieve the top-left quarter and the bottom-right quarter. These are the pieces that will complete your spool.
- Rotate these two retrieved pieces from the second block (the top-left and bottom-right) appropriately, then carefully place them into the empty corners of the first block’s frame (where you removed the top-right and bottom-left pieces). Observe the image below for precise placement and rotation. This swapping and rotation is what creates the distinct spool shape within your four-patch.
- Repeat this exact swapping process for the remaining pieces to create a second identical spool block.
- Carefully sew these four-quarter pieces together to form a larger “four-patch” block, ensuring all seams are aligned and pressed flat. This completed block now showcases the captivating diamond spool design, with the positive and negative Grecian patterns beautifully intertwined.
Finishing Your Diamond Spools Quilt: Beyond the Block
Once you’ve mastered the construction of a single Diamond Spools block, the next exciting phase is assembling multiple blocks into a full quilt top, and then completing the quilting process. This section provides an overview of how to turn your beautiful blocks into a finished quilt.
Assembling the Quilt Top
To create a larger quilt, you will need to repeat Steps 1 through 6 multiple times to produce the desired number of Diamond Spools blocks. Once you have a collection of these stunning blocks, you can begin arranging them to form your quilt top. Experiment with different layouts on a design wall or floor to see how the positive and negative Grecian patterns interact when repeated. You might choose to alternate the orientation of some blocks to create even more intricate designs. Once satisfied with your layout, sew the blocks together into rows, ensuring consistent seam allowances. Then, sew the rows together to form the complete quilt top. Press all seams thoroughly to keep your quilt top flat and square.
Adding Borders (Optional)
Borders can add a frame to your quilt, enhance its size, and provide an opportunity to introduce complementary fabrics. You can add one or more borders around your assembled quilt top. Measure your quilt top accurately through the center before cutting border strips to ensure they fit perfectly. Attach the side borders first, press, then attach the top and bottom borders, and press again.
Layering, Quilting, and Binding
With your quilt top complete, the next steps involve preparing it for quilting and adding the finishing touches.
- Backing Fabric: Choose a suitable fabric for the back of your quilt. It should be larger than your quilt top by several inches on all sides.
- Batting: Select a batting material (cotton, polyester, blend, wool) that meets your preferences for warmth, drape, and feel. It also needs to be larger than your quilt top.
- Layering: Create a “quilt sandwich.” Lay your backing fabric wrong side up on a clean, flat surface, taping it down taut. Place the batting smoothly over the backing. Finally, center your quilt top right side up on top of the batting.
- Basting: Secure all three layers together using safety pins, basting spray, or long basting stitches. This prevents shifting during the quilting process.
- Quilting: This is where you add the decorative stitching that holds all three layers together. You can hand quilt, machine quilt using a walking foot for straight lines, or free-motion quilt for more elaborate designs. Consider simple straight lines along the seam lines of your spools or a more complex pattern that complements the Grecian design.
- Trimming: Once quilted, trim the excess batting and backing fabric, squaring up your quilt edges.
- Binding: The final step is to bind the edges of your quilt. Cut fabric strips, join them, press, and then attach them to the raw edges of your quilt. Hand or machine stitch the binding down to complete a neat, durable finish.
Tips for Quilting Success
To ensure your Diamond Spools Quilt turns out beautifully, keep these tips in mind:
- Accurate 1/4-inch Seam: A consistent “scant” 1/4-inch seam allowance is crucial for quilting success. Practice on scraps to find your machine’s perfect setting.
- Pressing Matters: Pressing after every seam, rather than ironing (which can stretch fabric), helps to maintain block size and flatness. Decide whether to press seams open or to one side and stick with it for consistency.
- Rotary Cutter Safety: Always use a sharp blade, cut away from your body, and keep your fingers clear of the cutting path. Close your blade after each use.
- Fabric Selection: Choose good quality 100% cotton fabrics for ease of sewing and durability. Test contrasting fabrics beforehand if you’re concerned about bleeding colors.
- Take Your Time: Quilting is a journey, not a race. Enjoy the process, and don’t rush. If you feel frustrated, take a break.
Your Completed Diamond Spools Quilt
Congratulations! By following these detailed instructions, you will have successfully created a magnificent Diamond Spools Quilt. This quilt is not just a collection of fabric pieces; it’s a testament to your skill, patience, and creativity. The positive and negative Grecian patterns create a dynamic visual interest, making this quilt a true focal point in any room. We hope you enjoyed this rewarding project and are thrilled with your finished masterpiece. Share your creation with fellow quilters and inspire others to try this beautiful design. Happy quilting, and may your needle always fly true!