
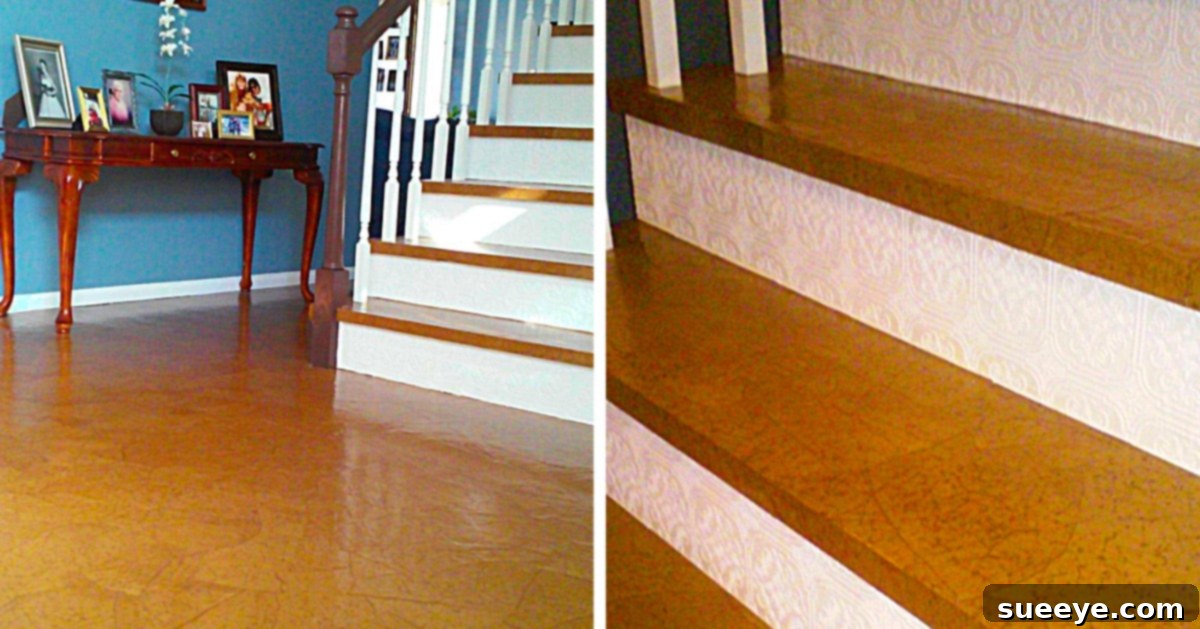
Transform Your Home: The Ultimate DIY Faux Wood Flooring with Brown Craft Paper
Are you dreaming of beautiful wood floors but cringing at the hefty price tag? What if we told you there’s an ingenious, budget-friendly solution that delivers the stunning aesthetic of real wood without breaking the bank? Introducing the DIY Faux Wood Flooring project, crafted simply with ordinary brown craft paper. This innovative technique offers a gorgeous, durable, and highly cost-effective alternative to traditional hardwood installation, allowing you to revamp your space with a warm, inviting, wood-toned finish.
Imagine ripping out that old, worn-out carpet and replacing it with a floor that not only looks incredibly rich and sophisticated but also costs as little as fifty cents per square foot! This DIY Brown Paper Floor project allows you to achieve a beautiful faux leather or wood-grain look, transforming any room into a cozy haven. It’s an accessible and rewarding home improvement venture that promises impressive results and significant savings. Ready to dive into this exciting project? Let’s begin by gathering everything you’ll need.
Essential Materials for Your Brown Paper Floor Project
Embarking on this DIY adventure requires a few readily available and inexpensive materials. Precision in choosing your supplies, especially the craft paper and polyurethane, will contribute significantly to the final look and longevity of your floor. Here’s a comprehensive list of what you’ll need to get started:
- Brown Craft Paper: You’ll need several large rolls. Look for sturdy, non-waxed craft paper. Michael’s Craft Store often has excellent options, and don’t forget to utilize their online coupons for significant savings. The quantity will depend on the size of your room; always get a bit more than you think you’ll need to account for errors or future repairs.
- Elmer’s Glue-All (or similar PVA glue): One gallon should suffice for a medium-sized room, but larger areas may require more. This all-purpose white glue is crucial for adhering the paper to your subfloor. Its water-soluble nature makes it easy to work with and clean up.
- Water: Approximately one gallon. Used to dilute the glue to achieve the perfect consistency for easy application and saturation of the paper.
- Mixing Bucket: A large, clean bucket for mixing your glue and water solution. Ensure it’s big enough to hold the gallon of glue and water with room to spare for stirring.
- Large Clean Paint Brush (or Paint Roller): A 3-4 inch wide brush is ideal for applying the glue mixture evenly onto the paper and subfloor. A paint roller can also be used for faster application over larger areas.
- Polyurethane: This is your protective topcoat. You’ll need enough to apply at least 5 coats. Oil-based polyurethane tends to offer a richer, amber tone and greater durability, while water-based options dry faster and yellow less over time. Choose a finish (satin, semi-gloss, or gloss) that suits your desired aesthetic.
- Scissors: For cutting paper as needed, though most of the paper will be torn for a more natural look.
- Small Garbage Can (or Container): A handy container for discarding torn paper scraps and keeping your workspace tidy.
- Optional but Recommended:
- Utility Knife or Box Cutter: For trimming edges neatly.
- Kneepads: You’ll be spending a lot of time on your knees!
- Plastic Sheeting/Drop Cloths: To protect surrounding areas from glue and polyurethane spills.
- Sanding Sponge/Fine-Grit Sandpaper: For light sanding between polyurethane coats if desired, to ensure a super smooth finish.
- Ventilation Fan: Especially important when applying polyurethane, as fumes can be strong.
- Clean Rags: For wiping up spills and cleaning tools.
Having all your materials organized and ready before you begin will streamline the process and make your DIY faux wood flooring project much more enjoyable and efficient.
Step-by-Step Guide to Crafting Your Faux Wood Paper Floor
Creating this stunning brown paper floor is a multi-step process that requires patience and attention to detail. Each stage plays a vital role in achieving that coveted faux wood or leather look and ensuring the longevity of your new floor. Follow these directions carefully for the best results.
Step 1: Prepare Your Craft Paper
The foundation of your beautiful floor starts with the paper. Instead of precise cuts, we’re aiming for an organic, natural look. Get a couple of large rolls of brown craft paper – remember, Michael’s Craft Store is a great source, and always check for online coupons to save money! Once you have your paper, the tearing process begins.
Tear the paper into jagged, irregular pieces, roughly around 1 foot by 1 foot (1′ x 1′) squares. The key here is to embrace imperfection; straight lines would detract from the natural, organic aesthetic we’re trying to create. As you tear each piece, give it a slight rumple or crinkle. This isn’t about creating deep creases, but rather adding subtle texture that will enhance the faux leather or wood grain effect once the paper is glued down and sealed. The rumpling allows for natural variations in light reflection and color depth, mimicking the natural imperfections found in real wood or aged leather. Stack your torn and rumpled pieces neatly within your small garbage can or a similar container for easy access during application.
Step 2: Mix Your Adhesive Solution
The glue mixture is the lifeblood of this project, ensuring your paper adheres firmly and evenly to the subfloor. In your mixing bucket, combine your gallon of Elmer’s Glue-All with a small amount of water. The goal is to achieve a consistency similar to that of heavy cream or thick pancake batter. Start by adding about a cup of water, mixing thoroughly, and then gradually add more water in small increments until you reach the desired consistency.
This dilution is critical for several reasons: it makes the glue easier to spread, allows the paper to absorb the adhesive more effectively, and helps prevent excessive bubbling when the paper is laid down. A mixture that is too thick will be difficult to work with and may lead to uneven adhesion, while one that is too thin might not provide sufficient bonding strength. Stir the mixture well to ensure there are no lumps and that the water and glue are fully incorporated. Having a smooth, consistent adhesive will make the application process much smoother.
Step 3: Laying Down Your Faux Wood Paper Floor
This is where your floor truly begins to take shape. Working in small, manageable sections, apply a generous amount of your glue mixture directly onto the subfloor using your large paintbrush or roller. You want enough glue to thoroughly wet the surface where you plan to lay down a few pieces of paper.
Next, pick up a torn piece of craft paper, brush additional glue onto one side of it (the side that will face down), and then carefully lay it onto the wet, glued section of your subfloor. Use your brush to smooth out any air bubbles or significant wrinkles from the center outwards. Don’t worry about minor imperfections; these contribute to the natural, textured appearance. The beauty of this DIY floor lies in its randomness and overlapping patterns. There is truly no “right” or “wrong” way to lay the paper. Overlap the edges of subsequent pieces slightly, mimicking the organic flow of real wood planks or the patchwork of natural stone. This overlapping creates depth and visual interest, making the faux wood effect even more convincing. Continue this process, piece by piece, until your entire floor is covered. Take your time, step back occasionally to assess your pattern, and enjoy the creative process.
Step 4: Drying and Sealing with Polyurethane
Once all your paper is laid down, it’s critical to let your floor completely dry. This can take anywhere from 24 to 48 hours, or even longer depending on the humidity levels and the amount of glue used. Ensure the room is well-ventilated to aid in the drying process. The paper must be absolutely dry and firm before moving to the next stage, as trapped moisture can lead to issues with adhesion and the polyurethane finish.
Once your paper floor is thoroughly dry, it’s time to apply the protective polyurethane coats. This step is essential for durability, water resistance, and to achieve that beautiful, rich finish. Apply at least 5 coats of polyurethane. Use a clean paintbrush or a foam applicator designed for varnishes and polyurethanes. Apply thin, even coats, working in sections. Allow each coat to dry completely according to the manufacturer’s instructions before applying the next. Lightly sanding with fine-grit sandpaper (220-grit or higher) between coats can help achieve a smoother finish, but it’s not strictly necessary if you’re happy with the texture. Make sure to wipe off any sanding dust thoroughly before applying the next coat. The multiple layers of polyurethane will create a hard, durable, and water-resistant surface that protects your paper floor, giving it a depth and sheen akin to real wood or leather. Ensure adequate ventilation during this entire process, as polyurethane fumes can be strong.
Step 5: Enjoy Your Stunning New Faux Wood Floor!
Once the final coat of polyurethane has fully cured (this can take several days, consult your product’s instructions), your DIY faux wood floor is complete and ready to be enjoyed! Step back and admire your handiwork. This floor is truly amazing and gorgeous, offering a unique aesthetic that combines the rustic charm of wood with the sophisticated texture of leather. The rich, varied tones created by the brown paper and sealant will add character and warmth to any room, and the best part is that you created it yourself on a minimal budget.
Why Choose Brown Paper Faux Wood Flooring?
Beyond the obvious cost savings, this DIY brown paper flooring method offers a multitude of benefits:
- Unmatched Affordability: Hardwood floors can cost upwards of $5-$10 per square foot, while this project can be completed for as little as $0.50 per square foot. This makes it an ideal solution for renters, first-time homeowners, or anyone on a tight budget.
- Unique Aesthetic Appeal: The random tears, overlapping layers, and the ambering effect of polyurethane create a truly unique finish that mimics aged leather or rich, distressed wood. No two floors will ever look exactly alike, giving your space a custom, designer feel.
- Surprising Durability: When properly sealed with multiple coats of quality polyurethane, a brown paper floor can be incredibly resilient. It stands up well to everyday foot traffic, spills, and general wear and tear, offering a surprisingly long lifespan for such an inexpensive material.
- DIY Satisfaction: There’s immense satisfaction in transforming a room with your own hands. This project is accessible to DIYers of all skill levels and offers a rewarding experience.
- Versatility: The technique can be adapted to various styles. From rustic farmhouse to modern industrial, the aesthetic can be adjusted by the type of paper, tearing style, and choice of polyurethane finish (matte, satin, or gloss).
Tips for a Flawless Faux Wood Finish
- Subfloor Preparation is Key: Ensure your subfloor (plywood, concrete, linoleum, etc.) is clean, dry, and free of debris, grease, or loose particles. Any imperfections will show through the finished floor. Fill any cracks or holes before you begin.
- Test a Small Area: If you’re unsure about the glue consistency or the final look, test a small, inconspicuous area first.
- Work in Sections: Don’t try to cover the entire floor at once. Work in small, manageable sections (e.g., 2×2 or 3×3 feet) to ensure the glue doesn’t dry before you can lay the paper.
- Patience, Patience, Patience: This project is not a race. Rushing the drying times, especially between glue application and polyurethane coats, can compromise the entire floor.
- Proper Ventilation: Ensure excellent airflow when working with glue and especially polyurethane. Open windows and use fans to disperse fumes.
- Edge Management: For neat edges, you can either tear the paper pieces right up to the wall, or trim excess paper with a utility knife once the glue has dried slightly. Install new baseboards or quarter-round molding to cover any minor imperfections along the walls.
- Maintain Consistency: Try to maintain a consistent rumpling and tearing style throughout the project for a cohesive look.
Maintenance and Care for Your Brown Paper Floor
Once your DIY faux wood flooring is installed and fully cured, caring for it is straightforward. Treat it much like you would a sealed hardwood floor:
- Regular Cleaning: Sweep or vacuum regularly to remove dust and grit, which can scratch the polyurethane finish.
- Damp Mopping: For deeper cleaning, use a damp (not soaking wet) mop with a mild floor cleaner designed for polyurethane-sealed surfaces. Avoid excessive water, as it can seep into seams over time.
- Avoid Harsh Chemicals: Do not use abrasive cleaners, strong detergents, or products containing ammonia or bleach, as these can dull or damage the polyurethane.
- Furniture Protection: Place felt pads under furniture legs to prevent scratches and gouges.
- Spill Cleanup: Wipe up spills immediately to prevent water spots or damage to the finish.
- Re-sealing: Depending on foot traffic, you may want to apply an additional coat of polyurethane every few years to refresh the finish and extend the life of your floor.
This DIY Faux Wood Flooring made with brown craft paper is more than just a flooring solution; it’s a statement of creativity and resourcefulness. It provides a warm, inviting atmosphere and a truly unique aesthetic that will undoubtedly become a talking point in your home. Get ready to impress everyone with your stunning, budget-friendly transformation!