
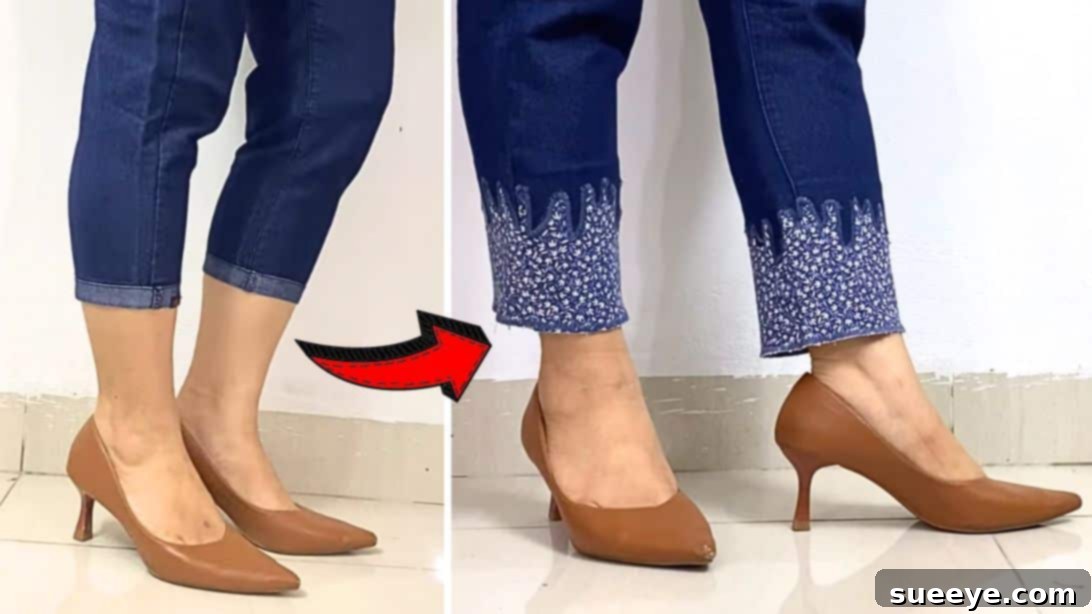
How to Effortlessly Lengthen Your Jeans: A Beginner-Friendly DIY Guide
Have you ever found a favorite pair of jeans that are just a little too short? Perhaps your child has grown, fashion trends have shifted, or you simply want to add a unique touch to your denim wardrobe. Whatever the reason, learning how to lengthen jeans is a remarkably simple and rewarding skill. This comprehensive guide will walk you through an easy-to-follow process, perfect for sewing novices and seasoned crafters alike. You’ll be surprised at how quickly you can master this trick, transforming an everyday item into a personalized fashion statement while contributing to sustainable living.
Whether it’s your very first time picking up a needle and thread or you’re looking for a quick and satisfying project, this tutorial is designed for clarity and success. We’ll show you how to give your beloved jeans new life, extend their wear, and infuse them with your personal style. You don’t even need to worry about making mistakes; the steps are straightforward and forgiving. Simply follow along with the detailed instructions below, inspired by the fantastic video tutorial from Trefa Craft on YouTube, and get ready to create something wonderful.
Why Lengthen Your Jeans? More Than Just a Fashion Fix
Lengthening your jeans offers a multitude of compelling benefits beyond merely adjusting their length. It’s a creative and practical solution that perfectly aligns with modern values of sustainability, personal expression, and smart budgeting:
- Embrace Sustainable Fashion: In an era of increasing environmental consciousness, repairing and upcycling clothing is more important than ever. Instead of discarding jeans that are too short, you can give them a stylish second life, significantly reducing textile waste and your environmental footprint. This simple act contributes positively to a more eco-friendly and responsible wardrobe.
- Cost-Effective Style Updates: The cost of new clothing can quickly add up. This DIY method allows you to refresh and update your existing denim collection without the need to buy new pairs. It’s a smart, budget-friendly way to adapt your look to current trends or simply extend the usability of garments you already own and love.
- Achieve the Perfect Fit and Comfort: Finding jeans that fit perfectly in every aspect – waist, hips, and length – can be a challenge. Often, a pair might fit beautifully everywhere but fall short on the length. This tutorial empowers you to achieve the ideal length for your height and personal style preferences, enhancing overall comfort and boosting your confidence.
- Unleash Personalized Expression: This project serves as a fantastic canvas for your creativity. By carefully selecting unique fabrics, patterns, colors, or even textures for the extension, you can infuse your jeans with a distinctive flair. This customization allows your denim to truly reflect your individual personality and stand out from mass-produced apparel.
- Extend Wear for Growing Children: For parents, this trick is an absolute game-changer. Children grow incredibly quickly, and their jeans often become too short long before they show any signs of wear and tear. Lengthening them can save significant money on clothes and ensures that your kids can continue to wear their favorite, comfortable pairs for much longer.
- Adapt to Evolving Trends: Fashion is dynamic and ever-changing. If cropped jeans are no longer your preference, or if you simply desire a different silhouette for your denim, this clever technique allows you to easily adapt your existing jeans to current styles or to your own evolving aesthetic preferences.
Essential Materials for Your Jeans Lengthening Project
Gathering all your supplies before you begin is a key step to ensure the process runs smoothly and remains enjoyable. Most of these items are standard components of a well-equipped sewing kit, making this an accessible project for almost anyone. Prepare your workspace and have everything within reach to maintain a steady workflow.
- Jeans: The primary item for this transformation! Select a pair that you love but find just a little too short. Ensure they fit well otherwise and are in reasonably good condition.
- Extension Fabric: This is where your personal style comes into play! Choose any pattern, color, or even texture that appeals to you and beautifully complements your existing jeans. Consider options like leftover denim scraps, vibrant cotton prints, elegant lace, or even a contrasting solid fabric for a bold statement. You’ll need a piece that is roughly 3 to 4 inches high and at least as wide as the circumference of the bottom of your pant legs, providing ample room for cutting and seaming.
- Marking Pen, Pencil, or Tailor’s Chalk: These tools are essential for making precise measurements and drawing clear guidelines on your fabric. A fabric-specific marker or tailor’s chalk is highly recommended as it’s designed to wash out or disappear completely, leaving no trace on your finished garment.
- Tape Measure: Absolutely necessary for taking accurate measurements of lengths, widths, and distances. A flexible tape measure is particularly useful for working with the curves of clothing.
- Seam Ripper: This small but mighty tool will be your best friend for carefully unpicking stitches without damaging the fabric. Choose a sharp one for efficiency and to prevent accidental tears.
- Sharp Scissors or Rotary Cutter and a Cutting Mat: High-quality fabric scissors are crucial for making clean, precise cuts. If you own a rotary cutter and a self-healing mat, they offer even greater precision, especially for achieving smooth curves and straight lines, and are highly recommended for this project.
- Basting Tape: This double-sided adhesive tape is a secret weapon for temporarily holding fabric layers in place before permanent stitching. It significantly simplifies the sewing process by preventing shifting and puckering. As an alternative, you can use sewing pins, but basting tape provides a flatter, more stable hold.
- Needle and Thread: You’ll need a sturdy polyester thread that either matches or contrasts with both your extension fabric and the denim, depending on the aesthetic you desire. For your sewing machine, a denim-specific needle (usually a size 90/14 or 100/16) is highly recommended as it’s designed to penetrate thick layers of fabric without breaking.
- Iron (for pressing): An iron is not an optional tool for this project; it’s absolutely vital for achieving crisp seams, flat fabric, and a truly professional finish. Pressing at each stage of construction makes a remarkable difference in the overall quality and appearance of your finished jeans.
- Sewing Machine: While it is technically possible to hand-sew this project, a sewing machine will make the process much faster, result in stronger, more durable seams, and produce a significantly more polished and professional-looking outcome.
Step-by-Step Guide: How to Lengthen Your Jeans with Style
Follow these detailed instructions carefully, taking your time with each step to ensure a beautiful, sturdy, and durable finish. Remember, precision and patience during preparation and execution are key to achieving a truly professional-looking result.
Step 1: Preparing Your Jeans for the Transformation
Begin by laying your chosen jeans flat on a clean, sturdy work surface. Ensure there are no wrinkles or creases that might affect your measurements. The first critical step is to carefully remove the existing cuff or finished bottom hem from both pant legs. Using your sharp fabric scissors or rotary cutter, make a clean, straight cut just above the original hemline. Take your time to ensure this cut is even across the entire width of the leg. Next, using your trusty seam ripper, gently and meticulously unpick the inner side seam of each pant leg. You’ll need to open up approximately 6 inches high from the newly cut raw edge. This crucial step serves two purposes: it allows the pant leg to lay flatter and provides ample room to seamlessly attach your extension fabric, ensuring a much smoother and cleaner finish. Once both side seams are unpicked, fully open and lay each pant leg as flat as possible. Now, measure up from the raw edge of the denim by exactly 4 centimeters (which is approximately 1.5 inches) and, using your chosen marking tool (pen, pencil, or chalk), draw a precise, straight horizontal line across the entire width of the leg. Repeat this exact marking process for the other pant leg, ensuring absolute consistency in height and straightness between both sides.
Step 2: Designing Your Unique Fabric Extension
Now, we move on to the most creative and visually impactful part of the project: designing the decorative edge for your extension. Focus on the bottom section of the jeans, specifically the area below the horizontal line you just drew. As wonderfully demonstrated in the video tutorial, draw random-sized curves all over this designated area. These curves can range from gentle, flowing waves to sharp, geometric scallops, or even abstract, organic shapes – let your personal imagination and style guide your hand! While perfect symmetry isn’t strictly necessary, aiming for a generally balanced look between both legs will result in a more cohesive finished product. Once you are completely satisfied with your drawn design, carefully cut along these curved lines using your sharp scissors. Precision here is paramount for achieving a clean, professional-looking edge. After cutting, retrieve your chosen extension fabric. This piece should measure approximately 3 to 4 inches in height and be at least the same length as the width of your pant legs (or slightly more to allow for adjustments). Lay this carefully selected fabric underneath the newly cut, curved edge of the denim. Position it strategically so that it extends beyond the denim’s raw edge, allowing for sufficient overlap for secure stitching and the creation of a neat new hem. This chosen fabric will be the visible extension that not only adds crucial length but also infuses unique flair and personality into your jeans. Remember to select a fabric that truly complements your jeans and expresses your distinct style.
Step 3: Stitching, Reinforcing, and Adding the Finishing Touches
With your extension fabric perfectly positioned underneath the curved denim edge of one pant leg, it’s now time to secure it in place. Carefully apply basting tape along the top edge of your extension fabric, precisely where it meets the denim. For areas with particularly pronounced curves or larger gaps created by your design, add small extra pieces of basting tape or fabric underneath to ensure full, smooth coverage and a seamless transition between the two materials. Gently press the basting tape with a warm iron to activate its adhesive and fuse the fabrics together. This temporary bond is incredibly helpful as it prevents any slipping or shifting during the next crucial step. Now, take your project to the sewing machine. Using a sturdy thread (a denim-specific thread is highly recommended for durability) that either perfectly matches or beautifully contrasts with your denim and extension fabric, begin topstitching meticulously all around the edges of the curved denim appliqué. This step not only permanently attaches the extension fabric but also provides a decorative, clean, and professional finish. Strive for an even stitch length and a consistent distance from the edge for a polished look. Once the topstitching is complete on both legs, it’s time to re-stitch the inner side seams that you unpicked earlier. Carefully align the raw edges of the denim and sew them back together, creating a strong and neat seam that restores the original pant leg structure. Finally, address the raw bottom edge of your extension fabric. Fold it up by about half an inch, press it crisply with your iron, and then fold it again to create a clean, durable double-folded hem. Stitch this hem securely in place, ensuring it is even and straight. As a very important final touch, carefully trim off any frayed threads or excess fabric from all seams and edges. Give your newly lengthened jeans a final, thorough press with the iron for a truly polished, professional, and ready-to-wear result.
Expert Tips for a Flawless Jean Lengthening Project
To ensure your project is a resounding success and looks as professionally done as possible, keep these invaluable expert tips in mind. They will help you navigate common challenges and elevate the quality of your finished garment.
- Always Pre-wash Your Fabrics: This is a non-negotiable step. Always pre-wash both your jeans and the extension fabric before you begin cutting and sewing. This crucial step prevents any unexpected shrinkage after the project is complete, which could otherwise distort your new hem and create an uneven look.
- Use the Correct Needle for Denim: Denim is a thick and sturdy fabric. Using a specific denim needle for your sewing machine (typically a size 90/14 or 100/16) is paramount. These needles are designed with a sharper, stronger point that will effortlessly glide through multiple layers of thick fabric, preventing skipped stitches, reducing thread breakage, and significantly minimizing the risk of snapping needles.
- Practice Makes Perfect: If you are new to sewing, especially when working with curves, take a moment to practice on some scrap fabric first. This will help you get a comfortable feel for guiding the fabric smoothly under the needle and maintaining an even, consistent stitch length. A little practice goes a long way in building confidence.
- Press, Press, Press: This tip cannot be emphasized enough. Ironing at each and every stage of the sewing process is a game-changer. It helps to set stitches securely, flatten seams, and give your project a crisp, clean, and professional finish that simply cannot be achieved without diligent pressing.
- Take Your Time and Be Patient: Rushing through any sewing project is an open invitation for mistakes. Enjoy the creative process, pay close attention to every detail, and don’t hesitate to use your seam ripper if something isn’t quite right. Patience is indeed a virtue in the world of sewing, leading to far superior results.
- Consider Your Thread Choice: For topstitching, a slightly thicker topstitching thread can create a more pronounced, decorative, and visually appealing effect. When selecting your thread color, you can either choose one that blends seamlessly with your fabric for a subtle look or opt for a striking contrast to make a bold fashion statement.
- Test Your Stitch Settings: Before you begin sewing on your actual jeans, always take a moment to test your sewing machine’s stitch length and tension settings on a small scrap piece of denim paired with your extension fabric. This ensures that your machine is perfectly calibrated for the specific thickness and type of fabrics you are working with, preventing frustration later on.
Unleash Your Creativity: Customization Ideas for Your Lengthened Jeans
This project is just the beginning of what you can achieve! Once you’ve mastered the basic technique of lengthening your jeans, consider these creative ideas to further personalize and enhance your new design, making them truly one-of-a-kind:
- Fabric Play Beyond Basic Cotton: While cotton is a great starting point, don’t limit yourself! Experiment with different fabric textures and types like soft corduroy, sleek faux leather, intricately patterned denim, luxurious velvet, or even delicately embroidered fabric for a truly unique and tactile look. The choice of fabric can dramatically alter the overall aesthetic.
- Add Stylish Embellishments: Elevate your jeans by incorporating various embellishments. You could add delicate lace trim along the seam lines, attach decorative buttons, strategically place metal studs for an edgy vibe, or even use fabric paint to create bespoke designs directly onto the extension itself for an extra touch of flair and individuality.
- Embrace a Patchwork Style: Instead of using one continuous piece of fabric for your extension, unleash your inner artist by sewing together several smaller, complementary fabric scraps. This creates a charming and bohemian patchwork effect, adding depth, texture, and a unique story to your lengthened jeans.
- Incorporate Distressing for Cohesion: If your original jeans already have a distressed or worn-in look, consider lightly distressing the edges of your new extension as well. You can achieve this effect with fine-grit sandpaper, a seam ripper, or even a specialized distressing tool to ensure a cohesive and natural style transition between the old and new denim.
Conclusion: A Rewarding DIY for Every Skill Level
Congratulations! You have successfully learned how to lengthen jeans that were once too short, transforming them into a stylish and unique piece that perfectly fits your needs and expresses your personal style. This project stands as a testament to how simple yet powerful sewing techniques can yield truly impressive results, even for absolute beginners. Not only have you given new life to a beloved pair of jeans, but you’ve also actively engaged in a sustainable practice that saves money, reduces waste, and fosters your innate creativity.
The satisfaction of wearing something you’ve customized and crafted with your own hands is unmatched, adding a unique sense of accomplishment to your wardrobe. We sincerely hope this detailed guide, inspired by the wonderful Trefa Craft tutorial, empowers you to confidently take on even more DIY fashion projects. Embrace your sewing machine, experiment boldly with various fabrics, and continue to mend, modify, and make your wardrobe truly and uniquely your own. Happy sewing, and enjoy your beautifully lengthened jeans!
*All image credit belongs to Trefa Craft via YouTube. Follow and subscribe to her channel for more inspiring DIY projects!