
Do you have an overflowing stash of fabric scraps, remnants from past projects, or perhaps just small pieces you can’t bear to throw away? You’re not alone! Many crafters find themselves with a treasure trove of leftover material, wondering how to give these vibrant snippets a new life. Instead of letting them gather dust, transform them into something beautiful and functional for your home. Repurposing fabric scraps is not only an eco-friendly practice but also a fantastic way to unleash your creativity and create unique, personalized decor.
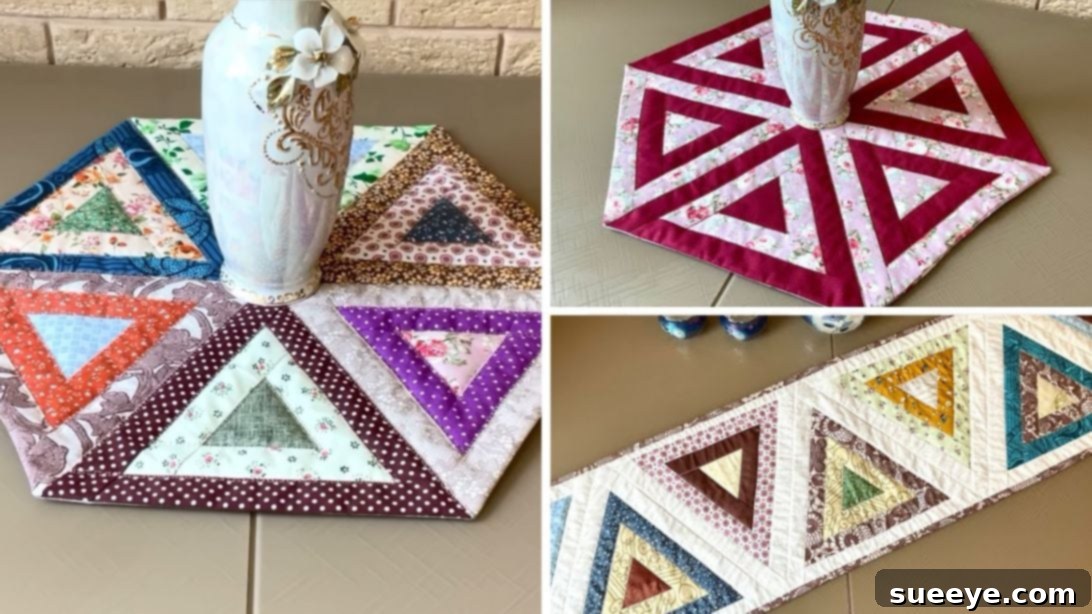
While there are countless DIY fabric scrap crafts you can explore, one project stands out for its elegance, versatility, and sheer satisfaction: the Triangle and Strip Fusion Table Runner Quilt. This stunning design, popularized by “The Melody of Sewing,” offers a brilliant method to combine an array of fabric textures and colors into a cohesive and eye-catching piece. Whether you’re an experienced quilter or a sewing enthusiast looking for your next challenge, this project promises a rewarding experience, culminating in a beautiful accent for your dining table, coffee table, or even as a decorative wall hanging.
Why Quilt with Fabric Scraps? The Joys of Scrap Busting
Quilting with fabric scraps, often affectionately called “scrap busting,” is more than just a frugal practice; it’s an art form in itself. Each tiny piece of fabric holds a memory of a previous project, a story waiting to be told. By integrating them into a new design, you create a rich tapestry of colors and patterns that is uniquely yours. This particular “Triangle and Strip Fusion” technique is especially adept at making the most of those smaller, seemingly unusable strips and irregular pieces, transforming them into dynamic, geometric blocks that interlock to form captivating visual effects.
Moreover, embracing scrap fabric projects promotes sustainable crafting. It reduces waste, gives new purpose to materials that might otherwise end up in a landfill, and encourages thoughtful consumption. It’s also an excellent way to practice your quilting skills without the pressure of cutting into expensive, brand-new yardage. The sheer variety of fabric types, colors, and prints in your scrap bin can lead to unexpectedly harmonious and vibrant creations, fostering a sense of artistic freedom and discovery. Dive into your stash and prepare to be inspired!
Versatility of the Triangle Block: Endless Design Possibilities
The beauty of the triangle quilt block lies in its incredible versatility. What begins as a simple geometric shape can be arranged in myriad ways to create complex and visually engaging patterns. While we’ll focus on a table runner for this guide, the foundational techniques can be applied to a vast array of sewing projects:
- Table Runners: Arrange the finished triangle blocks in a long, rectangular formation for a traditional yet striking table runner that will be the centerpiece of any meal.
- Placemats: Grouping 5 or 6 triangles can form a hexagon or a star, perfect for individual placemats that add a personal touch to your place settings.
- Wall Hangings: Create larger, intricate designs by combining more blocks. These can serve as mini art pieces for your walls, bringing warmth and color to any room.
- Cushion Covers: A single, large fusion triangle block or a cluster of smaller ones can make a unique panel for a throw pillow, adding a handmade touch to your sofa.
- Small Quilts/Baby Quilts: For ambitious crafters, these blocks can form the basis of a larger quilt, perfect for a lap quilt or a cherished baby gift.
Each arrangement unlocks a different aesthetic, allowing you to experiment with your design preferences and truly make each project your own. This modular approach makes quilting an accessible and enjoyable craft, as you build complex pieces from simple, repeatable units.
Essential Materials for Your Triangle and Strip Fusion Table Runner
Before you begin sewing, gathering all your supplies ensures a smooth and enjoyable crafting session. This project is a fantastic scrap buster, so raid your fabric bin with excitement!
- 4-inch Cardboard Square: This will be your sturdy template for cutting consistent triangle bases. A thick cardstock or thin plastic sheet can also work.
- Assorted Fabric Scraps: This is where the magic happens! Aim for a variety of cotton quilting fabrics in different colors, patterns, and scales. Having both light and dark values will enhance the “fusion” effect. Fat quarters, charm packs, or even jelly roll strips can also be incorporated.
- 1 1/2″ Wide Strips: These will form the “fusion” borders around your central triangles. You can cut these from larger scraps or use pre-cut strips. Having a good contrast between your central triangle and these strips will make your design pop.
- Sewing Machine: A reliable machine with a straight stitch capability is essential.
- Quilting Thread: High-quality cotton or polyester thread that complements your fabrics. Consider a neutral color like grey or beige, or a color that blends with your dominant fabrics.
- Rotary Cutter, Mat, and Quilting Ruler: These tools are crucial for precise and efficient fabric cutting. A 12.5-inch square ruler or larger will be helpful for trimming blocks.
- Fabric Scissors: For smaller cuts and trimming threads.
- Iron and Ironing Board: Pressing seams accurately is key to flat, professional-looking quilt blocks.
- Pins or Fabric Clips: To hold fabric layers together securely before sewing.
- Backing Fabric: A piece of fabric for the back of your table runner, slightly larger than your assembled quilt top.
- Batting: A layer of cotton, polyester, or blend batting, also slightly larger than your quilt top, to give your runner warmth and dimension.
- Binding Fabric: Strips of fabric to finish the edges of your table runner (typically 2.5 inches wide, sewn together to create a continuous strip).
Having your workspace tidy and all materials at hand will make the entire process much more enjoyable. Remember, the beauty of a scrap quilt lies in its eclectic mix, so don’t be afraid to combine different prints and colors!
How to Make a Triangle and Strip Fusion Quilt: A Step-by-Step Guide
This project might look intricate, but it’s broken down into manageable steps that even a confident beginner can master. Precision in cutting and sewing is your best friend here.
Step 1: Crafting Your Precision Triangle Template
The foundation of this project is an accurate 60-degree triangle template. While specialty rulers exist, creating your own from cardboard is economical and effective. Start with your 4-inch cardboard square. Using a quilting ruler and rotary cutter (or sharp utility knife), align one corner of the square at the 0-inch mark on your ruler. Then, carefully measure and mark a 60-degree angle from that corner. Cut along this line. Rotate the cardboard so the newly cut slanted edge is aligned with the bottom of your ruler. Repeat the 60-degree angle cut from the adjacent corner, ensuring your cuts meet to form an equilateral triangle. This exact template will ensure all your fabric blocks are uniform, which is critical for seamless piecing later on. Take your time with this step; accuracy here will save you frustration down the line.
Step 2: Preparing and Cutting Fabric Triangles from Your Scraps
With your template ready, it’s time to dive into your fabric scraps. First, press all your fabric scraps flat to remove any wrinkles or creases, ensuring precise cutting. Lay your fabric flat on your cutting mat. Position your cardboard triangle template on your chosen fabric scrap. For efficiency and accuracy, place the template along the straight grain of the fabric when possible. Using your rotary cutter, carefully cut around the template, creating your first fabric triangle. Repeat this process, cutting several triangles from a diverse selection of your fabric scraps. Aim for a good mix of colors and patterns to create visual interest in your final table runner. The number of triangles you need will depend on the desired length of your table runner (e.g., 10-15 triangles for a typical runner, more for a longer one or for placemats).
Step 3: The Fusion Technique – Adding Strips and Trimming
This is the core of the “fusion” design. Take one of your cut fabric triangles. Position one of your 1 1/2″ wide strips right sides together along one edge of the triangle. Ensure the strip extends beyond the triangle by at least 1 inch on both ends. Pin in place. Using a precise 1/4-inch seam allowance, sew the strip to the triangle. Press the seam open or towards the darker fabric to minimize bulk. Trim the excess strip fabric, leaving a small allowance if desired, and then place another 1 1/2″ strip along the next raw edge of your now-larger triangle unit. Repeat the sewing and pressing steps until all three sides of your original triangle are framed by strips. Now, take your original cardboard template and align it over your strip-framed triangle. Carefully trim the entire unit back into a precise triangle shape, using the template as your guide. This re-trims the block to its original size, but now with a framed effect. Repeat this entire strip-adding and trimming process for all your cut fabric triangles. Consistency in your 1/4-inch seam allowance and pressing is paramount for creating perfectly matched blocks that will fit together flawlessly.
For a more complex or larger block, you can repeat the process, adding a second round of 1 1/2″ strips (or strips of a different width) around the first border, then re-trimming to the template shape. This layering effect adds depth and showcases even more of your beloved fabric scraps.
Step 4: Arranging, Assembling, and Finishing Your Table Runner
Once all your triangle blocks are complete, the fun of arrangement begins! Lay out your blocks on a design wall or a large flat surface. There are several captivating ways to arrange these triangles:
- For a Table Runner: Arrange your triangles in a long, rectangular formation. You can align them point-to-point, creating a zigzag or diamond pattern down the length of the runner. Experiment with rotating blocks to see how different orientations change the overall look. Sew the blocks together in rows, and then sew the rows together to form the quilt top.
- For Placemats: Group 5 or 6 triangles together to form a hexagon or star shape. This makes for a beautiful individual placemat.
- Creating Secondary Patterns: Notice how the strip borders create secondary patterns when the blocks are joined. Play with this to create optical illusions or repeating motifs.
Once you are satisfied with your layout, carefully sew the individual triangle blocks together, remembering to use a consistent 1/4-inch seam allowance. Press all seams meticulously. After assembling your quilt top, it’s time for the final quilting steps:
- Basting: Create your quilt sandwich by layering your backing fabric (face down), batting, and quilt top (face up). Secure these layers together using basting spray, safety pins, or thread basting. This prevents shifting during quilting.
- Quilting: Using your sewing machine, quilt through all three layers. You can choose a simple “stitch in the ditch” along the seam lines, a more elaborate free-motion quilting design, or simple straight lines that crisscross the runner. Quilting adds texture, secures the layers, and enhances the durability of your project.
- Binding: Trim the excess batting and backing fabric, squaring up your table runner. Attach your binding strips to the edges of the runner using a 1/4-inch seam, mitering the corners for a neat finish. Hand-stitch or machine-stitch the binding to the back for a clean edge.
Your Beautiful Triangle and Strip Fusion Table Runner Quilt is Complete!
Congratulations! You’ve successfully transformed a pile of fabric scraps into a magnificent and unique home accent. This Triangle and Strip Fusion Table Runner Quilt isn’t just a decorative item; it’s a testament to your creativity, patience, and skill. Each stitch tells a story, and every scrap contributes to a beautiful, cohesive whole.
Enjoy displaying your handmade creation, whether it graces your dining table, a console table, or is gifted to a loved one. The sense of accomplishment from creating something so beautiful and functional from repurposed materials is truly unparalleled. Don’t stop here – use the skills you’ve gained to explore more quilting projects, experiment with different block arrangements, and continue turning those humble fabric scraps into works of art. Happy quilting, and may your sewing journey always be filled with joy and inspiration!