
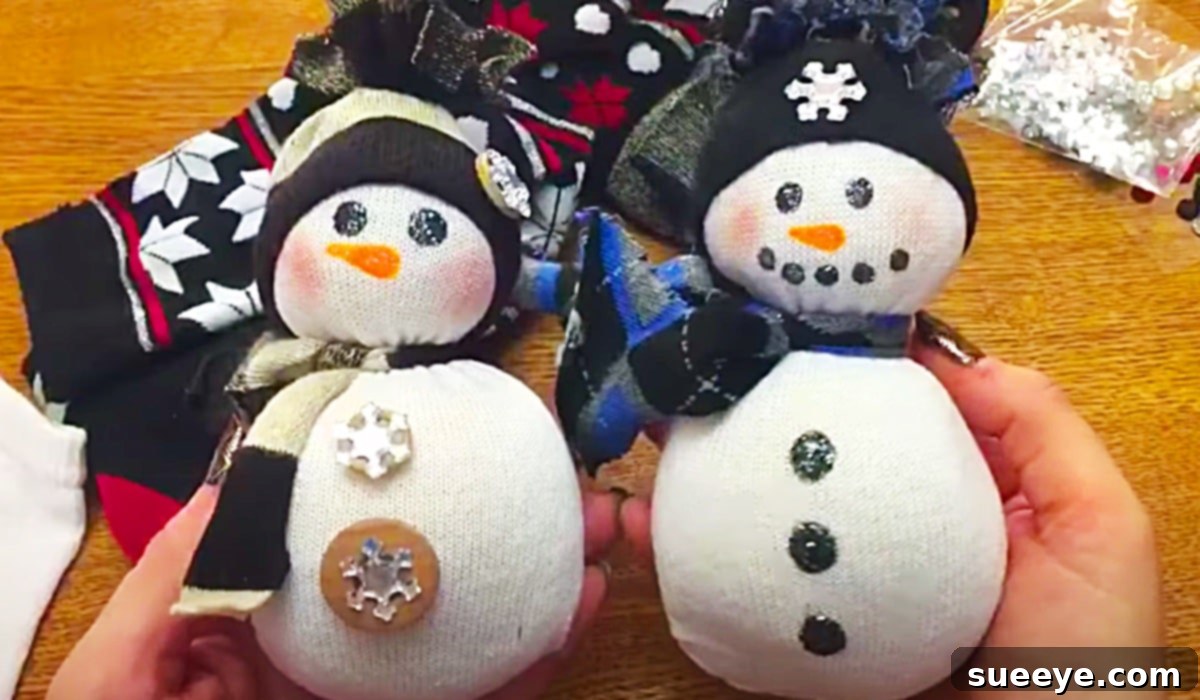
Cozy & Creative: DIY Scented Sock Snowmen from Dollar Tree!
Embrace the festive spirit and add a touch of handmade charm to your home with an adorable, scented sock snowman! Perfect for holiday decor, unique gifts, or a fun family craft project, these snowmen are incredibly easy and affordable to make, especially when you source your materials from your local Dollar Tree. We were absolutely captivated by this brilliant idea after watching the delightful video tutorial by This Southern Girl Can on YouTube. The concept of creating not just a cute figure, but one that fills your space with a lovely aroma, truly elevated this craft beyond expectation. If you love simple DIY projects that yield impressive results, you’re in for a treat!
Why Craft a Scented Sock Snowman?
There’s something inherently heartwarming about handmade decorations during the colder months. A DIY scented sock snowman offers a unique blend of visual charm and aromatic delight. Here’s why this project stands out:
- Affordable Fun: With most materials available at Dollar Tree, this craft is incredibly budget-friendly, making it accessible for everyone, from seasoned crafters to beginners.
- Sensory Experience: The addition of essential oils, particularly invigorating peppermint, transforms a simple decoration into a multi-sensory experience. Imagine the subtle, fresh scent wafting through your home, instantly evoking a festive atmosphere.
- Easy & No-Sew: Forget complicated patterns or hours spent at the sewing machine. This project is designed to be simple, using basic techniques that even kids can enjoy (with adult supervision).
- Customizable & Unique: Each snowman you create can be a unique character. Experiment with different sock patterns, embellishments, and essential oil scents to match your personal style or holiday theme.
- Perfect for Gifts: Handcrafted gifts carry a special sentiment. These scented sock snowmen make thoughtful presents for teachers, neighbors, friends, or as stocking stuffers.
- Eco-Friendly Potential: Give new life to old socks or repurpose textiles, adding a sustainable element to your crafting.
This project isn’t just about making a decoration; it’s about creating a little piece of joy that brightens your space and uplifts your spirits.
Essential Materials for Your Dollar Tree Snowman
One of the best aspects of this DIY project is how accessible and affordable the supplies are. Most items can be found at your local Dollar Tree or a similar discount store, ensuring your crafting doesn’t break the bank. Here’s a detailed list of what you’ll need:
- Socks from Dollar Tree:
- White or Light-Colored Socks: These will form the main body of your snowman. Look for crew socks or ankle socks that are relatively plain, providing a clean canvas for your design. Consider the size of the sock – longer socks will yield larger snowmen.
- Printed or Patterned Socks: These are for your snowman’s accessories – the scarf and hat. Choose festive patterns, stripes, or polka dots that complement the holiday season or your desired aesthetic. Fun, colorful socks add personality!
- Filling Material:
- Uncooked Rice: This is the ideal weighted filler for the snowman’s body, providing stability and shape. You’ll need a good amount, so consider buying a larger bag if you plan to make multiple snowmen. Lentils or dried beans can also work as alternatives.
- Aromatic Element:
- Peppermint Essential Oil: The star ingredient for the “scented” aspect! Peppermint is wonderfully invigorating and perfectly aligns with winter and holiday themes. A small bottle is usually sufficient for several snowmen. Other essential oils like cinnamon, spruce, or even a holiday blend could also be fantastic options for different aromas.
- Embellishments and Tools:
- Glitter Squeeze Fabric Paint (in Black and Orange): Essential for drawing the snowman’s cheerful face. Black is for the eyes and mouth, while orange creates a classic carrot nose. The glitter adds a festive sparkle. Standard fabric paint or permanent markers can be used as alternatives if glitter isn’t your preference.
- Sticky Beads and Jewels: These are perfect for adding buttons, decorative accents, or even a touch of sparkle to the snowman’s hat or scarf. Dollar Tree often has a fantastic selection of self-adhesive rhinestones, pearls, and decorative buttons.
- Rubber Bands or Twine: To secure the sections of your snowman’s body and tie off the top of the sock.
- Scissors: For cutting socks and any other materials.
- Funnel (Optional but Recommended): Makes filling the socks with rice much easier and less messy.
Gathering these simple supplies is the first exciting step towards bringing your charming, scented snowmen to life!
Step-by-Step Guide to Crafting Your Scented Sock Snowman
Creating your scented sock snowman is a straightforward process that’s enjoyable for all skill levels. Follow these easy steps to construct your delightful holiday decor piece:
Step 1: Prepare the Snowman’s Body and Add the Scent
Begin by taking one of your white or light-colored socks. This will form the main structure of your snowman. Using a funnel, carefully fill the sock with uncooked rice. Fill it to about two-thirds full, creating a stable base. As you fill, gently shape the rice to form a round, plump bottom for your snowman. Once filled, add a few generous drops of your chosen essential oil (peppermint, in this case) directly into the rice. This infuses the filling with the wonderful aroma. You can gently mix it or simply let it absorb. Tie a sturdy knot at the top of the filled sock to secure the rice, ensuring no grains escape.
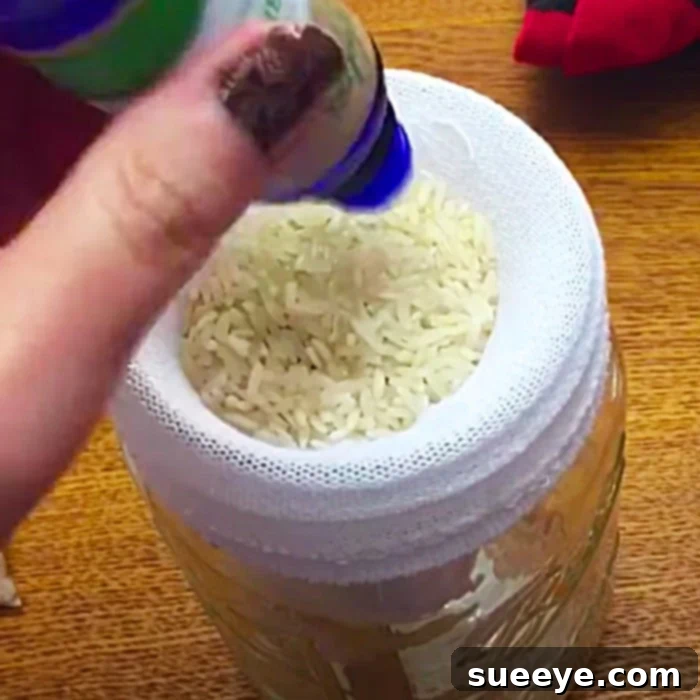
Step 2: Shape the Body and Dress Your Snowman
Now it’s time to give your snowman its distinct sections. About one-third of the way down from the top knot, tie a rubber band or a piece of twine tightly around the sock. This creates the “neck” of your snowman, separating the head from the body. Adjust the rice as needed to create two distinct, round sections. Next, take one of your printed socks. Cut off the toe and heel sections, leaving you with a tube of fabric. This fabric will be fashioned into a cozy hat and a stylish scarf for your snowman. You can cut a smaller strip for the scarf and use the larger remaining piece for the hat. Get creative with how you wrap the scarf around the snowman’s neck, securing it with a small knot if desired. The hat can simply be slipped over the top knot of the sock, with the raw edge tucked under for a neat finish.
Step 3: Bring the Face to Life with Glitter Paint
With the body and accessories in place, it’s time to give your snowman a personality! Using your black glitter squeeze fabric paint, carefully draw two round eyes on the upper “head” section. Below the eyes, create a series of small dots or a curved line for the mouth, giving your snowman a cheerful expression. Then, take your orange glitter squeeze fabric paint and draw a small, triangular “carrot” nose in the center of the face. Allow the paint to dry completely. This might take a few hours, so be patient to prevent smudging. The glitter paint adds a wonderful sparkle, making the face truly pop.
Step 4: Add Final Embellishments
This is where you can truly personalize your snowman! Use your sticky beads and jewels to add details. Place a few sticky beads down the front of the snowman’s body to represent buttons. You can also use smaller jewels or beads to decorate the hat or scarf, adding extra sparkle and charm. Don’t be afraid to experiment with different colors and sizes of embellishments to create a unique look. Small fabric scraps, tiny bells, or miniature bows can also be glued on for additional flair. Secure any embellishments firmly to ensure they stay in place.
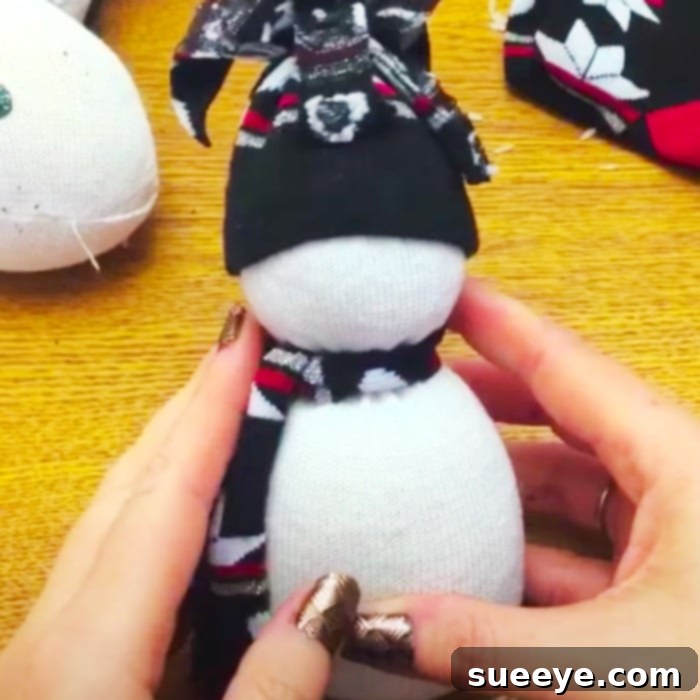
Step 5: Display and Enjoy Your Creation
Once all the paint is dry and embellishments are secure, your scented sock snowman is ready to be admired! Place it on a mantelpiece, bookshelf, desk, or as a charming centerpiece on your dining table. Every time you pass by, you’ll catch a delightful whiff of peppermint, enhancing the festive atmosphere of your home. These snowmen also make excellent additions to gift baskets or as small tokens of appreciation during the holidays. To refresh the scent over time, simply add a few more drops of essential oil to the rice inside (you might need to gently untie and re-tie the top knot). Enjoy the cozy warmth and wonderful aroma your handmade creation brings!
Customization Ideas for Your Sock Snowmen
While the basic tutorial provides a fantastic foundation, the true magic of DIY lies in customization! Here are several ways you can personalize your scented sock snowmen to make them truly unique:
- Scent Variations: Don’t limit yourself to peppermint! Consider other festive essential oils like cinnamon, frankincense, myrrh, pine, orange, or a delightful gingerbread blend. Each scent will create a different ambiance.
- Sock Styles: Explore different sock textures and patterns. Fuzzy socks can make for a softer, plush snowman. Argyle or striped socks can add a sophisticated touch. You can even use mismatched socks for a quirky, whimsical look.
- Embellishment Extravaganza:
- Buttons: Instead of sticky beads, sew or glue on actual buttons for a more classic look.
- Ribbons & Bows: Tie a small ribbon around the neck or create a tiny bow for the hat.
- Miniature Accessories: Small bells, tiny pinecones, mini pom-poms, or even doll-sized earmuffs can add character.
- Fabric Scraps: Use leftover fabric pieces to create a more elaborate scarf or tiny vest.
- Facial Expressions: Experiment with different eye shapes (oval, almond) or mouth designs (a simple curve, a wide grin). You can even add tiny rosy cheeks with a dab of blush or pink paint.
- Snowman Family: Make snowmen of different sizes by using various lengths and types of socks. Create a whole family to display together!
- Weighted Base: For extra stability, especially if using lighter socks, you can add a small layer of heavier material like pebbles or sand at the very bottom of the sock before filling with rice.
- Themed Snowmen: Adapt your snowman to different themes. For example, a “beach snowman” with a tiny seashell garland and a tropical scent, or a “sporty snowman” with team colors.
Let your imagination be your guide! Each unique detail you add will make your sock snowman a cherished piece of decor.
Tips for a Perfect DIY Scented Sock Snowman
To ensure your crafting experience is smooth and enjoyable, and your finished snowman looks fantastic, consider these helpful tips:
- Even Filling: When adding rice, shake the sock gently to ensure the rice settles evenly, creating a smooth and well-proportioned body for your snowman. Avoid overstuffing, which can make it hard to shape.
- Secure Knots: Make sure all knots (at the top and for the neck) are tied very tightly. This prevents the rice from shifting or spilling and maintains the snowman’s shape over time.
- Allow Paint to Dry Completely: Glitter fabric paint, especially when applied thickly, needs ample time to dry. Rushing this step can lead to smudges and a messy finish. Check the paint manufacturer’s instructions for recommended drying times.
- Child-Friendly Crafting: This is a wonderful project for children! For younger kids, pre-fill the socks with rice and let them handle the decorating. Use non-toxic paints and ensure small embellishments are securely glued if they are still prone to putting things in their mouths. Always supervise children during crafting.
- Essential Oil Application: Start with a few drops of essential oil and add more if you desire a stronger scent. You can always add more later, but it’s difficult to remove excess.
- Strategic Placement of Accessories: When cutting fabric for the hat and scarf, think about where the patterns on the original sock will fall. Utilize existing cuffs or hems for neat edges where possible.
- Storage: When the holidays are over, store your scented snowmen in an airtight container to help preserve their scent and keep them dust-free until next season.
By keeping these tips in mind, you’ll create beautiful, long-lasting scented sock snowmen that you’ll be proud to display year after year.
Conclusion: Your Charming New Winter Companion
There’s an undeniable satisfaction that comes from creating something beautiful with your own hands, especially when it brings joy and a lovely aroma into your home. This DIY scented sock snowman project, inspired by This Southern Girl Can’s insightful tutorial, is a testament to how simple, affordable materials can be transformed into enchanting holiday decor. From the cheerful face to the invigorating peppermint scent, each snowman becomes a unique character, ready to add warmth and festive cheer to any space.
Whether you’re looking for a fun activity with family, a thoughtful handmade gift, or simply a charming decoration to brighten your winter days, this project is a perfect choice. It’s proof that creativity doesn’t have to be expensive or complicated. So gather your Dollar Tree treasures, infuse them with your favorite scent, and start crafting your very own adorable, aromatic winter companion. We’re confident you’ll adore the result as much as we do!