
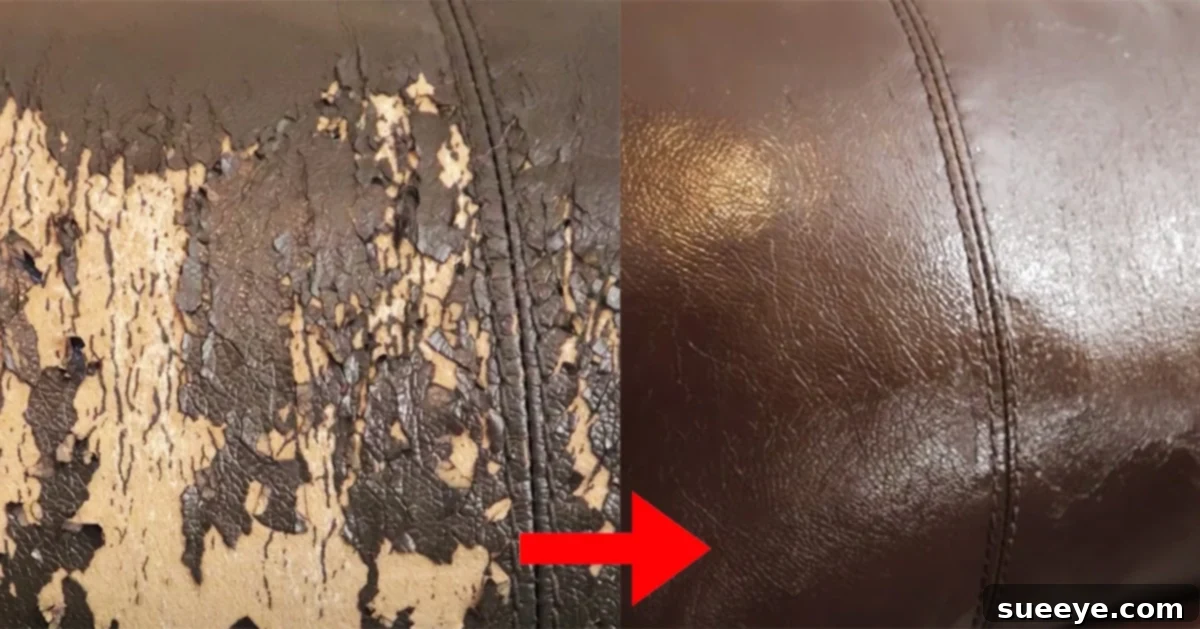
DIY Guide: Revitalize Your Peeling Leather Furniture – A Comprehensive Repair Hack
Discovering your beloved leather couch or chair starting to peel can be disheartening. Whether it’s a cherished family sofa or a functional office chair, peeling leather often signals the end of its aesthetic appeal, leading many to consider costly replacements. However, before you discard that piece, what if there was a simple, cost-effective way to extend its life and refresh its look? This comprehensive guide dives deep into a brilliant DIY repair hack, inspired by the practical tips from Christy Lyn’s YouTube tutorial, designed to tackle peeling leather on various items, including real, bonded, and faux leather furniture. While this method isn’t a magical transformation to “brand new” perfection, it’s an incredibly effective temporary fix that can significantly prolong the usability and appearance of your furniture, making it presentable for years to come. From a distance, the difference will be virtually unnoticeable, giving your item a new lease on life without breaking the bank.
Why Does Leather Peel? Understanding the Issue
Before we delve into the repair process, it’s helpful to understand why leather, or leather-like materials, begin to peel in the first place. This issue is most commonly associated with bonded leather and faux leather (also known as PU leather or PVC leather), rather than high-quality full-grain genuine leather. True leather, when properly cared for, tends to develop a rich patina over time, rather than flaking off in layers.
- Bonded Leather: This material is made from shredded leather scraps that are mixed with an adhesive, then bonded to a fiber backing and coated with a polyurethane layer. While it contains real leather, the bonding agent and thin top coating are susceptible to breaking down over time due to friction, body oils, heat, and sunlight exposure. This leads to the characteristic peeling and flaking.
- Faux Leather (PU/PVC): These are entirely synthetic materials. Polyurethane (PU) and polyvinyl chloride (PVC) coatings are applied to a fabric base. The plasticizers in these coatings can dry out and degrade over time, losing their flexibility. This makes them prone to cracking and peeling, especially in high-traffic areas or spots exposed to direct sunlight.
- Real Leather (Rarely Peels): While rare, even genuine leather can show signs of surface damage if it’s a highly processed “top-grain” or “corrected-grain” leather with a thick protective finish. This finish can sometimes crack and lift, resembling peeling, but it’s far less common and usually different in appearance from the widespread flaking seen in bonded or faux materials.
Understanding the material helps in setting realistic expectations for the repair. This DIY hack is particularly effective for bonded and faux leather, offering a budget-friendly solution to a common problem and saving your furniture from an early retirement.
Materials: What You’ll Need for Your Leather Repair
Gathering the right tools and materials is the first crucial step towards a successful repair. The quality of your materials directly impacts the durability and appearance of your finished project. Here’s a detailed list:
- Angelus Leather Paint (Appropriate Color): Angelus paints are highly recommended for their flexibility, durability, and wide range of colors specifically designed for leather and vinyl. You might need a specific shade like “Rich Brown” or “Black” as suggested, but it’s best to purchase a color that closely matches your furniture. If an exact match isn’t available, you can mix colors or opt to paint a larger section for a uniform look.
- Tip: Amazon and specialty craft stores offer a vast selection of Angelus paints and other reputable leather paint brands. Consider buying small bottles of primary colors if you anticipate needing to custom-mix for a perfect match with your couch.
- Angelus Acrylic Leather Matte Finish (Topcoat): This is an essential protective layer. A matte finish helps the repair blend seamlessly with most furniture, which often has a subtle sheen rather than a high gloss. The topcoat seals the paint, making it resistant to scratches, water, and daily wear, significantly prolonging the repair’s effectiveness.
- High-Quality Paint Brushes: Invest in a variety of sizes – a broader brush for larger areas and finer brushes for detailed work and feathering edges. Ensure they are soft-bristled to avoid streaking and achieve a smooth application.
- Leather Cleaner Wipes (or mild leather cleaner and cloth): Proper cleaning is paramount for paint adhesion. These wipes are convenient for removing dirt, oils, and grime from the surface. A clean surface ensures the paint bonds effectively.
- Hairdryer: Essential for speeding up the drying process between coats, allowing you to work efficiently and build layers without long waits.
- Plastic Cup (if mixing colors): Useful for custom blending paint colors to achieve the perfect match for your specific furniture item.
- Table Knife or Fingers (optional, but highly recommended): For carefully removing loose, peeling flakes. A dull table knife works well to gently scrape without damaging the underlying fabric.
- Disposable Gloves: To keep your hands clean and protect them from paint during the application process.
- Drop Cloth or Plastic Sheeting: To protect your work area from accidental paint spills and drips, ensuring a mess-free project.
- Masking Tape (Painter’s Tape): If you only need to paint a specific section and want crisp, clean lines to protect adjacent areas.
- Rubbing Alcohol (optional): For a final degreasing wipe after cleaning, ensuring optimal paint adhesion, especially on heavily used areas.
Directions: A Step-by-Step Guide to Repairing Peeling Leather
Patience and attention to detail are key to achieving a professional-looking finish. Follow these steps carefully for the best results, remembering to consult Christy Lyn’s video tutorial for visual guidance on techniques and tips.
Step 1: Preparation – Remove All Loose Peeling Material
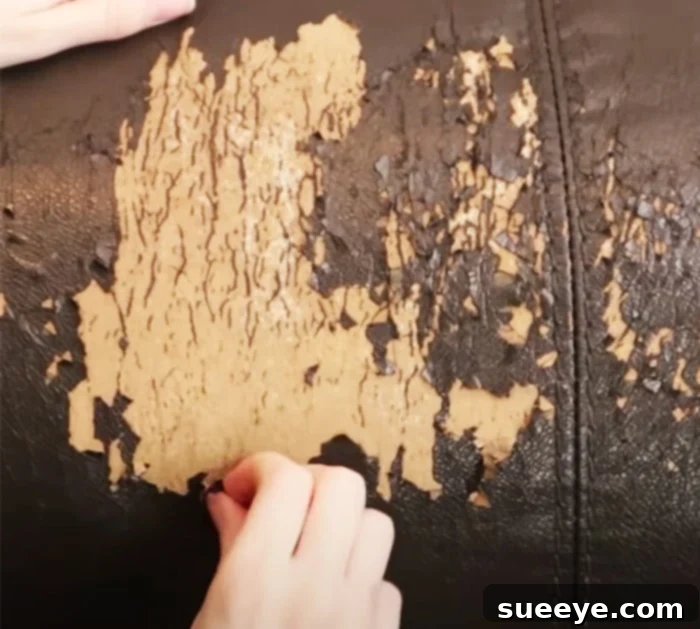
This is arguably the most critical step. Any loose or flaking material left on the surface will prevent the new paint from adhering properly, leading to further peeling and an uneven finish. The goal is to create as smooth and stable a surface as possible for the new paint to bond.
- Clean the Area Thoroughly: Begin by using your leather cleaner wipes or a mild leather cleaner with a soft cloth to clean the entire area to be repaired. This removes dirt, body oils, and grime that can impede paint adhesion. Allow the surface to dry completely before proceeding. For optimal paint bonding, a final wipe with rubbing alcohol (always test in an inconspicuous area first) can degrease the surface further.
- Meticulously Remove Peeling Flakes: Using a dull table knife, your fingers, or even a soft-bristled brush, meticulously remove all loose, peeling leather flakes. Gently scrape or rub until no more material comes off and the underlying fabric or stable layer is exposed. Pay close attention to the edges of the peeled areas, ensuring they are as flush and smooth as possible with the intact surface. This prevents future peeling from occurring under the new paint.
- Smooth the Edges (Optional but Recommended for a Seamless Finish): For a truly seamless repair, you might consider very gently sanding the feathered edges of the remaining intact leather with a super-fine grit sandpaper (600-800 grit) to smooth out any slight ridges. Be extremely careful not to over-sand or damage the underlying fabric. After sanding, wipe away any dust with a slightly damp cloth and allow it to dry completely.
- Protect Your Workspace: Lay down drop cloths or plastic sheeting around your furniture to protect your floor and other surfaces from accidental paint drips or overspray. If necessary, use painter’s tape to mask off areas you don’t intend to paint.
A well-prepared surface is the foundation of a durable and aesthetically pleasing repair. Do not rush this stage, as thorough preparation will make a significant difference in the final outcome.
Step 2: The Painting Process – Building Layers for Durability and Blend
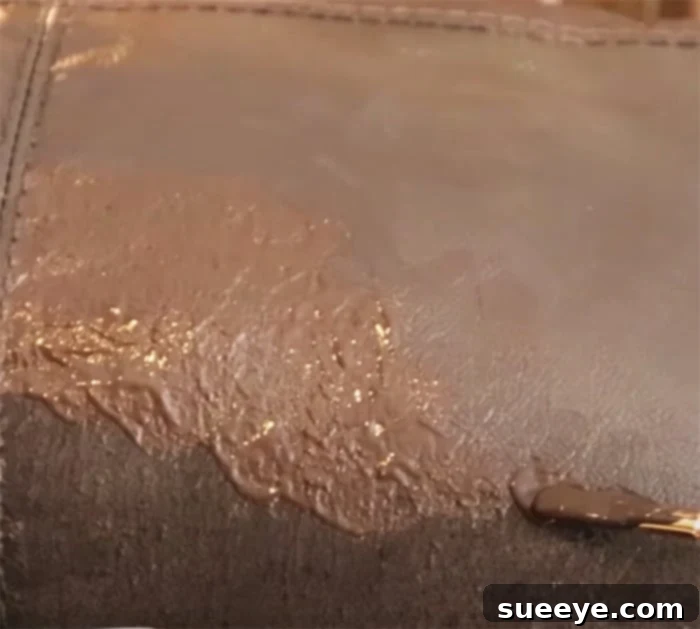
Now comes the creative part: applying the paint. The key here is to build up thin, even layers, allowing each to dry completely before applying the next. This ensures maximum adhesion, flexibility, and a professional finish that blends seamlessly with your furniture.
- Color Matching (If Necessary): If you’re mixing colors, do so in your plastic cup until you achieve a shade that closely matches your furniture. Always test a small dab of the mixed paint on an inconspicuous area of your furniture (like the back or under a cushion) and let it dry to see the true color in natural light. Adjust as needed to get as close a match as possible.
- Apply the First Thin Coat: Dip your brush into the paint, ensuring it’s not overloaded. Apply a very thin, even layer over the entire peeled area. Work the paint into the exposed fabric backing smoothly, ensuring even coverage. Don’t try to achieve full opacity with the first coat; thin coats are crucial for flexibility and preventing cracking.
- Dry with Hairdryer: Immediately after applying a thin coat, use a hairdryer on a low-to-medium heat setting to dry the paint. Keep the hairdryer moving to prevent overheating any single spot. The paint should be dry to the touch within a few minutes, which allows for quick layering. This rapid drying prevents the paint from sagging or leaving visible brush strokes.
- Repeat Layers (5-6 Coats or More for Opacity and Smoothness): Continue applying thin layers of paint, drying thoroughly with the hairdryer between each coat. You will likely need 5-6 layers, or even more, to achieve full opacity and create a smooth, consistent surface that covers the exposed backing.
- Focus on Edges: Pay special attention to the edges where the peeling meets the original leather. Apply slightly thicker coats here, feathering the paint outwards to camouflage any subtle ridges or bumps. The goal is to blend these transitions seamlessly into the existing material, creating a smooth transition.
- Expand if Needed for Blending: If you’re struggling to match the color perfectly, or if the peeled area is very large and uneven, consider painting the entire panel, cushion, or even the entire armrest. This can create a more uniform look, as the new paint will be consistent across a larger area, making slight color variations less noticeable.
- Ensure Full Coverage and Smoothness: Once you’ve applied enough layers to achieve full opacity, carefully inspect the surface from various angles. It should be smooth to the touch, with no visible fabric texture or uneven spots. If necessary, apply an additional thin layer or two until you’re completely satisfied with the texture and coverage of the repair.
Step 3: Apply the Protective Topcoat
After the final paint layer is completely dry (give it a bit longer than usual – perhaps 30 minutes to an hour without the hairdryer, or 10-15 minutes with), it’s time to apply the Angelus Acrylic Leather Matte Finish. This topcoat is vital for sealing the paint and protecting your repair from daily wear and tear.
- Apply Thin Layers of Topcoat: Just like with the paint, apply the topcoat in thin, even layers. The matte finish helps to protect the paint from future wear, scuffs, and moisture, while also providing a consistent sheen that helps the repair blend in with the original texture of your furniture.
- Dry Thoroughly Between Coats: Use your hairdryer to dry each layer of topcoat thoroughly. Typically, 2-3 thin layers of topcoat are sufficient for good protection and a durable finish.
- Allow for Curing Time: While the hairdryer speeds up surface drying, it’s crucial to allow the paint and topcoat to fully cure and harden. Avoid heavy use, excessive rubbing, or placing heavy objects on the repaired area for at least 24-48 hours. The longer you let it cure undisturbed, the more durable and long-lasting the repair will be.
Aftercare and Maintenance for Your Repaired Furniture
To maximize the longevity of your repair and prevent future issues, follow these maintenance tips. Proper care will ensure your furniture remains presentable for as long as possible:
- Gentle Cleaning: For routine cleaning, simply wipe the repaired area with a damp, soft cloth. Avoid harsh chemical cleaners, abrasive sponges, or alcohol-based solutions, as these can strip the paint or topcoat and damage the repair.
- Avoid Excessive Friction: Be mindful of objects that might rub against the repaired area frequently, such as abrasive fabrics, sharp accessories (like belt buckles), or pet claws. Consistent friction can wear down the new paint layers.
- Sunlight and Heat Protection: Position your furniture away from direct sunlight and strong heat sources (like radiators, fireplaces, or vents). UV rays and extreme heat can degrade both original and repaired surfaces over time, causing cracking or fading.
- Regular Inspection: Periodically check the repaired area for any early signs of wear or peeling. Small touch-ups are much easier to manage and less time-consuming than extensive re-repairs. Catching issues early can extend the life of your fix.
- Moisture Control: While the topcoat offers some protection, try to avoid prolonged exposure to moisture. Wipe up spills immediately to prevent water damage or the weakening of the paint layers.
Pros and Cons of This DIY Leather Repair Method
Every repair method has its advantages and limitations. Understanding these will help you set realistic expectations for your project and decide if this DIY approach is right for your situation.
Pros:
- Cost-Effective: This DIY method is significantly cheaper than replacing furniture or hiring professional repair services, making it an excellent budget-friendly solution.
- Extends Furniture Life: It effectively gives your furniture many more years of usable and presentable life, delaying the need for costly replacements.
- Aesthetic Improvement: Dramatically improves the visual appeal of peeling furniture, making it look much tidier and well-maintained.
- Relatively Simple: The steps are straightforward and don’t require specialized skills, making it accessible for most DIY enthusiasts.
- Customizable: Allows you to custom-match colors or even change the color of a small section, offering flexibility in your repair.
- Satisfying DIY Project: There’s a great sense of accomplishment in successfully restoring your own items and bringing them back to life.
Cons:
- Not a Permanent “New” Fix: This is a temporary repair. While durable, it won’t make the furniture “brand new” or prevent future peeling entirely, especially if the underlying material continues to degrade due to age or original material quality.
- Texture Differences: While visually blended, you might feel a slight difference in texture (subtle bumps and grooves) if you look closely or run your hand over the repaired area. It won’t perfectly replicate the factory finish.
- Color Matching Challenge: Achieving an exact color match can be tricky and may require patience and experimentation with mixing different paint shades.
- Time-Consuming: Multiple thin layers and necessary drying times mean the process can take several hours, often spread over a day or two, demanding patience.
- Durability Varies: The longevity of the repair depends on factors like the original material, frequency of use, and the quality of application. High-traffic areas may require more frequent touch-ups.
When to Consider Professional Help or Replacement
While this DIY hack is fantastic for common peeling issues, there are instances where professional intervention or even complete replacement might be the better choice for your furniture:
- Extensive Structural Damage: If your furniture has broken frames, collapsed cushions, significant tears in the fabric (beyond surface peeling), or other structural integrity issues, a paint-based repair won’t address these underlying problems.
- Very Valuable or Antique Items: For expensive, antique, or highly sentimental leather pieces, it’s often best to consult a professional leather restorer. They possess specialized techniques and materials to preserve the item’s value and integrity.
- Widespread Peeling and Degradation: If nearly the entire surface of your furniture is peeling and the underlying fabric is severely compromised or deteriorating rapidly, the effort required for DIY repair might not be worth the limited lifespan of the fix.
- Desire for a “Like-New” Finish: If you’re seeking a factory-perfect, immaculate finish, a DIY job, while excellent for prolonging life and improving appearance, may not meet that precise standard. Professional reupholstering or replacement might be necessary.
- Health and Safety Concerns: If the peeling material is shedding excessively and causing respiratory or allergenic issues, or if the furniture is structurally unsound, prioritizing replacement for safety and health is crucial.
Conclusion: Give Your Leather Furniture a Second Chance
Ultimately, this DIY leather repair method offers a powerful, accessible, and budget-friendly solution for revitalizing peeling furniture. It’s a testament to how simple tools and a bit of patience can transform a worn-out item into something functional and aesthetically pleasing once more. While it may not replicate the original factory finish perfectly, this hack provides a significant improvement that can prolong the life of your bonded or faux leather couch, chair, or any other item, saving you money and contributing to a more sustainable approach to home furnishings. Embrace the satisfaction of a successful DIY project and enjoy your refreshed furniture, knowing you’ve given it a valuable second chance!