
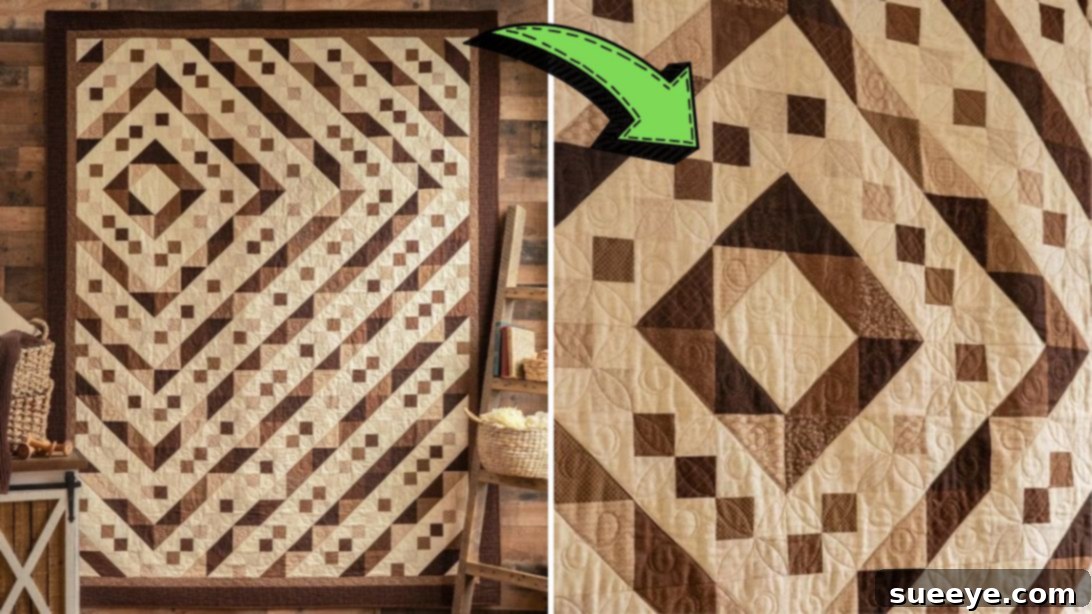
Embark on a captivating journey into the world of fabric art with the enchanting Ripples Quilt, a project that promises a breathtaking result for quilters of all skill levels. This detailed guide, inspired by the wonderful tutorial from Shabby Fabrics on YouTube, is designed to walk you through every step of creating a visually stunning quilt. While the Ripples Quilt does require a dedicated investment of patience and time, the immense satisfaction of seeing your fabric pieces transform into a dynamic, flowing design is truly unparalleled. Whether you’re a beginner eager to learn fundamental quilting techniques or a seasoned quilter looking for a rewarding new challenge, this project offers an engaging experience. The finished quilt is not just a testament to your craftsmanship; it makes a cherished gift, a beautiful heirloom, or a striking item for sale. Dive into this creative endeavor and discover the joy of bringing fabric to life.
Mastering the Ripples Quilt: A Detailed Sewing Tutorial
The Ripples Quilt stands out with its unique visual depth and movement, creating an optical illusion of gently flowing waves across the fabric. This design, while appearing intricate, is built upon foundational quilting techniques, making it accessible yet deeply satisfying. Its versatility allows for endless color combinations, from serene monochromatic palettes to vibrant, contrasting hues, each yielding a distinct mood and effect. Crafting this quilt is an excellent way to hone your precision cutting, accurate piecing, and diligent pressing skills – all critical for achieving a professional finish in any quilting project. Beyond the technical skills, there’s a meditative quality to the process, a mindful engagement with fabric that many find therapeutic and creatively fulfilling. Let’s gather our tools and prepare to create something truly magnificent.
Essential Materials for Your Ripples Quilt Project
Before you begin, ensure you have all the necessary supplies. High-quality tools and materials are key to a smooth and enjoyable quilting experience, helping you achieve precise results with less effort.
- Ripples Quilt Kit: Opting for a quilt kit, such as the one recommended by Shabby Fabrics, can significantly simplify your project. These kits typically include all the pre-selected fabrics you need, perfectly coordinated for the Ripples design, saving you time and effort in fabric selection. Alternatively, you can curate your own fabrics, selecting light and dark contrasting prints to achieve the distinctive ripple effect.
- Marking Pen or Pencil: An essential tool for transferring pattern lines onto fabric, especially for drawing diagonal lines on squares. Choose a fabric-safe marker that will either vanish with heat or water, or a sharp pencil that leaves a clear, fine line.
- Ruler: A high-quality quilter’s ruler, preferably transparent and marked with clear grid lines, is indispensable for accurate measuring and cutting. A longer ruler (e.g., 6×24 inches) is beneficial for larger cuts, while smaller squares are easier to manage with a square ruler.
- Scissors or Rotary Cutter and a Cutting Mat: For efficiency and precision, a rotary cutter and self-healing cutting mat are highly recommended. They allow for multiple layers of fabric to be cut simultaneously and with incredible accuracy. Sharp fabric scissors are also useful for trimming threads and small adjustments.
- Fabric Pins and Clips: These are vital for holding fabric pieces together securely before and during sewing, preventing shifting and ensuring accurate seam allowances. Quilting clips are particularly useful for bulkier seams or when working with many layers.
- Needle and Thread: A strong, good-quality cotton thread that matches your fabric or a neutral color is best for piecing. Ensure your sewing machine needle is sharp and suitable for cotton fabric (e.g., a universal 80/12).
- Iron, for pressing: A well-heated iron is perhaps one of the most underrated yet crucial tools in quilting. Proper pressing, not ironing, between each step helps to create flat, crisp seams, ensuring your blocks lie flat and your finished quilt has a professional, unpuckered appearance.
- Pattern: The detailed pattern and guide from Shabby Fabrics is your roadmap. Ensure you download and print it before starting. It contains specific cutting dimensions and assembly instructions crucial for replicating the Ripples design accurately. (Click here to download the full pattern and guide)
Step-by-Step Directions: Crafting Your Ripples Quilt
Follow these detailed instructions to construct your beautiful Ripples Quilt. Precision in each step will lead to a wonderfully cohesive and visually striking final product.
Step 1: Preparation and Initial Piecing for the Ripple Effect
Begin by carefully cutting all your fabric pieces according to the precise measurements specified in your downloaded pattern. Accuracy at this stage is paramount, as even slight variations can impact the alignment of your blocks later on. A sharp rotary cutter and a steady hand, guided by your ruler, will ensure clean, precise cuts. Once your pieces are cut, it’s time to start piecing together the contrasting light and dark fabric squares. Take one light square and one dark square, place them with their right sides facing each other, aligning all edges perfectly. Sew them together along one edge using a consistent ¼-inch seam allowance. After sewing, carefully press the seam open, always directing the seam allowance towards the darker fabric side. This technique helps to “hide” the seam and prevent shadowing through the lighter fabric, resulting in a cleaner finish.
Continue this process of joining light and dark squares until you have created numerous paired units. Once you have a sufficient number of these paired units, you’ll begin joining them into larger blocks. Lay two of these sewn sets together with their right sides facing, carefully nesting the seams if possible to ensure they align perfectly. Sew down one side to connect them, and then press this new seam open nicely. This meticulous pressing after each seam is crucial; it ensures your fabric lies flat, your blocks are square, and ultimately, your finished quilt top is smooth and even. Continue creating these small pieced units, ensuring all seams are neat and flat.
Next, shift your focus to the larger squares which will form the foundation of your half-square triangles (HSTs). Take two larger squares, one light and one dark, and place them with their right sides together. Using your fabric marking pen or pencil and a ruler, carefully draw a single diagonal line down the center from one corner to the opposite corner. This line will serve as your cutting guide, but first, you’ll stitch on either side of it.
Step 2: Assembling Half-Square Triangles and the Quilt Top
With the diagonal line drawn on your larger squares, proceed to sew a seam on each side of this line. Maintain a precise ¼-inch seam allowance from the drawn line. This means you will have two parallel stitch lines running diagonally across your square. Once both seams are sewn, take your rotary cutter and ruler, and carefully cut the fabric right down the drawn diagonal line. This technique will yield two perfectly formed half-square triangles (HSTs) from each pair of larger squares. Gently press these HSTs open, again directing the seam allowance towards the darker fabric to ensure a crisp, flat finish. Trim any dog ears (small triangles of fabric that extend beyond the square) to make your HSTs perfectly square and ready for assembly.
After you’ve created all the required half-square triangles, the true magic of the Ripples Quilt begins as you start assembling the various pieces. Refer closely to your pattern guide and the visual demonstrations in the video tutorial. The pattern will illustrate how to arrange your small pieced squares and your HSTs into larger units and then into rows to create the distinct ripple design. This stage requires careful attention to detail and arrangement to ensure the “ripple” flows correctly across your quilt. Begin by sewing these smaller units together, paying close attention to matching points and seams. Use pins or clips to hold sections in place before sewing, especially where seams meet, to ensure accuracy.
As you sew each unit and row together, press your seams consistently. Often, alternating the direction of seams in adjacent rows (e.g., pressing seams in row 1 to the right, and seams in row 2 to the left) can help them “nest” together when you join the rows, resulting in perfectly matched points and reduced bulk. Continue sewing unit by unit, then row by row, gradually building your large quilt top. This methodical approach ensures that each section contributes to the overall cohesion and beauty of the design. Once all your rows are sewn together, and your quilt top is complete, take a moment to admire your work. You’ve successfully created the intricate foundation of your Ripples Quilt!
Now, to truly finish your quilt, you will need to add the backing fabric, the batting (the soft inner layer that gives the quilt its warmth and dimension), and the border. The border frames your design beautifully and can be a continuation of your existing fabrics or a contrasting pop of color. Once these layers are prepared, they are basted together (either with pins, spray, or thread basting) to hold them securely. Then comes the quilting stage, where you stitch through all three layers to secure them and add texture and durability to your quilt. Finally, a binding is added around the edges of the quilt to give it a neat, professional finish and protect the raw edges. This final stage transforms your pieced top into a functional, beautiful, and lasting quilt.
Tips for Quilting Success
- Take Your Time: Quilting is a journey, not a race. Rushing can lead to mistakes. Enjoy each step of the process.
- Accuracy is Key: Precise cutting and consistent seam allowances are the cornerstones of a beautiful quilt. Invest in good rulers and a sharp rotary blade.
- Press, Don’t Iron: When quilting, you lift and place the iron, allowing heat to set the seams without distorting the fabric. Ironing involves sliding the iron, which can stretch and warp your fabric pieces.
- Use Quality Materials: Good quality fabric and thread will make your quilt more durable and enjoyable to work with.
- Don’t Fear the Seam Ripper: Everyone makes mistakes. A seam ripper is a quilter’s best friend. It’s better to undo a seam and re-sew it correctly than to live with a mistake.
- Organize Your Workspace: A tidy workspace helps keep your fabric pieces organized and reduces errors.
- Watch Tutorials: Visual aids like the Shabby Fabrics tutorial are incredibly helpful. Watch a section, then try it yourself.
Care and Maintenance for Your Handmade Quilt
Once your Ripples Quilt is complete, proper care will ensure its beauty lasts for years to come. Generally, machine wash your quilt on a gentle cycle with cold water and a mild detergent. Avoid harsh chemicals or bleach. Tumble dry on low heat or, for best results, air dry flat to prevent stretching and shrinkage. Store your quilt folded or rolled in a breathable cotton bag, away from direct sunlight and extreme temperatures, to protect the fabric and batting. With loving care, your handmade Ripples Quilt will provide warmth and beauty for generations.
*These amazing images are all credited to Shabby Fabrics via YouTube. Be sure to check out their channel for more inspiring quilting content and tutorials!
How to Make a Ripples Quilt: Your Next Project
The journey of creating a Ripples Quilt is a rewarding one, filled with opportunities to learn, grow, and express your creativity through fabric. From the precise cuts to the careful piecing and final assembly, each step contributes to the intricate beauty of the finished piece. This project is a testament to the power of simple shapes coming together to form a complex and stunning design. Whether you choose to keep this masterpiece for yourself, adorn your home, or share it as a heartfelt gift, the Ripples Quilt is sure to bring joy and admiration. We encourage you to gather your materials, follow this guide, and experience the immense satisfaction of crafting your very own Ripples Quilt. Happy quilting!