
Master Your Kitchen: 6 Ingenious Food Hacks for Effortless Home Cooking
Are you ready to transform your culinary routine? Whether you’re a seasoned chef or just starting your journey in the kitchen, these smart food tricks by Make Sushi 1 are designed to simplify your cooking, boost efficiency, and elevate your dishes. Say goodbye to kitchen frustrations and embrace a smoother, more enjoyable cooking experience with these six invaluable tips.
From ensuring ingredient freshness to mastering quick preparations and perfecting tricky techniques, these hacks will empower you to cook with confidence and creativity. Let’s dive into these game-changing secrets that will make your time in the home kitchen more productive and fun.
1. The Ultimate Egg Freshness Test
Ever wondered if those eggs in your fridge are still safe to eat? Food safety is paramount, and there’s a surprisingly simple and reliable method to check the freshness of your eggs without even cracking them open. This quick water test takes all the guesswork out of determining whether your eggs are past their prime.
How It Works: Gently place your egg into a bowl or glass filled with cold water. Observe its behavior:
- If it sinks horizontally and lies flat on the bottom: Congratulations! Your egg is exceptionally fresh and perfect for any recipe, from poaching to frying.
- If it sinks but stands on its end, with the blunt side pointing upwards: The egg is still perfectly fine to consume but is a few weeks old. This happens because the air cell inside the egg has slightly expanded. These eggs are ideal for hard-boiling, as the larger air pocket makes them easier to peel.
- If it floats to the surface: It’s best to discard this egg. A floating egg indicates that the air cell has grown significantly large, meaning the egg is quite old and likely spoiled. While some older floating eggs might still be technically edible, it’s safer to err on the side of caution to avoid any foodborne illnesses.
This ingenious trick leverages the natural aging process of an egg. As an egg ages, its porous shell allows air to slowly enter, causing the small air cell at its blunt end to expand. The larger the air cell, the more buoyant the egg becomes, leading it to float. Always trust your senses too; if an egg passes the float test but has an unusual smell or appearance upon cracking, it’s always best to throw it out.
2. The Spoon Method for Perfect Ginger Peeling
Peeling ginger can be one of the most frustrating kitchen tasks. Its knobby, irregular shape makes using a traditional vegetable peeler or even a small paring knife a challenge, often leading to wasted ginger and a lot of effort. But what if there was a simpler, more effective way that actually saves more of the precious root?
Enter the humble spoon. This unexpected kitchen utensil is surprisingly superior for peeling ginger due to its unique shape and edge. Unlike a rigid peeler that struggles with bumps and crevices, the curved edge of a spoon can effortlessly conform to the ginger’s contours, scraping away only the thin skin while leaving the flavorful flesh intact.
How To Do It:
- Hold the piece of ginger firmly in one hand.
- Take a sturdy spoon (a metal spoon works best) in your other hand.
- Using the edge of the spoon, gently scrape the skin across the surface of the ginger. Apply light pressure and work your way around the root, getting into all the nooks and crannies.
- The skin will come off in thin, translucent strips, leaving behind the smooth, pale yellow flesh.
This method is not only less wasteful but also much safer than using a sharp knife. You’ll find that it’s faster, more precise, and results in a perfectly peeled piece of ginger ready for grating, slicing, or mincing. Say goodbye to struggling with awkward angles and hello to perfectly peeled ginger every time, ready to infuse your stir-fries, teas, and curries with its aromatic zest.
3. Whipping Up Instant Mayonnaise with an Immersion Blender
Store-bought mayonnaise is convenient, but nothing beats the fresh, vibrant taste and velvety texture of homemade mayo. Traditional methods can be intimidating, often requiring a slow, steady drizzle of oil and constant whisking. However, with an immersion blender, you can achieve perfect, creamy mayonnaise in mere minutes, making it a truly “instant” delight.
Making your own mayonnaise means you control the ingredients, avoiding unwanted preservatives or sugars, and allowing you to customize the flavor profile to your exact liking. This recipe yields a rich, smooth mayonnaise that will elevate sandwiches, salads, and dressings.
Ingredients You’ll Need:
- 2 large egg yolks (ensure they are at room temperature for best emulsification)
- 1/2 teaspoon of Dijon mustard (acts as an emulsifier and adds depth of flavor)
- 2 tablespoons of freshly squeezed lemon juice (for brightness and acidity)
- 1 tablespoon of water (helps adjust consistency and aids emulsification)
- 1/2 teaspoon of smoked flake salt (or regular fine sea salt, adjust to taste)
- 1 cup of neutral-flavored oil, such as canola, grapeseed, or sunflower oil (avoid strong-flavored oils like extra virgin olive oil for a classic mayo)
Step-by-Step Instructions:
- Combine Ingredients: In a tall, narrow measuring cup or jar that is just wide enough to fit the head of your immersion blender, add the egg yolks, mustard, lemon juice, water, and salt. Pour the entire cup of canola oil directly on top of these ingredients. Do not stir.
- Position the Blender: Insert the immersion blender into the cup, making sure the head is resting firmly on the bottom, completely covering the egg yolks. Hold the cup slightly at an angle to ensure all ingredients are within reach of the blender head.
- Begin Blending: Turn the immersion blender on high. Keep it pressed against the bottom of the cup and blend for about 15-20 seconds without lifting it. You’ll observe the mixture at the bottom starting to thicken and emulsify into a creamy, pale yellow mayonnaise.
- Slowly Lift: Once a thick, white emulsion forms at the bottom, very slowly begin to pull the immersion blender upwards through the oil, allowing the emulsified mixture to incorporate the remaining oil. Take about 5-10 seconds to slowly bring the blender head all the way to the top.
- Final Touches: Once most of the oil is incorporated, pump the immersion blender up and down quickly a few times to fully combine any remaining oil and ensure a uniformly thick and smooth consistency.
Tips for Success: Ensure all ingredients, especially the egg yolks, are at room temperature. Cold ingredients are more resistant to emulsification. If your mayonnaise doesn’t thicken, it might be due to cold ingredients or not keeping the blender at the bottom long enough initially. You can try adding another egg yolk and repeating the process, or slowly whisking in a tablespoon of hot water. Store your homemade mayonnaise in an airtight container in the refrigerator for up to one week.
4. Preventing Cutting Board Slippage for Safer Prep
A wobbly or sliding cutting board isn’t just annoying; it’s a significant safety hazard in the kitchen. A stable cutting surface is crucial for precise cuts and, most importantly, for preventing accidents with sharp knives. While specialized non-slip mats are available, you can easily secure your cutting board with items you likely already have on hand.
The primary goal is to create friction between the cutting board and your countertop. This simple trick ensures your board stays firmly in place, allowing you to focus on your chopping without fear of slips.
The Wet Paper Towel Method:
This is arguably the most common and effective DIY solution, utilizing the surface tension of water to create a strong grip:
- Prepare Your Paper Towel: Take a standard paper towel (or a clean cloth towel).
- Wet It Thoroughly: Run the paper towel under cold water until it’s completely soaked.
- Squeeze Out Excess Water: Wring out as much water as you can. The goal is for the towel to be damp, not dripping wet. It should feel cool and moist, but not leave a puddle.
- Lay Flat: Place the damp paper towel flat on your clean work surface where you intend to cut. Smooth out any wrinkles to create an even layer.
- Position Cutting Board: Place your cutting board directly on top of the damp paper towel.
- Press Down: Apply firm pressure to the top of the cutting board, ensuring good contact with the paper towel. You’ll feel it suction slightly, creating a remarkably stable base.
The slight moisture creates a vacuum-like effect and increases friction, locking your cutting board in place. This method works brilliantly on various countertop materials, including granite, laminate, and stainless steel.
Alternative Solutions:
- Non-Slip Mesh Mat: If you have one, a dedicated non-slip silicone or rubber mesh mat placed under the board is excellent. These are designed specifically for this purpose and offer superior grip.
- Rubber Shelf Liner: A piece of rubber shelf liner can be cut to size and placed under your cutting board for a similar effect to the mesh mat.
- Damp Kitchen Towel: A slightly damp, thin kitchen towel can also work in a pinch, though paper towels often offer a better grip due to their texture.
By preventing your cutting board from shifting, you reduce the risk of accidental cuts, make your knife work more efficient, and create a much safer and more enjoyable cooking environment. This simple habit can significantly improve your kitchen safety.
5. The Grating Method for Perfectly Soft Butter
We’ve all been there: reaching for butter for toast or a baking recipe, only to find it rock-hard in the fridge. Cold butter is notoriously difficult to spread without tearing bread and often struggles to incorporate evenly into baking mixtures, leading to lumpy results. While microwaving seems like a quick fix, it frequently leads to an unevenly melted mess – soft on the outside, still hard inside, or completely liquid in parts.
The solution to achieving perfectly soft, spreadable, and easily mixable butter in a flash lies in a common kitchen tool: the cheese grater.
How To Do It:
- Take a cold stick of butter directly from the refrigerator.
- Grab a standard box grater, using the side with the larger holes.
- Grate the butter over a plate or into a bowl.
As the butter is grated, it creates small, thin shreds. These shreds have a much larger surface area compared to a solid block, allowing them to warm up and soften almost instantly to room temperature. Within moments, you’ll have butter that is perfectly pliable and ready for immediate use.
Why This Method is Superior:
- Instant Softness: No more waiting for butter to come to room temperature for hours.
- Even Texture: Unlike microwaving, grating ensures uniform softness, preventing melted edges and hard centers.
- Easy Spreading: The softened shreds are incredibly easy to spread on toast, muffins, or pancakes without damaging the delicate baked goods.
- Seamless Baking Integration: For baking recipes that call for “softened butter,” grated butter incorporates beautifully, creating smooth batters and doughs.
Other Quick Softening Methods (if you don’t have a grater):
- Warm Glass Method: Heat a glass with hot water, then invert it over the butter on a plate for a few minutes.
- Pounding/Rolling: Place butter between two sheets of parchment paper and gently pound it with a rolling pin or meat tenderizer to flatten and soften.
- Small Cubes: Cut the butter into very small cubes; they will soften faster than a large block.
The grating method, however, remains one of the quickest and most effective ways to go from fridge-cold to perfectly soft butter, making your baking and breakfast routines much smoother.
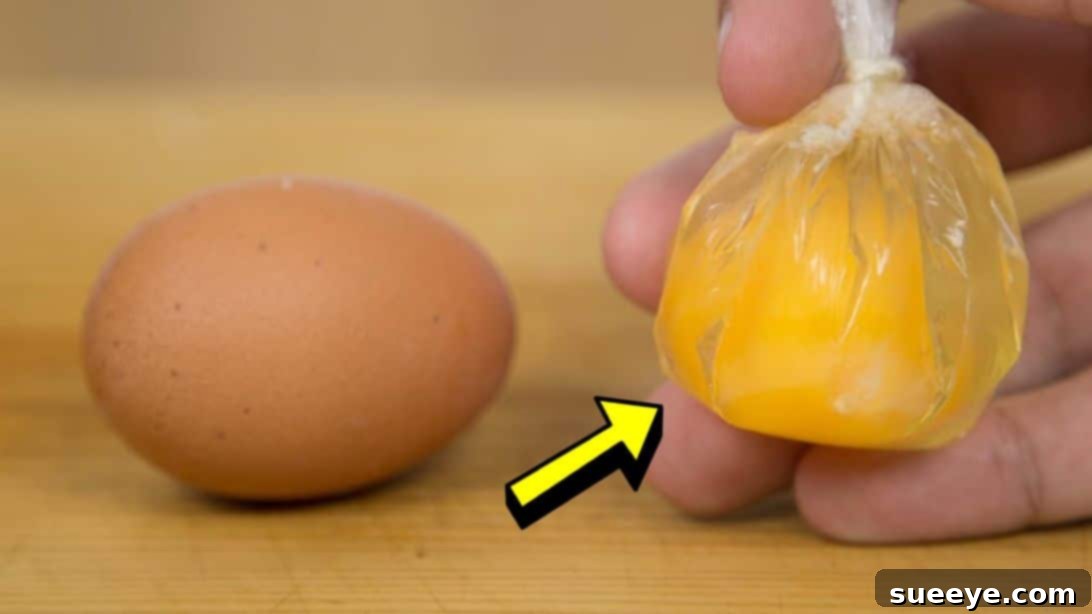
6. The Foolproof Cling Film Method for Easy Poached Eggs
A perfectly poached egg, with its delicate, runny yolk and tender, set white, is a culinary delight, ideal for breakfast, brunch, or adding a touch of elegance to salads and avocado toast. However, traditional poaching can be intimidating, often resulting in wispy whites, broken yolks, or a messy pot. This clever cling film (plastic wrap) method eliminates all the challenges, guaranteeing a beautifully shaped poached egg every single time with minimal effort.
This technique essentially creates a miniature individual pouch for each egg, allowing it to cook gently and evenly without losing its shape or scattering its whites.
What You’ll Need:
- Cling film (plastic wrap)
- Small bowls or ramekins (one per egg)
- Eggs
- Kitchen string or heat-safe twist ties (optional, but helpful)
- A pot of boiling water
Step-by-Step Guide:
- Prepare the Cling Film: Lay out a piece of cling film, about 10-12 inches square. Lightly grease the center of the cling film with a tiny drop of olive oil or cooking spray (this prevents sticking and helps release the egg).
- Create the Pouch: Drape the cling film over a small bowl or ramekin, pushing it down into the center to create a cup-like depression.
- Add the Egg: Carefully crack one egg directly into the cling film-lined bowl. You can add a pinch of salt and pepper now if desired.
- Seal the Pouch: Gather the edges of the cling film, bringing them up and together to create a tight little bundle around the egg. Twist the top to seal it, removing as much air as possible from around the egg. The tighter you make it, the more perfectly round your poached egg will be.
- Secure (Optional but Recommended): For extra security and a neat shape, tie a knot with a small piece of kitchen string or a heat-safe twist tie just above the egg, sealing the pouch. Trim any excess cling film above the knot to prevent it from getting in the way.
- Cook the Egg: Bring a pot of water to a rolling boil. Gently lower the cling film-wrapped egg pouch into the boiling water. Ensure the water is simmering, not aggressively boiling, to prevent the pouch from bursting.
- Timing: Cook for approximately 4 minutes for a perfectly runny yolk, 5 minutes for a soft-set yolk, and 6 minutes for a firmer yolk. Adjust cooking time based on your preferred doneness and egg size.
- Cool and Unwrap: Once cooked, carefully remove the pouch from the water using tongs or a slotted spoon. Let it cool for a very brief moment (about 15-30 seconds) on a plate.
- Serve: Snip the string (if used) and gently unwrap the cling film. Your perfectly poached egg will slide right out, beautifully shaped and ready to enjoy!
This method truly takes the stress out of poaching, allowing you to consistently achieve restaurant-quality results in your own kitchen. Serve immediately on toast, alongside roasted vegetables, or as a topping for salads to add a touch of gourmet flair to any meal.