
Mastering Food Preservation: Expert Tips to Keep Your Groceries Fresh Longer
In today’s fast-paced world, minimizing food waste and maximizing the freshness of our groceries are more important than ever. Every year, households worldwide discard vast amounts of perfectly good food due to improper storage, leading to significant financial losses and environmental impact. Not only does proper food preservation save you money by preventing premature spoilage, but it also ensures you get to enjoy the delicious flavors and nutritional benefits of your food for a longer period. From delicate leafy greens to pungent cheeses and vibrant herbs, each food item has its unique requirements for optimal longevity. If you’ve ever found yourself tossing out wilted produce or moldy cheese before you’ve had a chance to use them, you’re certainly not alone. The good news is that with a few simple, yet highly effective, strategies, you can significantly extend the shelf life of your favorite ingredients and transform your kitchen into a more efficient, waste-conscious space.
This comprehensive guide will walk you through proven methods endorsed by culinary experts and experienced home cooks alike, helping you revolutionize the way you store food. We’ll delve into specific techniques for some of the most commonly mishandled items in your kitchen, ensuring they remain fresh, flavorful, and ready for your next meal whenever you need them. Get ready to adopt clever hacks that are designed to be easy to implement, often utilizing common household items, and prepare to say goodbye to unnecessary food waste. These invaluable tips will become your go-to food storage playbook from now on, empowering you to make the most out of every grocery run. Let’s dive in and discover how to unlock the full potential of your pantry and refrigerator, ensuring your food stays fresh longer and tastes better.
#1 Cheese: The Art of Breathable Preservation
Cheese is a living product that breathes, and how you store it dramatically impacts its flavor, texture, and overall longevity. One of the most common and detrimental mistakes people make is wrapping cheese tightly in plastic wrap. While it might seem like a convenient and logical solution to keep air out, plastic wrap actually suffocates the cheese. It traps moisture and ammonia, creating an environment ripe for mold growth and imparting an unpleasant plastic-like taste that can permeate the delicate flavors of your cheese. Instead, the secret to keeping your cheese fresh, delicious, and free from undesirable odors lies in allowing it to breathe properly while simultaneously protecting it from drying out.
For most hard and semi-hard cheeses, the ideal storage solution is parchment paper, or specialized cheese paper if you have it. Wrapping your cheese in parchment paper provides a breathable barrier that prevents excessive moisture loss, yet allows the cheese to respire naturally. This method helps maintain the cheese’s natural rind, prevents the build-up of off-flavors, and preserves its intended taste and texture. Once wrapped snugly in parchment paper, place the cheese in a loosely sealed plastic bag or an airtight container to offer an additional layer of protection against strong odors from other foods in the refrigerator and to guard against too much humidity. This two-step process can extend the freshness of your cheese for up to seven days, and often even longer, depending on the variety and initial condition. Always store cheese in the warmest part of your refrigerator, typically the cheese drawer or on the top shelf, where temperatures are more stable and less prone to freezing.
Remember, different cheeses have slightly different needs. Softer, fresh cheeses like mozzarella or ricotta should generally be kept in their original brine or water, changed regularly. Bloomy-rind cheeses like brie or camembert often do best in an airtight container lined with a slightly damp paper towel (changed daily) after being wrapped in parchment, to maintain their delicate texture and prevent them from drying out or becoming too moist. Very hard cheeses like Parmesan can be grated and frozen in airtight bags for extended storage, while blue cheeses often benefit from being wrapped in foil after parchment to effectively contain their strong aroma without suffocating them. Always be vigilant for signs of spoilage, such as excessive fuzzy mold (beyond the usual surface mold on hard cheeses, which can often be trimmed), a strong ammonia smell, or a slimy texture. When in doubt, it’s always best to discard. Mastering proper cheese storage is an art form that truly elevates your culinary experience, ensuring every bite is as delicious as intended.
#2 Bananas: Understanding Ethylene Gas for Optimal Freshness
Bananas are a staple in many households, prized for their convenience, natural sweetness, and nutritional value. However, their notoriously short shelf life can often lead to frustration and unnecessary waste if not managed properly. A common misconception is that refrigerating bananas immediately upon purchase will extend their freshness. In reality, placing unripe or even newly ripened bananas directly into the fridge can actually accelerate the browning and blackening of their skins. More importantly, the cold temperature can hinder the full ripening process of the fruit’s flesh, making them turn mushy and unappealing quickly, especially if they haven’t fully ripened at room temperature first. This phenomenon is due to the cold affecting the enzymes in the banana peel, causing it to break down pigments rapidly.
The true key to longer-lasting bananas lies in understanding their natural ripening agent: ethylene gas. Bananas, like many climacteric fruits (fruits that continue to ripen after being picked), naturally release ethylene gas, a powerful plant hormone that promotes further ripening. The stem of the banana bunch is where a significant amount of this gas is released. To effectively slow down the ripening process, particularly when bananas are stored at room temperature, it’s highly effective to isolate this source of ethylene. This can be achieved by wrapping the stems of the banana bunch tightly with plastic wrap or aluminum foil. This simple act helps to contain the ethylene gas, preventing it from permeating the rest of the fruit and signaling it to ripen at an accelerated pace. You can further enhance this by separating individual bananas from the bunch, as this also reduces the collective ethylene emission.
Storing bananas at room temperature, ideally away from other ethylene-producing fruits (such as apples, avocados, and tomatoes), is generally the best approach until they reach your desired level of ripeness. Once your bananas are perfectly ripe and ready to eat, you can then transfer them to the refrigerator. While the skin may still eventually turn brown or black in the fridge due to the cold, the flesh inside will remain firm and sweet for an additional few days, giving you more time to enjoy them without rushing. If your bananas do become overly ripe before you can consume them, don’t despair! Overripe bananas, with their intensified sweetness and softer texture, are perfect for peeling and freezing (slice them beforehand for easier portioning) and are excellent for baking delicious banana bread, muffins, pancakes, or adding to smoothies. This multi-stage storage strategy ensures you get the most out of your bananas, reducing waste and enjoying them exactly when and how you want.
#3 Celery and Carrots: The Hydration Method for Enduring Crispness
Few things are as disappointing in the kitchen as reaching for crisp celery stalks or crunchy carrots, only to find them limp, rubbery, and devoid of their satisfying snap. These popular crunchy vegetables are largely composed of water – in fact, celery is over 95% water – and their characteristic crispness is directly related to their optimal hydration level. The common method of simply leaving them in their original plastic bag or tossing them loosely into the crisper drawer often falls short. Plastic bags can sometimes trap too much moisture around the surface of the vegetables, leading to sliminess and premature spoilage, or conversely, allow too much moisture to evaporate, resulting in rapid dehydration and a flaccid texture.
The most effective and widely acclaimed way to keep celery and carrots irresistibly crisp for an extended period is through immersion in water. This technique mimics their natural, hydrated state and ensures their cells remain plump and firm. After purchasing, it’s crucial to wash your celery stalks and carrots thoroughly under cold running water to remove any dirt or residue. For celery, it’s best to chop the stalks into manageable lengths that fit comfortably into your chosen container. For carrots, you can peel them if desired, or simply trim the ends. Place these prepared vegetables into a clean glass jar or any appropriate airtight container. Completely fill the container with fresh, cold water, ensuring the vegetables are fully submerged. Finally, seal the jar or container with a lid and place it securely in your refrigerator.
This hydration method works wonders because it provides a continuous source of moisture to the vegetables, preventing their cell walls from collapsing and keeping them firm and crunchy. The airtight seal of the container helps to prevent the water from becoming stagnant and also minimizes the transfer of odors. For optimal freshness and to prevent any bacterial growth, it’s advisable to change the water every couple of days. With this simple yet incredibly effective technique, your celery and carrots can remain perfectly crisp and flavorful for up to seven days, and often even longer, significantly extending their usability. This makes them ideal for convenient snacking, adding a refreshing crunch to salads, or incorporating into your favorite cooked recipes without the worry of them going bad quickly. It’s a true game-changer for anyone who values fresh, crunchy vegetables and aims to reduce food waste in their kitchen.
#4 Herbs: Preserving Freshness and Flavor with Olive Oil Cubes
Fresh herbs are the unsung heroes of countless culinary creations, capable of elevating any dish with their vibrant flavors, delightful aromas, and beautiful garnishes. However, their delicate nature means they often wilt, discolor, and spoil quickly if not stored correctly, frequently leading to wasted ingredients and missed opportunities for flavor. While traditional short-term methods like wrapping them in a damp paper towel and refrigerating can offer a few days of extended life, for truly long-term preservation, especially when you have an abundance of fresh herbs from a garden or farmer’s market, freezing offers an excellent and highly convenient option.
One of the most innovative and remarkably effective ways to freeze herbs is by combining them with olive oil. This brilliant method not only preserves their inherent flavor and vibrant color but also makes them incredibly convenient for cooking. Begin by washing your chosen herbs thoroughly under cold water – think parsley, cilantro, basil, oregano, rosemary, or thyme. It’s crucial to pat them completely dry afterwards; any excess moisture can lead to freezer burn and compromise their quality. Once dry, finely chop your herbs to your preferred consistency. Then, pack the chopped herbs tightly into the compartments of an ice cube tray. Drizzle a good quality olive oil over the herbs, ensuring they are fully submerged. The olive oil serves a dual purpose: it acts as a protective barrier, shielding the delicate herbs from freezer burn and the harsh effects of the cold, while also locking in their essential oils, robust flavors, and bright colors.
Once the herb and oil cubes are frozen solid – typically after a few hours – carefully transfer them from the ice cube tray to a freezer-safe bag or an airtight container. Be sure to label them clearly with the type of herb and the date of freezing for easy identification later. When you’re ready to cook, simply pop out a cube or two and add it directly to your hot pans as you sauté, into simmering soups, hearty stews, or savory sauces. The olive oil will melt, releasing the fragrant herbs directly into your dish, infusing it with fresh, vibrant flavor without any additional chopping. This method keeps herbs perfectly preserved and bursting with taste for several months, making them ready to enhance your meals whenever inspiration strikes. It’s a fantastic way to minimize food waste, save time on meal prep, and ensure you always have fresh-tasting herbs on hand, even out of season.
#5 Lettuce and Leafy Greens: The Paper Towel Moisture Management Method
Lettuce and other delicate leafy greens are notorious for their short shelf life, often wilting, turning yellow, or becoming slimy within just a few days of purchase. The primary culprit behind this rapid deterioration is the delicate balance of moisture. While leafy greens absolutely need hydration to stay crisp and vibrant, too much surface moisture can accelerate bacterial growth, leading to premature spoilage and that undesirable slimy texture. Conversely, too little moisture will cause them to dry out quickly, becoming limp and unappetizing. The trick, therefore, is to strike the perfect equilibrium – providing enough moisture to keep them fresh without allowing them to sit in standing water.
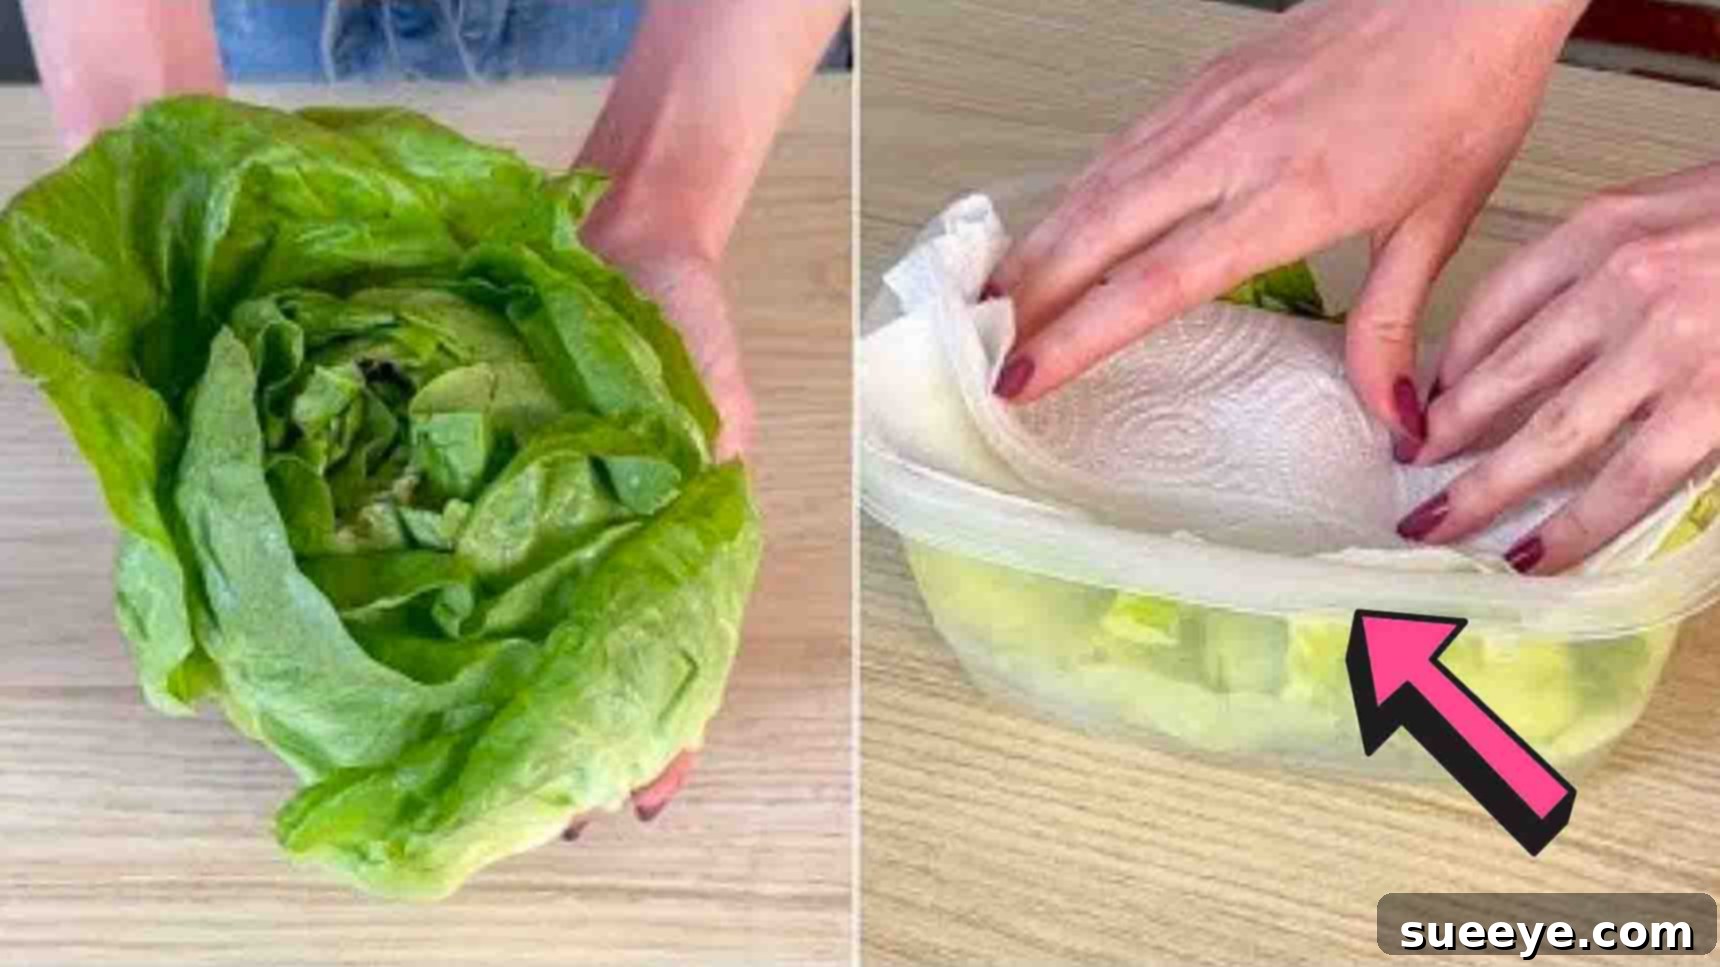
The most effective and widely recommended strategy for keeping your lettuce and other leafy greens remarkably fresh and crisp for an extended period involves the clever use of paper towels. Begin by washing your greens thoroughly under cold running water. It’s crucial to dry them as much as possible afterward; a salad spinner is an invaluable tool for this, removing excess water efficiently. Once your greens are mostly dry, select a large glass or plastic container with an airtight lid, or a sturdy, reusable ziplock bag. Line the bottom of this container or bag with a generous layer of dry paper towels. Place your cleaned and well-dried greens gently on top of this initial layer of paper towels. Then, add another layer of dry paper towels on top of the greens before securely sealing the container or bag.
This method works wonders because the paper towels act as a natural, highly effective moisture absorber. They diligently wick away any excess condensation or lingering moisture that accumulates inside the container or bag, preventing the greens from sitting in standing water, which is a primary cause of rot and sliminess. The sealed container or bag, in turn, helps to maintain a suitably humid environment, preventing the greens from drying out completely and losing their crispness. To maintain optimal freshness, remember to check and change the paper towels every couple of days, especially if they become noticeably damp. This simple yet incredibly effective method can keep your lettuce and other leafy greens vibrant, crisp, and fresh for up to a week, or even longer, significantly extending their usability and reducing the frequency of your grocery runs. Enjoy fresh, crunchy salads and sandwiches with confidence, knowing your greens will be ready when you are!
Beyond the Basics: General Food Storage Principles for a Waste-Free Kitchen
While the specific tips above target common culprits of food spoilage, adopting broader, holistic food storage principles can further enhance your kitchen efficiency, reduce waste, and ensure the safety of your food supply. Integrating these habits into your routine will make a significant difference.
- Understand Your Refrigerator Zones: Your fridge isn’t uniformly cold. Different areas have varying temperatures, designed for specific food types. The top shelf and door are generally warmer and fluctuate more, making them ideal for condiments, butter, and pre-cooked foods. The middle shelves offer more consistent temperatures, best suited for dairy products (milk, yogurt, eggs) and leftovers. The bottom shelf, being the coldest, is perfect for raw meats, poultry, and seafood, preventing potential cross-contamination onto other foods. Crisper drawers are designed to manage humidity, often with adjustable settings for fruits (low humidity) and vegetables (high humidity).
- First-In, First-Out (FIFO): This is a simple yet powerful rule of thumb in professional kitchens that every home cook should adopt. Always place newer groceries behind older ones in your fridge or pantry. This ensures that you use items nearing their expiry date first, preventing them from being forgotten and spoiling in the back, thereby minimizing waste and maximizing freshness.
- Proper Packaging is Key: Invest in high-quality, airtight containers. These are invaluable for storing leftovers, opened packages (like cereals or crackers), and many other items, protecting them from air exposure which causes oxidation and staleness. Airtight containers also prevent flavor transfer between foods and guard against freezer burn. Glass containers are often preferred for their durability, non-reactive properties, and ease of cleaning, while BPA-free plastic containers are also excellent choices.
- Don’t Overstuff Your Fridge: A packed refrigerator might seem efficient, but it actually hinders proper air circulation. This leads to uneven cooling, creating warm spots where food can spoil faster, and making your fridge less energy-efficient. Leave enough space for air to flow freely around your food items to maintain consistent temperatures.
- Learn Expiration Dates and Food Safety: Understand the nuanced difference between “best by,” “use by,” and “sell by” dates. “Use by” dates are typically safety recommendations, indicating when a product should be consumed for optimal safety. “Best by” dates, conversely, are more about quality and peak flavor; many foods are perfectly safe and palatable to consume past their “best by” date. “Sell by” dates are for retailers, indicating how long a product should be displayed for sale. Always trust your senses—if food looks, smells, or feels off, it’s safer to discard it.
Embrace a Fresher Future, One Tip at a Time!
Implementing these practical and insightful food storage techniques can profoundly impact your household, leading to a more organized, efficient, and delicious kitchen experience. Not only will you savor the peak freshness and vibrant flavors of your ingredients for significantly longer, but you’ll also contribute to a more sustainable lifestyle by drastically cutting down on food waste, a critical step towards environmental responsibility. Imagine the tangible benefits: fewer hurried trips to the grocery store, more money remaining in your pocket due to reduced spoilage, and the immense satisfaction of cooking with consistently fresh, high-quality produce every single time you step into your kitchen.
From expertly preserving delicate cheese with breathable parchment paper to maintaining the crisp integrity of your carrots and celery through hydration, and innovatively freezing herbs in olive oil, each tip presented here is a valuable step towards achieving culinary excellence and waste reduction. These methods are straightforward, accessible, and designed for real-world application in any home kitchen. Don’t wait to make a change; start incorporating these invaluable hacks into your daily routine today. Share these newfound insights with friends and family, empowering them to embrace smarter food preservation habits, and prepare to be amazed at just how much longer your food stays delicious, flavorful, and ready for your next culinary adventure. Happy storing, and happy cooking!