
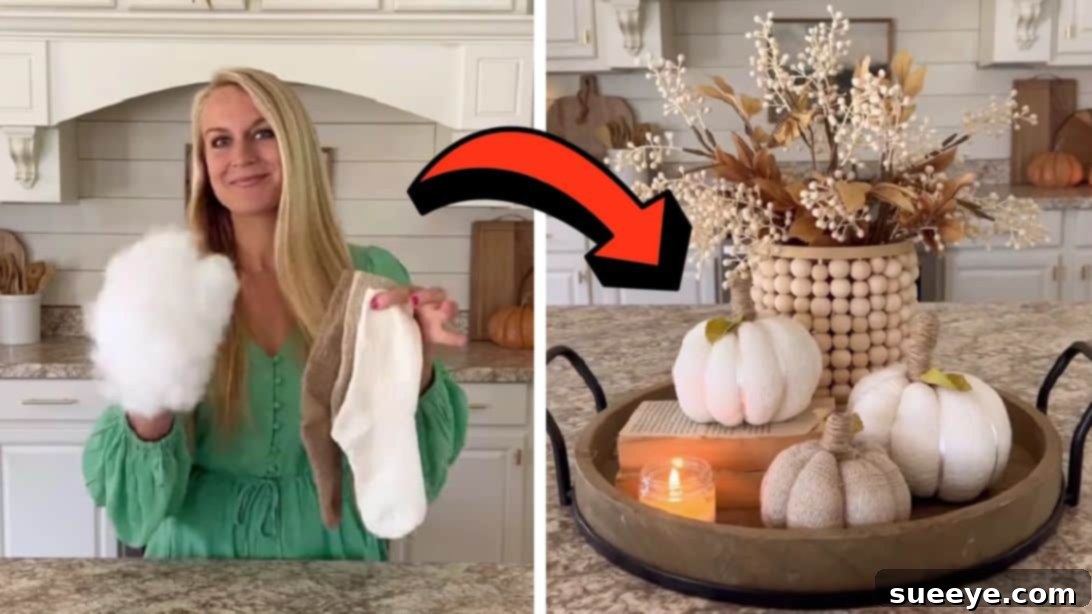
As the crisp air of autumn ushers in the beautiful Fall season, it brings with it the perfect opportunity to refresh your home decor or introduce new elements that celebrate the spirit of harvest. If you’re searching for a delightful and impactful decorating project that won’t consume hours of your precious time, look no further! This ingenious project idea, originally shared by ourwintonhome on TikTok, offers a quick and incredibly satisfying solution to infuse your living space with cozy fall vibes.
Imagine transforming your forgotten pile of old socks, destined for the discard bin, into charming, fluffy mini pumpkins. This brilliant upcycling hack not only breathes new life into unused items but also provides an eco-friendly way to create unique, seasonal decor. Crafting these DIY mini pumpkins is surprisingly fast, often taking as little as 5 minutes per pumpkin, making it an ideal activity for busy individuals or anyone seeking instant gratification from their creative endeavors. Dive into this tutorial to learn how to make these adorable decorations that will undoubtedly add a touch of warmth and whimsy to any room in your home.
The original inspiration for this project comes from a viral TikTok video by @ourwintonhome, showcasing how effortlessly these adorable sock pumpkins come to life. Her video beautifully demonstrates the simplicity and charm of this craft, highlighting its potential to transform ordinary socks into extraordinary fall accents. The creator expressed her excitement over the finished look, noting how cozy and perfect they appear in her kitchen. This project truly embodies the essence of fall decoration, offering a creative outlet that results in stunning handmade pieces. You can find the full visual guide and discover more of her wonderful DIY ideas by visiting her TikTok profile.
The Magic of Upcycling: Why DIY Sock Pumpkins are Your Go-To Fall Craft
In a world increasingly focused on sustainability, upcycling has become a beloved trend among crafters and home decorators alike. DIY sock pumpkins perfectly embody this spirit, offering a myriad of benefits that extend beyond their aesthetic appeal. Firstly, they are incredibly **budget-friendly**. Instead of purchasing new decor, you’re utilizing items you already own, saving money while reducing waste. Old socks, often considered trash, are given a beautiful second life, preventing them from ending up in landfills.
Beyond their eco-conscious appeal, these pumpkins offer unparalleled **customization options**. Every sock tells a story – from vibrant patterns to cozy textures – allowing each pumpkin to have a unique personality. This means your fall decor will be truly one-of-a-kind, reflecting your personal style and creativity. They are also remarkably **beginner-friendly**. With no complex sewing or intricate techniques involved, this project is accessible to crafters of all skill levels, making it a fantastic activity for families or a relaxing solo endeavor. The simplicity ensures a high success rate, giving you beautiful results every time. Finally, the **speed** at which these pumpkins can be made is a major draw. In just minutes, you can create a charming piece that instantly adds a festive touch to your home, making it ideal for last-minute decorating or spontaneous crafting sessions.
Embracing Fall Decor with a Creative Twist
Fall decor is all about warmth, texture, and bringing the beauty of the outdoors inside. Traditional pumpkins, gourds, and autumn foliage are staples, but handmade elements like these sock pumpkins add a unique, personal touch that mass-produced items simply can’t replicate. They introduce a soft, tactile dimension to your decor, perfect for creating a cozy, inviting atmosphere. Whether nestled on a bookshelf, arranged on a mantelpiece, or gracing a dining table as part of a centerpiece, these fabric pumpkins exude a homespun charm that perfectly complements the autumnal aesthetic. Their versatility allows them to blend seamlessly with various decor styles, from rustic farmhouse to modern minimalist, proving that thoughtful DIY can elevate any space.
Inspired by TikTok: Your Guide to a 5-Minute Craft
The beauty of social media platforms like TikTok is the ability to share quick, impactful tutorials that inspire creativity worldwide. The viral video from ourwintonhome serves as a fantastic visual guide for this project, breaking down each step into easily digestible segments. While this written tutorial provides all the necessary details, watching the video can offer an invaluable perspective, demonstrating the exact movements and techniques to achieve the perfect pumpkin shape and finish. It helps to visualize the process, ensuring that even novice crafters can confidently create these charming decorations. We highly recommend giving the video a watch to complement these instructions and see the magic unfold in real-time!
Materials: Crafting Your Cozy Fall Pumpkins
Gathering your materials is the first exciting step in any DIY project. For these adorable sock pumpkins, you’ll find that most items are likely already within your home, emphasizing the project’s affordability and accessibility. Here’s what you’ll need:
- Sock: The star of our project! Choose an old sock you no longer wear. Textured socks, patterned socks, or even plain colored socks work wonderfully. The bigger the sock, the larger your pumpkin will be.
- Poly-fil fiberfill: This soft stuffing material gives your pumpkins their plump, squeezable form. You can also repurpose old pillow stuffing or even cotton balls if you’re in a pinch.
- Scissors: For cutting your sock and any excess ribbons or strings.
- Thin ribbon: This will be used to create the segments of your pumpkin, giving it that classic pumpkin shape. Any color that complements your sock will work beautifully.
- Jute string: Essential for crafting the rustic stem of your pumpkin, adding an authentic natural touch.
- Hot glue gun and glue sticks: For securely attaching the ribbon, jute string, and faux leaf, ensuring your pumpkin stays intact.
- Faux pumpkin leaf: A small, artificial leaf adds a lovely decorative finish to your pumpkin’s stem, enhancing its realistic appearance.
Directions: Step-by-Step Guide to Your DIY Sock Pumpkins
Follow these simple instructions to create your charming sock pumpkins in no time. Each step is designed to be straightforward, ensuring a fun and rewarding crafting experience.
Step 1: Prepare and Stuff Your Sock Base
Begin by taking your chosen sock. Using your scissors, carefully cut the sock across, just above the heel section. This creates the main body of your pumpkin. Next, take your poly-fil fiberfill and begin stuffing the cut part of the sock. As you fill it, gently shape the fiberfill to create a smooth, round ball. The key is to stuff it firmly enough so it holds its shape, but not so tightly that it becomes rigid. Continue filling until the sock is almost completely full, leaving a small opening at the top. Once adequately stuffed and shaped, gather the open ends of the fabric together. Pull them tight, and then tie them securely with a strong knot. For extra security, knot it a few more times to prevent the stuffing from coming out, creating a stable base for your pumpkin.
Step 2: Shape Your Pumpkin with Ribbon
Now it’s time to give your stuffed sock its characteristic pumpkin shape. Take your thin ribbon and begin wrapping it around the ball you’ve created. As demonstrated in the video, wrap the ribbon around the pumpkin a few times, evenly spaced, to create distinct segments. Imagine dividing the pumpkin into vertical sections, much like a real pumpkin’s natural grooves. Once you are satisfied with the segmentation, bring the ends of the ribbon together at the very center-top of the pumpkin. Tie them securely, creating a tight knot that holds the ribbon in place and maintains the pumpkin’s shape. Trim any excess ribbon tails close to the knot. To ensure the ribbon stays perfectly in place and the shape is preserved, apply a small dot of hot glue directly onto the knot and press it down firmly. This will keep your pumpkin looking neat and tidy.
Step 3: Add the Finishing Touches – Stem and Leaf
The final steps involve adding the elements that truly transform your craft into a recognizable pumpkin: the stem and leaf. Take your jute string and begin wrapping it around the center-top where your ribbon knot is located. Wrap the jute string several times, building up layers to create a sturdy and rustic-looking stem. As you wrap, apply small amounts of hot glue to secure the string in place, especially at the beginning and end of your wrapping, and periodically along the stem for added stability. Once your stem is complete, choose your faux pumpkin leaf. Apply a small amount of hot glue to the base of the leaf and carefully adhere it to the side of the jute string stem. This tiny detail adds a wonderful touch of authenticity and polish to your mini pumpkin, completing its charming fall aesthetic.
Unleash Your Creativity: Customization Ideas for Your Sock Pumpkins
While the basic tutorial provides a fantastic foundation, the real fun begins when you start to personalize your sock pumpkins. The possibilities for customization are virtually endless, allowing you to create decor that perfectly matches your home’s aesthetic and your personal taste. Consider experimenting with different types of socks: fuzzy socks for extra plush pumpkins, striped socks for a playful look, or even holiday-themed socks for a quirky twist. The patterns and colors of your socks will directly influence the final look, so choose wisely!
Beyond the base, embellishments can elevate your pumpkins. Instead of plain ribbon, try using lace, burlap strips, or even thin strips of contrasting fabric. For the stem, explore alternatives to jute string; a twig from your yard, a cinnamon stick for a delightful aroma, or even a wine cork could create a unique top. You could also add small beads, buttons, or tiny faux berries to the base of the stem for extra sparkle. For an aromatic touch, a few drops of fall-scented essential oils (like cinnamon, clove, or pumpkin spice) can be added to the poly-fil before stuffing, infusing your pumpkins with a welcoming seasonal scent. Consider grouping pumpkins of various sizes and colors together to create a dynamic display, showcasing the full range of your creativity.
Styling Your Handmade Pumpkins: Decor Tips
Once your charming sock pumpkins are complete, it’s time to integrate them into your fall home decor. Their versatility makes them suitable for almost any area of your house. Here are a few styling ideas to inspire you:
- **Tiered Trays:** Arrange a collection of different-sized and colored sock pumpkins on a tiered tray, alongside small candles, faux leaves, and other mini fall accents for a stunning centerpiece.
- **Mantelpiece Magic:** Line your fireplace mantel with a row of sock pumpkins, interspersed with twinkling fairy lights, garlands, and family photos to create a warm and inviting focal point.
- **Cozy Corners:** Place a single, larger sock pumpkin on an accent table next to a stack of books and a cozy blanket to create an inviting reading nook.
- **Dining Table Centerpiece:** Combine your sock pumpkins with fresh or faux flowers, natural gourds, and candles for an elegant and rustic dining table display.
- **Entryway Welcome:** Group a few pumpkins on your entryway console table to greet guests with a festive autumn welcome.
- **Shelf Styling:** Tuck smaller sock pumpkins onto bookshelves or open shelving units to add pops of color and texture throughout your living space.
Don’t be afraid to mix and match textures, colors, and sizes. The beauty of these handmade pumpkins is their ability to add a personalized, cozy touch wherever they are placed.
Conclusion: A Cozy Touch for Your Home
In conclusion, creating DIY sock pumpkins is more than just a craft project; it’s an invitation to infuse your home with the warmth, beauty, and personal touch of the Fall season. This quick, easy, and incredibly satisfying endeavor allows you to transform forgotten household items into charming decorations that truly speak to the spirit of autumn. With minimal materials and just a few minutes of your time, you can craft a collection of these adorable, fluffy pumpkins that will brighten any corner of your home. From their eco-friendly nature to their endless customization possibilities, sock pumpkins offer a delightful way to celebrate fall without breaking the bank or dedicating hours to complex projects. So, gather your old socks, unleash your creativity, and get ready to add a dash of handmade charm to your fall decor! We extend our sincere thanks to ourwintonhome via TikTok for providing the brilliant inspiration and visual guidance for this wonderful DIY project. If you enjoyed crafting these adorable pumpkins, we highly recommend visiting her TikTok account for more creative ideas and delightful home decor inspiration!
Quick & Easy 5-Minute DIY Sock Pumpkin Tutorial