
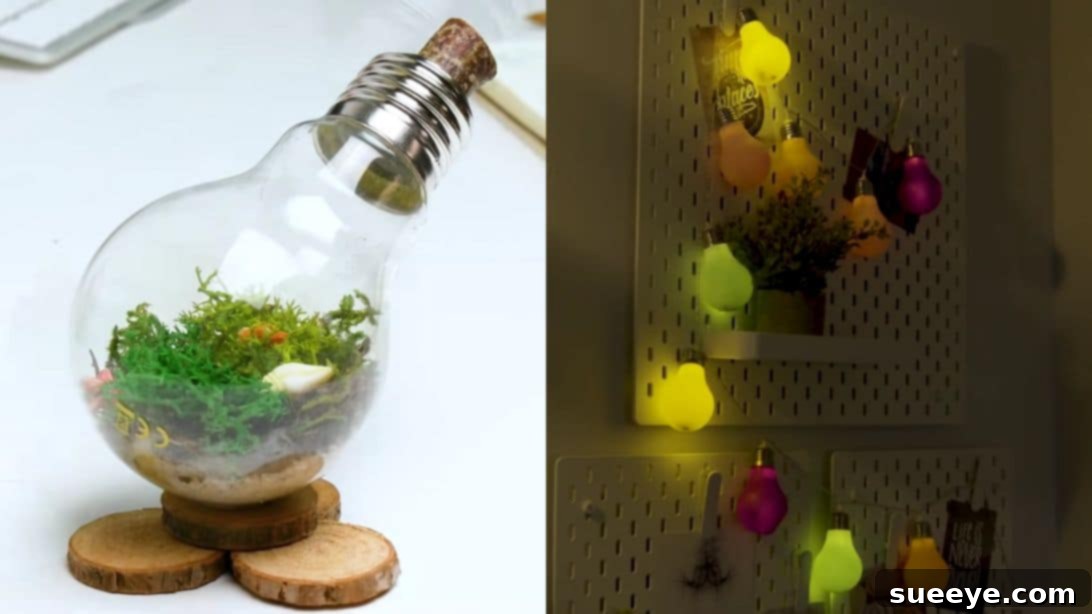
Unlock your creativity and embrace sustainable living by transforming everyday discarded items into beautiful, functional pieces for your home. Old, burnt-out light bulbs, often destined for the trash, hold surprising potential for charming DIY projects. Instead of letting them contribute to landfill waste, consider giving them a new lease on life with these ingenious upcycling ideas. Whether you’re looking for unique home decor, a personalized gift, or a fun craft to do with the family, repurposing old light bulbs is an eco-friendly and rewarding endeavor. This guide will walk you through four simple yet captivating projects, turning those seemingly useless bulbs into miniature terrariums, elegant hanging vases, practical soap dispensers, and whimsical fairy lights. Get ready to illuminate your imagination and craft something truly special!
4 Creative DIY Projects for Repurposing Old Light Bulbs
Before you toss those expired light bulbs, think again! They are not just waste; they are canvases waiting for a touch of creativity. With a few simple tools and a little imagination, you can convert them into unique decorative items that add character to any space. These projects are not only fun and easy but also contribute to a greener planet by giving materials a second purpose. Let’s explore how to transform these humble objects into captivating treasures. For visual guidance, you might enjoy this video tutorial by Cleverly on YouTube, offering inspiration and step-by-step demonstrations.
Why Upcycle Your Old Light Bulbs?
Upcycling, the process of transforming waste materials or unwanted products into new materials or products of better quality or for better environmental value, is more than just a trend—it’s a sustainable practice with numerous benefits. When you choose to repurpose old light bulbs, you’re not just creating something beautiful; you’re also making a positive impact on the environment. Here’s why upcycling light bulbs is a brilliant idea:
- Environmental Stewardship: Every light bulb you upcycle is one less item in a landfill. This reduces waste, conserves resources that would otherwise be used to create new products, and lowers your carbon footprint.
- Unique Home Decor: Mass-produced items often lack character. Handmade crafts from repurposed materials offer a distinctive charm and tell a story, making your home decor truly unique and reflecting your personal style.
- Cost-Effective Solutions: Crafting with items you already own or can acquire cheaply is incredibly budget-friendly. Instead of buying new decorations or functional items, you can create them with minimal expense.
- Boost Creativity and Skill: DIY projects stimulate creativity, problem-solving skills, and hand-eye coordination. They provide a sense of accomplishment and the satisfaction of having created something beautiful with your own hands.
- Educational for All Ages: Upcycling projects are excellent activities for families. They teach children about sustainability, resourcefulness, and the value of giving objects a second life.
Essential First Step: Safely Preparing Your Light Bulbs
Most of these projects require an empty glass bulb. Safely preparing the light bulb is crucial. This process involves carefully removing the electrical contact and internal filaments, leaving you with just the hollow glass sphere and its metal base. Always wear safety glasses and gloves when performing this step to protect your eyes and hands from potential glass shards. Work on a stable surface covered with newspaper or a cloth to catch any debris. Adult supervision is highly recommended, especially when handling sharp tools.
Here’s a general guide for hollowing out a standard incandescent light bulb:
- Saw Off the Electrical Contact: Using a small saw or a pair of sturdy pliers, carefully break or saw off the small, rounded electrical contact point at the very bottom center of the metal base. This will expose a black insulator material.
- Remove the Insulator: With a flathead screwdriver or the tip of your pliers, gently pry out the black insulator material. This should come out in pieces.
- Extract the Filaments: Once the insulator is removed, you will see the internal wires and the filament. Carefully use a small screwdriver or a long, thin tool to break and remove these components. The goal is to clear out all internal structures until only the glass bulb and its metal base remain.
- Clean the Interior: If necessary, use a small brush or a blast of air to remove any remaining glass dust or debris from the inside of the bulb. Be extremely careful not to cut yourself on the inner edge of the metal base.
Once you have a clean, hollow bulb, you’re ready to embark on your chosen DIY project!
Project 1: Mini Terrarium – A Tiny Ecosystem
Transforming an old light bulb into a miniature terrarium is a fantastic way to bring a touch of nature indoors. These self-contained ecosystems are not only beautiful but also surprisingly easy to maintain, making them perfect for small spaces or as unique desk decor. The enclosed environment creates a humid microclimate ideal for certain plants.
Materials for Mini Terrarium:
- Hollowed Light Bulb
- Small decorative wood pieces (for the base)
- Hot glue gun and glue sticks
- Small pebbles or gravel (for drainage)
- Sand (decorative or for drainage layer)
- Sterile potting soil
- Live or preserved moss
- Water (a few drops)
- Tiny decorative elements (e.g., small figurines, polished stones, twigs)
- Small wooden peg or cork (for the cap)
Directions for Mini Terrarium:
- Prepare the Base: Acquire four round pieces of decorative wood, ensuring they are stable and suitable for supporting the bulb. Carefully stack and glue them together using a hot glue gun to create a sturdy, elevated base. This base will give your terrarium stability and a finished look.
- Mount the Bulb: Once the wooden base is dry and secure, carefully adhere the hollowed light bulb onto the top of the wooden base using hot glue. Position it slightly slanted to add visual interest and make it easier to view the interior. Allow the glue to set completely.
- Layer the Substrate: Begin filling your light bulb terrarium with layers. First, gently add a small layer of pebbles or gravel at the bottom for drainage. Next, add a thin layer of sand, followed by a layer of sterile potting soil. These layers mimic a natural soil profile and help create a healthy environment for your moss.
- Introduce the Moss: Carefully place small pieces of live or preserved moss on top of the soil layer. Use tweezers or a small stick to arrange the moss to your liking. Moss thrives in humid environments, making the light bulb a perfect home.
- Hydrate and Decorate: Using an eyedropper, add a few drops of water to the moss. Be conservative; too much water can lead to mold. Finally, use tweezers to carefully add any small decorative elements you’ve chosen, such as tiny figurines, polished stones, or miniature twigs, to create a personalized scene.
- Seal the Terrarium: Once all elements are in place, gently insert a small wooden peg or cork into the opening of the light bulb. This helps to seal the terrarium, maintain humidity, and protect the delicate ecosystem inside.
Your mini light bulb terrarium is now complete! Place it on a desk, shelf, or windowsill where it can receive indirect light. Minimal maintenance is required; occasionally check for condensation and add a tiny drop of water if the moss appears dry.
Project 2: Elegant Hanging Vase – A Touch of Floral Charm
A simple yet stunning way to repurpose an old light bulb is by transforming it into a delicate hanging vase. Perfect for displaying single stems or small sprigs of flowers, these miniature vases add an elegant touch to any room. They are ideal for propagating plant cuttings, showcasing fresh blooms, or adding a minimalist aesthetic to your living space.
Materials for Hanging Vase:
- Hollowed Light Bulb
- Hobby wire (flexible yet sturdy, e.g., 18-gauge floral wire)
- Small funnel
- Water
- Single-stemmed flowers or plant cuttings
Directions for Hanging Vase:
- Shape the Wire Hanger: Take a length of hobby wire (approximately 18-24 inches, depending on desired hanging length). Carefully bend one end of the wire to form a large, stable ring at the bottom. This ring will cradle the bulb. Ensure it’s wide enough to support the bulb’s body without it slipping through.
- Create the Top Loop: Continue bending the wire upwards from the large ring, then form a smaller loop at the top. This smaller loop will serve as the hanging point for your vase. You can twist the wire around itself to secure the loops and create a sturdy structure.
- Insert the Bulb: Gently insert the socket end of your hollowed light bulb into the large bottom ring, ensuring the bulb’s glass body faces downwards. The wire structure should hold the bulb securely in place, allowing it to hang freely.
- Fill with Water: Using a small funnel, carefully pour water into the light bulb until it’s about two-thirds full. The funnel is essential to prevent spills due to the small opening.
- Add Flowers: Select a single-stemmed flower, a small sprig of greenery, or a plant cutting that you wish to display or propagate. Carefully insert it into the water-filled bulb.
- Hang Your Vase: Choose a suitable location to hang your new light bulb vase, such as near a window, from a ceiling hook, or on a decorative plant stand. The clear glass allows you to admire the root growth of cuttings or the vibrant colors of your chosen flowers.
These hanging vases are perfect for air plants, small succulents, or even just a splash of colorful water with a drop of food coloring. Remember to change the water every few days to keep your flowers fresh or promote healthy root growth for cuttings.
Project 3: Unique Soap Dispenser – Functional Art for Your Kitchen or Bath
Who knew a light bulb could become a stylish and functional soap dispenser? This ingenious project transforms a larger light bulb, often a heat lamp bulb, into a one-of-a-kind dispenser for liquid soap. It’s an excellent way to add a unique, industrial-chic touch to your bathroom or kitchen counter while reducing waste.
Materials for Soap Dispenser:
- Larger Light Bulb (a red heat lamp bulb works well due to its robust size and often interesting tint)
- Liquid hand soap or dish soap
- Pump mechanism from an old soap dispenser (ensure the screw thread fits the bulb’s base)
Directions for Soap Dispenser:
- Prepare the Light Bulb: As with the other projects, the first step is to safely hollow out the light bulb. If using a heat lamp bulb, the glass can be thicker, so exercise extra caution. Saw off the electrical contact point and use a screwdriver and pliers to completely remove the internal components, leaving only the glass bulb and its metal cap.
- Clean and Fill: Thoroughly clean the inside of the hollowed bulb to remove any debris or dust. Once clean and dry, carefully fill the bulb with your preferred liquid hand soap or dish soap. A small funnel can be helpful to avoid spills. Fill it almost to the top, leaving a little space for the pump mechanism.
- Attach the Pump: Take the pump mechanism from an old soap dispenser. Carefully screw or press the pump onto the metal socket of the light bulb. The threads of the pump should fit snugly onto the light bulb’s base. If the fit is loose, you might need to find a pump with compatible threading or use a bit of plumber’s tape around the bulb’s base to create a tighter seal.
- Test and Enjoy: Once the pump is securely attached, test it a few times to prime the pump and ensure it dispenses soap smoothly. Your unique, upcycled light bulb soap dispenser is now ready to grace your sink, adding a touch of personalized flair to your home.
This project is particularly striking with vintage-style or colored bulbs. You can further customize your dispenser by decorating the bulb’s glass with glass paint or etched designs.
Project 4: Colorful Fairy Lights – Illuminating Your Space with Whimsy
Add a magical glow to any room with these colorful fairy lights, cleverly crafted from LED string lights and small balloons. This project is incredibly simple, requires no hollowing of light bulbs, and is perfect for creating a festive or whimsical atmosphere for parties, bedrooms, or outdoor spaces.
Materials for Colorful Fairy Lights:
- LED string lights (choose a string with individual, small bulbs)
- Assortment of small, colorful balloons
Directions for Colorful Fairy Lights:
- Prepare the Balloons: Take your colorful balloons. Using a pair of scissors, carefully cut off the small mouthpiece (the part you would typically blow into) from each balloon. This creates a wider, more flexible opening.
- Cover the LED Bulbs: Gently stretch each balloon over an individual LED bulb on your string lights. The cut end of the balloon should wrap around the base of the LED bulb, effectively “coloring” the light. Work slowly and carefully to avoid tearing the balloons or damaging the LED bulbs.
- Arrange and Light Up: Once each LED bulb is encased in a colorful balloon, arrange your newly transformed fairy lights anywhere you desire. Hang them along a wall, drape them around a mirror, or use them to decorate a canopy. Plug them in and watch as your space is instantly filled with a vibrant, playful glow.
This project is fantastic for adding a pop of color to children’s rooms, creating a festive ambiance for celebrations, or simply bringing a cheerful glow to your everyday environment. Experiment with different balloon colors and sizes to achieve various lighting effects.
General Tips for Your DIY Light Bulb Projects
- Safety First: Always prioritize safety. Wear protective eyewear and gloves when hollowing out bulbs. Handle glass carefully to prevent cuts.
- Bulb Variety: Different types of bulbs (incandescent, CFL, LED) have different internal structures. Incandescent bulbs are generally the easiest to hollow out. Exercise caution with CFLs as they contain mercury and should be handled with extreme care if you choose to hollow them (though generally not recommended for DIY without proper safety protocols). LEDs are usually encapsulated and not suitable for hollowing.
- Creative Bases: Don’t limit yourself to wood for bases. Consider using small stones, metal washers, or even clay to create unique stands for your terrariums or vases.
- Personalization: Feel free to customize your projects with paint, glitter, fabric, or other embellishments to match your personal style and home decor.
- Gift Ideas: These upcycled light bulb crafts make thoughtful and unique handmade gifts for friends and family.
Conclusion: Illuminate Your Home with Upcycled Treasures
Repurposing old light bulbs is a fantastic way to embrace creativity, promote sustainability, and add a touch of personal charm to your home. From enchanting miniature terrariums that bring nature indoors to elegant hanging vases and practical, stylish soap dispensers, the possibilities are endless. Even the simplest project, like transforming fairy lights with colorful balloons, can dramatically alter the ambiance of a room. By choosing to upcycle, you’re not just crafting; you’re contributing to a healthier planet and discovering the hidden potential in everyday objects. So, gather those old bulbs, unleash your inner artisan, and start creating something truly remarkable today. These projects prove that with a little imagination, even the most mundane items can be transformed into extraordinary works of art!
*All these images are credited to Cleverly via YouTube. Give their channel a visit and subscribe for more innovative DIY ideas!