
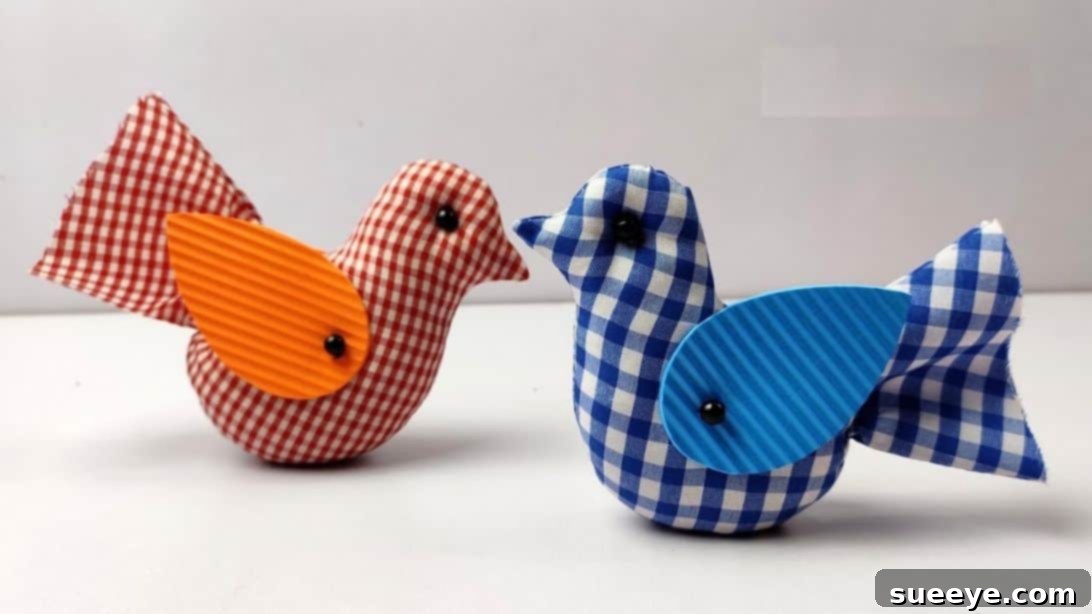
Welcome to a delightful crafting journey where you’ll transform ordinary scrap fabrics into extraordinary little fabric birds! This incredibly easy and rewarding sewing project is perfect for beginners and seasoned crafters alike. Not only is it a wonderful way to utilize those fabric remnants collecting dust, but it also allows you to create charming, personalized pieces for your home or as heartfelt gifts. Imagine a flock of these adorable birds perched on your shelves, hanging as festive ornaments, or even serving as aromatic sachets. Each bird carries a unique character, reflecting your choice of fabric patterns and personal creative touches. Get ready to unleash your creativity and bring these lovely textile creatures to life in just a few simple steps!
Why Sew Adorable Fabric Birds?
Fabric birds are more than just a craft; they’re a testament to sustainable creativity and personalized charm. In an age where minimizing waste is paramount, repurposing scrap fabrics into something beautiful and functional is a wonderfully eco-conscious choice. This project encourages you to dive into your fabric stash, giving new life to pieces that might otherwise be discarded. Beyond their eco-friendly appeal, these little birds offer immense versatility. They can be whimsical additions to a child’s nursery, elegant decorative accents in a living room, or thoughtful handmade gifts that carry a personal touch. The process itself is therapeutic and deeply satisfying, allowing you to unwind while engaging in a fulfilling creative endeavor. Whether you’re looking to enhance your home decor, create unique party favors, or simply enjoy the meditative rhythm of sewing, crafting fabric birds promises a joyful experience with charming results.
Essential Materials for Your Fabric Bird Project
Before you begin stitching, gather all your supplies. Having everything at hand ensures a smooth and enjoyable crafting process. Here’s a detailed list of what you’ll need:
- Cotton Fabric: Ideal for its ease of sewing and variety of patterns. This is where your scrap fabric collection truly shines! Choose fun patterns, solids, or a mix to create unique birds. You’ll need pieces large enough to cut out your bird pattern, roughly 12×8 inches per bird, folded.
- Ribbon: A small piece of ribbon (around 3-4 inches) is used to create a hanging loop. Select a color that complements your fabric or offers a nice contrast. Thin satin or grosgrain ribbons work beautifully.
- Foam Sheet: This is for crafting the wings. A thin craft foam sheet (EVA foam) provides a slight stiffness that helps the wings hold their shape. You can also experiment with felt or stiffened fabric for a different look.
- Black Beads: Small black beads (2-4mm) make perfect, expressive eyes for your birds. Alternatively, you could use embroidery floss to stitch French knots for eyes or even small buttons.
- Needle and Matching Thread: Essential for hand-sewing details and any touch-ups. Ensure your thread color blends well with your fabric. All-purpose polyester thread is usually sufficient.
- Sewing Machine: While the main body stitching can be done by hand, a sewing machine will make the process much quicker and give a more professional finish to the seams.
- Polyester Fiberfill: This soft, fluffy stuffing gives your bird its plump, squeezable body. It’s lightweight and hypoallergenic.
- Rice: A unique addition to the stuffing, rice adds a lovely weight and stability to the base of your bird, allowing it to sit upright nicely. You can use any type of uncooked rice.
- Iron and Ironing Board: Crucial for pressing fabric folds and seams, ensuring crisp, professional-looking results.
- Marking Pen or Fabric Chalk: For tracing your bird pattern onto the fabric. A disappearing ink pen or a fine chalk pencil is recommended.
- Bird Pattern: You can either print out a free bird template found online or unleash your inner artist and draw your own unique bird shape. Ensure it has a distinct head, body, and tail.
- Fabric Scissors: Sharp scissors specifically for fabric will ensure clean, precise cuts.
- Pins: To secure your pattern to the fabric and hold fabric layers together during sewing.
Step-by-Step Guide: How to Sew Your Adorable Fabric Bird
Follow these detailed instructions to craft your very own charming fabric bird. Take your time with each step, and don’t hesitate to personalize your creation!
Step 1: Preparing Your Pattern and Fabric
The foundation of your fabric bird begins with careful preparation. First, choose or create your bird pattern. If you’re drawing your own, aim for a simple silhouette with a defined head, body, and tail. Once your pattern is ready, grab your chosen cotton fabric. Cut a piece roughly 12 by 8 inches, or slightly larger than your pattern. Fold this fabric piece neatly in half, ensuring the right sides are together (this means the patterned or ‘pretty’ side of the fabric is facing inwards). Press this fold gently with a warm iron to create a crisp crease. This helps keep the fabric stable while you work. Now, position your bird pattern on top of the folded fabric, aligning the straight edge of the pattern (usually the bottom of the bird) with the folded edge of the fabric if your pattern is designed for it, or simply ensure it’s placed to maximize fabric use. Secure the pattern in place with several pins, making sure it doesn’t shift. Using your marking pen or fabric chalk, carefully trace the entire outline of the bird pattern onto the top layer of fabric. Next, take a small piece of ribbon, about 3 to 4 inches long. Fold it in half to create a loop. Carefully insert the raw ends of this folded ribbon underneath the fabric layers, positioning them precisely at the bird’s neck area, where the head meets the body. Make sure the loop itself extends inwards, away from the cutting line. Pin the ribbon ends securely in place between the fabric layers, ensuring they won’t slip during stitching. This loop will serve as a convenient hanger for your finished bird.
Step 2: Stitch, Assemble, and Refine the Bird’s Body
With your pattern traced and ribbon secured, it’s time to bring your bird to life with stitches. Using your sewing machine (or hand-sewing if preferred), carefully stitch directly along the traced marking line, following the outline of the bird. It’s crucial to leave an opening for turning and stuffing: do not stitch the straight edge of the bird’s tail. This section will be left open. Ensure you backstitch at the beginning and end of your stitching, especially where the ribbon is inserted, to reinforce the seam. Once stitched, carefully cut around your stitched bird shape, leaving a consistent seam allowance of approximately 1/8 inch (3mm) from your stitch line. This narrow allowance helps reduce bulk. Now, prepare the tail for turning: cut the raw edge of the tail opening straight across. To ensure smooth curves once turned right side out, make small notches or clips around the curved sections of the bird’s body, especially in the inward curves. Be careful not to cut through your stitch line. Then, through the unstitched opening at the tail, carefully turn the bird right side out. Use a blunt tool, like a chopstick or a turning tool, to gently push out all the curves and corners, particularly the beak and tail, making sure they are nicely defined. Press the entire fabric bird with an iron to smooth out any wrinkles and crisp up the seams. Now comes the unique stuffing process: begin by filling the head and upper body of the bird with polyester fiberfill, making it firm but not overly dense. Once you reach roughly the middle section of the body, switch to filling with rice. The rice will provide a lovely weight to the bird, helping it sit stably. Fill the bottom half of the body with rice, then switch back to polyester fiberfill for the upper part of the body, creating a nice blend. However, do not stuff the tail area; leave it unstuffed for flexibility. Once stuffed, hand-sew the opening at the tail closed using a ladder stitch or a similar invisible stitch. As you sew, gently pull the stitch lightly to create little scrunches or gathers on the tail, adding charming textural details. Finally, for the bird’s eyes, carefully sew a small black bead onto each side of the bird’s head using a needle and matching thread, ensuring they are positioned symmetrically and securely.
Step 3: Adding Charming Details and Crafting the Wings
With the body complete, it’s time to add the wings, giving your bird its distinct character. Start by preparing your wing pattern. You can either use a printed template or draw your own simple wing shape – a slightly elongated oval with one side more curved works well. Trace this wing pattern onto your foam sheet using a marking pen. Carefully cut out two identical wing shapes from the foam. These foam wings provide a nice structural element. For an extra touch of charm, take a small decorative bead (this could be a different color or size from the eyes if you wish) and thread it onto your needle with some matching thread. Sew this bead onto the front curved edge of each foam wing. This adds a subtle decorative detail and a hint of sparkle. Once your wings are ready, you will attach them to the bird’s body. The original tutorial implicitly shows the wings as an integrated part of the design or sewn on top. For a neat finish, position one wing on each side of the bird, slightly behind the neck area. You can secure them with a few discreet hand stitches, sewing through the foam and into the fabric body, ensuring they are firmly attached but still have a slight natural movement. Alternatively, for a quicker attachment, a strong fabric glue or hot glue can be used, though hand-stitching provides greater durability and a more crafted look. Take a moment to admire your creation; these small details truly bring your fabric bird to life!
Tips for Sewing a Perfect Fabric Bird
To ensure your fabric bird turns out beautifully and to make your crafting experience even more enjoyable, consider these helpful tips:
- Fabric Choices: Don’t limit yourself to just cotton! While cotton is beginner-friendly, try experimenting with flannel for a softer, cozier bird, or even linen for a more rustic look. Ensure your fabrics are tightly woven to prevent stuffing from poking through. Mixing coordinating patterns or using a solid for the body and a patterned fabric for the wings can add visual interest.
- Stuffing Alternatives: While polyester fiberfill and rice offer a great combination of softness and weight, you can experiment. For a fully weighted bird, you could use heavier materials like sand (sealed in a small bag for security) or poly pellets (crafting beads). For a purely decorative, lightweight bird, fiberfill alone is sufficient. For scented birds, add a sachet of dried lavender or cedar chips along with the fiberfill.
- Personalization Ideas: This is where your creativity truly shines! Instead of simple black beads for eyes, consider tiny embroidered French knots in contrasting thread. Add a small fabric flower, a tiny bow, or even a stitched-on patch to the bird’s body. Use fabric paint to add patterns or details to the wings. You could even use different colored ribbons for the hanging loop.
- Troubleshooting Common Issues: If your seams look puckered, try adjusting your sewing machine’s tension or stitch length. If turning the bird right side out is difficult, make sure your seam allowance isn’t too wide and that you’ve notched your curves sufficiently. For a smoother finish, always press your fabric thoroughly at each stage. If your bird doesn’t sit straight, adjust the rice distribution inside until it feels balanced.
- Safety First: If these birds are for small children, ensure all beads and small parts are securely sewn on or consider embroidering features instead to eliminate choking hazards.
Creative Uses for Your Handmade Fabric Birds
Once you’ve finished stitching your charming fabric birds, the possibilities for how to use them are endless! Here are some creative ideas to inspire you:
- Home Decor: Arrange them on shelves, mantelpieces, or windowsills for a touch of handmade warmth. Create a mobile for a nursery or hang them from branches as a unique centerpiece.
- Thoughtful Gifts: Handmade gifts are always cherished. These birds make excellent birthday presents, housewarming tokens, or even wedding favors. Personalize them with fabrics that match the recipient’s decor or interests.
- Festive Ornaments: With their built-in ribbon loops, these birds are perfect for hanging on Christmas trees, Easter branches, or as seasonal decorations throughout the year.
- Aromatic Sachets: Incorporate dried lavender, cedar shavings, or other fragrant potpourri with the fiberfill to create delightful scent diffusers for drawers, closets, or small rooms.
- Playful Cat Toys: If made without small, detachable parts (like securely sewn eyes or embroidered features), these weighted fabric birds can become charming, crinkly toys for your feline friends (ensure no small beads could detach).
- Keychains or Bag Charms: For a larger bird, you can attach a keyring to the ribbon loop and use it as a whimsical accessory for your keys or handbag.
- Pin Cushions: While small, if stuffed firmly, some of these birds could even double as decorative pin cushions for your sewing space.
Conclusion: Enjoy Your Adorable Creations!
Congratulations! You’ve successfully crafted your very own adorable fabric bird. This project not only breathes new life into your scrap fabric collection but also allows you to infuse your personal style into charming, handcrafted decor. From selecting the perfect fabric to adding those final, intricate details, each step is an opportunity for creative expression. We hope this detailed tutorial has empowered you to embrace the joy of sewing and the satisfaction of making something beautiful with your own hands. These little birds are more than just fabric and stuffing; they are a symbol of creativity, sustainability, and the simple pleasure of making. Display them proudly, gift them with love, and let them bring a smile to everyone who sees them. Happy crafting, and we encourage you to continue exploring the endless possibilities that handmade creations offer!
This comprehensive sewing tutorial is inspired by the talented Globe Studio One on YouTube. Their original video provides a fantastic visual guide to complement these written instructions. For more creative ideas, detailed tutorials, and inspiring projects, be sure to visit and subscribe to their wonderful channel!