
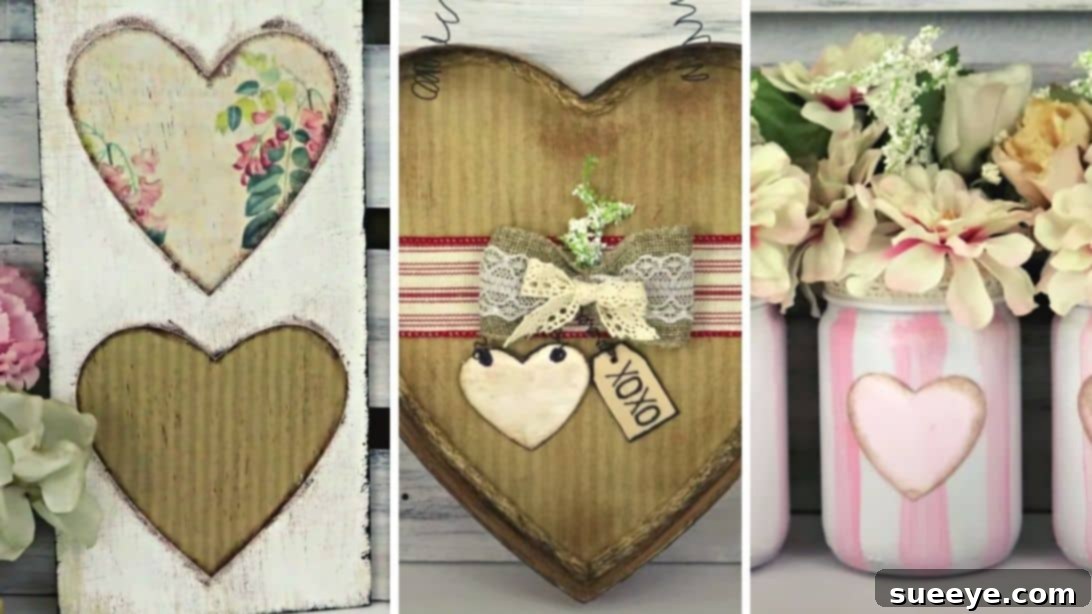
Transform Your Home with 5 Budget-Friendly Dollar Tree Valentine’s Day Decor Ideas
As the season of love approaches, what better way to express your affection than by creating charming, heartfelt decorations? If you’ve enjoyed crafting for past holidays, you’re in for a treat! We’ve gathered five incredibly easy and utterly adorable Valentine-themed DIY projects that you can craft almost entirely from materials found at your local Dollar Tree. These budget-friendly ideas will not only add a touch of rustic charm or sweet romance to your home but also make for thoughtful, handmade gifts. Special thanks to Hot Humble Pie via YouTube for inspiring this fantastic compilation of creative ideas.
Get ready to unleash your inner crafter and discover how simple it is to transform everyday items into stunning Valentine’s Day masterpieces!
Gather Your Crafting Essentials: Materials for Each Project
Before diving into the creative process, let’s ensure you have all the necessary supplies for each heartwarming project. Remember, the beauty of Dollar Tree crafts lies in their affordability and accessibility!
Craft #1: Rustic Sweetheart Signs
- Rectangle Dollar Tree signs or spare wood pieces
- Acrylic paints: White, brown, and black
- 4 heart printouts (from the internet)
- Glue stick
- Sponge (for distressing)
- Paintbrushes
Craft #2: Vintage Truck of Love Wall Decor
- Truck wall decor (if available at Dollar Tree) or a printed truck image
- Acrylic paints: White, brown, and black
- Parchment paper
- Carbon paper
- Permanent marker
- Plain/translucent acrylic paint or sealer
- Heart foam stickers
- Antique wax
- Superglue
- Small Valentine-themed sign or printed message
- Cardboard (if not using existing truck decor)
Craft #3: Charming Striped Mason Jars
- 3 glass jars (Mason jars or similar from Dollar Tree)
- White primer spray paint
- Pink acrylic paint
- Sponge (for stripes)
- Ribbon or lace trim
- Hot glue gun and glue sticks
- Foam hearts
- Artificial flowers (optional, for display)
Craft #4: Inspirational Message Hanger
- Large craft sticks (popsicle sticks)
- Small craft sticks
- Acrylic paints: White, brown, and black
- Printed sentence or quote on paper
- Drill with small bit
- Floral wire or thin craft wire
- Pencil (for shaping wire)
- Hot glue gun and glue sticks
Craft #5: Decorative Heart-Shaped Box
- Heart-shaped box (cardboard or wood)
- Decorative paper with a design
- White acrylic paint
- Sisal rope
- Antique wax
- Ribbon
- Small decorative bow
- Hot glue gun and glue sticks
- Small wooden stick (for tag)
- Foam heart
- Drill with small bit
- Thin craft wire
- Small artificial flower
Step-by-Step Directions: Crafting Your Valentine’s Masterpieces
Now that you have all your materials, let’s get crafting! Each project is designed to be straightforward and fun, perfect for an afternoon of creative expression.
Craft #1: Rustic Sweetheart Signs – A Touch of Farmhouse Love
- Prepare Your Canvas: Begin by applying a smooth, even coat of crisp white paint to your rectangular Dollar Tree signs or chosen spare wood pieces. This forms the perfect canvas for your rustic design, allowing subsequent layers to truly pop. Allow it to dry completely.
- Heartwarming Embellishments: While your base dries, print out four heart shapes from the internet. Choose simple, classic heart designs. Carefully cut out each heart, ensuring clean edges.
- Arrange and Attach: Once the white paint is dry, position two hearts on each wooden sign. Experiment with placement until you find an arrangement you love. Secure them firmly using a glue stick.
- Add Rustic Dimension: Dip a small sponge into brown paint and carefully dab it around the edges of each paper heart. This creates a subtle shadow and adds depth, making the hearts appear slightly distressed and integrated into the wood.
- Antique Wood Finish: To enhance the rustic, antique wood look, take a brush and apply a light wash of black and brown paint along the outer borders of the wooden signs. Use a dry brushing technique or blend the colors softly to mimic aged wood. This step truly transforms inexpensive signs into charming farmhouse decor.
- Display: These charming heart signs are perfect for a mantelpiece, a gallery wall, or as thoughtful gifts to loved ones. Their rustic appeal makes them versatile for various decor styles.
Craft #2: Vintage Truck of Love Wall Decor – Delivering Affection
- Truck Base Preparation: If you’re using a Dollar Tree truck wall decor, proceed to painting. If you’re creating your own, trace the shape of a truck onto sturdy cardboard and cut it out. Paint the entire truck shape white, creating a clean base for your design. Let it dry thoroughly.
- Detail Transfer Magic: Find an image of a vintage truck online with details you’d like to include. Place parchment paper over the screen or printout and carefully trace the key details of the truck.
- Transfer to Cardboard: Position the carbon paper face-down onto your white-painted cardboard truck. Layer your parchment paper tracing on top. Using a pencil, firmly re-trace all the lines on the parchment paper. This will transfer the truck details onto your cardboard.
- Outline and Define: Mix a small amount of white and brown paint to create a muted, antique shade. Use this mixture to carefully outline the transferred truck image, giving it a soft, vintage feel. Then, use a permanent marker to draw in the finer details, such as windows, wheels, and any decorative accents, ensuring crisp lines.
- Seal and Protect: Once all the details are drawn, apply a coat of plain or translucent acrylic paint over the entire surface. This acts as a protective sealant, preserving your artwork and giving it a finished look.
- Cloudy Heart Accents: Take your heart foam stickers. Using a sponge, lightly dab white paint onto them. This technique makes the hearts appear cloudy, soft, and slightly distressed. For an extra touch of vintage charm, accent the edges lightly with antique wax.
- Final Assembly: Carefully peel the backing from your cloudy foam hearts and strategically stick them onto the truck, perhaps in the truck bed or around the wheels, as if the truck is carrying love. Use superglue to securely attach a small Valentine’s sign or a printed “Happy Valentine’s Day” message onto the truck.
Craft #3: Charming Striped Mason Jars – Sweet and Simple Decor
These adorable jars are perfect for holding flowers, candies, or even as standalone decorative pieces for your Valentine’s Day display.
- Prime Your Jars: In a well-ventilated area, spray all three glass jars with white primer. Apply even coats and allow them to dry completely between applications, ensuring full coverage. This creates a uniform base for your paint.
- Create Pink Stripes: Once the primer is dry, dip a sponge into pink acrylic paint. Gently dab or lightly brush the sponge onto the jars to create charming, uneven pink stripes. Don’t aim for perfection; the slightly rustic look adds to their appeal. Allow the pink paint to dry.
- Embellish with Ribbon: Select a delicate ribbon or lace trim. Using a hot glue gun, carefully attach the ribbon around the top rim of each jar, securing the ends neatly.
- Heartfelt Accents: Adorn the center of each jar with a foam heart. You can use hot glue to secure them, or if they have an adhesive backing, simply stick them on.
- Final Touch and Display: For an extra touch of elegance, place fresh or artificial flowers inside the jars. These striped jars make beautiful centerpieces, shelf decor, or even thoughtful gifts filled with treats.
Craft #4: Inspirational Message Hanger – Crafting Words of Love
This project creates a rustic hanging sign, perfect for displaying a loving message or an inspirational quote.
- Construct the Base: Lay three large craft sticks side-by-side, ensuring they are aligned. Take a small craft stick and position it diagonally across the top of the three large sticks. Trace a line along both edges of the small stick onto the larger sticks. Repeat this process for the other side, creating a “V” shape or angled braces.
- Cut and Assemble: Carefully cut the large craft sticks along the marked lines. Reassemble the pieces to form a flat, sturdy panel. Apply hot glue at each gap where the sticks meet to secure them.
- Add Support Braces: Take two smaller pieces of craft stick and glue them horizontally across the back of your assembled panel. These act as additional braces, adding stability.
- Bottom Support: Cut a small craft stick slightly shorter than the width of your main panel and attach it at the bottom, creating a small shelf or decorative element.
- Base Painting: Dry brush the entire wooden assembly with white paint. Use a light hand to allow some of the natural wood grain to show through, enhancing the rustic appeal.
- Print Your Message: Print out your chosen sentence or quote on a piece of paper. Cut it out neatly.
- Attach the Message: Once the white paint is dry, use a glue stick to firmly attach the printed message onto the center of your wooden panel.
- Drill for Hanging: Carefully drill two small holes, one in each top corner of the wooden panel. These holes will be used for the wire hanger.
- Rustic Distressing: Lightly dry brush the wood with brown paint, creating subtle streaks to further enhance the aged, rustic look. Add a tiny bit of black paint on the very edges for depth and definition.
- Create the Hanger: Take a piece of floral or craft wire and wrap it tightly around a pencil to create a curly spring shape. Remove the wire from the pencil.
- Final Assembly and Display: Insert the ends of your curly wire into the two drilled holes at the top of your sign. Twist the ends securely on the back to hold them in place. Your beautiful, personalized message hanger is now ready to be displayed!
Craft #5: Decorative Heart-Shaped Box – A Sweet Keepsake
This charming heart-shaped box is perfect for storing small treasures, chocolates, or as a decorative accent piece.
- Prepare the Decorative Paper: Place your heart-shaped box onto your chosen decorative paper. Carefully trace the outline of the box onto the paper, then cut it out. Set this paper heart aside.
- Paint the Box: Paint the entire heart-shaped box with white acrylic paint. Apply even coats and allow it to dry completely. This creates a clean, uniform base.
- Line the Box: Once the white paint is dry, spread a layer of glue stick evenly inside the box. Carefully align and stick your decorative paper heart into the bottom of the box, ensuring it lies flat and smooth.
- Rope Embellishment: Take your sisal rope. To prevent fraying, you can lightly burn off the ends (use caution and adult supervision, or use a dab of glue). Using hot glue, attach the rope along the inside edges of the heart-shaped box, creating a neat border.
- Antique the Exterior: Apply antique wax to the exterior of the box. Use a light hand and buff gently to achieve a subtle, aged finish that complements the rustic rope.
- Ribbon Accent: Measure the width of the inside of your box. Cut a piece of ribbon to this size. Using hot glue, attach the ribbon to the middle of the inside of the box, creating a soft dividing line or decorative band. Add a small, pre-made decorative bow to the center of the ribbon for an extra touch of elegance.
- Crafting the Tag: Cut a large wooden stick into a smaller, tag-sized piece. Drill a small hole at one end of this wooden tag.
- Foam Heart Embellishment: Take a foam heart and drill a small hole at its top as well.
- Top Hanger Wire: Carefully poke a small hole through the top of the heart-shaped box. Insert a piece of thin craft wire, rolled into a curly spring shape, through this hole, securing it inside the box.
- Mini Hanger Wire: Create a smaller curly wire for the foam heart. Attach one end to the foam heart and the other to the curly wire inside the box, allowing the foam heart to dangle prettily.
- Final Floral Touch: To complete this charming piece, add a small artificial flower to the top of the box, perhaps near where the main wire hanger is attached.
Pro Tips for Dollar Tree Crafting Success
- Patience is Key: Always allow paint and glue to dry completely between steps. Rushing can lead to smudges or less durable finishes.
- Ventilation for Sprays: When using spray primer or paint, always work in a well-ventilated area, preferably outdoors, and wear appropriate protective gear.
- Embrace Imperfection: Dollar Tree crafts often have a charming, handmade quality. Don’t stress over minor imperfections; they add to the unique character of your creations.
- Personalize Everything: Feel free to change colors, add glitter, or swap out embellishments to truly make these projects your own. Your personal touch is what makes them special!
- Stock Up: If you find a Dollar Tree item that’s perfect for crafting, consider buying a few extras. Inventory can change quickly!
These five Dollar Tree DIY ideas offer a fantastic way to celebrate Valentine’s Day without breaking the bank. Whether you’re aiming for a rustic farmhouse aesthetic, a touch of vintage charm, or simply sweet and simple decorations, these projects provide an accessible and fun crafting experience. Not only will you enjoy the process of making them, but you’ll also create lasting memories and beautiful pieces that will fill your home with love.
So, gather your supplies, put on your favorite crafting playlist, and get ready to create some heartwarming decor. Happy crafting, and Happy Valentine’s Day!
*All images and original inspiration for these crafts are credited to Hot Humble Pie via YouTube. We highly recommend visiting her channel and subscribing for more amazing DIY inspiration!