
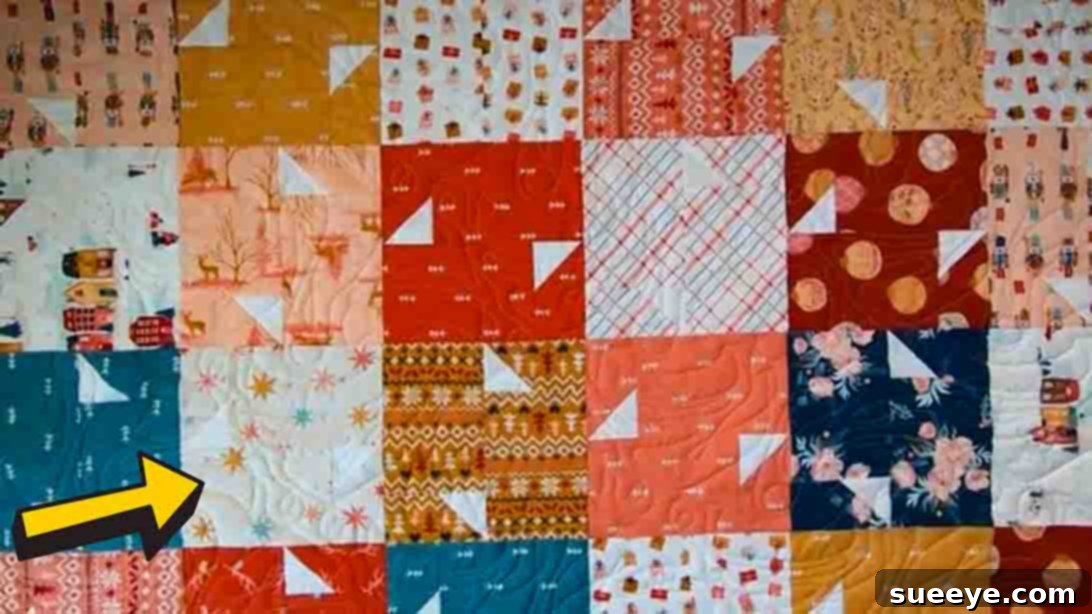
Are you searching for your next inspiring quilt project? Look no further than the captivating Flurries Layer Cake Quilt! This delightful pattern, brilliantly demonstrated by Moonkin Stitchery on YouTube, offers a refreshing blend of simplicity and elegance. It’s the ideal endeavor for anyone looking to create a beautiful quilt in a weekend, or craft a truly personalized gift that will be cherished for years to come. What makes this project truly appealing is its straightforward nature, primarily utilizing pre-cut layer cakes and a single background fabric. This means less cutting and more sewing, allowing you to dive into the joy of quilting sooner.
RELATED: Prince’s Pond Layer Cake Quilt Pattern – Explore another fantastic layer cake quilt pattern for more creative inspiration!
The Flurries Layer Cake Quilt has quickly become a go-to pattern in the quilting community, especially for those with a stash of gorgeous layer cakes waiting to be transformed. Its ease of construction makes it perfect for beginners taking their first steps into the world of quilting, while experienced quilters will appreciate its quick finish and striking visual appeal. The pattern yields a sophisticated design that looks far more complex than it actually is, making it incredibly rewarding. If you’re on the hunt for a layer cake project that promises both enjoyment and a stunning outcome, we wholeheartedly recommend giving this one a try—you certainly won’t be disappointed. Follow along with our detailed instructions and refer to the original video tutorial below for a comprehensive, step-by-step guide.
Why Choose the Flurries Layer Cake Quilt?
This pattern stands out for several compelling reasons. Firstly, it leverages the convenience of layer cakes, which are collections of 10-inch fabric squares from a specific fabric line. This not only ensures a coordinated and harmonious look for your quilt but also significantly reduces the initial cutting time, a common barrier for many quilters. Secondly, the design itself is inherently forgiving yet visually dynamic. The “flurries” effect is created through clever block rotation, giving the quilt a sense of movement and depth without requiring intricate piecing. It’s a fantastic way to showcase a beautiful fabric collection or to create a themed quilt for any occasion. Whether you’re making a snug throw for your sofa, a charming baby quilt, or a thoughtful wedding gift, this pattern adapts beautifully to various fabric styles and color palettes.
Materials and Essential Tools:
To embark on your Flurries Layer Cake Quilt journey, you’ll need just a few key materials and some standard quilting tools. Gathering everything beforehand ensures a smooth and enjoyable crafting process.
- Layer Cake (10″ squares): A standard layer cake typically contains 42 squares. This pre-cut bundle is the star of our quilt, offering a coordinated assortment of fabrics that eliminate the need for extensive fabric selection and initial cutting. The variety within a single layer cake will give your quilt a rich and diverse appearance.
- 1/4 yard of Background Fabric: This fabric provides contrast and allows the vibrant layer cake prints to truly pop. Choose a solid, a tone-on-tone, or a subtle blender fabric that complements your layer cake beautifully. A neutral color like white, cream, or a light gray often works wonderfully, but don’t hesitate to experiment with bolder choices if they fit your aesthetic.
Essential Quilting Tools:
While the materials list is short, having the right tools will make all the difference in achieving precise cuts and seams, leading to a professional-looking finish.
- Rotary Cutter: Essential for quick and accurate fabric cutting. A sharp blade is paramount for clean edges.
- Self-Healing Cutting Mat: Protects your work surface and extends the life of your rotary blade.
- Quilting Rulers: A few clear acrylic rulers (e.g., 6.5″ x 24.5″, 12.5″ square) are invaluable for measuring and cutting.
- Sewing Machine: A reliable machine with a good quarter-inch seam foot will ensure consistent seam allowances.
- Thread: High-quality polyester or cotton thread that matches or blends with your fabrics.
- Fabric Scissors: For clipping threads and small cuts.
- Iron and Ironing Board: Crucial for pressing seams flat and accurately at every stage. A well-pressed quilt block is a happy quilt block!
- Pins or Fabric Clips: To hold fabric pieces together securely before sewing.
- Fabric Marker or Pencil: For drawing lines on the wrong side of your fabric, especially for half-square triangle (HST) units.
Getting Started: Preparation Tips
Before you begin cutting and sewing, a little preparation can go a long way in ensuring a successful project. Consider these tips to set yourself up for quilting success:
- Pre-wash Your Fabrics (Optional but Recommended): Some quilters prefer to pre-wash their fabrics to prevent shrinkage and color bleeding, especially if combining different fabric types or colors. If you choose to pre-wash, dry and press your fabrics thoroughly before cutting.
- Press Your Layer Cake Squares: Even though they are pre-cut, your layer cake squares might have creases from packaging. Give each square a good press to ensure they are perfectly flat, which is critical for accurate cutting and piecing.
- Organize Your Workspace: A tidy workspace with all your tools within reach will make the process more efficient and enjoyable.
Directions: Step-by-Step Flurries Quilt Tutorial
Step 1: Precision Cutting and Unit Assembly
Accuracy in cutting is the foundation of any well-made quilt. Take your time with this initial stage to ensure all your pieces are the correct size.
Begin by taking your 1/4 yard of background fabric. Subcut this into eight 2 1/2″ squares. These smaller squares will be used to create the striking “flurries” effect within your quilt blocks.
Next, move on to your layer cake squares. For each of your 42-count 10″ squares, you will perform specific cuts. From each 10″ square, subcut two rectangles measuring 2 1/2″ x 4 1/2″. These will be the smaller accent pieces for your blocks. Additionally, from the same 10″ square, subcut two larger rectangles measuring 4 1/2″ x 6 1/2″. These will form the main components of your quilt blocks. Repeat this precise cutting process for all 42 of your 10″ layer cake squares, ensuring consistency across all pieces.
Once all your fabric pieces are accurately cut, you’re ready to begin assembling the individual units that make up your blocks. Take one 2 1/2″ x 4 1/2″ rectangle (from a layer cake print) and one background 2 1/2″ square. On the wrong side of your background square, use a fabric marker or pencil to draw a clear diagonal line from one corner to the opposite corner. This line will serve as your sewing guide for creating a precise half-square triangle-like unit.
Now, place the background square right sides together onto the layer cake rectangle. Position it on the left side of the rectangle, aligning the raw edges carefully. Pin in place to prevent shifting. Sew directly along the diagonal line you just drew. After sewing, use your rotary cutter to trim away the excess fabric. Measure 1/4″ away from your sewn line towards the corner, then cut. Press the seam open or towards the darker fabric (the layer cake print) to reduce bulk and ensure a flat unit. You’ve just created your first “unit” for the flurries block!
Repeat these steps with a second 2 1/2″ x 4 1/2″ rectangle (from the same layer cake print) and another background 2 1/2″ square, mirroring the placement of the background square on the right side of the rectangle this time. This ensures you create two perfectly matching print units that will mirror each other, forming the characteristic “flurries” effect when combined later. Precision here is key for crisp points in your finished quilt.
Step 2: Assembling Quilt Blocks and Constructing the Quilt Top
With your individual units prepared, it’s time to bring them together to form your quilt blocks. This step is where the magic of the “flurries” design truly begins to emerge.
Take the two matching print units you just created in Step 1. You will also need the two 4 1/2″ x 6 1/2″ rectangles cut from the same original layer cake square. Arrange these pieces on your work surface to visualize the block. First, sew one of the 2 1/2″ x 4 1/2″ units (the one with the background square on the left) to the left side of one of the 4 1/2″ x 6 1/2″ rectangles, ensuring right sides are together and raw edges are aligned. Press the seam open or towards the larger rectangle.
Next, sew the other 2 1/2″ x 4 1/2″ unit (the one with the background square on the right) to the right side of the remaining 4 1/2″ x 6 1/2″ rectangle. Again, press your seams. Now, carefully sew these two newly formed rectangle units together along their longer 6 1/2″ sides. Ensure that the background squares are facing outwards, forming a diagonal line across the block. When pieced correctly, this will form a completed 8 1/2″ square quilt block. Take your time matching seams and pressing frequently to ensure your block lays flat and square. Consistent 1/4-inch seam allowances are crucial here for your blocks to fit together perfectly.
Repeat these steps until you have a total of 42 individual quilt blocks. This process can be efficiently done using chain piecing, where you feed multiple sets of fabric pieces through your machine without lifting the presser foot between them, then clip them apart. This saves time and thread.
Once all 42 blocks are complete, the exciting part of laying out your quilt top begins! Find a large flat surface—this could be your design wall, the floor, or a bed—and arrange your blocks side by side in a 6 x 7 layout (6 blocks wide by 7 blocks long). The key to achieving the mesmerizing “flurries” effect is to rotate every other block 90 degrees. This creates a dynamic, pinwheel-like pattern that gives the quilt its signature movement and visual interest. Experiment with the rotation until you are pleased with the overall flow and balance of the design. Step back frequently to view your layout from a distance.
With your layout finalized, begin sewing the blocks together to create rows. Take the first two blocks in a row, place them right sides together, and sew with a 1/4″ seam. Continue adding blocks to form each row. Press your seams after each row. For flatter seams and to help with matching points, consider pressing seams in alternating directions for adjacent rows (e.g., press seams to the right for row 1, to the left for row 2). This allows the seams to “nest” perfectly when you join the rows.
Finally, sew these completed rows together to finish your stunning quilt top. Pin extensively when joining rows, especially at seam intersections, to ensure all your points align beautifully. Press the entire quilt top one last time from the front to smooth out any wrinkles and fully set your seams. You now have a magnificent Flurries Layer Cake Quilt top, ready for the next stages of quilting!
Beyond the Quilt Top: Finishing Your Masterpiece
While the tutorial focuses on creating the quilt top, remember that a finished quilt involves a few more crucial steps: layering, quilting, and binding. Each stage adds to the durability and beauty of your project.
- Layering (Making the Quilt Sandwich): You’ll need batting (the soft inner layer) and backing fabric. Lay your backing fabric wrong side up, then smooth your batting on top, and finally, your completed quilt top right side up. Secure these three layers together with basting pins, spray basting, or long hand stitches to prevent shifting during quilting.
- Quilting: This is the process of sewing through all three layers to hold them together and add texture. You can choose simple straight-line quilting, stitch-in-the-ditch (quilting along the seam lines), or free-motion quilting for more intricate designs. The “flurries” design would look wonderful with simple diagonal lines or a classic meander.
- Binding: The final step involves encasing the raw edges of your quilt with a strip of fabric. This not only gives the quilt a clean, finished look but also protects the edges from wear. You can sew your binding on by machine or by hand for a more traditional finish.
Tips for a Perfect Flurries Quilt
- Scant 1/4-Inch Seam: Most quilters use a “scant” 1/4-inch seam allowance, which is just a thread’s width less than a true 1/4-inch. This small adjustment helps account for the fabric taken up by the thread in the seam, ensuring your blocks finish at the correct size.
- Pressing is Key: Pressing after every seam, rather than ironing (which can stretch fabric), ensures flat blocks and accurate dimensions. Pressing seams open or to one side (usually the darker fabric) can impact bulk and nesting.
- Stay Organized: Keep your cut pieces organized by print or size to avoid confusion, especially with 42 blocks. Small trays or plastic containers can be very helpful.
- Enjoy the Process: Quilting is a journey, not just a destination. Embrace any imperfections as unique characteristics of your handmade creation.
Flurries Layer Cake Quilt Tutorial – Your Next Creative Adventure Awaits!
The Flurries Layer Cake Quilt is a truly rewarding project that combines the ease of pre-cuts with a captivating design. Whether you’re a seasoned quilter or just starting out, this pattern from Moonkin Stitchery offers a wonderful opportunity to create something beautiful and functional. Its quick construction time makes it an excellent choice for last-minute gifts or simply to brighten your own home with a touch of handmade charm. So, gather your materials, set up your sewing machine, and prepare to be delighted by the process and the stunning result. Don’t forget to watch the full video tutorial for visual guidance on each step. Happy quilting!