
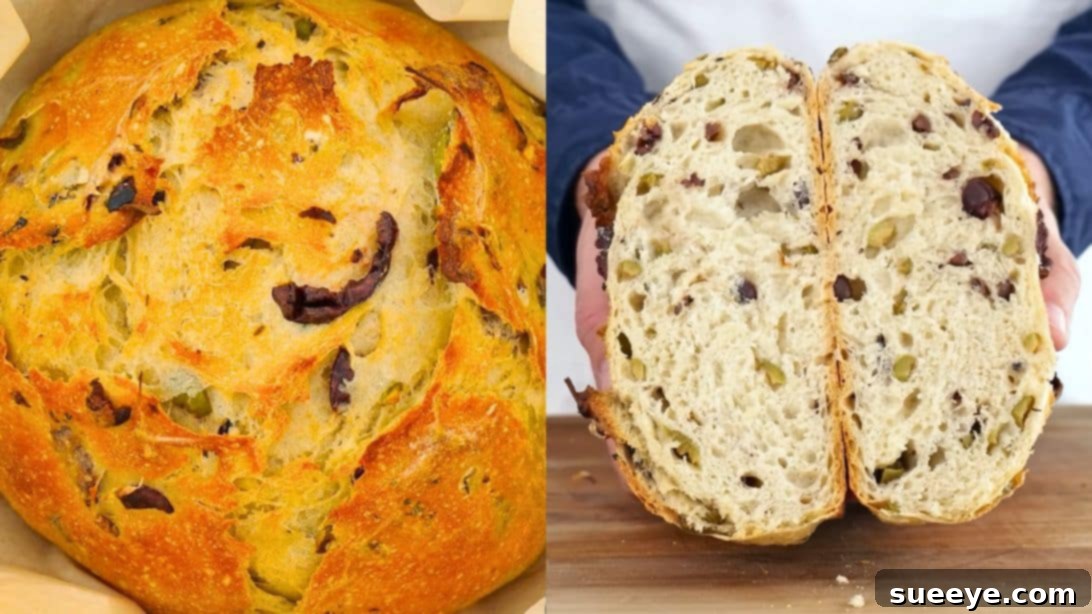
Bake the Perfect No-Knead Olive Bread: An Artisan Delight Made Easy
Imagine the irresistible aroma of freshly baked bread filling your kitchen, its crust golden and crisp, its interior soft and studded with savory olives. If you’ve always dreamed of baking artisan bread but hesitated due to complex techniques, Vincenzo’s Plate brings you a game-changer: the No-Knead Olive Bread recipe. This ingenious method allows anyone, regardless of baking experience, to create a truly spectacular loaf that rivals any bakery offering. It’s incredibly delicious, surprisingly simple, and a must-try for any olive enthusiast.
While many artisan bread recipes demand extensive kneading and a significant time commitment, this particular olive bread stands out. Its unique combination of crunchy crust and soft, flavorful crumb bursting with briny goodness from both Kalamata and green olives is simply unparalleled. It’s not just bread; it’s an experience, a perfect companion for a charcuterie board, a flavorful sandwich base, or simply enjoyed with a drizzle of olive oil.
The Magic of No-Knead Baking: Artisan Bread Without the Fuss
The thought of baking bread can often conjure images of endless kneading, sticky dough, and tiring arm workouts, especially if you don’t own a stand mixer. But here’s the beautiful secret behind no-knead bread: time does the work for you. This revolutionary technique leverages a long, slow fermentation process to develop the gluten structure in the dough, eliminating the need for manual kneading. This means you can achieve that desired chewy texture and airy crumb with minimal effort, making it the ideal recipe for beginners and busy individuals alike.
While the actual hands-on time for this no-knead olive bread is minimal, it does require patience. The dough undergoes a series of rises and rests, allowing complex flavors to develop and the texture to transform. This extended fermentation is precisely what gives the bread its signature rustic charm and deep, nuanced taste. The wait, though substantial, is an essential part of the process and absolutely worth it for the incredible result you’ll savor with every single bite.
RELATED: Enhance your bread-making repertoire with this equally simple 5-Ingredient No-Knead Sandwich Bread.
A Symphony of Flavors: Why This Olive Bread Will Be Your New Favorite
What sets this particular no-knead bread apart is its generous inclusion of olives. Unlike a plain artisan loaf, which offers a blank canvas, this bread is a celebration of savory, briny notes that perfectly complement the earthy flavor of the crust. The recipe calls for a blend of Kalamata and green olives, creating a delightful contrast in texture and taste. Kalamata olives provide a rich, fruity, and slightly sweet flavor, while green olives contribute a sharper, more piquant tang. Together, they infuse the bread with an intoxicating aroma and a burst of flavor in every slice, making it truly irresistible for olive lovers.
Serve your warm, aromatic olive bread with this delightful Restaurant Style Bread Dip for an elevated culinary experience. The combination is simply divine and perfect for entertaining or a cozy night in.
Essential Ingredients for Your Rustic Olive Loaf
Crafting this incredible olive bread requires only a handful of common ingredients, emphasizing quality over quantity. Each component plays a vital role in developing the unique flavor and texture of the finished loaf. Here’s what you’ll need to gather:
- 1.7 oz (approximately ½ cup) Pitted Kalamata Olives: These dark, almond-shaped olives bring a rich, fruity, and slightly tangy flavor to the bread. Ensure they are pitted for convenience.
- 3.5 oz (approximately 1 cup) Pitted Green Olives: Lighter in flavor and firmer in texture, green olives add a bright, briny counterpoint to the Kalamatas. Again, pitted is best.
- 14 oz (approximately 3 cups) All-Purpose or Bread Flour: The foundation of your bread. High-quality flour will yield the best results for crumb and texture.
- 0.2 oz (approximately 2 teaspoons) Active Dry Yeast: The leavening agent responsible for the dough’s rise and airy texture. Ensure it’s fresh for optimal activation.
- 1 tablespoon of Salt: Crucial for flavor and also plays a role in controlling yeast activity and strengthening the gluten structure.
- 1.2 cups of Water: The hydration for your dough. Lukewarm water is ideal for activating yeast without killing it.
A note on ingredients: while the recipe is forgiving, using good quality olives will significantly impact the final flavor. Choose olives that are plump and firm, preferably from a brine, and ensure they are well-drained before use.
Crafting Your Olive Bread: A Step-by-Step Guide to Perfection
Follow these detailed instructions carefully to ensure your no-knead olive bread turns out perfectly crusty, flavorful, and a true testament to artisan baking.
Step 1: Prepare the Olives with Precision
Begin by taking your pitted Kalamata and green olives and carefully cutting them into small, manageable pieces. The goal here is to achieve an even distribution throughout the dough, ensuring every slice of bread boasts a delightful olive burst. You can chop them finely or leave them slightly coarser for more textural contrast – the choice is yours, but aim for consistency.
Step 2: Combine the Dry Elements
In a large mixing bowl, combine all your dry ingredients: the measured flour, salt, and dry yeast. Use a whisk or a spoon to mix these thoroughly. This ensures that the yeast and salt are evenly distributed throughout the flour, which is crucial for uniform leavening and flavor in the final loaf.
Step 3: Integrate Wet and Dry Ingredients for Dough Formation
Pour about half of the measured water into your bowl of dry ingredients. Using a wooden spoon or a sturdy spatula, mix until the water is mostly incorporated and you have a shaggy, somewhat clumpy dough. At this point, add your chopped olives and the remaining water. Continue mixing the dough until all the flour is fully hydrated and there are no visible dry white spots. The dough will be quite wet and sticky, which is exactly what you want for a no-knead recipe.
Step 4: The Initial Fermentation: First Rise at Room Temperature
Once your dough is well-mixed, cover the bowl tightly with plastic wrap. This prevents the dough from drying out and creates a humid environment for fermentation. Place the covered bowl at room temperature (ideally between 68-75°F or 20-24°C) and let it rest for approximately 6 hours. During this period, the yeast will begin to work its magic, consuming sugars and producing carbon dioxide, which causes the dough to rise and develop flavor.
Step 5: The Overnight Chill: Enhancing Flavor and Texture
After the initial 6-hour rise at room temperature, transfer the covered bowl directly into your refrigerator. Allow the dough to chill overnight, typically for 8 to 12 hours. This cold fermentation process is crucial for deepening the bread’s flavor profile, improving its texture, and making the dough much easier to handle the following day.
Step 6: Preparing for Shaping: From Bowl to Work Surface
The next day, remove the dough from the refrigerator. Lightly wet your hands with water. This prevents the very sticky dough from adhering to your fingers. Gently loosen the dough from the sides of the bowl and carefully transfer it onto a lightly floured work surface or a wooden chopping board. Try to handle the dough as little as possible to avoid deflating it excessively.
Step 7: Folding and Shaping the Dough
With your hands still slightly wet, gently fold the dough over on itself a few times. This simple folding technique helps to build strength and structure within the dough. After a few folds, carefully gather the edges of the dough and tuck them underneath, rotating the dough to form it into a large, round ball. Aim for a relatively tight surface tension on the top of the dough. Once shaped, carefully transfer this dough ball onto a piece of parchment paper, which will be used for baking.
Step 8: The Final Proof: A Rest Before Baking
Take a large bowl and line it generously with a clean tea towel or a cloth, ensuring it is lightly floured to prevent sticking. Carefully place the dough ball, still on its parchment paper, into the lined bowl. Cover the bowl with another cloth or plastic wrap and allow it to rest at room temperature for approximately 2 hours. This final proof gives the dough one last opportunity to rise and become airy before hitting the oven.
Step 9: Preheat Your Oven and Dutch Oven
Once the first hour of the final proof has passed (so, with about 1 hour remaining for the dough), preheat your oven to 446°F (230°C) with the fan-forced setting, if available. Crucially, place an empty Dutch oven (with its lid) inside the oven as it preheats. This allows the Dutch oven to get incredibly hot, creating an ideal environment for baking, mimicking a professional bread oven. Let it heat for at least an hour to ensure it reaches the target temperature.
Step 10: The Grand Finale: Baking to Golden Perfection
After the full 2 hours of the final proof have elapsed, your dough should look visibly risen and airy. Carefully remove the dough from the bowl, keeping it on the parchment paper. Using a sharp knife or a bread lame, make a cross-cut (or any desired pattern) on the top surface of the dough. This scoring allows the bread to expand beautifully during baking, preventing uncontrolled cracks and creating a stunning aesthetic.
With extreme caution, remove the preheated Dutch oven from the oven (it will be intensely hot!). Carefully transfer the dough, still on its parchment paper, into the hot Dutch oven. Place the lid back on and immediately return it to the oven. Bake for approximately 30 minutes at 446°F (230°C). The lid traps steam, which is essential for developing that wonderfully crisp and chewy crust and achieving maximum “oven spring.”
After 30 minutes, carefully remove the lid from the Dutch oven. This allows the steam to escape and the crust to brown beautifully. Continue baking uncovered for another 15 to 20 minutes, or until the bread achieves a deep golden-brown color and sounds hollow when tapped on the bottom. Once baked, carefully remove the bread from the Dutch oven and transfer it to a wire rack to cool completely. Resist the urge to cut into it immediately; cooling allows the internal structure to set and flavors to fully develop.
Achieving Perfection: Expert Tips for Your No-Knead Olive Bread
While the no-knead method is forgiving, a few pointers can elevate your olive bread from great to absolutely exceptional:
- Don’t Rush the Rises: The long fermentation is the cornerstone of this recipe. Resist the temptation to shorten the resting times, as this significantly impacts flavor development and crumb structure.
- Water Temperature Matters: Ensure your water is lukewarm, not hot, to activate the yeast effectively without killing it. Around 100-110°F (38-43°C) is ideal.
- Quality Ingredients: While simple, the quality of your flour and olives makes a noticeable difference. Opt for unbleached all-purpose or bread flour, and fresh, flavorful olives.
- The Dutch Oven Advantage: A heavy-bottomed Dutch oven is crucial for achieving that signature crust. It acts like a mini-oven, trapping steam and providing even heat. If you don’t have one, a sturdy lidded pot or even a baking stone with a pan of water for steam can work, though results may vary.
- Cool Completely: This is perhaps the hardest step, but vital. Slicing into hot bread can result in a gummy texture. Allow the bread to cool on a wire rack for at least 1-2 hours before cutting, allowing residual heat to complete the cooking process and set the crumb.
- Storage: Store your cooled olive bread at room temperature in a paper bag or a breathable bread box to maintain its crustiness. For longer storage, freeze sliced portions.
Beyond the Basics: Variations and Serving Suggestions
Once you’ve mastered this classic no-knead olive bread, feel free to experiment with additions to customize it to your taste:
- Herbs: Incorporate fresh rosemary, thyme, or oregano into the dough along with the olives for an aromatic twist.
- Cheese: A handful of grated Parmesan or crumbled feta cheese can add another layer of savory goodness. Add it during the final mixing stage with the olives.
- Sun-Dried Tomatoes: For a different Mediterranean flair, add chopped sun-dried tomatoes (oil-packed and drained) along with the olives.
- Spicy Kick: A pinch of red pepper flakes can introduce a subtle warmth.
This versatile olive bread pairs wonderfully with a variety of dishes. Serve it alongside rich stews, hearty soups, or crisp salads. It’s magnificent as part of a Mediterranean-inspired spread with hummus, feta, and fresh vegetables. Use it to make gourmet sandwiches, bruschetta, or simply tear off a piece and dunk it into your favorite olive oil or the suggested restaurant-style bread dip. Its robust flavor means it can stand alone as a star.
Conclusion: Your Artisan Bread Journey Starts Here
Baking this No-Knead Olive Bread isn’t just about creating a delicious loaf; it’s about discovering the joy and satisfaction of making something truly wonderful with your own hands, with surprisingly little effort. Vincenzo’s Plate has provided us with a fantastic, foolproof recipe that transforms simple ingredients into an extraordinary culinary delight. Embrace the simplicity of the no-knead method, savor the briny burst of olives, and delight in the crunchy crust and tender crumb. This recipe proves that artisan bread is well within reach for every home baker. Go ahead, give it a try, and prepare to impress yourself and everyone lucky enough to share a slice!
No-Knead Olive Bread Recipe Summary
For quick reference, here are the key steps and ingredients for your delicious no-knead olive bread:
- Ingredients: 1.7 oz pitted Kalamata olives, 3.5 oz pitted green olives, 14 oz flour, 0.2 oz dry yeast, 1 tablespoon salt, 1.2 cups water.
- Preparation: Chop olives. Mix flour, salt, yeast. Add half water, then olives and remaining water; mix until no dry spots.
- First Rise: Cover bowl, rest at room temperature for 6 hours.
- Cold Fermentation: Refrigerate overnight.
- Shaping: Wet hands, transfer dough to floured surface. Fold a few times, form into a ball, place on parchment paper.
- Final Proof: Place dough (on parchment) in a tea towel-lined bowl. Cover and rest for 2 hours.
- Baking Prep: After 1 hour of final proof, preheat oven to 446°F (230°C) with an empty Dutch oven inside for at least 1 hour.
- Baking: Score dough. Carefully transfer dough (on parchment) to hot Dutch oven. Bake with lid on for 30 minutes at 446°F. Remove lid, bake uncovered for 15-20 minutes until golden.
- Cooling: Transfer to a wire rack and cool completely before slicing.