
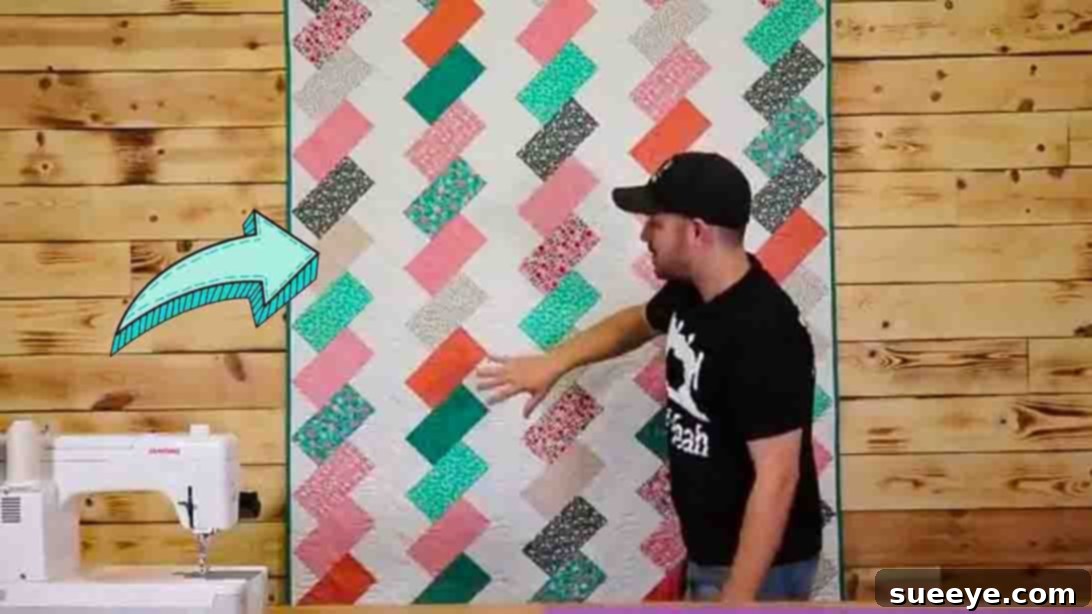
Welcome to the wonderful world of quilting, where creativity meets comfort! Today, we’re diving into one of my absolute favorite patterns: the beautiful Side Step Quilt. This design, popularized by Sew Yeah on YouTube, is a true gem. Its intricate appearance might make it seem challenging, but I assure you, it’s incredibly beginner-friendly and immensely satisfying to create.
From the moment I first laid eyes on this stunning pattern, I was captivated. It quickly became a go-to project, especially when I wanted to craft a heartfelt gift for friends and family. What I love most is its versatility – simply by swapping out different fabric patterns and colors, you can achieve a completely unique look every time. Whether you’re new to quilting or a seasoned pro looking for a quick and rewarding project, the Side Step Quilt offers a fantastic creative outlet. Follow along with our detailed instructions and refer to the original video tutorial to master this gorgeous design.
Master the Side Step Quilt: An Easy & Stunning Pattern for Every Quilter
The Side Step Quilt stands out with its dynamic, diagonal design that creates a beautiful sense of movement and depth. It’s a pattern that looks far more complex than it actually is, making it incredibly rewarding for quilters of all skill levels. The magic lies in its clever use of fabric strips and strategically cut triangles, which come together to form an eye-catching staircase-like effect across your quilt top. This project isn’t just about sewing; it’s about playing with color, contrast, and geometry to bring a unique piece of textile art to life.
For beginners, this pattern is a perfect introduction to essential quilting techniques such as accurate cutting, consistent seam allowances, and efficient block assembly. Experienced quilters will appreciate its speed and the endless possibilities for customization, allowing them to experiment with various fabric collections and themes. Imagine a vibrant quilt for a child’s bedroom, a serene, neutral-toned one for a modern living space, or a festive design for holiday decor – the Side Step Quilt can adapt to any vision. Let’s gather our supplies and get ready to transform fabric into a functional masterpiece!
Essential Materials for Your Side Step Quilt Journey
Before we dive into the fun of cutting and sewing, it’s crucial to have all your materials organized and ready. The right fabrics and tools will make your quilting experience smooth and enjoyable. Here’s a detailed list of what you’ll need to create your stunning Side Step Quilt. Remember, precision in measuring and cutting is key, so ensure your tools are sharp and accurate.
- 1/2 yard binding fabric: This will be used to create the border that finishes the edges of your quilt. Choose a fabric that complements or contrasts beautifully with your main quilt top fabrics.
- Backing fabric: You will need approximately 3 – 1/2 yards of backing fabric. This fabric will form the bottom layer of your quilt sandwich. Consider a soft, durable fabric that will feel comfortable against the skin.
- Batting: While not explicitly listed, you will need a piece of quilt batting roughly 3 – 1/2 yards to match your backing. Batting provides warmth, loft, and helps give your quilt its texture.
- General quilting supplies: Rotary cutter with a fresh blade, self-healing cutting mat, quilting rulers (various sizes are helpful, especially a large rectangular one), fabric scissors, sewing machine, good quality sewing thread (cotton is recommended), pins or fabric clips, an iron and ironing board. These tools are indispensable for accurate and efficient quilting.
- Free pattern: Don’t forget to download the official free pattern for precise measurements and visual guidance on block placement. Click here to get your free pattern!
Fabric A: Your Main Design Elements (Layer Cake)
For Fabric A, you’ll need one pack of 42 pre-cut layer cake squares. A layer cake typically consists of 10-inch by 10-inch squares, making it incredibly convenient for starting projects without extensive initial cutting. These squares will form the vibrant “steps” of your quilt, so choose a collection that features colors and patterns you adore. The variety within a layer cake pack will add wonderful visual interest and depth to your finished quilt, making each step unique and captivating.
Fabric B: The Essential Background Fabric
Fabric B will serve as the background, allowing your Fabric A prints to truly pop. You’ll need 1 5/8 yards of this background fabric. A solid or a subtle tone-on-tone print works best here, as it provides a visual resting place and enhances the “side step” effect. Consider a crisp white, a soft cream, a light gray, or a coordinating solid that highlights your chosen layer cake prints without competing with them. This contrast is fundamental to the quilt’s striking design and helps define the diagonal movement.
Step-by-Step Directions to Craft Your Side Step Quilt
Now that you have all your materials ready, let’s dive into the core of the project: cutting your fabrics and assembling your quilt top. Remember, precision at each stage will contribute to a beautifully finished quilt. Take your time, measure twice, and cut once!
Step 1: Precision Cutting for a Perfect Start
Accurate cutting is the cornerstone of any successful quilt. It ensures your pieces fit together perfectly, resulting in crisp points and straight seams. We’ll be working with both Fabric A (layer cake) and Fabric B (background) to create the various components of our quilt blocks.
From Fabric A (Layer Cake):
- Begin by selecting five of your layer cake squares. From each of these five 10″ x 10″ squares, cut them down into 7″ x 7″ squares. This initial cut reduces the size for the specific triangular units needed.
- Next, take each of these five 7″ x 7″ squares and cut them diagonally twice. This means you will cut from one corner to the opposite corner, and then from the other two opposite corners. Each 7″ x 7″ square will yield four smaller triangles. These smaller triangles are your “end triangles,” which will be used to fill out the corners of your quilt blocks. You will have a total of 20 end triangles from these five squares (5 squares x 4 triangles/square = 20 triangles).
- You should have 37 layer cake squares remaining from your original Fabric A pack. From these, you will need 28 squares to complete the main body of the quilt. From these 28 squares, cut fifty-five 4 – 1/2″ x 8 – 1/2″ rectangles. These rectangles form the dominant “step” units in your quilt design, creating the diagonal movement. This will involve cutting two rectangles from some layer cake squares and one from others, depending on how you maximize your fabric.
From Fabric B (Background):
- First, cut five 8 – 1/2″ x WOF (Width of Fabric) strips from your background fabric. WOF typically refers to the full usable width of your fabric, usually around 42-44 inches after selvages are trimmed.
- From these five WOF strips, subcut forty-four 4 – 1/2″ x 8 – 1/2″ rectangles. These background rectangles will complement the Fabric A rectangles, forming the contrasting “risers” of your steps.
- Next, cut two 7″ x WOF strips. From these two strips, subcut eight 7″ x 7″ squares.
- Take these eight 7″ x 7″ squares and cut them diagonally twice, just as you did with Fabric A. This will yield another 32 end triangles (8 squares x 4 triangles/square = 32 triangles). When combined with the 20 triangles from Fabric A, you’ll have a total of 52 end triangles. The original pattern states 40 end triangles from Fabric B, implying a slightly different use or discard. Always refer to the free pattern for the most precise cutting guide, as minor variations can occur.
- Finally, with your remaining Fabric B, cut one 3 – 3/4″ x 4 – 3/4″ strip. From this strip, cut it diagonally once to make two corner triangles. These specific corner triangles are designed to perfectly finish the outer corners of your quilt, ensuring a neat and squared-off edge.
Step 2: Assembling Your Quilt Top with Confidence
With all your pieces meticulously cut, it’s time for the exciting part: assembling your quilt top! This pattern is sewn diagonally, which gives it its unique flow. Careful planning of your layout before you stitch is highly recommended.
Layout and Design:
- If you have the space, whether it’s a design wall, a large floor area, or even a clear bed, lay out all your cut fabric pieces. This allows you to visually disperse your prints and colors from Fabric A among the solid Fabric B background pieces to your liking. Take photos with your phone to remember your preferred arrangement before sewing.
- Pay close attention to the orientation of the “steps.” The beauty of this quilt lies in its consistent diagonal flow. Refer often to the free pattern for specific piece placement and a visual guide, especially if you’re unsure about how the different triangles and rectangles fit together to form the larger units and rows.
Sewing Techniques and Tips:
- Seam Allowance: Throughout the entire assembly process, maintain a precise 1/4″ seam allowance. Consistency here is paramount for your blocks to fit together accurately and for your finished quilt top to lie flat and square. Use a 1/4″ quilting foot if your machine has one, or mark a guide on your machine’s throat plate.
- Chain Piecing: To save time and thread, consider chain piecing. This involves sewing several units one after another without lifting the presser foot or cutting threads in between. Once all units are sewn, you can snip the threads connecting them.
- Pressing: After sewing each seam, press it carefully with a hot iron. You can press seams open or to one side, depending on what helps your quilt lie flatter and reduces bulk. For this pattern, pressing seams toward the darker fabric or open might be beneficial for certain junctions. Pressing makes a huge difference in the final appearance of your quilt.
- Assembling Units: Start by sewing the smaller units together according to the pattern’s diagram. This will likely involve joining the end triangles to the rectangular pieces to form larger blocks.
- Building Rows: Once your smaller units are complete, begin joining them into diagonal rows. Pin carefully at intersections to ensure points match up and seams nest neatly.
- Joining Rows: After assembling all your diagonal rows, you’ll then join these rows together to form the complete quilt top. Again, take your time to align everything perfectly, pinning generously before sewing.
Step 3: Finishing Touches: Bringing Your Quilt to Life
Once your quilt top is meticulously pieced together, you’ve completed the most intricate part of the journey! However, a quilt isn’t truly finished until it’s quilted and bound. These final steps not only secure all your hard work but also add texture, durability, and a professional look to your project.
Layering and Quilting:
- Create the Quilt Sandwich: Lay your backing fabric right side down on a clean, flat surface. Tape it down or use temporary fabric adhesive to keep it smooth. Next, place your batting smoothly on top of the backing, ensuring it’s free of wrinkles. Finally, carefully place your finished quilt top right side up on top of the batting, centering it as best as possible. The backing and batting should extend a few inches beyond the quilt top on all sides.
- Basting: Secure all three layers together using your preferred basting method. This could be safety pins (pin basting), long basting stitches (thread basting), or temporary spray adhesive (spray basting). Basting prevents the layers from shifting while you quilt.
- Quilting: Now for the quilting itself! This is where you stitch through all three layers to hold them together permanently and add beautiful texture. You can choose to machine quilt (using a walking foot for straight lines or a free-motion foot for more elaborate designs) or hand quilt for a more traditional, softer look. Simple straight lines along the seams (stitch-in-the-ditch) or a grid pattern would complement the geometric nature of the Side Step Quilt beautifully. If machine quilting feels daunting, consider sending your quilt to a professional longarmer.
Binding Your Quilt:
- Prepare Binding Strips: From your 1/2 yard of binding fabric, cut several 2.5-inch wide strips (usually across the width of fabric). Join these strips end-to-end with diagonal seams to create one long continuous strip. Press the seams open and then press the entire binding strip in half lengthwise, wrong sides together.
- Attach Binding: Trim your quilted sandwich so the edges are perfectly square and even with your quilt top. Start attaching the binding strip to the front of your quilt, aligning the raw edges of the binding with the raw edge of the quilt. Stitch with a 1/4-inch seam allowance, mitering the corners as you go.
- Finish Binding: Once stitched to the front, wrap the folded binding strip around to the back of the quilt. You can then hand-stitch it in place for an invisible finish or machine-stitch it for a quicker, yet still neat, result. Your quilt is now beautifully framed!
Optional: Add a Quilt Label: Consider adding a small label to the back of your quilt. Include details like your name, the date you finished it, the name of the pattern, and who it’s for. This personal touch turns your quilt into a cherished heirloom.
Unleash Your Creativity: Variations and Beyond
One of the most exciting aspects of the Side Step Quilt is its incredible versatility. Once you’ve mastered the basic pattern, you’ll find countless ways to make it uniquely your own.
- Color Play: Experiment with different color palettes. For a modern look, try a monochromatic scheme with varying shades of a single color. For a bold statement, choose complementary colors (opposites on the color wheel). A rainbow gradient can be stunning, or a carefully curated collection of low-volume prints for a subtle effect. Don’t be afraid to mix solids with patterned fabrics to create dynamic contrasts.
- Fabric Types: While cotton is the standard, consider incorporating other fabric types. Flannel can make for a wonderfully soft and warm quilt, perfect for snuggling. Batiks offer rich, saturated colors and a subtle texture. Just be mindful that mixing fabric types can sometimes require different handling due to varying stretches and thicknesses.
- Scale and Size: The beauty of quilt patterns is their adaptability to size. Want a smaller throw? Reduce the number of blocks or the size of your initial layer cake squares (adjusting subsequent cuts proportionally). Dreaming of a king-sized bed quilt? Simply create more blocks or enlarge the original block dimensions. The pattern can be scaled up or down to fit any project.
- Beyond a Quilt: The “Side Step” block itself is so striking, it can be repurposed for smaller projects. Imagine a striking Side Step cushion cover, a vibrant table runner for your dining room, or a unique placemat set. These smaller projects are also great for using up leftover fabric scraps from your main quilt!
Care and Longevity of Your Handmade Quilt
Your handmade Side Step Quilt is a work of art and a testament to your dedication. To ensure it remains beautiful and cherished for years to come, proper care is essential.
- Initial Wash: For the first wash, especially if using vibrant colors, wash your quilt separately in cold water with a color-catcher sheet to absorb any potential dye bleeding. Use a gentle, pH-neutral detergent designed for delicate fabrics.
- Regular Washing: For subsequent washes, machine wash on a gentle cycle with cold water. Avoid harsh detergents or bleach, which can fade colors and weaken fabric fibers.
- Drying: Tumble dry on a low heat setting, or preferably, air dry flat or hang your quilt to dry. This helps prevent shrinkage, preserves the integrity of your stitches, and maintains the quilt’s shape. Over-drying can make cotton brittle over time.
- Storage: When not in use, store your quilt folded in a breathable cotton bag or wrapped in a clean sheet. Avoid storing it in plastic bins for long periods, as plastic can trap moisture and cause yellowing or mildew. Store in a cool, dry place away from direct sunlight, which can cause fading.
- Spot Cleaning: For small spills, gently spot clean with a mild soap and water solution. Blot the area rather than rubbing.
By following these simple care instructions, your Side Step Quilt will provide warmth, beauty, and comfort for many years, becoming a beloved heirloom passed down through generations.
Ready to Start Your Side Step Quilt?
There you have it – a comprehensive guide to creating your very own Simple Side Step Quilt! This pattern truly offers the best of both worlds: a stunning visual impact that looks complex, paired with an accessible, beginner-friendly construction. It’s a project that builds confidence, hones your quilting skills, and leaves you with a beautiful, functional piece of art.
Don’t let the idea of intricate steps intimidate you. With the detailed instructions provided here, the invaluable visual aid from the Sew Yeah YouTube tutorial, and the precise measurements in the free downloadable pattern, you have everything you need to succeed. Gather your fabrics, set up your sewing space, and embark on this rewarding quilting adventure.
We encourage you to experiment with colors and prints, making each quilt a unique reflection of your personal style. Whether you’re crafting a gift, enhancing your home decor, or simply enjoying the meditative process of quilting, the Side Step Quilt is sure to bring joy. Happy quilting, and don’t forget to share your amazing creations with the quilting community!