
Transform Egg Cartons into Beautiful DIY Flowers: An Eco-Friendly Craft for All Ages
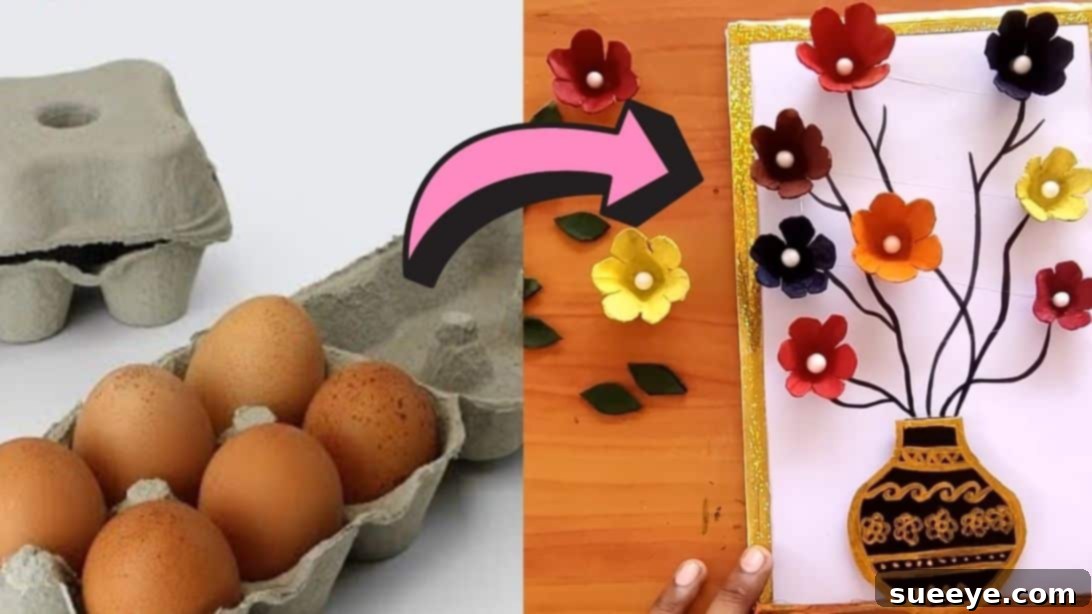
There’s a unique satisfaction that comes with giving new life to items destined for the trash. As a passionate advocate for repurposing and sustainable living, I constantly seek creative ways to transform everyday waste into something beautiful and functional. My home is a testament to this philosophy, filled with upcycled treasures that tell a story of creativity and resourcefulness. Recently, after a delightful baking session left us with a stack of empty egg cartons, inspiration struck. Instead of discarding them, I embarked on a charming craft project: turning those humble cartons into vibrant, whimsical DIY egg carton flowers! This brilliant and incredibly rewarding idea, originally shared by Craft Homie on YouTube, is not just a simple art project; it’s an invitation to unleash your inner artist and embrace sustainable crafting. It’s a fantastic activity for adults seeking a mindful escape, and even better, it’s perfect for engaging kids in a fun, educational, and eco-conscious endeavor.
Upcycling egg cartons into decorative flowers is more than just a craft; it’s a statement. It’s about reducing waste, fostering creativity, and adding a touch of personalized charm to your living space without breaking the bank. These charming blooms are surprisingly easy to make, requiring minimal supplies that you likely already have around the house. Whether you’re looking to brighten up a room, create a unique gift, or simply enjoy a relaxing crafting session, these DIY egg carton flowers offer a delightful solution. Get ready to transform ordinary cardboard into an extraordinary display of floral artistry!
Materials You’ll Need: Bringing Your Flowers to Life
One of the best aspects of this craft is its simplicity and reliance on readily available materials. You don’t need fancy tools or expensive supplies; just a few household items will suffice to bring your floral vision to life. Gather these essentials before you begin:
- Egg Carton: The star of our project! Cardboard egg cartons work best as they are easy to cut and paint. The more cups you have, the more flowers you can create.
- Scissors: A sharp pair of scissors is crucial for precise cutting and shaping of your petals. Crafting scissors or even kitchen shears will work.
- Assorted Acrylic Paints: Choose a variety of bright and cheerful colors to make your flowers pop. Think reds, yellows, blues, pinks, purples, and green for leaves. Acrylic paints dry quickly and offer vibrant coverage.
- Paint Brushes: Have a few brushes on hand – a wider one for painting the main flower bodies and a finer, pointed brush for delicate details and stems.
- Cardboard: A sturdy piece of cardboard (e.g., from an old box or cereal box) will serve as the backing for your floral arrangement and for creating the vase.
- Pencil: Essential for drawing the vase shape and marking cut lines.
- Small Foam Balls (or other embellishments): These will form the center of your flowers, adding a lovely three-dimensional touch. You can also use beads, buttons, or even small rolled-up paper balls.
- Ribbon: A decorative ribbon will add a polished finish to the edges of your cardboard backing, framing your artwork beautifully.
- Craft Glue (Hot Glue Recommended): Strong craft glue or a hot glue gun will be needed to secure the flowers, leaves, vase, and ribbon in place. Hot glue provides a quick and strong bond.
Step-by-Step Guide: Crafting Your DIY Egg Carton Flowers
Creating these beautiful flowers is a delightful process that unfolds in a series of simple steps. Take your time, enjoy each stage, and watch as your egg cartons transform into a stunning floral masterpiece.
Step 1: Preparing Your Flower Bases
Carefully begin by separating individual cups from your egg carton. Use your scissors to gently cut around each cup, ensuring you remove it cleanly from the rest of the carton. Once separated, take the time to trim any rough or uneven edges, aiming for a smooth, uniform cup shape. This initial trim sets the foundation for neat petals. Next, visualize four points around the rim of the cup – these will be your initial petal cuts. Cut inward from the rim at each of these points, creating four distinct sections. Then, cut again in the middle of each of these four sections, effectively dividing the cup into eight potential petals. This technique allows for a fuller, more detailed flower. Repeat this process for all the egg carton cups you intend to turn into flowers.
Step 2: Shaping the Petals
Now comes the artistic part of giving your flowers their distinctive shape. With your newly cut sections, gently round the edges of each ‘petal’ with your scissors. You can make them pointed, rounded, or even slightly jagged, depending on the flower look you’re aiming for. Once the edges are shaped, carefully curve each petal outwards using your fingers. This gives the flower a beautiful, natural, three-dimensional appearance. Experiment with different sizes for your flowers; some cups can be trimmed down further to create smaller, delicate blooms, while others can remain larger for more dramatic effect. Creating a variety of sizes will add depth and interest to your final arrangement.
Step 3: Bringing Color to Your Blooms
This is where your flowers truly come to life! Select your desired paint colors for each bloom. Using your paint brush, carefully apply paint to the outer and inner surfaces of each flower. Feel free to use solid colors, or try blending two shades for a gradient effect. The only part you should avoid painting is the very bottom flat surface of the egg carton cup. This unpainted area will provide a clean, unpainted surface for glue adhesion later, ensuring your flowers attach securely to your background. Once painted, arrange your colorful blossoms on a newspaper or a protected surface and allow them to dry completely. Depending on the paint thickness and humidity, this might take an hour or two.
Step 4: Crafting a Charming Vase
To give your floral arrangement a place to reside, you’ll create a simple yet elegant vase. Take a piece of cardboard and measure out a square approximately 3.15 inches (about 8 cm) on each side. Using your pencil, draw the outline of a vase within this square. You can opt for a classic hourglass shape, a simple rectangular design, or something more whimsical. Once satisfied with your drawing, carefully cut out the vase shape. Now, paint your cardboard vase in a color that complements your flowers and overall aesthetic. Blues, browns, grays, or even a metallic shade can look wonderful. Let the paint dry thoroughly. Once dry, feel free to add decorative details with a finer brush – think delicate floral patterns, bold stripes, elegant curves, or even small polka dots to make your vase truly unique.
Step 5: Adding Greenery with Leaves
No floral arrangement is complete without a touch of refreshing greenery. From the leftover scraps of your egg carton, cut out small leaf shapes. You can make them long and slender, broad and round, or even jagged-edged, depending on the type of leaves you prefer. Once cut, paint these shapes a vibrant green. You might even experiment with different shades of green or add subtle veins with a darker green for a more realistic touch. Set them aside to dry completely.
Step 6: Preparing the Canvas for Your Arrangement
To create a backdrop for your beautiful flowers, take a larger piece of cardboard. This will serve as the canvas for your entire display. Cut it to a size that will comfortably accommodate your vase and flowers, leaving some space around the edges. For a cleaner, more finished look, cover this cardboard piece with decorative paper. You can use plain white paper, colored construction paper, scrapbook paper with a subtle pattern, or even fabric. Secure the paper firmly with glue, ensuring smooth, wrinkle-free application.
Step 7: Detailing the Flower Centers
With your flowers dry and ready, it’s time to add their charming centers. Take your small foam balls (or chosen embellishments) and carefully glue one into the very center of each painted egg carton flower. If using hot glue, a tiny dot is all you need. Press the foam ball gently into place and hold for a few seconds until it’s secure. These centers add a lovely focal point and complete the transformation of the egg carton into a recognizable flower.
Step 8: Assembling the Base of Your Artwork
Now, let’s bring the elements together. Position your painted cardboard vase on the lower-middle section of your paper-covered cardboard backing. Apply a generous amount of glue to the back of the vase and press it firmly onto the backing. Ensure it’s straight and secure. To give your entire piece a polished and framed appearance, glue your chosen ribbon around all four edges of the paper-covered cardboard. This adds a beautiful border and hides any rough edges of the paper or cardboard.
Step 9: Finalizing Your Floral Masterpiece
With the vase and backing in place, it’s time for the final touches. Using your fine-tipped brush and brown paint, carefully paint thin, elegant stems extending upwards from the top of your vase. You can make them straight, slightly curved, or branching out, simulating a natural floral arrangement. Once the stems are painted, carefully arrange your dried egg carton flowers at the ends of these painted stems. Use hot glue to attach each flower securely. Finally, glue your green egg carton leaves onto the stems, placing them strategically to create a balanced and aesthetically pleasing look. Step back and admire your stunning, eco-friendly floral artwork!
Why Choose DIY Egg Carton Flowers? Benefits Beyond Beauty
Beyond their undeniable charm, crafting egg carton flowers offers a multitude of benefits, making it an ideal project for crafters of all ages and skill levels.
- Eco-Friendly & Sustainable: At its core, this project is about upcycling. By transforming egg cartons into art, you’re diverting waste from landfills and actively participating in sustainable living. It’s a wonderful way to teach children about recycling and resourcefulness.
- Budget-Friendly: Most of the materials required are household items or inexpensive craft supplies. This makes it an accessible craft for everyone, regardless of budget constraints.
- Unleashes Creativity: There are no strict rules when it comes to design! From choosing colors and shaping petals to decorating your vase, this project encourages boundless creativity and personal expression. Each flower and arrangement will be unique.
- Perfect for All Ages: The steps are straightforward enough for younger children (with adult supervision for cutting) yet engaging enough for adults. It’s a fantastic family activity that promotes bonding and shared creation.
- Versatile Decor: Once completed, these flowers aren’t just a craft project; they’re beautiful decorative pieces. They can adorn walls, serve as unique greeting card embellishments, be incorporated into larger art projects, or even be given as thoughtful, handmade gifts.
- Mindful and Relaxing: The repetitive motions of cutting, shaping, and painting can be incredibly therapeutic. It offers a mindful escape from daily stresses, allowing you to focus on the creative process.
Tips and Variations to Enhance Your Egg Carton Creations
While the basic instructions provide a solid foundation, there are countless ways to personalize and expand on your egg carton flower project:
- Layering Petals: For fuller, more realistic flowers, cut two or three different-sized flower shapes and layer them on top of each other, securing them at the center.
- Add Texture: Before painting, try gently crinkling the egg carton pieces for added texture, giving your flowers a more organic feel.
- Glitter and Embellishments: Once dry, add a touch of sparkle with glitter, attach small sequins, or glue tiny beads to the petal tips for extra flair.
- Create a Bouquet: Instead of a flat wall hanging, attach wire or pipe cleaner stems to the back of your flowers to create a standing bouquet that can be placed in a real vase.
- Different Flower Types: Experiment with cutting different petal shapes to mimic various flowers like daisies, roses, or sunflowers. A simple change in cut can yield vastly different results.
- Gift Toppers & Ornaments: Smaller egg carton flowers make charming gift toppers or can be strung together to create a festive garland or ornaments.
- Themed Arrangements: Create flowers in specific color palettes for holidays (e.g., red and green for Christmas, pastels for Easter) or to match room decor.
- Interactive Elements: If creating a bouquet, use floral foam in a real vase to arrange your wired flowers, allowing for easy repositioning.
Final Thoughts on Your DIY Egg Carton Flowers
Crafting DIY egg carton flowers is a journey that celebrates creativity, sustainability, and the simple joy of making something beautiful with your own hands. From the initial cuts to the final decorative touches, each step offers an opportunity for personal expression and a chance to transform everyday waste into a work of art. This project is a wonderful reminder that beauty can be found in the most unexpected places and that with a little imagination, we can all contribute to a more sustainable and colorful world. So gather your supplies, invite your family or friends, and embark on this delightful crafting adventure. We can’t wait to see the vibrant blooms you create!