
Mastering the Modern One Color Quilt: A Detailed Tutorial for Every Quilter
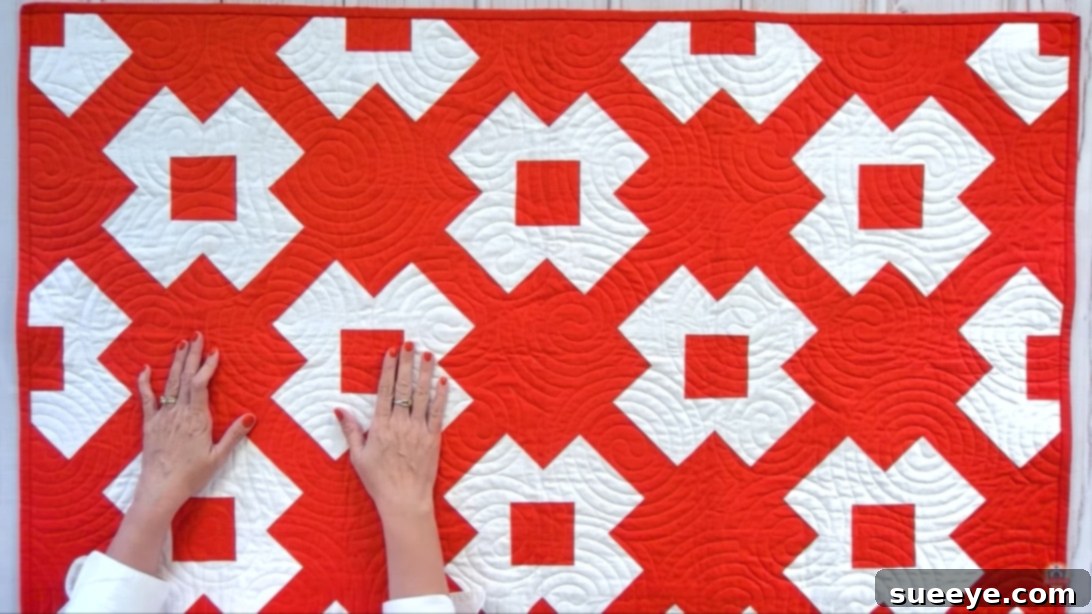
Embark on a creative journey with this captivating modern one-color quilt pattern, a design that elegantly blends simplicity with striking visual impact. While traditional quilting patterns often hold a special place in our hearts, this contemporary approach, brought to light by the esteemed Fat Quarter Shop, stands out as a remarkable exception. Its streamlined construction and stunning finished look make it an ideal project for both seasoned quilters seeking a quick yet rewarding make, and ambitious beginners eager to expand their skills. The inherent beauty of a one-color quilt lies in its ability to highlight texture, contrast, and the intricate piecing work without the distraction of multiple hues, resulting in a sophisticated and versatile piece perfect for any home decor. This comprehensive tutorial will guide you through each step, ensuring a smooth and enjoyable quilting experience from fabric selection to the very last stitch.
Quilting, at its core, is a labor of love—a craft that allows us to transform simple fabric pieces into cherished heirlooms and functional art. This particular modern quilt pattern, despite its contemporary aesthetic, remains incredibly approachable, with each step meticulously designed to be straightforward and easily manageable. We’ll delve into precise cutting techniques, efficient piecing methods, and smart pressing strategies that contribute to a truly professional-looking finish. Prepare to be inspired as you watch your chosen fabric come to life, evolving into a beautiful and unique quilt that perfectly reflects your personal style. For a visual walkthrough of the entire process, be sure to watch the full instructional video provided by the Fat Quarter Shop – it’s an invaluable resource to complement these detailed written instructions and enhance your learning.
Essential Materials for Your One-Color Quilt Project
Gathering all your materials before you begin is a crucial first step in any successful quilting project. This ensures a seamless flow and prevents interruptions once you’re deep into the creative process. For this modern one-color quilt, the fabric selection is particularly important, as the chosen hue will be the star of the show, allowing the intricate design to truly shine. We highly recommend using high-quality quilting cotton for its durability, ease of sewing, and beautiful drape. Here’s a detailed list of what you’ll need to create your stunning quilt:
- 4 ¾ yards of Main Colored Fabric (Fabric A): This fabric will be the dominant color in your quilt, forming the intricate patterns and focal points. Consider a color that deeply resonates with you or perfectly complements the space where the finished quilt will reside.
- 4 yards of Background Fabric (Fabric B): This fabric provides the necessary contrast to make Fabric A pop and define the design elements. Typically, a neutral color like white, cream, or a light gray works wonderfully, but don’t hesitate to experiment with a subtle tone that harmonizes with your main color.
- ⅝ yard for Binding: The binding fabric frames your quilt and adds a professional, durable finish. It can perfectly match Fabric A for a cohesive look, or provide a subtle contrasting edge to enhance the design.
- 3 ¼ yards for Backing: The backing fabric is the underside of your quilt, providing warmth and comfort. While often unseen, choosing a soft, comfortable fabric can significantly enhance the quilt’s overall feel. This is also an opportunity to introduce a complementary print or texture.
- Coordinating Thread: High-quality thread that matches or subtly blends with your chosen fabrics is absolutely essential for durable and attractive seams.
- Rotary Cutter, Self-Healing Mat, and Quilting Rulers: Precision cutting is paramount in quilting. Invest in sharp tools for accurate results, as consistent cuts are key to a beautiful finished product.
- Sewing Machine: A reliable machine with a consistent ¼-inch seam allowance foot is highly recommended to achieve accurate piecing.
- Iron and Ironing Board: Essential tools for pressing seams flat, which creates crisp, professional-looking blocks and a smooth quilt top.
- Fabric Scissors: For any small snips, trimming threads, or fussy cutting.
- Quilting Pins or Fabric Clips: To hold fabric pieces together securely before sewing, ensuring precise alignment.
Always remember to pre-wash and press your fabrics before cutting to prevent shrinking or color bleeding after the quilt is finished. This small, preparatory step can save you a lot of heartache and ensure the longevity and beauty of your handmade quilt.
Step-by-Step Modern One-Color Quilt Construction
Now that your materials are meticulously prepared, let’s dive into the exciting process of bringing your modern one-color quilt to life. Throughout these steps, remember that precision and patience are your best allies, ensuring each block comes together beautifully to form the larger, stunning design. Follow these detailed instructions carefully for the best results.
Step 1: Accurate Fabric Cutting for Your Quilt Blocks
The foundation of any stunning quilt lies in precise cutting. Take your time with this step; accurately cut pieces are crucial for perfectly matched seams and a beautifully square quilt. Remember, “WOF” stands for “Width of Fabric,” which is typically 42-44 inches, depending on the manufacturer.
- From Fabric A (Main Colored Fabric), cut:
- 28 strips of 5 ½″ x WOF. From these wider strips, meticulously sub-cut into 48 pieces of 5 ½″ x 8 ½″ rectangles and 96 pieces of 5 ½″ squares. Organize these carefully, perhaps into separate, labeled piles to avoid confusion.
- 5 strips of 2″ x WOF. From these narrower strips, sub-cut into 96 pieces of 2″ squares. These small squares will play a crucial, yet subtle, role in creating the unique block design.
- From Fabric B (Background Fabric), cut:
- 16 strips of 5 ½″ x WOF. From these, sub-cut into 96 pieces of 5 ½″ squares. These squares will provide the necessary visual contrast to highlight Fabric A.
- 24 strips of 2″ x WOF. From these, sub-cut into 96 pieces of 2″ x 7″ rectangles. These rectangles will combine with the small Fabric A squares to form foundational units in your blocks.
- For the Binding, cut:
- 7 strips of 2 ½″ x WOF. Set these strips aside for now; they will be sewn together later to create the continuous binding strip that beautifully finishes the quilt’s edge.
When cutting, always ensure your rotary blade is sharp, your ruler is properly aligned, and you’re pressing firmly and consistently. Double-check your measurements to avoid errors that can compound as you piece your quilt together. Labeling your cut piles can also be incredibly helpful for maintaining organization throughout the construction process!
Step 2: Constructing Unit A – The Foundation
This step introduces a fundamental quilting technique: adding a contrasting corner to a strip, which is often used to create subtle visual interest and depth. You’ll be making 96 identical Unit A pieces, so consider chain piecing to save valuable time and thread, making the process more efficient.
- Take one 2″ Fabric A square and one 2″ x 7″ Fabric B rectangle.
- Place the Fabric A square on one end of the Fabric B rectangle, ensuring the raw edges are perfectly aligned. The right sides of the fabrics should be facing each other.
- Sew them together with an accurate ¼-inch seam allowance. Precision here ensures consistent block sizes. Ensure your stitches are straight and consistent.
- Press the seam allowance towards the darker fabric (Fabric A in this case) to minimize bulk and create a clean, crisp finish that will lay flat.
- Repeat this precise process until you have successfully created all 96 pieces of Unit A. These units will form the integral “arms” of your main quilt blocks.
Step 3: Beginning Unit B – Adding the First Corner
Unit B involves a clever and widely used quilting technique, sometimes referred to as “snowballing” a corner or creating a modified flying geese effect. This step initiates the distinctive diagonal element of your quilt’s design.
- Take one 5 ½″ x 8 ½″ Fabric A rectangle.
- Take two 5 ½″ Fabric B squares.
- Place one 5 ½″ Fabric B square on top of one corner of the Fabric A rectangle. Align the raw edges precisely so the square covers one end of the rectangle. Ensure the right sides of the fabrics are facing each other.
- Using a quilting ruler and a fabric marking pen (or simply pressing a crease), draw a diagonal line from one corner of the Fabric B square to the opposite corner (specifically, the corner closest to the center of the Fabric A rectangle).
- Sew directly on this drawn diagonal line. Take extreme care to sew precisely on the line for crisp, clean points in your finished blocks.
- Once sewn, trim off the excess fabric ¼″ away from your sewn line, towards the outside corner. This creates your necessary seam allowance and removes bulk.
- Press the remaining triangular flap open, towards the darker fabric (Fabric A). This will reveal a square corner that has been effectively replaced by a contrasting triangle of Fabric B.
Step 4: Completing Unit B – Mirroring the Design
To finish Unit B, you will mirror the technique from Step 3 on the opposite end of the Fabric A rectangle. This creates a distinctive shape with two contrasting corners, which forms the central element of your quilt blocks.
- Take the unit you just created in Step 3.
- Place the second 5 ½″ Fabric B square on the other end of the Fabric A rectangle, ensuring its raw edges align perfectly. Again, right sides should be together.
- Draw a diagonal line on this second square, making absolutely sure it runs in the same direction as the diagonal line on the first square you attached. This consistency is crucial for the overall flow and visual impact of the quilt pattern.
- Sew precisely on this marked line.
- Trim off the excess fabric ¼″ away from the seam, just as you did before, maintaining your seam allowance.
- Press the seam open, towards the darker fabric. You should now have a rectangular unit with two Fabric B triangles on opposite corners, creating the complete Unit B.
- Repeat this entire process (encompassing both Step 3 and Step 4) to create a total of 48 pieces of Unit B. These units will form the dynamic central element of your larger quilt blocks.
Step 5: Assembling the Central Block Section
Now, we bring together the Unit A pieces and Unit B to form the core section of your quilt blocks. This step involves careful alignment to ensure the diagonal lines create a visually continuous and striking element within your quilt design.
- Gather two of your freshly made Unit A pieces and one Unit B piece.
- Position one Unit A piece on each side of Unit B. It’s absolutely essential that the Unit A pieces are oriented in opposite directions, creating a beautiful mirrored effect around the central Unit B.
- Specifically, ensure that the small Fabric A squares on the ends of Unit A are positioned *away* from the diagonal lines of Fabric B in the center of Unit B. This creates the unique “negative space” effect that gives this modern quilt its distinctive character.
- Carefully sew one Unit A to each side of Unit B with a precise ¼-inch seam allowance. Use plenty of pins to align the raw edges and ensure the seams match up perfectly, especially where multiple fabric pieces converge.
- Press the seams open to reduce bulk and help the assembled block section lie completely flat. This combination forms a key component of your larger, finished quilt block structure.
Step 6: Adding Corner Squares to Complete the Quilt Blocks
The final step in creating your individual quilt blocks involves adding two larger Fabric A squares to the corners. This further defines the modern aesthetic and adds depth to the design, bringing the block to its full potential.
- Take the central block section you meticulously assembled in Step 5.
- Identify the two corners where the small Fabric A squares on Unit A are showing. These are the specific corners where you will place your new, larger Fabric A squares.
- Place a 5 ½″ Fabric A square on each of these two corners, right sides together, carefully aligning all raw edges.
- Draw a diagonal line across each of these 5 ½″ Fabric A squares, from the outer corner towards the center of the block.
- Sew precisely on each drawn diagonal line. Accuracy here will impact the crispness of your final points.
- Trim off the excess fabric ¼″ away from your sewn seams, creating the necessary seam allowance and tidying the edges.
- Press the seams open. Congratulations! You have now completed one full, beautiful quilt block!
- Repeat this entire process (Steps 5 and 6) until you have a total of 48 finished quilt blocks. Consistency in your seam allowances and pressing throughout this repetitive process will ensure all your blocks are the exact same size, making the final quilt top assembly much smoother and more accurate.
Step 7: Assembling Quilt Rows with Precision
With all your individual quilt blocks now complete, it’s time to arrange them into rows and begin forming the full quilt top. This is the exciting stage where your quilt truly starts to take shape, transitioning from individual units to a cohesive design!
- Lay out all 48 of your finished quilt blocks on a large, flat surface. A clean floor or a dedicated design wall works perfectly for this. Arrange them into 8 rows, with 6 blocks in each row. Take a moment to step back and observe the overall flow and placement of your blocks. This is your absolute last chance to easily swap blocks around to achieve your desired aesthetic or correct any misalignments in the pattern.
- Once you’re completely satisfied with the layout, carefully sew the blocks together within each row, using a consistent ¼-inch seam allowance. Pin generously at the intersections where blocks meet to ensure points match up precisely and seams nest beautifully.
- After sewing each row, press the seams. For odd-numbered rows (Row 1, 3, 5, 7), press all seams carefully to the left. For even-numbered rows (Row 2, 4, 6, 8), press all seams to the right. This alternating pressing technique is crucial; it will allow the seams to “nest” perfectly when you join the rows together in the next step, significantly reducing bulk and creating much flatter, more professional intersections.
Step 8: Joining Rows to Complete Your Quilt Top
This is the moment your individual rows transform into a unified quilt top, revealing the full grandeur of your modern one-color design. Careful alignment in this step is paramount for a beautifully square and symmetrical finished quilt.
- Take your pressed rows and begin to join them together, starting by connecting Row 1 and Row 2. Place Row 1 directly on top of Row 2, ensuring the right sides of the fabric are facing each other.
- Carefully align the seams where the blocks meet. Because you meticulously alternated your pressing directions in Step 7, these seams should naturally “nest” into each other, creating a perfect match and minimizing bulk. Pin extensively at these intersections and along the entire length of the row to prevent any shifting during sewing.
- Sew the rows together with a consistent ¼-inch seam allowance.
- Continue joining the remaining rows in the same careful manner (connecting Row 3 to Row 2, then Row 4 to Row 3, and so on) until all 8 rows are securely sewn together to form your complete quilt top.
- After all rows are joined, press all the long seams open. Pressing open helps to distribute the bulk of the seams evenly across the back of the quilt, creating a much flatter and smoother quilt top. This is especially important for achieving excellent results during machine quilting later. Take your time to ensure all seams are neatly pressed for a polished finish.
Finishing Your Quilt: Backing, Batting, and Binding for a Professional Touch
With your quilt top now gloriously complete, you’re almost at the finish line! The final steps involve preparing your quilt sandwich and adding the binding, which provides a professional, durable, and beautiful edge to your handmade masterpiece.
- Prepare the Quilt Sandwich: This critical step involves layering your quilt components. First, on a clean, large, flat surface (like a floor or design wall), lay your backing fabric right side down, smoothing out any wrinkles. If needed, tape it securely to keep it taut. Next, carefully place your batting evenly on top of the backing. Finally, center your finished quilt top, right side up, on top of the batting. Ensure all three layers are perfectly flat and smooth, with no puckers or creases.
- Basting: To prevent the layers from shifting during the quilting process, you must securely baste them together. You have several options: use safety pins (pin basting), apply a temporary basting spray, or try traditional hand basting with large stitches. Choose the method that suits your preference and experience level.
- Quilting: This is where you add the decorative stitching that permanently holds all three layers together (quilt top, batting, and backing) and gives your quilt its texture, drape, and durability. You can choose to quilt by hand for a traditional look or by machine for speed and intricate designs. Designs can range from simple straight lines or a grid pattern (which would beautifully complement this modern design) to more elaborate free-motion quilting. For a beginner, “stitch-in-the-ditch” (quilting along the seam lines) or simple diagonal lines are excellent and effective starting points.
- Prepare the Binding: Take your 7 strips of 2 ½″ x WOF binding fabric. Join them together end-to-end using diagonal seams to create one continuous, extra-long strip. Press these seams open to reduce bulk. Then, fold the entire long strip in half lengthwise, wrong sides together, and press well to create a crisp, finished edge.
- Attach the Binding: Starting at an inconspicuous spot on the quilt (such as the middle of one side), align the raw edge of your folded binding strip with the raw edge of your quilt top. Sew the binding to the quilt with a ¼-inch seam allowance, carefully mitering the corners as you go for a neat finish. Once sewn all around, fold the binding over to the back of the quilt. You can then hand-stitch the folded edge to the back of the quilt for a classic, invisible finish, or machine-stitch it for a quicker, more durable result.
Your Modern One-Color Quilt: A Finished Masterpiece
Congratulations! You have successfully completed your stunning modern one-color quilt. This project, while featuring accessible techniques, yields a remarkably sophisticated and visually engaging piece. Whether you chose a bold, vibrant hue or a serene, muted tone for your main fabric, the intricate piecing and geometric design truly stand out, powerfully demonstrating the impact and versatility of a single color in quilting.
This quilt is not just a testament to your growing skills and dedication to the craft, but also a beautiful and functional addition to your home decor, or a thoughtful, cherished handmade gift for a loved one. We sincerely hope you found this detailed tutorial helpful, inspiring, and easy to follow. Don’t hesitate to experiment with different fabric choices for future quilting projects, perhaps exploring subtle prints or varying textures within a single color family for added depth and visual interest. We absolutely love seeing your creativity come to life – please share your finished projects with us and the wider quilting community!