
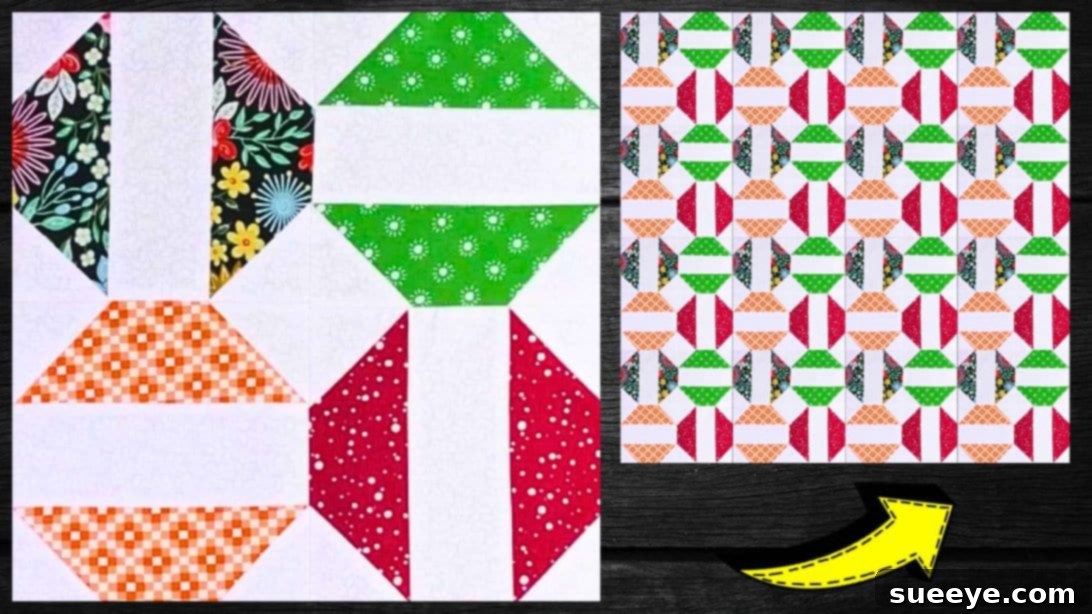
Whimsy Jelly Roll Quilt Block Tutorial (with Free Pattern)
Embark on a delightful quilting journey with the enchanting Whimsy Jelly Roll Quilt Block! Whether you’re a seasoned quilter looking for a charming new project or a complete beginner eager to dive into the world of fabric and stitches, this tutorial is designed for you. Utilizing the convenience of pre-cut jelly roll strips, this block simplifies the cutting process, allowing you to focus on the joy of creation. We’ll guide you through each step, ensuring a smooth and rewarding experience as you bring this unique design to life. This fantastic project, complete with a free downloadable pattern, is brought to you by the talented Carol Thelen on YouTube, known for her clear instructions and inspiring designs. Let’s gather our materials and start crafting your next masterpiece!
The beauty of the Whimsy Quilt Block lies in its deceptively simple construction, making it an ideal choice for those new to quilting. Jelly rolls, with their perfectly coordinated 2.5-inch fabric strips, eliminate the need for intricate fabric selections and extensive cutting, allowing you to jump straight into the fun part: sewing! Follow our detailed instructions below and be sure to complement your learning by watching Carol Thelen’s video tutorial for visual guidance.
What Are Jelly Rolls and Why They’re Perfect for Beginners
For those new to quilting, the term “jelly roll” might sound whimsical, and fittingly so! A jelly roll is a collection of 40 pre-cut fabric strips, each typically 2.5 inches wide by the full width of the fabric (usually 44 inches). These strips are meticulously rolled up and tied with a ribbon, resembling a delightful fabric dessert. The magic of jelly rolls lies in their curation: all the fabrics within a single roll are designed to complement each other, eliminating the daunting task of choosing coordinating prints and colors. This pre-selection not only saves significant time but also guarantees a harmonious final quilt.
Jelly rolls are an absolute game-changer for beginners. They standardize your fabric pieces, making cutting less intimidating and more precise. Their uniform width ensures consistent seams and professional-looking results right from your first project. With a jelly roll, you can spend less time measuring and cutting and more time enjoying the meditative process of stitching, pressing, and seeing your quilt block come to life. This Whimsy Quilt Block leverages these advantages perfectly, providing a stress-free introduction to quilting techniques.
Materials and Essential Tools for Your Whimsy Quilt Block
Before you begin sewing, gathering all your materials and tools is crucial. High-quality supplies will make your quilting experience much more enjoyable and your finished block more beautiful. Here’s everything you’ll need to create your Whimsy Jelly Roll Quilt Block:
- Print Fabric: Your chosen jelly roll strips will serve as your main print fabric, bringing vibrant patterns and colors to your block. Consider a jelly roll with a variety of prints that appeal to your aesthetic.
- Background Fabric: A solid or subtly textured fabric that contrasts with your print fabric. This helps the whimsical design stand out. White, cream, or a light neutral are popular choices.
- Scissors or Rotary Cutter and a Cutting Mat: A sharp pair of fabric scissors or, even better, a rotary cutter with a self-healing mat, will ensure clean, precise cuts. A rotary cutter is highly recommended for accuracy, especially with multiple layers.
- Quilting Ruler: A transparent acrylic quilting ruler (at least 6×12 inches or larger) is indispensable for accurate measurements and straight cuts when used with a rotary cutter.
- Needle and Thread: All-purpose polyester thread in a neutral color (like white, grey, or ecru) works well for piecing quilt blocks. Ensure your sewing machine needle is sharp and suitable for quilting cotton.
- Iron and Ironing Board: Crucial for pressing seams. Pressing flat ensures your block lays evenly and pieces align accurately. Remember, you “press” not “iron” when quilting to avoid stretching fabric.
- Sewing Machine: A reliable sewing machine capable of sewing a consistent ¼-inch seam allowance is key.
- Free Pattern: Don’t forget to download the official pattern! Click here to download the free Whimsy Jelly Roll Quilt Block pattern.
Step-by-Step Directions for Creating Your Whimsy Quilt Block
Now that you have all your materials ready, let’s dive into the creation process. Precision in cutting and stitching is important for a successful quilt block, so take your time and enjoy each step.
Step 1: Preparing Your Fabric and Assembling the Initial Units
Begin by carefully cutting your print and background fabrics according to the dimensions specified in the free pattern and demonstrated in Carol Thelen’s video. Accuracy at this stage will greatly influence the final outcome of your block. Once your fabric pieces are cut, you’ll start forming your first unit.
Take one of your chosen print fabric strips (from your jelly roll) and lay it horizontally at the center of your work surface. This will be the focal point of your initial unit. Next, select two background fabric pieces (often cut into squares or rectangles, then sometimes cut diagonally into triangles, as per the pattern). Place one background piece on each side of the print fabric strip. It’s crucial that the bottom edges of all three fabric pieces are perfectly lined up. This creates a neat, even base for your stitching.
Now, take your pre-cut triangle pieces (likely from your background fabric, created by cutting squares diagonally). Lay one triangle on top of one side of the print fabric strip. Ensure the right sides of the fabric are facing each other, and once again, confirm that their bottom edges are perfectly matched. This is where your precise cutting pays off. Using a ¼-inch seam allowance (the standard for quilting), stitch these two pieces together along the diagonal side. A consistent ¼-inch seam is vital for your blocks to fit together correctly. After completing one side, repeat this exact process on the other side of the print fabric strip with the second triangle. You should now have a central print strip with background triangles stitched to both diagonal sides.
Step 2: Pressing, Trimming, and Final Block Assembly
Once you’ve stitched the triangles to the central print strip, it’s time to press your fabric. Carefully open up the fabric unit you’ve just sewn and press the seams flat. In quilting, we typically press seams towards the darker fabric to prevent the lighter fabric from shadowing through, or sometimes open for less bulk. For this block, follow Carol Thelen’s recommendation in the video. Pressing is a critical step that helps your quilt block lie flat and ensures accuracy when joining subsequent pieces. After pressing, you may notice small fabric “nubs” or “dog ears” at the corners where the seams meet. Carefully trim these off; this reduces bulk and makes for cleaner intersections.
Continue this process to piece the remaining fabric pieces into identical units as outlined in the pattern. You will likely create several of these initial units. Once you have a few units ready, take two units made with the same print fabric. These will form a larger section of your quilt block. Place one of your background rectangles (these are generally longer pieces of background fabric) in between these two units. Orient the background rectangle so its longer edges face towards the center of the two print units. Pin these pieces together, ensuring all raw edges are aligned. Stitch them together one at a time, again using your consistent ¼-inch seam allowance.
As you stitch these larger sections together, remember to press your seams after each step. This incremental pressing helps maintain accuracy and a flat finish. Continue to piece the rest of your cut fabric pieces into similar block units, meticulously following the pattern’s layout. Once all your individual units are created, lay them out on a flat surface, such as your cutting mat or floor, to resemble the final block as shown in the diagram within the pattern. This visual layout stage is crucial for ensuring all pieces are correctly oriented and that your design unfolds as intended.
When you are satisfied with the layout, begin stitching the rows of units together, and then stitch the rows to each other. Always align raw edges, pin generously to prevent shifting, and maintain that precise ¼-inch seam allowance. Again, press your seams as you go, ensuring a smooth and professional finish for your Whimsy Jelly Roll Quilt Block. Take pride in each seam, knowing that every stitch contributes to your beautiful, handmade creation.
Tips for Quilting Success
To ensure your quilting project is as enjoyable and successful as possible, keep these pro tips in mind:
- Maintain a Consistent Seam Allowance: The ¼-inch seam is fundamental in quilting. Practice on scraps to ensure your machine consistently stitches this width. A quarter-inch foot for your sewing machine can be a great investment.
- Press, Don’t Iron: When pressing seams, lift and place your iron rather than sliding it. This prevents stretching the fabric, which can distort your block.
- Accuracy is Key: Measure twice, cut once. Even a small discrepancy in cutting or stitching can lead to blocks that don’t fit together perfectly.
- Pin Generously: Use pins to align your fabric pieces before sewing, especially when joining longer seams or matching complex intersections.
- Watch the Video: Carol Thelen’s video tutorial provides invaluable visual demonstrations. Don’t hesitate to pause, rewind, and rewatch sections as needed.
- Don’t Fear the Seam Ripper: Everyone makes mistakes! A seam ripper is a quilter’s best friend. It’s better to unpick a wonky seam and re-sew it than to leave a mistake that will bother you later.
All images and the original tutorial concept are credited to Carol Thelen via YouTube. We highly recommend visiting her channel and subscribing for more inspiring quilting content and brilliant tutorials!
Conclusion: Your Quilting Journey Begins
Congratulations on completing your Whimsy Jelly Roll Quilt Block! You’ve just mastered a charming and versatile design that’s perfect for a wide range of quilting projects, from a standalone mini-quilt to a full-sized bedspread. By utilizing convenient jelly roll strips and following these clear instructions, you’ve developed foundational quilting skills that will serve you well in all your future endeavors. The process of transforming simple fabric strips into a beautiful, intricate pattern is truly rewarding, and we hope this tutorial has sparked a lifelong passion for quilting within you.
Remember to share your creations! There’s a vibrant online quilting community eager to see your work and offer encouragement. Don’t forget that the free pattern provided by Carol Thelen is a fantastic resource, allowing you to replicate this block with ease. Continue to explore new patterns, experiment with different fabrics, and most importantly, enjoy every stitch of your quilting journey. Happy quilting!