
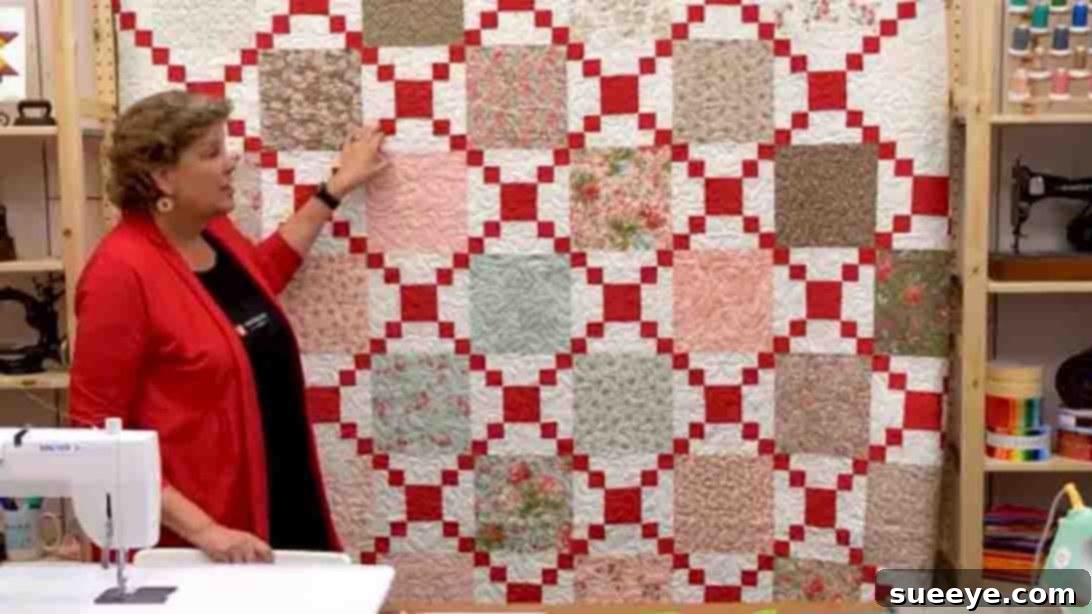
Easy Irish Change Quilt Tutorial: Create a Stunning Quilt with Jenny Doan
Are you searching for a quilting project that’s both engaging and delightfully straightforward? Look no further than the captivating Irish Change Quilt. This fantastic design, popularized by quilting maestro Jenny Doan of Missouri Star Quilt Company, is celebrated for its simplicity and the breathtaking visual impact it achieves with minimal effort. Whether you’re a seasoned quilter looking for a quick and satisfying make, or a beginner eager to dive into the world of fabric and thread, this pattern is an absolute gem.
The beauty of the Irish Change Quilt lies in its clever use of pre-cut fabrics, specifically 10-inch layer cakes, combined with carefully crafted strip sets. This ingenious approach eliminates much of the tedious cutting, allowing you to focus on the joy of sewing and watching your design come to life. The result is a dynamic quilt top where colors and patterns “change” or flow seamlessly, creating an intricate chain-like effect across the entire surface. It’s a project that promises not only a beautiful finished product but also a truly enjoyable creative journey.
In this comprehensive guide, we’ll walk you through every essential step, from gathering your materials to assembling your quilt blocks and finishing your masterpiece. We’ll build upon the brilliant techniques shared by Jenny Doan, adding detailed insights and helpful tips to ensure your success. Get ready to transform your fabric stash into a cherished heirloom with this beginner-friendly Irish Change Quilt pattern!
Materials Needed for Your Irish Change Quilt Project
Gathering all your supplies before you begin is a crucial step that ensures a smooth and uninterrupted quilting process. For this particular Irish Change Quilt pattern, you’ll primarily be working with pre-cut layer cakes and coordinating yardage for accents, backgrounds, and borders. Here’s a detailed list of what you’ll need to create your beautiful quilt:
- 1 Print Layer Cake (10-inch squares): This pre-cut bundle will form the core of your quilt’s design, providing a wonderful array of coordinated prints. Using a layer cake saves significant time on cutting and ensures your fabrics harmonize beautifully, perfect for a striking Irish Change design.
- 1 1/2 Yards of Accent Fabric: This fabric will be used to create specific elements within your blocks, adding contrast and depth. Choose a color that complements your layer cake prints but stands out effectively to highlight the “change” effect.
- 3 1/4 Yards of Background Fabric (includes inner border): The background fabric provides a visual “resting place” for your patterned blocks and helps define their shapes. It’s also used for your inner border, creating a harmonious frame. A neutral color like white, cream, or a light gray often works best to make your accent colors pop.
- 1 3/4 Yards of Outer Border Fabric: The outer border frames your entire quilt top, giving it a finished and polished look. Select a fabric that either ties all your colors together or provides a striking contrast, enhancing the overall appeal of your Irish Change Quilt.
- 9 1/4 Yards of Backing Fabric (for vertical seams) OR 3 1/4 Yards of 108″ Wide Backing Fabric: The backing is the underside of your quilt. The amount needed depends on the width of your fabric and whether you’re piecing it. Wide backing (108 inches) is a convenient option as it often requires no seams, simplifying the process.
- 1 Yard of Binding Fabric: Binding is the narrow strip of fabric that finishes the edges of your quilt, encasing the raw edges and adding durability. It’s an opportunity to add a final pop of color or a subtle frame that complements your Irish Change Quilt design.
- Basic Quilting Supplies: Don’t forget your essential tools: a sewing machine, sharp scissors or a rotary cutter, a self-healing mat, quilting rulers, pins or wonder clips, an iron and ironing board, and coordinating thread. These tools are indispensable for accurate cutting and precise piecing.
Step-by-Step Directions: Crafting Your Irish Change Quilt
The magic of the Irish Change Quilt comes together through a series of easily repeatable steps. Precision in cutting and sewing is key to achieving that signature “chain” effect. Let’s break down the process into manageable sections to help you create your beautiful quilt with confidence.
Step 1: Preparing Your Strip Sets – The Foundation of Your Blocks
The core of this quilt relies on creating three distinct strip sets. These sets are then cut into smaller units that form the components of your unique quilt blocks. Accuracy here is paramount for ensuring your blocks fit together perfectly and achieve the desired Irish Change pattern.
-
First Strip Set (Center Unit):
- Begin by cutting a 4-inch wide strip from your chosen accent fabric (e.g., a vibrant red). This will form the central element of your first strip set, providing a focal point.
- Next, cut two 2-inch wide strips from your background fabric (e.g., a crisp white). These will frame the accent strip.
- Carefully sew one 2-inch white strip to each long side of the 4-inch red strip, ensuring right sides are together and using a consistent 1/4-inch seam allowance. Press your seams, ideally towards the darker fabric to prevent shadowing, or open for a flatter finish, which can be helpful for reducing bulk.
- From this completed strip set, cut individual 4-inch blocks. These will serve as the central components for your quilt blocks. You’ll need one of these 4-inch units for each quilt block you plan to make.
-
Second Strip Set (Side Units):
- For your second set, cut a 4-inch wide strip from your background fabric (e.g., white). This will be the inner part of this unit.
- Then, cut two 2 1/2-inch wide strips from your accent fabric (e.g., red). These will create the flanking elements.
- Sew one 2 1/2-inch red strip to each short side of the 4-inch white strip. Again, maintain that precise 1/4-inch seam allowance and press your seams carefully. Consistent pressing is vital for accurate block construction.
- Once sewn, cut 2-inch pieces from this strip set. For each complete Irish Change quilt block, you will need two of these 2-inch units. These will ultimately flank the central unit created in the first step.
-
Third Strip Set (Top and Bottom Units):
- The final strip set requires a 7-inch wide strip from your background fabric (e.g., white). This larger strip forms the base of this unit.
- Next, cut two 2-inch wide strips from your accent fabric (e.g., red). These will be sewn to the sides.
- Sew one 2-inch red strip to each long side of the 7-inch white strip. Press your seams after sewing. These units will create the top and bottom borders of your assembled blocks, contributing to the chain effect.
- From this set, you’ll cut specific units that will form the top and bottom of your assembled blocks.
Step 2: Assembling Your Irish Change Quilt Blocks
With your strip sets prepared and accurately cut, it’s time to bring all the elements together to form the individual Irish Change quilt blocks. This is where the magic starts to happen, and the intricate design begins to reveal itself through careful piecing.
- Start with the Center Unit: Take one of the 4-inch center blocks you created from the first strip set (the unit with the 4-inch accent strip flanked by two 2-inch background strips). This forms the distinct heart of your Irish Change block.
- Attach the Side Units: Next, take two of the 2-inch units from your second strip set (the unit with the 4-inch background strip flanked by two 2.5-inch accent strips). Sew one of these 2-inch units to each of the long sides of your center block. Ensure they are aligned perfectly, using a consistent 1/4-inch seam allowance. Press your seams away from the center or open to reduce bulk, which aids in a flatter finished block.
- Add Top and Bottom Strips: Now, you’ll incorporate the units from your third strip set. Take two 7-inch strips (or the longer units created from the third strip set with the 2-inch accent squares already attached on the ends). Sew one of these 7-inch strips to the top and one to the bottom of your assembled unit. These will frame the central part of your block, extending the chain pattern.
- Refine the Block Assembly (Chain Effect): The precise configuration of the “7-inch white strips with two 2-inch red squares on top and bottom” can be interpreted in a couple of ways depending on the overall desired effect and the specific Missouri Star tutorial nuances. Generally, these longer strip-set units (from the third set) become the horizontal elements that connect the blocks and define the “chain.” If your third strip set was specifically designed to have the 2-inch red squares *within* the 7-inch white strip, then those complete pieces are what you attach to the top and bottom of your current unit. The key is to ensure the accent squares align to create the continuous chain when blocks are sewn together, creating the signature Irish Change look.
- Pressing for Perfection: After each seam, take the time to press your block carefully. Consistent pressing makes a huge difference in the final look of your quilt, ensuring flat seams, accurate dimensions, and a professional finish for your Irish Change Quilt.
As you assemble multiple blocks, you’ll start to see the distinctive “Irish Change” pattern emerge. The precise cutting and careful sewing of your strip sets mean that when these blocks are laid out and sewn together, the accent colors will connect, forming elegant diagonal chains that traverse the entire quilt top. This interlocking design is what gives the quilt its unique charm and sophisticated appeal, making it a truly rewarding project.
Bringing It All Together: Assembling Your Quilt Top
Once you’ve created a sufficient number of individual Irish Change blocks, the next exciting phase is to assemble them into your full quilt top. This stage involves careful layout and methodical sewing to ensure your design flows perfectly and the iconic “chain” pattern is continuous.
- Layout Your Blocks: Before sewing, lay out all your completed blocks on a large flat surface (like the floor or a design wall). Arrange them in rows and columns according to your desired pattern. This is crucial for visualizing the “chain” effect and ensuring all your accent pieces align correctly. Step back and examine your layout from a distance to catch any misplaced blocks or color inconsistencies.
- Sew Blocks into Rows: Working one row at a time, sew the blocks together, right sides facing, using a consistent 1/4-inch seam allowance. Pay close attention to nesting your seams where blocks meet to ensure points align beautifully. Press seams in alternating directions for adjacent rows (e.g., press seams to the right for row 1, to the left for row 2). This helps reduce bulk and makes joining rows easier and flatter.
- Join Rows to Form the Quilt Center: Once all your rows are sewn, carefully join them together, again with right sides facing and a 1/4-inch seam allowance. Nesting seams at the block intersections is especially important here for a professional finish. Press these long seams open or to one side, aiming for the method that creates the least bulk for your particular fabrics and ensures a smooth quilt top.
Adding the Borders: Framing Your Irish Change Quilt
Borders are essential for framing your quilt top, protecting its edges, and often enhancing the overall design. The Irish Change Quilt typically features an inner and outer border, which add structure and visual appeal.
- Measure for Inner Border (Sides): First, measure the exact length of your quilt top through the center. Cut two strips of your background fabric to this precise length. Attach one to each side of your quilt top, ensuring even distribution. Press seams towards the border fabric to prevent shadowing and create a crisp edge.
- Measure and Attach Remaining Inner Borders (Top & Bottom): Now, measure the width of your quilt top, including the newly added side borders. Cut two strips of your background fabric to this new length. Attach one to the top and one to the bottom of your quilt top. Press seams towards the border. Your inner border is now complete, providing a subtle frame and definition to your Irish Change Quilt.
- Measure for Outer Border (Sides): Repeat the careful measuring process for your outer border fabric. Measure the length of the quilt top through the center (now including the inner border). Cut two strips of your outer border fabric to this exact length and attach them to the sides of your quilt top. Press.
- Complete the Outer Border (Top & Bottom): Measure the width of the quilt top, including all previously added borders. Cut two final strips of your outer border fabric to this precise length and attach them to the top and bottom. Press your seams one final time. Your complete quilt top is now square, stable, and ready for the next exciting phase: quilting!
The Finishing Touches: Quilting and Binding Your Irish Change Quilt
Completing your quilt involves three final stages: basting, quilting, and binding. These steps transform your pieced top into a durable, warm, and beautiful finished quilt, ready for snuggling or display.
- Basting Your Quilt Sandwich: This crucial step involves layering your quilt backing (wrong side up), then your batting, and finally your quilt top (right side up). Ensure all layers are smooth and free of wrinkles. Secure these three layers together using safety pins, basting spray, or long basting stitches. Proper basting prevents shifting and puckering during the quilting process, leading to a much better final result.
- Quilting: This is where you add stitches through all three layers to secure them together and add texture and dimension to your quilt. You can choose to machine quilt using a walking foot for simple straight lines or a basic grid pattern (often recommended for beginners), or explore free-motion quilting for more intricate designs. Alternatively, hand quilting offers a traditional, charming touch. The quilting design can highlight the “change” pattern or add a contrasting element to enhance the quilt’s visual appeal.
- Binding Your Quilt: Once quilted, carefully trim your quilt edges square and even. Prepare your binding strips by sewing them end-to-end to create one long strip, then press them in half lengthwise. Attach the binding to the front of your quilt, ensuring to miter the corners for a professional look. Then, wrap the binding around to the back and hand-stitch or machine-stitch it in place for a clean, durable, and beautiful finish. This step protects the raw edges of your Irish Change Quilt and adds a final frame.
Why the Irish Change Quilt is a Must-Try for Every Quilter
The Irish Change Quilt, as taught by brilliant quilters like Jenny Doan, is more than just another pattern; it’s an accessible entry point into sophisticated quilting designs. Here’s why this particular quilt pattern stands out and is highly recommended for quilters of all skill levels:
- Beginner-Friendly: Its reliance on pre-cut layer cakes significantly simplifies fabric selection and cutting, making it incredibly ideal for those new to quilting. The techniques, while requiring precision, are straightforward and effectively build fundamental quilting skills, setting you up for future success.
- Visually Striking: The “change” or “chain” effect is incredibly captivating and creates a stunning optical illusion. It gives the appearance of complex piecing, yet it’s achieved through repetitive and relatively simple strip-set construction. This makes for a quilt that looks much harder and more intricate than it actually is, impressing anyone who sees it!
- Versatile Design: By simply varying your choice of layer cake and accent fabrics, you can dramatically change the look and feel of your Irish Change Quilt. Go for vibrant, bold colors for a modern, energetic look, or select soft, muted tones for a more traditional, serene aesthetic. It adapts beautifully to any personal style or home decor.
- Efficient Use of Pre-cuts: Layer cakes are specifically designed to coordinate beautifully, meaning you spend less time agonizing over fabric choices and more time enjoying the actual sewing process. This efficiency is a huge plus for busy quilters who want to achieve stunning results without excessive planning.
- Rewarding Project: There’s immense satisfaction in creating a quilt that looks so intricate and beautiful with such manageable steps. It’s a project that builds confidence, hones your quilting skills, and inspires further creative adventures in the wonderful world of fabric and thread.
Final Thoughts and Inspiration for Your Irish Change Quilt
The Irish Change Quilt is a testament to the fact that beautiful quilting doesn’t have to be overly complicated. With the clear guidance provided by experts like Jenny Doan of Missouri Star Quilt Company, and the detailed steps outlined above, you have all the tools and knowledge you need to create a truly wonderful and cherished quilt. This pattern offers a perfect balance of challenge and reward, making it an excellent choice for any quilter.
We highly encourage you to watch the original video tutorial by Missouri Star Quilt Company on YouTube to see these steps in action. There’s nothing quite like seeing a master demonstrate the techniques firsthand to solidify your understanding and gain extra tips. Don’t forget to explore their channel for a treasure trove of quilting videos and endless inspiration for your next fabric project.
So, gather your fabrics, fire up your sewing machine, and embark on this delightful quilting journey. The Irish Change Quilt is waiting to bring warmth, beauty, and a touch of handmade charm into your home. Share your finished creation with us and your quilting community – happy quilting!