
Last-Minute DIY Money Gift Ideas: Creative Ways to Present Cash
We’ve all been there: the dreaded last-minute gift scramble. Whether you’re wrestling with writer’s block for gift ideas or life simply got in the way, finding the perfect present under pressure can feel like a Herculean task. While some might shy away from gifting money, believing it lacks personal touch, the truth is, a beautifully presented cash gift is almost universally appreciated. It empowers the recipient to choose exactly what they need or desire, avoiding unwanted clutter and ensuring their happiness.
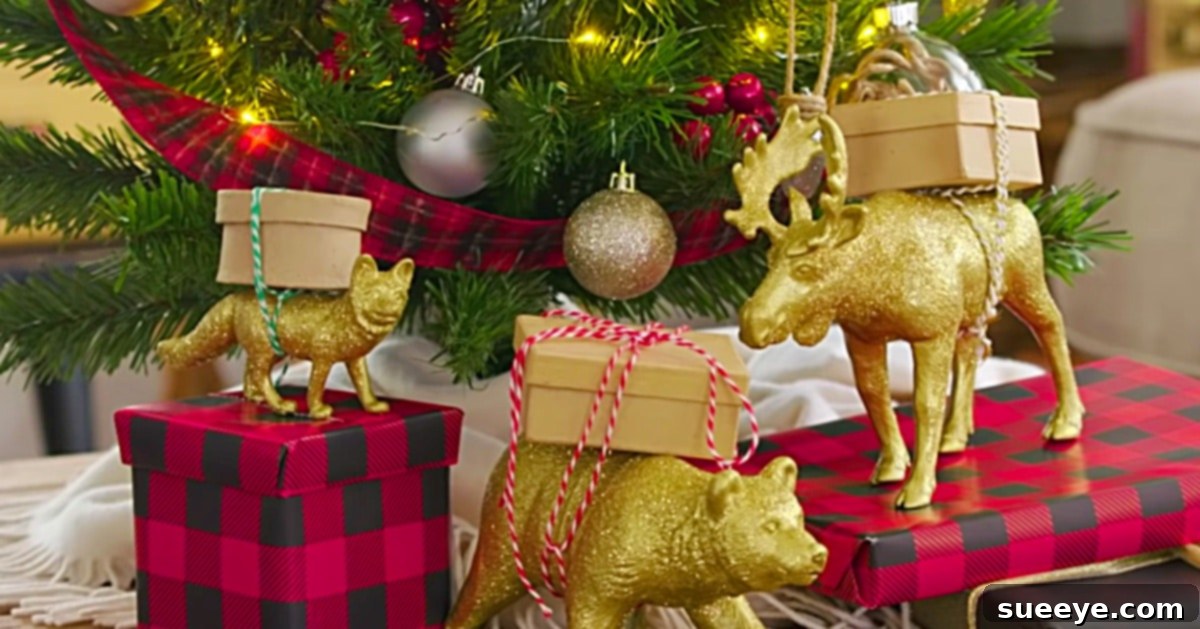
However, the traditional method of slipping a bill into a plain card can sometimes fall short of capturing the celebratory spirit of giving. The magic lies in the presentation. After all, even a practical gift can be made extraordinary with a touch of creativity. This very dilemma recently led me down a rabbit hole of online inspiration, scouring platforms like YouTube for innovative ways to elevate a simple money gift into something truly special and memorable. What I discovered was a treasure trove of ingenious ideas, but one particular DIY project stood out, capturing my imagination and sparking an immediate desire to create: the adorable DIY gold animal carrying a present on its back. This charming concept isn’t just a gift; it’s a delightful miniature work of art that promises to bring a smile to anyone’s face.
The moment I saw it, I was captivated. It was so irresistibly cute that I felt an overwhelming urge to bestow a beautifully packaged money gift upon everyone I knew. The excitement to get started was palpable! This project isn’t just easy and quick; it’s incredibly rewarding, transforming humble craft supplies into a luxurious-looking, personalized present. Let’s dive into how you can create your own “Golden Guardian of Generosity” and turn a last-minute gift into an unforgettable gesture.
Why Choose Money as a Gift? The Ultimate Flexible Present
Before we delve into the crafting, let’s acknowledge why money makes such an excellent gift, especially when time is of the essence. In today’s world, where preferences are highly individualized, money offers unparalleled flexibility. It’s a gift that’s always the right size, the right color, and perfectly aligned with the recipient’s tastes – because they get to decide! Here are a few compelling reasons to consider cash for your next gift:
- Personal Choice: Recipients can use it for something they genuinely need, a long-desired item, or even an experience.
- Avoids Waste and Clutter: Say goodbye to unwanted gifts that end up gathering dust or being re-gifted.
- Universally Appreciated: From a teenager saving for a gadget to an adult planning a vacation, extra funds are almost always welcome.
- Convenience: For the giver, it’s straightforward. For the recipient, it’s practical.
- Last-Minute Lifesaver: When inspiration strikes late, money is a reliable go-to, and with creative presentation, it can still feel incredibly thoughtful.
Elevating the Presentation: Beyond the Envelope
The key to making a money gift feel special lies in how you present it. Moving beyond the standard greeting card, the goal is to add an element of surprise, charm, and effort. This DIY project achieves exactly that, transforming a simple cash offering into a delightful spectacle. Imagine the look on their face as they receive a glittering golden animal, thoughtfully carrying a tiny treasure chest just for them. It’s an interactive, visually appealing, and utterly unique way to say, “I care.”
Gathering Your Treasure Hunt Essentials: Materials You’ll Need
One of the best aspects of this DIY is that the materials are readily available, often found at your local craft store like Michael’s. Here’s what you’ll need to embark on your golden animal adventure:
- Small Animal Figurines: (From Michael’s Craft Store or similar). Opt for sturdy plastic or ceramic animals that are easy to spray paint. Think woodland creatures, farm animals, or even mythical beasts – whatever suits the recipient’s personality or the occasion. A variety of sizes can add character if you’re making several.
- Gold Spray Paint: A good quality, fast-drying metallic gold spray paint will give the best finish. Look for one suitable for plastic, wood, or ceramic surfaces.
- Gold Glitter: Fine-grain gold glitter will add that extra sparkle and touch of magic.
- Decorative Holiday String or Twine: Choose something festive yet durable enough to securely hold the small gift box. Gold, silver, red, or green twine would be perfect for holiday themes, or a simple natural jute for a rustic look.
- Small Gift Boxes: (Also from Michael’s or craft stores). These should be small enough to sit comfortably on the animal’s back without overwhelming it. Consider boxes with lids that close securely.
- Christmas Grass or Shredded Filler: (For the box interior). Green Christmas grass adds a festive nest for the money, but any shredded paper filler in a coordinating color will work beautifully.
- The Money Gift: Of course! Consider neatly folding or rolling the bills to fit snugly into the small boxes.
Step-by-Step Guide: Crafting Your Golden Messenger of Generosity
With your materials gathered, it’s time to unleash your inner crafter! This project is designed to be straightforward, even for those new to DIY. Follow these simple steps to bring your golden animal gifts to life:
Step 1: Preparing the Treasure Chest – Packaging the Money
Begin by making the money itself look inviting. Take your small gift boxes and gently place the money inside. You might fold the bills neatly or even roll them into small scrolls tied with a tiny ribbon. Then, add a generous amount of Christmas grass or shredded filler around the money. This not only makes the box look fuller and more festive but also creates a cushioned nest for your valuable gift. Ensure the lid closes securely, creating a compact and attractive package.
Step 2: The Midas Touch – Goldifying Your Animals
Now for the transformation! Set up a well-ventilated area, preferably outdoors or in a garage with open windows, and lay down newspaper or a drop cloth to protect your surfaces. Place your animal figurines on the protected area. Holding the gold spray paint can about 6-8 inches away, apply thin, even coats across the entire surface of each animal. Rotate the animals as you spray to ensure full coverage, reaching all crevices. It’s better to apply several thin coats than one thick coat, which can lead to drips. Aim for a rich, consistent gold finish that truly shines.
Step 3: A Sprinkle of Sparkle – Glitter Application
Immediately after applying the final coat of gold spray paint, while the paint is still wet and tacky, generously sprinkle gold glitter over the entire surface of each animal. The wet paint acts as an adhesive, ensuring the glitter adheres beautifully. Don’t be shy with the glitter; the more sparkle, the better! Once you’ve applied the glitter, gently tap off any excess. Allow the animals to dry completely, which might take a few hours depending on your paint and humidity. A fully dry surface will prevent glitter from flaking off.
Step 4: The Grand Assembly – Tying It All Together
Once your gold, glittery animals are completely dry, it’s time for the final magical step. Take your decorative holiday string or twine and carefully tie the small gift box containing the money onto the back of each animal. Experiment with different knot styles – a simple square knot, a decorative bow, or even a slip knot that allows easy removal. Ensure the box is securely fastened so it doesn’t fall off during transport but is also easy for the recipient to untie. Position the box centrally on the animal’s back for the best aesthetic. You can trim any excess string for a neat finish.
Tips for Success and Customization
This DIY project is incredibly versatile and can be adapted to suit various occasions and personal tastes. Here are some tips to make your golden animal gifts even more special:
- Theme Your Animals: For a child, perhaps use plastic farm animals or dinosaurs. For an adult, elegant deer or birds might be more appropriate.
- Vary the Metallic Finish: While gold is stunning, consider silver, rose gold, or even iridescent spray paint for a different look.
- Add Personal Touches: Attach a tiny handwritten tag with a personalized message to the string, or a small charm that relates to the recipient’s interests.
- Inside the Box: Besides money, you could include a small, flat chocolate, a handwritten coupon for a favor, or a lottery ticket.
- Group Display: If making multiple, arrange them together on a tray with more Christmas grass for a stunning collective presentation.
- Seal the Glitter: For extra durability and to prevent glitter fallout, you can apply a clear sealant spray over the glittered animals once they are completely dry.
Why This DIY Money Gift Stands Out from the Rest
The beauty of these little money-carrying animal gifts is undeniable. They are far more charming and memorable than any other last-minute present I’ve crafted. This DIY isn’t just a gift; it’s an experience, a delightful surprise that shows genuine effort and creativity. It proves that even a practical gift like money can be presented with immense thought and flair.
- Beyond Expectations: It transforms the often-understated money gift into a focal point.
- Visually Stunning: The gold and glitter combination creates an opulent, festive look.
- Effort and Thought: It clearly communicates that you put time and creativity into their gift.
- Versatile for All Ages: From a young child’s birthday to an adult’s milestone celebration, these gifts are suitable for anyone.
- Budget-Friendly: Craft supplies are generally inexpensive, allowing you to create a luxurious-looking gift without breaking the bank.
Conclusion: Give the Gift of Gold (and Choice!)
Next time you find yourself in a last-minute gifting predicament, remember this fantastic, easy, and quick DIY money gift idea. It’s an ingenious solution that combines the practicality of cash with the charm of a handmade present. These golden animal messengers are sure to be a conversation starter and a cherished memory, long after the money has been spent. So gather your materials, embrace your creativity, and prepare to delight your loved ones with a gift that sparkles with both generosity and ingenuity. Happy crafting, and happy gifting!