
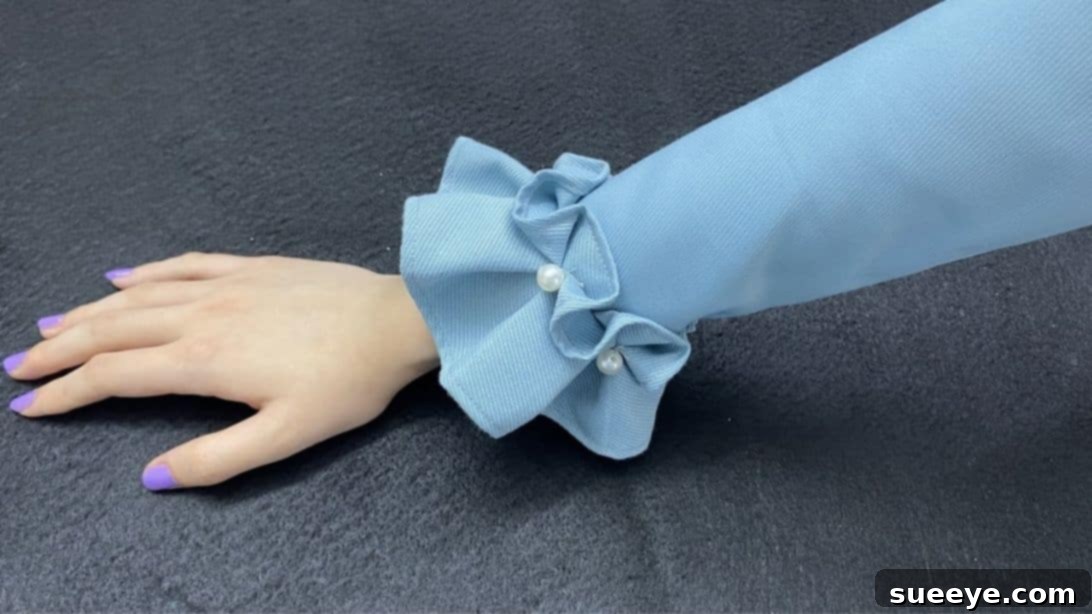
Mastering the Art of Ruffled Sleeves: An Effortless DIY Sewing Guide
Who would’ve thought that transforming a simple sleeve into a pretty, elegant ruffled masterpiece could be so incredibly easy? Thanks to a brilliant and straightforward sewing trick shared by Trefa Craft on YouTube, creating charming ruffled sleeves is now within reach for every sewing enthusiast, regardless of skill level. This ingenious method sidesteps complicated patterns and tedious calculations, offering a quick path to adding a delightful touch of femininity and style to your garments. After discovering this technique, many find themselves inspired to give all their sleeves this adorable upgrade. Prepare to be amazed by how easily you can achieve a professional-looking ruffled finish!
Why Embrace Ruffled Sleeves in Your Wardrobe?
Ruffled sleeves are more than just a passing trend; they’re a timeless design element that injects personality and flair into any outfit. Here’s why you should consider adding them to your sewing repertoire:
- Instant Elegance and Charm: Ruffles instantly elevate a plain top or dress, making it feel more special and sophisticated. They create beautiful movement and a soft, romantic silhouette, perfect for adding a touch of grace to your everyday or special occasion wear.
- Versatility for Any Occasion: Depending on the fabric and garment style, ruffled sleeves can be dressed up for a formal event or kept casual for everyday wear. Imagine a delicate, flowing ruffle on a chiffon blouse for an evening out, or a more structured, playful ruffle on a cotton top for a weekend brunch.
- Personalized Fashion Statement: Handmade ruffled sleeves allow you to customize your clothing, expressing your unique style and creativity. This DIY approach means you won’t find this exact, personalized design anywhere else, making your creations truly one-of-a-kind.
- Revitalize Old Garments: This technique is perfect for upcycling and breathing new life into your existing wardrobe. Give an old, beloved top, dress, or jacket a fresh, modern twist by simply adding a pair of chic ruffled sleeves. It’s a sustainable and stylish way to refresh your look without buying new.
- A Fun and Rewarding Project: The process itself is incredibly enjoyable, and the immense satisfaction of wearing something you’ve crafted with your own hands is truly unparalleled. This comprehensive tutorial breaks down each step into simple, manageable instructions, ensuring a rewarding and successful sewing experience for all.
What You Will Master in This Tutorial
By following this comprehensive guide, you’ll not only learn how to create beautiful ruffled sleeves but also gain valuable sewing insights and skills that can be applied to many other projects:
- The Clever Paper Template Trick: Discover how a simple, homemade paper guide can ensure perfectly spaced and consistent ruffles every single time, eliminating guesswork and frustration. This ingenious method guarantees professional-looking results with minimal effort.
- Precise Fabric Preparation: Master the art of accurately marking and cutting fabric strips, a crucial step for achieving a neat, professional finish in any sewing project. You’ll learn the importance of seam allowances and precise measurements.
- Effortless Ruffle Formation: Learn Trefa Craft’s straightforward method for folding and stitching ruffles. This technique makes the ruffle-creation process quick, enjoyable, and incredibly effective, producing uniform pleats that enhance your garment’s aesthetic.
- Seamless Attachment Techniques: Understand how to securely and neatly attach your newly formed ruffled strip to your main sleeve fabric, integrating them flawlessly into your garment’s design. This ensures a clean and durable connection.
- Essential Sewing Machine Skills: Practice fundamental sewing machine techniques, including creating perfect double-fold hems, executing straight stitches, and confidently working with multiple layers of fabric. These skills are transferable and will boost your overall sewing confidence.
Essential Materials for Your Ruffled Sleeve Project
Gathering all your materials before you begin sewing is a golden rule that ensures a smooth, uninterrupted, and enjoyable creative process. Here’s a detailed list of what you’ll need to embark on your ruffled sleeve journey:
-
A Piece of Sturdy Paper (approximately 2×6 inches): This small, precisely cut paper template will be your invaluable guide for achieving consistent ruffle spacing. Using cardstock, a thick piece of printer paper, or even an old index card works best, as it needs to be firm enough to act as a reliable guide for marking. The precision of this template is absolutely key to ensuring uniform, professional-looking ruffles across your entire strip.
-
Sharp Fabric Scissors: Investing in a good pair of fabric scissors is non-negotiable for any serious sewer. Keep them exclusively for cutting fabric to maintain their razor sharpness. Clean, precise cuts are vital for preventing fraying and ensuring accurate dimensions, which contribute significantly to a neat, finished product.
-
Fabric of Your Choice: The amount of fabric you’ll need will largely depend on the circumference of your sleeve opening and your desired ruffle fullness. As a general guideline, start with a strip roughly 3 inches wide and at least 1.5 to 2 times the length of your sleeve opening. For soft, flowing ruffles, consider lightweight fabrics such as cotton lawn, voile, rayon, or chiffon. If you prefer a more structured, defined ruffle, medium-weight cotton, linen, or even a light denim could be ideal. Always remember to pre-wash and press your fabric thoroughly before cutting. This crucial step prevents unexpected shrinkage after your garment is sewn and ensures your measurements remain accurate.
-
Reliable Sewing Machine: Any basic sewing machine capable of performing a straight stitch will be perfectly suitable for this project. Before you start, ensure your machine is clean, well-oiled, and correctly threaded. It’s also wise to install a fresh needle appropriate for your fabric type; a dull or incorrect needle can lead to skipped stitches or fabric damage.
-
Tailor’s Chalk or Fabric Marking Pen: These specialized tools are designed to allow you to temporarily mark your fabric without leaving permanent traces. They are essential for transferring your ruffle guide marks accurately. Always test your chosen marking tool on a scrap piece of your exact fabric first to ensure it erases or washes out cleanly and doesn’t stain.
-
Matching Thread: Select a high-quality polyester thread that closely matches the color of your fabric. Polyester thread is known for its strength, durability, and resistance to stretching, making it ideal for garment construction. If an exact color match isn’t readily available, it’s generally better to opt for a slightly darker shade, as it tends to blend in more seamlessly than a lighter one.
-
Plenty of Sewing Pins: While not explicitly listed in some basic guides, pins are truly indispensable for this project. They are crucial for holding multiple fabric layers together securely before sewing, especially when managing the folds of the ruffles. Generous pinning helps maintain accuracy and prevents fabric shifting, leading to a much smoother sewing experience.
-
Iron and Ironing Board: An iron and ironing board are absolutely essential for achieving a crisp, professional finish. Pressing your fabric, seams, and folds at various stages throughout the process will make a remarkable difference in the overall appearance and quality of your ruffled sleeves.
Step-by-Step Guide to Crafting Perfect Ruffled Sleeves
Follow these detailed instructions carefully to create beautiful, uniform ruffled sleeves with ease. Paying close attention to precision in each step will undoubtedly lead to the best, most professional-looking results.
Phase 1: Preparing Your Fabric Strips for Ruffling
Step 1: Constructing Your Paper Template for Consistent Ruffles
Begin by taking your piece of paper, which should be approximately 2 inches wide and 6 inches long. This simple template is the secret weapon for achieving perfectly even and consistently spaced ruffles. First, fold this paper strip in half along its 6-inch length, ensuring the edges meet perfectly. Next, fold it again, this time dividing the folded paper into three equal sections along its new, folded length. Once folded, carefully unfold the paper completely. You should now clearly see six distinct, equal segments marked by the creases. Using your sharp fabric scissors (or paper scissors, as this is paper), carefully cut the paper precisely along these fold lines to create six individual, identical paper strips. These narrow strips will serve as your invaluable marking guides, ensuring uniform ruffle spacing on your fabric.
Step 2: Precisely Marking Your Fabric for Ruffle Placement
Now, turn your attention to your main fabric. Cut a long strip of this fabric that is approximately 3 inches wide. The critical length of this fabric strip should be determined by the circumference of the sleeve opening you intend to embellish, plus a generous allowance for fullness. A good starting point is a length that is 1.5 to 2 times the circumference of your sleeve opening for a beautiful, full ruffle.
Lay your newly cut fabric strip flat on your working surface, ensuring it is smooth and free of wrinkles. Take one of your small paper marking strips. Place it on one end of the fabric, making sure to leave a precise 0.4-inch (approximately 1 cm) seam allowance beyond the paper strip’s edge. Using your tailor’s chalk or fabric marking pen, carefully mark both sides of this paper strip onto your fabric. Leave the paper strip in place for reference. Next, pick up another paper strip. Now, carefully skip a space on your fabric that is equivalent to the width of two of these paper strips. Place the second paper strip at this new, designated position and mark both its sides onto the fabric. Continue this precise process across the entire length of your fabric strip: place a paper strip, mark its sides, then skip two paper strip widths, place another paper strip, mark its sides, and so on. Once you’ve used all your paper strips and marked all the corresponding sections on your fabric, remember to add a final space equivalent to two paper strip widths at the very end, followed by another 0.4-inch seam allowance. Finally, trim off any excess fabric from the length of your marked strip, ensuring that both ends retain the 0.4-inch seam allowance you initially planned. This marked fabric strip will form the base for your elegant ruffles.
Phase 2: Forming the Ruffles and Attaching Them to Your Sleeve
Step 3: Creating a Clean Finish with Double-Fold Hems
Before you begin forming the beautiful ruffles, it’s essential to finish the long edges of your fabric strip for a polished and durable look. Take one of the long sides of your fabric strip and carefully roll it inwards by about 0.4 inches (1 cm). Press this fold neatly and firmly with a warm iron to set the crease. Then, roll it inwards one more time by another 0.4 inches, completely encasing the raw edge within the fold. Press again to secure this double-fold hem. This technique creates a very neat, clean, and durable edge, preventing any fraying. Carefully sew this hem in place using your sewing machine, stitching as close as possible to the inner folded edge. Ensure your stitches are straight and even. Repeat this exact process for the other long side of your fabric strip. These meticulously finished hems will provide a professional and lasting finish to the visible edges of your ruffles.
Step 4: Expertly Forming Your Ruffles with Precision
Now comes the most exciting part: creating the ruffles themselves! Refer back to the marks you made on your fabric strip in Step 2. Locate your very first strip mark on the fabric. Carefully fold this mark precisely towards the center of the fabric strip. Next, find the subsequent strip mark (remembering the “skip two” spacing) and fold it towards the center as well. Align these two folds so that their edges meet perfectly at the center, creating your very first controlled ruffle. This technique forms a neat, almost box-pleat-like ruffle, rather than a gathered one. Pin this ruffle securely in place to prevent it from shifting. Continue this precise process along the entire fabric strip: locate the next strip mark, fold it towards the center, then fold the subsequent strip mark towards the center, always aligning their folds neatly. As you create each ruffle, sew over them with a straight stitch to hold them firmly in place. Maintain consistent spacing and neat, crisp folds as you work your way along the entire fabric strip. This method ensures uniform, elegant ruffles without the need for traditional gathering stitches.
Step 5: Seamlessly Attaching the Ruffled Strip to Your Sleeve Fabric
Once you have finished forming and securing ruffles along the entire fabric strip, it’s time to attach it to your main sleeve. Take your main sleeve fabric. Lay the ruffled strip onto the sleeve fabric, ensuring that both pieces are positioned with their wrong sides facing up (or, to put it another way, the right side of the ruffled strip is placed against the wrong side of your main sleeve fabric). Align the raw, unruffled edge of the ruffled strip with the designated attachment line on your sleeve. This line could be the cuff edge, or a line higher up on the sleeve if you prefer a different placement. Carefully pin the ruffled strip to the sleeve fabric. Then, sew the ruffled strip to the sleeve fabric, stitching directly over the same line of stitching that secured your ruffles in Step 4. This clever method expertly hides the raw edges of the ruffle strip and creates a clean, integrated attachment. Use plenty of pins to keep everything perfectly aligned during this critical step, ensuring a smooth, even join.
Step 6: Completing Your Ruffled Sleeve Assembly with a Professional Touch
With the ruffled strip now securely attached to your sleeve fabric, the final assembly of the sleeve can begin. Fold the entire sleeve fabric so that the right sides are facing together, aligning the raw edges of the long side of the sleeve (this is typically the underarm seam). Pin these edges securely from the cuff to the armhole. Sew this long side seam with your sewing machine, creating the tubular shape of your sleeve. Use a 0.4-inch (1 cm) seam allowance, or whatever seam allowance is appropriate for your main sleeve pattern. Once sewn, carefully trim any excess seam allowance to reduce bulk and finish the raw edges with a zigzag stitch or a serger to prevent fraying and ensure durability. Finally, gently turn your newly constructed ruffled sleeve right side out. Take it to your ironing board and press all seams and the ruffles gently with an iron for a crisp, professional finish. You now have a beautiful, custom-made ruffled sleeve, ready to be attached to your garment!
Expert Tips for Flawless Ruffled Sleeves
To ensure your ruffled sleeve project turns out perfectly every time and to elevate your overall sewing experience, keep these expert tips in mind:
- Test on Scrap Fabric: Before committing to your main project, always make a small test ruffle using your chosen fabric. This invaluable step allows you to check your marking tool’s visibility and removability, adjust your thread tension for optimal results, and practice your overall technique.
- Pressing is Your Best Friend: Ironing at each and every stage—after cutting, after hemming, after forming ruffles, and after attaching—makes a significant difference in the final appearance and professional quality of your garment. Crisp folds and flat seams contribute immensely to a polished finish.
- Use Plenty of Pins: Do not be shy with pins! They are absolutely crucial for holding folds and multiple layers of fabric securely in place, especially when working with slippery fabrics or intricate ruffle formations. Generous pinning helps maintain accuracy and prevents fabric shifting during sewing.
- Slow and Steady Wins the Race: Take your time, particularly during the marking and ruffle-forming stages. Precision here is key. Rushing through these steps can easily lead to uneven ruffles, crooked seams, or a less-than-perfect finish. Patience will be rewarded.
- Adjust Stitch Length: For topstitching on hems and for securing your ruffles, a slightly longer stitch length (for example, between 2.5mm and 3.0mm) often looks more professional and allows the fabric to lie flatter. Experiment on scraps to find what looks best with your fabric.
- Consider Fabric Grain: For maximum stability and to help your ruffles hold their shape, cut your ruffle strip along the straight grain of the fabric. Cutting on the bias, however, can create softer, more drapey ruffles, though they might be a bit more challenging to manage for beginners due to the stretch.
- Experiment with Ruffle Fullness: The “skip 2 strips wide” rule outlined in this tutorial provides a lovely, balanced fullness. For denser, more voluminous ruffles, try skipping only one strip width. For more subtle, understated ruffles, you might skip three. Don’t be afraid to adjust your paper template spacing to experiment and find your preferred aesthetic.
Common Issues and How to Solve Them
Even the most experienced sewers encounter occasional hiccups. Here are some common problems you might face during your ruffled sleeve project and straightforward solutions to help you overcome them:
- Uneven Ruffles: This is almost always due to inconsistent marking or folding. To remedy this, meticulously recheck your paper template to ensure it’s precisely cut. When marking your fabric, take extra care to apply the marks accurately. During the folding stage, ensure you are aligning the marks evenly and consistently for each pleat.
- Fabric Puckering During Sewing: Puckering can be caused by several factors: incorrect thread tension on your machine, using the wrong needle size for your specific fabric, or not guiding the fabric smoothly through the machine. Check your machine’s tension settings (test on a scrap!), try a fresh, appropriate needle, and ensure you’re not inadvertently pulling or pushing the fabric, allowing the machine to feed it naturally.
- Raw Edges Fraying After Hemming: If your double-fold hem isn’t executed neatly enough, tiny raw edges might poke out. To prevent this, ensure your initial folds are precise and that you’re stitching close enough to the inner folded edge to securely capture all raw threads. For extra security on highly fraying fabrics, a serger or a tighter zigzag stitch on the raw edges *before* folding can provide an excellent preventative measure.
- Ruffles Appear Too Stiff or Too Limp: This issue is primarily a matter of fabric choice. If your ruffles are excessively stiff, consider using a lighter, more drapey fabric for your next project. Conversely, if they’re too limp and lack body, opt for a fabric with more inherent structure or consider adding a lightweight fusible interfacing to your ruffle strip before forming the ruffles to give them more substance.
- Difficulty Attaching Ruffles to Curved Sleeves: If your sleeve opening has a significant curve, it can indeed be tricky to smoothly attach a straight ruffle strip. To make it easier, carefully clip the seam allowance of your sleeve (making small snips without cutting through the stitch line) to allow it to spread and conform to the straight edge of the ruffle strip more readily.
Creative Variations for Your Ruffled Sleeves
Once you’ve confidently mastered the basic ruffled sleeve technique, don’t stop there! The beauty of DIY sewing lies in experimentation. Explore these creative ideas to add your unique touch and truly make these designs your own:
- Layered Ruffles: For a dramatic and voluminous effect, create two or even three ruffle strips of varying widths. Layer these strips on top of each other before attaching them to the sleeve. This adds incredible depth and visual interest.
- Contrasting Fabrics: Introduce a captivating visual element by using a contrasting color or a boldly patterned fabric for your ruffle strip. This makes the ruffles pop and adds an exciting focal point to a solid-colored garment.
- Adding Decorative Trim: Elevate your ruffles with extra embellishments! Before you hem, you can incorporate delicate lace, a beautiful ribbon, or even a subtle piping along the edges of your ruffle strip for an added decorative touch and bespoke feel.
- Exploring Different Ruffle Types: While this tutorial focuses on a neat, pleated-style ruffle, you can easily adapt the core concept to create traditional gathered ruffles. Achieve this by running two rows of basting stitches along one edge of the fabric strip and gently pulling the bobbin threads to gather the fabric to your desired fullness.
- Ruffles Beyond Sleeves: The versatility of this technique extends far beyond just sleeves! Apply this same method to other parts of your garments to create ruffled necklines, add playful tiers to skirt hems, embellish pockets, or even enhance home decor items like throw pillows and curtains.
Unleash Your Creativity with Ruffled Sleeves
Congratulations! You’ve now unlocked the secret to crafting beautiful, elegant ruffled sleeves with an incredibly simple and effective method. This comprehensive tutorial, inspired by the clever and accessible insights of Trefa Craft, empowers you to add a sophisticated, handmade touch to any garment in your wardrobe. From refreshing an old, beloved top to creating a brand-new, custom-designed piece from scratch, ruffled sleeves are a fantastic and rewarding way to express your personal style and significantly enhance your sewing skills.
Don’t hesitate to experiment with different fabric types, adjust ruffle sizes by modifying your paper template, and play with various placements on your sleeves to truly make these designs your own. Embrace the joy of creating with fabric and thread, and watch with pride as your wardrobe transforms with these charming and stylish handmade additions! The possibilities are endless, and your unique creative vision is the only limit.
All inspiring images and the ingenious technique are graciously credited to Trefa Craft via YouTube. We encourage you to visit her channel, explore her other fantastic content, and subscribe for more sewing inspiration and brilliant DIY projects!