
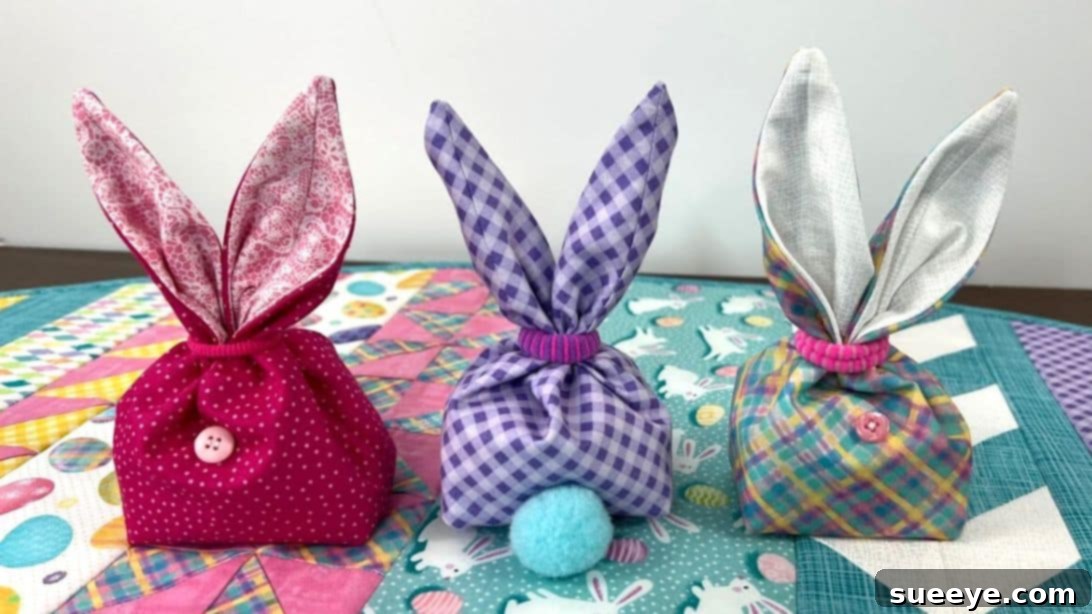
Welcome to a delightful crafting journey where we bring a charming Easter tradition to life! There’s something truly special about a handmade gift, and this DIY Easter Bunny Treat Bag is no exception. Inspired by the brilliant tutorial from The Quilted Forest, this project transforms simple fabric into an adorable bunny-shaped pouch, complete with a fluffy pompom tail. It’s the perfect craft to add a personal touch to your Easter celebrations, whether you’re filling it with candies for the kids, using it as a unique party favor, or simply decorating your home. This guide will walk you through each step, making it easy for both novice and experienced sewers to create a beautiful, custom Easter bunny bag that will surely bring smiles and joy. Let’s gather our supplies and hop into creating these wonderful Easter keepsakes!
Materials You’ll Need for Your Easter Bunny Treat Bag
Before diving into the sewing process, ensure you have all your materials ready. Gathering everything beforehand makes the crafting experience smoother and more enjoyable. Here’s a comprehensive list of what you’ll need to create your very own adorable Easter bunny treat bag:
- Fabric Rectangles: You’ll need two pieces of fabric, each measuring approximately 6 inches by 18 inches. One piece will be for the outer bag, and the other for the lining. Choosing contrasting fabrics adds visual interest and allows the bunny’s ears to stand out beautifully. Consider festive Easter prints, soft pastels, or vibrant patterns that complement your decor.
- Cute Buttons: Select two small, decorative buttons that will serve as the bunny’s eyes or as charming embellishments on the front of the bag. These small details add personality and a touch of whimsy.
- Pompom: A soft, fluffy pompom is essential for the bunny’s tail. You can use a store-bought pompom or create one yourself using yarn. White is classic, but feel free to experiment with other colors!
- Marking Pencil or Fabric Marker: A fabric-safe marking tool is crucial for transferring measurements and cut lines onto your fabric accurately. Ensure it’s easily erasable or disappears with heat/water.
- Essential Sewing Supplies: This includes your sewing machine (with appropriate needle and thread that matches your fabric), sharp fabric scissors, sewing pins or fabric clips to hold pieces together, an iron and ironing board for pressing seams, and a seam ripper (just in case!).
- Ponytail Holder or Ribbon: A simple hair tie or a decorative ribbon will be used to cinch the top of the bag, forming the bunny’s head and ears. This also helps secure the treats inside.
- Candies or Small Treats: The ultimate purpose of this bag! Have your favorite Easter candies, small toys, or other treats ready to fill your finished bunny bag.
Having these items prepared will ensure a seamless crafting experience, allowing you to focus on the fun of bringing your Easter bunny treat bag to life.
Step-by-Step Guide: Crafting Your DIY Easter Bunny Treat Bag
Follow these detailed instructions carefully to construct your delightful Easter bunny treat bag. Precision in each step will lead to a professional-looking and durable finished product.
Step 1: Preparing Your Fabric for the Bunny Ears
Begin by taking one of your 6″ by 18″ fabric rectangles. Fold it in half lengthwise, then in half again crosswise, or simply find the center point along one of the 6-inch edges. Using your marking pencil, make a small mark at the exact center of this edge. From this central mark, measure out a quarter of an inch (approximately 0.6 cm) away from the side of the fabric piece, moving towards each corner. You’ll essentially be marking points that are a quarter of an inch in from each corner along the short edge. Carefully cut a gentle curve or a straight diagonal line from the central mark to these quarter-inch points on all four corners of both fabric rectangles. These cuts will ultimately form the distinctive shape of your bunny’s ears when the bag is assembled, so strive for symmetry.
Step 2: Sewing the Bag Sides and Preparing the Lining
Take one of your cut fabric pieces – this will be your outer bag. Fold it in half lengthwise, ensuring the ‘right sides’ (the patterned or ‘good’ sides of the fabric) are facing each other. Pin along the two raw side edges. Using your sewing machine, stitch a straight seam a quarter of an inch (0.6 cm) away from the raw edges along both sides. This creates the basic tubular shape of your bag. Repeat this process for the lining fabric piece. However, on one of the side seams of the lining piece, remember to mark a 2-inch (approx. 5 cm) opening in the middle. When sewing the lining’s side seams, sew up to this mark, skip the 2-inch section, and then continue sewing to the end. This unsewn opening is crucial as it will allow you to turn the entire bag right side out later.
Step 3: Creating the Flat Bottom of Your Treat Bag
Now it’s time to create the boxed corners that give your treat bag a flat, sturdy bottom. For both your outer fabric piece and your lining piece, carefully pull the side seams apart at the bottom of the tube you’ve just sewn. Flatten the fabric so that the side seam aligns perfectly with the center of the bottom fold, creating a triangular point on each side. The goal is to make the bottom into a neat square. Using your ruler and marking pencil, draw a straight line across each triangular point. This line should be approximately one inch (2.5 cm) away from the very tip of the point. This measurement will determine the depth of your bag’s bottom. Sew directly along these marked lines. Once sewn, carefully trim the excess fabric from these newly formed corners, leaving a seam allowance of about a quarter of an inch (0.6 cm). Trimming here reduces bulk and helps the corners turn out sharply and neatly.
Step 4: Pressing Your Seams for a Crisp Finish
After sewing, the next crucial step for a professional-looking finish is pressing. For all the seams you’ve just sewn (the side seams and the boxed bottom corners), take the time to finger press them open. This means using your fingers to gently flatten the seam allowances to opposite sides. For an even crisper finish, follow up with an iron, pressing each seam flat. Pressing is not just about aesthetics; it helps the fabric lay correctly, reduces bulk, and makes the subsequent sewing steps much easier and more accurate. This simple act significantly elevates the quality of your finished Easter bunny treat bag.
Step 5: Assembling the Outer and Lining Bags
Now, it’s time to bring your outer bag and lining together. Turn your outer fabric piece right side out. Carefully insert this outer bag into the lining piece, which should still be wrong side out. Ensure that the right sides of both fabrics are facing each other. Align the top raw edges of the outer bag with the top raw edges of the lining bag, making sure the side seams match up perfectly. Pin all the way around the top edge to hold the two layers securely together. Using a quarter-inch (0.6 cm) seam allowance, sew around the entire top edge of the bag. Pay close attention to the points of the bunny ears; carefully trim off any excess fabric at these points to reduce bulk. To ensure a smooth curve when turned, use very sharp scissors to make small, V-shaped snips into the seam allowance along the “V” shapes of the ear base. Be careful not to cut through your stitch line!
Step 6: Turning the Bag Right Side Out and Finishing the Lining
With the top seam sewn, it’s time for the magical reveal! Reach into the bag and carefully pull the entire outer fabric piece through the 2-inch opening you left in the lining in Step 2. Gently ease all the fabric through until the entire bag is right side out. Take your time with this step, making sure all corners and curves are pushed out nicely. Once turned, you will have a fully formed bag with the lining on the inside. Now, you need to close the opening in the lining. You can do this by hand using an invisible ladder stitch for a seamless finish, or you can machine stitch it very close to the edge. Once the opening is sewn shut, carefully tuck the lining completely inside the outer bag, smoothing it down so the top seam creates a neat, crisp edge. Give the top edge another press with the iron for a refined look.
Step 7: Adding the Bunny’s Tail and Decorative Buttons
To add the adorable bunny tail, pull the lining side out slightly again. Using a safety pin or a sturdy hand-sewing needle and thread, securely attach your pompom to the center of what will be the back of the bag (the lining side). Ensure it’s firmly attached so it doesn’t detach easily. Once the tail is in place, carefully push the lining back into the bag. Next, it’s time to add the charming buttons that will decorate the front of your bunny bag. Hand-sew a button approximately an inch (2.5 cm) away from the bottom center of the ‘V’ shape formed by the bunny’s ears at the front of the bag. You can add one or two buttons, creating eyes or just a decorative accent. Position them symmetrically for the best effect, making sure your stitches are neat and secure.
Step 8: Shaping the Ears and Filling with Treats
Almost there! To give your bunny treat bag its final charming form, gently press the ears flat with your fingers or a cool iron to define their shape. Now for the fun part: filling the bag! Carefully add your chosen candies, small gifts, or other Easter treasures inside. Be mindful not to overfill the bag, as you’ll need space to secure the top. Once filled, take your ponytail holder or ribbon. Position it at the top of the ears, about a third of the way down from the tips. Gently tuck in the sides of the bag a little bit to gather the fabric, then grab the two ears and pull them apart and upward, cinching them together with the ponytail holder. This action creates the distinct bunny head shape with perky ears. Adjust as needed until your bunny bag looks perfect and the treats are securely nestled inside.
Why Choose a DIY Easter Bunny Treat Bag?
Opting for a homemade Easter bunny treat bag over store-bought alternatives offers a multitude of benefits, making it a truly rewarding project. Firstly, customization is key. You get to select fabrics that perfectly match your Easter theme, favorite colors, or the recipient’s personality. This personal touch makes each bag unique and far more special than any mass-produced item. Secondly, it’s a wonderfully cost-effective option. With just a few simple materials, you can create multiple bags, saving money while still producing high-quality, charming gifts.
Beyond the practical aspects, crafting these bags provides a fantastic opportunity for a fun and engaging activity. It’s a mindful process that allows for creativity and relaxation. If you have children, it can be a great way to involve them in the preparations for Easter, teaching them basic sewing skills or simply letting them choose fabrics and buttons. The joy on a child’s face when they receive a personalized treat bag, knowing it was made with love, is truly priceless. These bags aren’t just for treats either; they can serve as delightful decorations, small gift pouches, or even keepsakes long after Easter is over.
Tips for Success and Customization Ideas
To ensure your DIY Easter Bunny Treat Bag project goes smoothly and yields the best results, consider these helpful tips and customization ideas:
- Fabric Choice: While cotton is easy to work with, feel free to experiment with other fabrics like flannel for a softer feel or even waterproof canvas for a more durable bag. Just ensure your needle and thread are appropriate for the chosen material.
- Precision is Key: Take your time with measurements and cutting. Even small discrepancies can affect the final shape and symmetry of your bunny ears and bag bottom.
- Pressing is Your Friend: Don’t skip the pressing steps! A well-pressed seam lies flat, looks professional, and makes subsequent sewing much easier. Use an iron appropriate for your fabric type.
- Embellishments Galore: Beyond buttons, consider embroidering a small nose and whiskers for a more expressive bunny face. You could also add small fabric flowers, bows, or even heat-transfer vinyl monograms for personalized gifts.
- Varying Sizes: Once you’ve mastered the basic technique, try adjusting the initial fabric rectangle dimensions to create smaller “favor” bags or larger “gift” bags. Remember to proportionally adjust your seam allowances and other measurements.
- Secure the Tail: For younger children, consider using fabric glue in addition to stitching for the pompom tail, ensuring it withstands enthusiastic play.
- Thread Color: While a matching thread is often preferred, a contrasting thread can add a subtle design element, especially if you’re confident in your stitching.
By keeping these tips in mind and letting your creativity flow, you can elevate your Easter bunny treat bags from simple crafts to cherished, personalized items.
Caring for Your Handmade Bunny Treat Bags
To ensure your beautiful DIY Easter Bunny Treat Bags last for many Easters to come, proper care is important. Most cotton fabrics can be gently hand-washed or machine-washed on a delicate cycle with cold water. It’s advisable to air dry them by laying them flat or hanging them, as high heat from a dryer can sometimes cause shrinking or alter the shape of your meticulously crafted ears. If your bag includes delicate embellishments like glued-on buttons or intricate embroidery, spot cleaning might be the best option to protect these details. A light press with a cool iron can help reshape the ears and smooth out any wrinkles after washing. By following these simple care instructions, your handmade bunny bags can become treasured keepsakes, ready to be filled with joy year after year.
Conclusion: The Joy of a Handmade Easter
There’s an undeniable charm and warmth that comes with a handmade gift, and this DIY Easter Bunny Treat Bag truly embodies that spirit. From the initial cuts to the final decorative touches, each step is an act of creation, leading to a unique and adorable item that’s perfect for Easter. Whether you’re a seasoned seamstress or just beginning your crafting journey, this project offers a rewarding experience and a tangible piece of joy to share with loved ones. Imagine the delight on children’s faces as they discover these charming bags filled with treats, knowing they were crafted especially for them. So, gather your materials, follow these steps, and embrace the satisfaction of creating something beautiful with your own hands. We encourage you to share your finished Easter bunny treat bags with us – happy crafting and Happy Easter!