
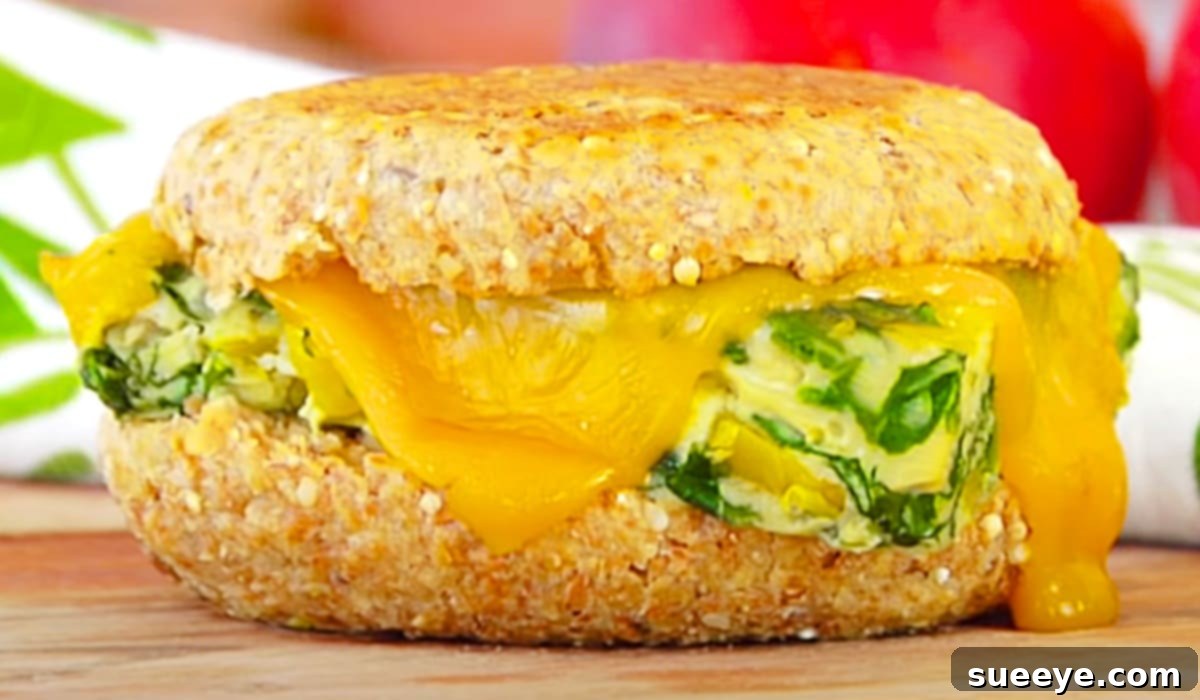
Freezer-Friendly Breakfast Sandwiches: Your Ultimate Guide to Easy Meal Prep
Imagine waking up to a delicious, wholesome breakfast ready in mere minutes, even on the busiest mornings. That dream becomes a reality with freezer-friendly breakfast sandwiches. Skipping breakfast is a common habit in our fast-paced lives, often leading to less healthy choices later in the day. But what if you could have a satisfying, homemade meal at your fingertips, packed with protein and fresh vegetables, designed for convenience?
Inspired by the fantastic insights from Clean & Delicious on YouTube, we’ve perfected a recipe that makes breakfast meal prep not just simple, but incredibly tasty. While the original inspiration might evoke the comforting flavors of potatoes, sausage, and eggs, our refined approach focuses on creating a versatile, healthy base with the option to customize, making it accessible and enjoyable for everyone. These sandwiches are not only incredibly easy to assemble but also designed to be frozen and reheated, providing a perfect solution for nutritious meals on the go.
Why Freezer-Friendly Breakfast Sandwiches Are a Game Changer for Busy Mornings
In today’s hectic world, finding time for a proper breakfast can feel like an Olympic sport. Often, we resort to sugary cereals, unhealthy fast-food options, or worse, skip the most important meal of the day entirely. This is where freezer-friendly breakfast sandwiches revolutionize your morning routine. The concept is brilliantly simple: dedicate a small amount of time to prepare a batch of delicious sandwiches, then individually wrap and freeze them. Come morning, you simply grab one, heat it up, and you’re out the door with a balanced and satisfying meal.
The benefits extend beyond mere convenience. By preparing your breakfast ahead of time, you gain control over the ingredients, ensuring you’re fueling your body with wholesome nutrients. You can pack them with lean protein from eggs, essential vitamins from fresh spinach and bell peppers, and whole grains from English muffins. This not only promotes a healthier diet but also helps maintain stable energy levels throughout your morning, avoiding the dreaded mid-morning crash that comes from carb-heavy, sugary alternatives. Moreover, preparing these sandwiches in bulk is significantly more cost-effective than buying pre-made frozen options or daily take-out breakfast.
Whether you’re a busy parent juggling school runs, a working professional needing a quick grab-and-go, or simply someone who appreciates the efficiency of meal prepping, these make-ahead breakfast sandwiches are an invaluable addition to your culinary repertoire. They eliminate decision fatigue, save precious morning minutes, and ensure you start your day nourished and ready to tackle whatever comes your way.
The Foundation: Building Your Perfect Breakfast Sandwich
The beauty of this recipe lies in its simplicity and the ability to customize. Our core recipe focuses on a flavorful egg and vegetable patty, combined with cheese and an English muffin. This combination provides a hearty base that’s easy to prepare and holds up wonderfully in the freezer. Let’s dive into the essential ingredients you’ll need.
Ingredients For Your Freezer-Friendly Breakfast Sandwich Recipe:
- 6 Large Eggs: The protein powerhouse of our sandwich. Eggs provide essential amino acids and healthy fats, keeping you feeling full and energized. We’ll be baking these for a perfect, sliceable patty.
- 1 Teaspoon of Olive Oil: Used for sautéing our vegetables, adding a touch of healthy fat and enhancing flavor. You can also use avocado oil or any other cooking oil of your preference.
- 1/2 of an Onion (Chopped): Onions add a foundational savory depth to the egg mixture. Yellow or white onions work best here, offering a sweet pungency when cooked.
- 2 Bell Peppers (Chopped): Bell peppers, whether red, yellow, or green, contribute vibrant color, a crisp texture, and a wealth of Vitamin C. They add a delightful sweetness and freshness to the egg patty.
- 1/2 Pound of Fresh Baby Spinach (Chopped): Spinach is a superfood, rich in iron and vitamins, that wilts down beautifully into the egg mixture. It adds a wonderful green hue and a mild, earthy flavor without overpowering the other ingredients.
- Salt and Pepper (To Taste): Essential seasonings to bring out the best in our ingredients. Feel free to adjust quantities based on your preference.
- 6 English Muffins: The ideal vessel for our breakfast sandwiches. Their nooks and crannies are perfect for holding the fillings, and they toast up wonderfully, providing a satisfying crunch. Whole wheat English muffins can be used for added fiber.
- 6 Slices of Your Favorite Cheese: A melty slice of cheese ties all the flavors together. Cheddar, provolone, American, or even a spicy pepper jack can elevate your sandwich.
- Cooking Spray (or Butter to Grease the Pan): To ensure your egg mixture bakes without sticking, making for easy removal and slicing.
Step-by-Step Directions: Crafting Your Delicious Breakfast Sandwiches
Creating these delightful breakfast sandwiches is a straightforward process, broken down into a few easy-to-follow steps. The key is preparing a large egg and vegetable patty that can be easily portioned for your muffins. Follow these detailed instructions, inspired by the method from Clean & Delicious, to ensure perfect results every time.

- Prepare Your Vegetables: Begin by heating the olive oil in a large skillet over medium heat. Add the chopped onions and bell peppers. Sauté them for about 5-7 minutes, or until they become tender and slightly translucent. This step softens the vegetables and brings out their natural sweetness. Once tender, add the chopped baby spinach. Continue to cook for another 2-3 minutes, stirring frequently, until the spinach has completely wilted. Remove the skillet from the heat and set the cooked vegetables aside to cool slightly.
- Whisk the Eggs: In a large mixing bowl, crack the 6 large eggs. Whisk them vigorously until the yolks and whites are fully combined and slightly frothy. This ensures a uniform texture for your egg patty. Season the whisked eggs generously with salt and pepper to taste. You can also add a pinch of garlic powder or onion powder for extra flavor if desired.
- Combine and Bake the Egg Mixture: Gently fold the cooled, sautéed vegetables into the whisked eggs. Make sure the vegetables are evenly distributed throughout the egg mixture. Prepare a baking dish (a 9×13 inch baking pan works well for standard English muffin sizes, or a square pan for thicker patties) by greasing it with cooking spray or butter. Pour the egg and vegetable mixture into the prepared baking dish, spreading it out evenly. Bake in a preheated oven at 350°F (175°C) for 18-25 minutes, or until the egg casserole is set in the center and lightly golden brown around the edges. The exact baking time may vary based on your oven and the size of your baking dish.
- Cool and Slice the Egg Patty: Once baked, remove the egg casserole from the oven. Allow it to cool completely in the pan on a wire rack. This is a crucial step; attempting to slice the hot egg patty will result in a crumbly mess. Once thoroughly cooled, carefully invert the egg patty onto a cutting board. Using a sharp knife or a round cookie cutter (approximately the size of your English muffins), slice the egg patty into 6 equal squares or circles.
- Prepare the English Muffins: While the egg patty is cooling, slice your English muffins in half. You can lightly toast them if you prefer a slightly crisper texture, but it’s not strictly necessary as they will be reheated later.
- Assemble Your Sandwiches: Now comes the fun part – assembling! Place a slice of your favorite cheese on the bottom half of each English muffin. Then, carefully place one of the egg and vegetable patties on top of the cheese. Finally, cover with the top half of the English muffin. At this point, if you want to add cooked sausage, bacon, or ham, layer it between the egg patty and the top muffin half.

Wrapping, Freezing, and Reheating Instructions for Ultimate Convenience
The true magic of freezer-friendly breakfast sandwiches lies in their ability to be stored and reheated with ease. Proper wrapping is essential to prevent freezer burn and maintain freshness.
- Individual Wrapping: Once your sandwiches are assembled and completely cooled (this is critical to prevent condensation and ice buildup), wrap each one individually. You can use plastic wrap, aluminum foil, or a combination of both for extra protection. For best results, first wrap tightly in plastic wrap, then an additional layer of aluminum foil. This dual layer helps to seal in moisture and flavor.
- Freezing: Place the individually wrapped sandwiches into a large freezer-safe bag or an airtight container. Label the bag or container with the date and contents. This helps you keep track of freshness. Store in the freezer for up to 1-2 months.
- Reheating from Frozen:
- Microwave Method (Quickest): Remove the sandwich from the foil (if used) and plastic wrap. Wrap it loosely in a paper towel. Microwave on high for 1.5 to 2 minutes, or until heated through. The exact time may vary depending on your microwave’s wattage.
- Oven/Toaster Oven Method (Best Texture): For a crisper muffin, remove the sandwich from all wrapping. Place it on a baking sheet or directly on the rack in a preheated oven or toaster oven at 350°F (175°C) for 20-25 minutes, or until the cheese is melted and the sandwich is thoroughly heated. If the muffin browns too quickly, you can cover it loosely with foil.
- Air Fryer Method (Crispy Finish): Remove the sandwich from all wrapping. Place it in the air fryer basket. Cook at 300°F (150°C) for 10-15 minutes, flipping halfway through, until heated and crispy.
Elevate Your Breakfast: Variations and Customizations
While our core recipe is fantastic, the beauty of homemade breakfast sandwiches is the endless possibilities for customization. Don’t be afraid to experiment and tailor them to your taste and dietary preferences.
- Protein Power-Ups:
- Sausage: Cooked turkey or pork sausage patties (or crumbles) can be added. Ensure they are fully cooked and cooled before adding to the sandwich.
- Bacon: Crispy bacon strips or crumbles are always a popular addition.
- Ham/Canadian Bacon: Sliced deli ham or Canadian bacon offers a leaner protein option.
- Vegetarian Options: For a plant-based twist, consider adding pre-cooked black bean patties, seasoned tofu scramble, or even slices of grilled halloumi cheese.
- Vibrant Veggie Boosts:
- Mushrooms: Sautéed mushrooms add an earthy flavor.
- Sweet Potatoes: Diced and roasted sweet potatoes can be mixed into the egg patty for a touch of sweetness and extra nutrients.
- Kale: Similar to spinach, wilted kale is another excellent green addition.
- Tomatoes: Slices of fresh tomato can be added before reheating, or dried tomatoes can be mixed into the egg.
- Avocado: Fresh avocado slices are best added after reheating, just before serving, to avoid browning.
- Cheese, Please!: Beyond cheddar, explore other cheeses like Swiss, provolone, Monterey Jack, feta, or a sharp white cheddar for different flavor profiles.
- Bread Beyond English Muffins:
- Bagels: Mini bagels or regular bagels sliced in half make for a heartier sandwich.
- Whole Wheat Toast: For a simpler, lighter option, use toasted whole wheat bread.
- Croissants: For an indulgent treat, use croissants, but note they might get slightly less crispy after freezing.
- Gluten-Free: Opt for gluten-free English muffins or bread.
- Flavor Adventures:
- Spicy Kick: Add a pinch of red pepper flakes to the egg mixture, or a slice of jalapeño cheese.
- Herbaceous: Incorporate fresh herbs like chives, parsley, or dill into the egg mixture for a gourmet touch.
- Tex-Mex: Serve with a side of salsa or add a dash of cumin and chili powder to the eggs.
- Mediterranean: Crumbled feta cheese and a sprinkle of oregano can transform the flavor profile.
Tips for Freezer-Friendly Breakfast Sandwich Success
Achieving perfectly delicious and easily reheatable breakfast sandwiches consistently involves a few key tips:
- Cool Everything Completely: Before assembling and especially before wrapping for the freezer, ensure all components—the egg patty, cooked meats, and even the muffins (if toasted)—are completely cool. This prevents condensation from forming inside the wrap, which can lead to soggy sandwiches and freezer burn.
- Don’t Overcook the Eggs: A slightly undercooked egg patty is better than an overcooked one when it comes to freezing and reheating. The eggs will continue to cook a bit during reheating. Overcooked eggs can become rubbery.
- Portion Control: Cut your egg patty to fit your English muffins or chosen bread perfectly. This ensures a balanced bite and helps with neat assembly.
- Prevent Soggy Bread: If you’re concerned about your English muffins becoming soggy, you can toast them lightly before assembly. However, the most crucial step is ensuring all fillings are cool. For very moist fillings, you might place a slice of cheese on both sides of the egg patty to act as a barrier.
- Double Wrap for Protection: Individually wrapping each sandwich first in plastic wrap, then in foil, offers the best protection against freezer burn and preserves freshness and flavor.
- Label Clearly: Always label your frozen packages with the date and contents. This helps you rotate your stock and ensures you consume them within their optimal timeframe (generally 1-2 months for best quality).
- Batch Cooking Efficiency: When you’re making one batch, consider making a double or triple batch. The prep time isn’t significantly longer, but you’ll have even more convenient breakfasts stored away for future busy mornings.
- Thawing is Optional: Most freezer-friendly breakfast sandwiches can go straight from the freezer to the microwave or oven. Thawing them in the refrigerator overnight can reduce reheating time slightly, but it’s not usually necessary.
This healthy and delicious recipe is a true gift to your future self. By investing a little time now, you’re setting yourself up for stress-free, wholesome breakfasts for weeks to come. Say goodbye to rushed mornings and hello to the convenience and satisfaction of a homemade meal, ready when you are!