
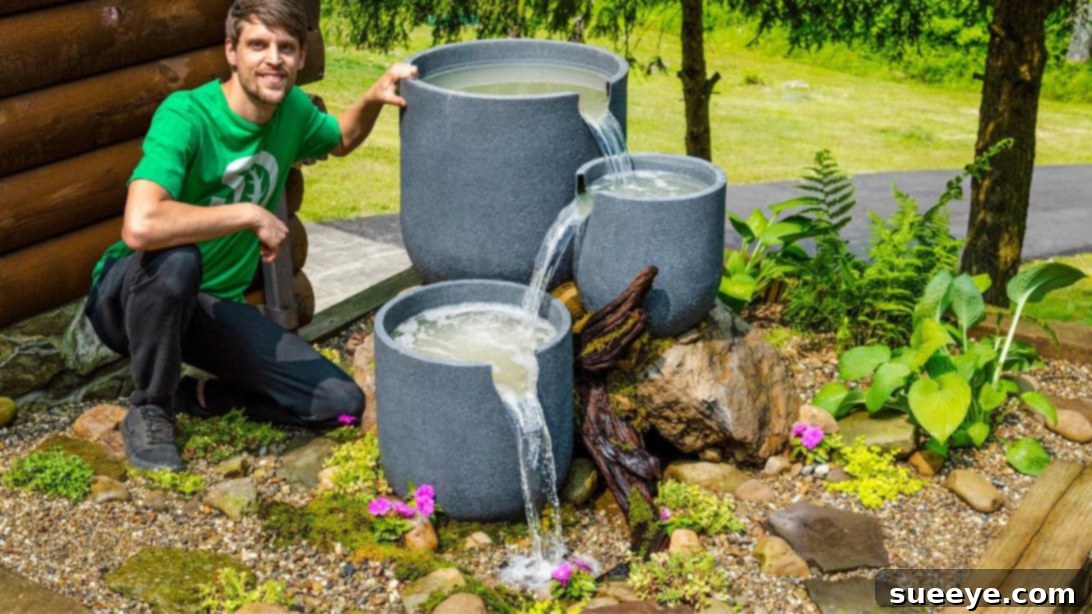
Create Your Own Stunning DIY Vanishing Waterfall Planter Pot Fountain: A Comprehensive Guide to Your Garden Oasis
As the vibrant hues of spring emerge, it’s the perfect season to rejuvenate your garden and infuse it with life. Beyond clearing weeds, pruning, and planting colorful blooms, spring offers an ideal opportunity to embark on engaging DIY projects that truly elevate your outdoor space. If you’re seeking a unique and rewarding endeavor, we highly recommend crafting this magnificent DIY vanishing waterfall planter pot fountain, a brilliant design brought to life by the creative minds at SerpaDesign.
While many planter pot fountain projects exist, this vanishing waterfall design stands out for its sophisticated appeal and ingenious construction. It’s a more detailed undertaking than typical fountain projects, involving several carefully orchestrated steps, yet the final result is undeniably worth every effort. Don’t be intimidated by its intricate appearance; the process is more straightforward than you might imagine, especially with clear instructions. This vanishing waterfall will undoubtedly become the breathtaking centerpiece of your garden, offering soothing sounds and visual delight.
Why a Vanishing Waterfall Fountain is the Perfect Garden Addition
A vanishing waterfall, also known as a disappearing or Pondless® waterfall, offers the enchanting beauty and tranquility of a traditional waterfall without the maintenance demands of an open pond. The water cascades over carefully arranged rocks and planters, disappearing into an underground reservoir where it is then recirculated. This innovative design provides a safe, low-maintenance, and eco-friendly water feature that conserves water and prevents issues like mosquito breeding. It’s perfect for any garden size, adding a touch of serene elegance and a calming auditory experience that transforms your outdoor area into a true sanctuary.
Before You Begin: Explore More DIY Garden Inspirations
If you’re eager to dive deeper into garden creativity, consider these other fantastic DIY projects to complement your new fountain:
- Amazing Outdoor Waterfall DIY
- Easy DIY Upcycled Glassware Garden Flower Tutorial
- DIY Tabletop Indoor Garden Using Small Clay Pots
- Easy DIY Garden Dragonflies Tutorial
Essential Materials for Your Vanishing Waterfall Fountain
Gathering all your materials before you start will ensure a smooth and efficient building process. Here’s a detailed list of what you’ll need, along with insights into their purpose:
- 3 Polyresin Planter Pots in Different Sizes: These lightweight, durable pots will form the visual structure of your waterfall, allowing water to cascade from one to the next. Polyresin is ideal for outdoor use due to its weather resistance.
- Elbow Pipes: Essential for directing water flow, especially in tight spaces or for creating specific angles for your spillways.
- Geotextile Fabric: This porous, synthetic fabric acts as a protective layer, preventing soil and debris from contaminating your reservoir while allowing water to pass through. It also helps stabilize the ground.
- Pea Pebbles: Used for leveling the basin bottom and providing drainage, pea pebbles also serve as a decorative element.
- LDPE Pond Liner (Low-Density Polyethylene): A robust, waterproof membrane critical for creating the sealed reservoir that holds your fountain’s water.
- Pavers: These flat, sturdy stones create a stable, level base for your cinder blocks and overall fountain structure within the basin.
- Limestone Boulders: Large, decorative stones that will be strategically placed to enhance the natural aesthetic of your waterfall and conceal components.
- Cinder Blocks: These hollow concrete blocks form the structural support for your planters and create the internal framework of the reservoir, allowing for water circulation beneath the surface.
- Pressure-Treated Spindles: Used to construct a sturdy frame that supports the galvanized mesh and helps contain the liner, ensuring the fountain’s longevity.
- Galvanized Mesh: This durable metal mesh acts as the “lid” of your underground reservoir, supporting the decorative rocks and preventing larger debris from falling into the pump area. Its galvanized coating prevents rust.
- Weathered Driftwood: Adds a natural, rustic charm to your fountain’s aesthetics, enhancing the “vanishing” effect and providing visual interest.
- PVC Coupling Adapter: Connects PVC pipes or other fittings, creating a secure, leak-proof connection for your pump’s tubing.
- Barbed Hose Fitting: Used to connect flexible tubing to rigid PVC pipes or pump outlets, ensuring a tight seal for water circulation.
- PVC Pipe: The primary conduit for water from your pump up to the top planter, allowing for controlled water flow.
- Grow Pot Planters: Smaller, often plastic, planters that can be repurposed or used upside down as internal supports or decorative elements within the main pots.
- River Rocks: Smooth, aesthetically pleasing stones used for decorative covering, camouflaging the mesh and creating a natural riverbed look around the fountain.
- Oase Waterfall Pump 1650: A powerful and reliable submersible pump designed specifically for waterfalls, ensuring adequate flow and height for your fountain. (Note: Specific pump model may vary based on desired flow and head height).
Step-by-Step Guide: Building Your Vanishing Waterfall Fountain
Follow these detailed instructions to construct your captivating vanishing waterfall. Remember to take your time with each step to ensure a durable and beautiful result.
Step 1: Preparing Your Site
Begin by carefully clearing the chosen area in your garden. Remove any existing mulch, leaves, weeds, and other debris from the soil. This ensures a clean workspace and prevents unwanted organic matter from potentially contaminating your reservoir or pump area.
Step 2: Excavating the Reservoir Basin
Measure and dig a hole that is approximately four feet by four feet (1.2m x 1.2m) and about 18-24 inches (45-60 cm) deep, or to a depth that accommodates your cinder block structure. The dimensions can be adjusted slightly based on your garden size and desired fountain scale. It is crucial that the bottom of this hole is as flat and level as possible. Use a hand tamper or your feet to compact the soil firmly, stabilizing the base and preventing future settling, which could compromise your liner.
Step 3: Lining the Basin for Waterproofing
First, lay down a layer of geotextile fabric across the entire excavated hole. This fabric protects your main pond liner from sharp stones or roots. Then, carefully line the hole with the LDPE pond liner. Ensure you leave plenty of slack in the bottom corners and edges; do not stretch it tightly, as this can lead to punctures or tears over time. Allow the liner to conform naturally to the shape of the hole. Temporarily secure the edges with a few heavy rocks to prevent it from slipping while you work.
Step 4: Establishing the Foundation
Spread a uniform layer of pea pebbles across the bottom of the lined basin. This provides a soft, porous bed for your structural components. Next, strategically place pavers on top of the pea pebbles to create a perfectly flat and stable surface for the cinder blocks that will support your fountain. Use additional strips of geotextile fabric around the edges of the pavers and where components might rub against the liner to provide extra protection against abrasion.
Step 5: Constructing the Internal Support Structure
Before placing the cinder blocks, arrange your planter pots inside the basin to visualize your desired layout and ensure they fit comfortably. Once you have an idea, remove the pots. Begin placing the cinder blocks: start with two blocks laid on their sides at the bottom. Create a small gap between them; this space is vital for running the pump’s tubing. Place an additional set of blocks on top, aligning them carefully. Continue adding layers of blocks until you have filled the majority of the hole’s depth. For the bottom layers, position the blocks on their sides to create channels that facilitate unrestricted water flow throughout the reservoir. For the top-most layer of blocks, place them facing up (with their hollow openings vertical) to allow water to easily enter the basin and recirculate.
Step 6: Framing and Securing the Reservoir
Construct a sturdy frame using pressure-treated spindles around the perimeter of your cinder block structure, just above the top layer of blocks. This frame will provide support for the galvanized mesh. Carefully pull the excess pond liner and geotextile fabric up and over this frame. Secure both layers tightly to the frame using stainless steel staples, ensuring a snug fit. Once the liner and fabric are secured, staple the galvanized mesh firmly in place across the top of the frame. This mesh will act as the crucial support layer for your decorative rocks and plants, while also allowing water to pass through to the reservoir below.
Step 7: Preparing the Planters and Tubing
Carefully cut a circular hole in the center of the galvanized mesh. This opening will accommodate the pump’s tubing, allowing it to reach the top planter. Now, place your planter pots back into their final positions, arranging them aesthetically. Add decorative elements like weathered driftwood around the pots and boulders to enhance the natural look. For the largest planter pot (typically the bottom-most in the cascade), drill a sufficiently sized hole in its bottom. Install a bulkhead fitting through this hole, creating a waterproof seal. Then, connect a PVC coupling adapter to both the exterior and interior sides of the bulkhead. Attach a barbed hose fitting to one end of a flexible hose, which will later connect to your pump.
Step 8: Connecting the Plumbing
Securely attach a length of PVC pipe to the inside coupling of the largest planter. This pipe will extend upwards through the center of your cascading planters, carrying water from the pump. Ensure all connections are tight and leak-proof to prevent water loss.
Step 9: Crafting the Spillways
For each planter pot that will cascade water (all except the very top one), you’ll need to create a “spillway.” This involves cutting a notch or slot into the rim of the pot at the desired point where water will flow into the next lower planter. Ensure these spillways are wide enough to allow a generous, natural-looking flow of water. You may need to use a saw or Dremel tool for clean cuts, depending on the pot material.
Step 10: Finalizing Planter Placement and Details
Carefully place the prepared pots back onto the galvanized mesh, ensuring they are level and stable. You may need to use shims or adjust the underlying rocks. To elevate smaller pots or create internal support, place grow pot planters upside down inside each larger pot. Then, fill each pot with river rocks, securing the internal PVC pipe and adding visual weight. For the largest planter, specifically, drill an additional, larger hole in its bottom to accommodate a “stand pipe” or overflow, ensuring proper drainage and preventing overfilling.
Step 11: Filling the Basin and Securing the Mesh
With all the structural elements in place, begin to fill the underground basin with water. Observe carefully for any leaks. Once filled, permanently secure the galvanized mesh to the frame using more stainless steel staples and washers. The washers help distribute the pressure, making the mesh even more secure and preventing it from pulling through the staples. This secure mesh is vital for supporting the decorative elements you’ll add next.
Step 12: Landscaping and Concealment
Now for the aesthetic touches! Artfully arrange various rocks, pebbles, and small plants over the galvanized mesh. Your goal is to completely conceal the mesh and give the impression of a natural stream bed, with water appearing to flow from nowhere. However, leave a specific area clear where the pump will be situated, allowing for easy access for maintenance. For the final spillway area (where water exits the fountain structure to cascade over the rocks), place a layer of geotextile fabric beneath the decorative stones. Then, cover this area with lush moss to create a soft, natural transition and further enhance the vanishing effect.
Step 13: Installing and Testing the Pump
Cut a section of the galvanized mesh (in the designated access area) where the pump’s pipe will extend through. Carefully place your Oase waterfall pump into the open reservoir section beneath the mesh. Connect the flexible tubing from the pump to the PVC pipe extending up into your planter structure. Ensure all connections are tight. Finally, cover the pump access area with decorative stones, allowing for easy removal when maintenance is required. Plug in your pump and marvel as your DIY vanishing waterfall comes to life, creating a serene and captivating focal point in your garden.
Enhancing Your Vanishing Waterfall: Design Tips and Maintenance
Design Personalization
Your vanishing waterfall is a canvas for creativity. Consider incorporating varied plant textures and colors around the fountain to soften its edges and integrate it seamlessly into your garden. Use lighting to highlight the waterfall’s features at night, creating a magical ambiance. Experiment with different types of rocks—from smooth river stones to craggy slate—to achieve a look that perfectly matches your garden’s aesthetic. Small statues or natural wood pieces can also add a personal touch.
Maintaining Your Fountain for Lasting Beauty
To ensure your vanishing waterfall remains a source of joy for years, regular maintenance is key. Check water levels periodically and top off as needed, especially during hot weather, to prevent the pump from running dry. Clean the pump intake screen every few weeks to remove debris that could obstruct flow. Annually, consider draining and thoroughly cleaning the reservoir to remove accumulated sediment. In colder climates, winterize your fountain by draining it, removing the pump, and storing it indoors to prevent freezing damage. These simple steps will keep your waterfall performing beautifully and sounding serene.
Conclusion: Your Garden Transformation Awaits
Building your own DIY vanishing waterfall planter pot fountain is more than just a project; it’s an investment in the tranquility and beauty of your home. With this comprehensive guide, you have all the knowledge and inspiration needed to create a stunning, low-maintenance water feature that will be the envy of your neighborhood. Embrace the challenge, enjoy the process, and soon you’ll be relaxing to the soothing sounds of your very own garden oasis. Start today and transform your outdoor space into a sanctuary of peace and natural elegance!