
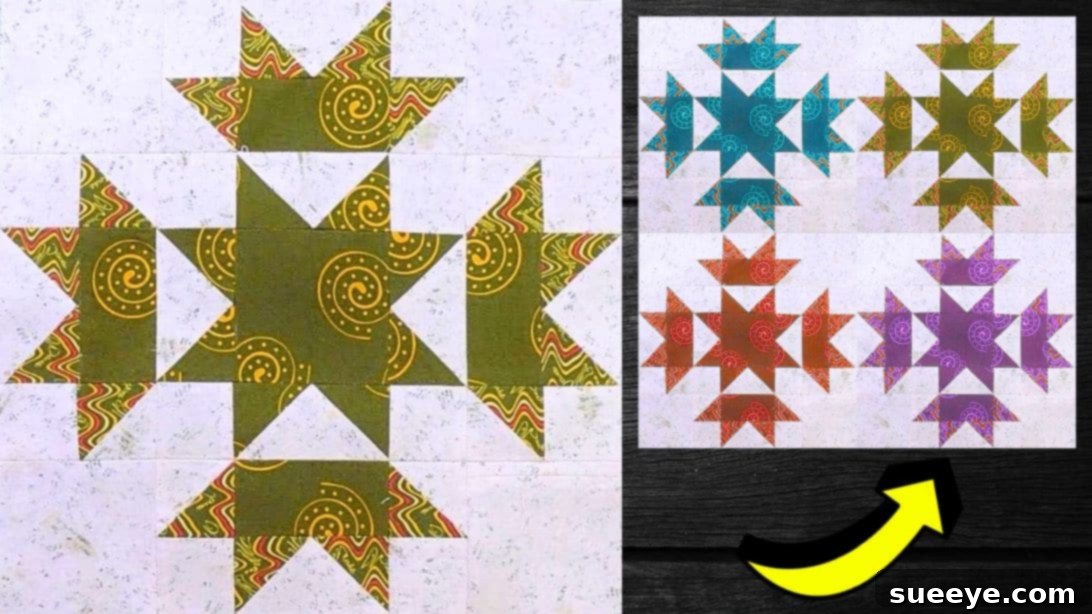
Create a Beautiful Helen Quilt Block: The Ultimate Beginner-Friendly Guide
Embark on a delightful quilting journey with the classic Helen Quilt Block! This versatile and visually appealing design is perfect for quilters of all skill levels, from complete beginners to seasoned stitchers looking for a quick and satisfying project. Inspired by the brilliant tutorial from Carol Thelen on YouTube, this guide breaks down each step into simple, manageable instructions, ensuring you can piece together your own stunning quilt block with confidence. Get ready to transform your fabric stash into a beautiful work of art this weekend!
Essential Materials for Your Helen Quilt Block
Having the right tools and materials is the first step towards a successful quilting project. Gather these items to ensure a smooth and enjoyable crafting experience:
- Dark Print Fabric: Choose a fabric with a distinct pattern or color that will stand out against your lighter fabrics, creating visual depth.
- Light Print Fabric: A contrasting lighter fabric will complement the dark print, adding brightness and definition to your block design.
- Background Fabric: This fabric provides a foundational canvas for your design, often a solid or subtle print that allows the other fabrics to pop.
- Marking Pen, Pencil, or Chalk: Essential for drawing precise lines on your fabric, which will guide your cutting and stitching.
- Quilting Ruler: A clear, sturdy ruler is crucial for accurate measuring and cutting, ensuring all your fabric pieces are the correct size.
- Fabric Scissors or Rotary Cutter and Cutting Mat: While sharp scissors work, a rotary cutter combined with a self-healing cutting mat offers unparalleled speed and precision for cutting multiple fabric layers at once.
- Needle and Thread: High-quality thread that matches or blends with your fabrics will ensure strong, durable seams.
- Sewing Machine: A reliable sewing machine is vital for consistent stitch length and seam allowance, key to a professional-looking finish.
- Helen Quilt Block Pattern: Don’t forget your guide! Click here to download the pattern for precise cutting instructions and layout diagrams.
Preparing Your Fabric for Quilting Success
Proper fabric preparation is a critical, often overlooked, step that sets the foundation for a beautiful quilt. Taking a few extra moments here can prevent headaches later:
- Pre-wash Your Fabrics: While not always strictly necessary for small projects, pre-washing prevents potential fabric shrinkage after your quilt is finished and can remove excess dyes that might bleed onto lighter fabrics.
- Press All Fabrics: Before you even think about cutting, iron all your fabrics thoroughly. Wrinkles and creases can lead to inaccurate cuts and distorted block pieces, affecting the final look of your Helen Quilt Block.
- Starching (Optional but Recommended): For crisper fabric that’s easier to cut and sew, consider using a fabric starch or sizing. This adds body to the fabric, making it more stable and reducing stretch, which is particularly helpful for precise piecing.
Step-by-Step Guide to Crafting Your Helen Quilt Block
Step 1: Precision Cutting for Perfect Pieces
Accuracy begins with cutting. Refer to your downloaded pattern for the exact dimensions required for each fabric piece. Lay your pressed fabric flat on your cutting mat. Use your quilting ruler and rotary cutter to carefully cut all the specified squares and rectangles from your dark print, light print, and background fabrics. Take your time, as precise cuts are fundamental to ensuring your finished block lies flat and squares up perfectly.
Step 2: Constructing the Elegant Flying Geese Units
The Flying Geese unit is a classic quilting element that adds dynamic movement to any block. Here’s how to create these foundational pieces for your Helen Quilt Block:
- Select the fabric pieces designated for your flying geese units. Begin with a large background fabric square, placing it in the center of your workspace.
- Rotate the background square so it sits like a diamond (on point).
- Take two dark print squares. Place one square at the top corner of the background diamond and another at the bottom corner, ensuring their right sides are facing each other and all edges are perfectly aligned.
- Using your marking tool and ruler, draw a diagonal line from corner to corner across each dark print square.
- Stitch a seam on either side of each marked diagonal line, approximately 1/4 inch away. This technique allows you to create two flying geese units from a single initial setup.
- Carefully cut along the marked diagonal line. You will now have two separate units.
- Press the seams open on both units to reduce bulk and ensure they lie flat.
- Trim off the small triangular fabric remnants (often called “nubs” or “dog ears”) from the outer corners. Then, square up each flying geese unit to the specified size from your pattern, ensuring clean edges and accurate dimensions.
- Repeat this process for the remaining corners of your large background square, attaching another dark print square, marking, stitching, cutting, pressing, and trimming, until you have all the necessary flying geese units.
Step 3: Crafting Precise Half-Square Triangles (HSTs)
Half-Square Triangles (HSTs) are another fundamental building block in quilting, known for their versatility and ability to create intricate patterns. For the Helen Quilt Block, you’ll be making HSTs from your light print fabric:
- Take a large light print square. On the wrong side of the fabric, use your marking tool and ruler to draw lines that divide the square in half both vertically, horizontally, and diagonally from corner to corner. This creates a grid on your fabric.
- Carefully stitch a seam on either side of the two diagonal lines, approximately 1/4 inch away from each line.
- Once stitched, cut along all the marked lines – the vertical, horizontal, and both diagonal lines. This method will yield multiple individual units.
- Open each cut unit. You will now have several half-square triangles, each consisting of one light print fabric and one of the background fabric, or a variation depending on how you paired them initially.
- Press all the seams open to reduce bulk, just as you did with the flying geese units.
- Trim off any remaining “nubs” and carefully square up each half-square triangle to the exact dimensions specified in your pattern. This step is crucial for ensuring your block components fit together perfectly in the final assembly.
Step 4: Assembling Your Helen Quilt Block with Precision
With all your flying geese units and half-square triangles prepared and squared up, it’s time for the exciting final assembly. This is where your Helen Quilt Block truly comes to life:
- Lay Out Your Pieces: Following the layout diagram provided in the video tutorial by Carol Thelen or your downloaded pattern, carefully arrange all your individual units on a flat surface. Pay close attention to the orientation of each flying geese and half-square triangle to ensure your design unfolds correctly. This visual step helps prevent mistakes before you start sewing.
- Stitch Row by Row: Once satisfied with your layout, begin stitching the units together into horizontal rows. Take one row at a time, sewing the individual pieces with a consistent 1/4-inch seam allowance. As you sew, pause after each seam to press it open or to one side (usually the darker fabric) to minimize bulk and ensure your rows lie flat.
- Join the Rows: After all your rows are complete and pressed, it’s time to join them together. Align the seams carefully, “nesting” them if possible, to ensure your points match up perfectly. Pin generously to hold everything in place.
- Final Pressing: Stitch the rows together with your consistent 1/4-inch seam allowance. Once all rows are joined, give your completed Helen Quilt Block a final, thorough press to flatten all seams and ensure a crisp, professional finish.
Expert Tips for a Flawless Helen Quilt Block Finish
Achieving a beautiful, high-quality quilt block involves more than just following steps. Here are some pro tips to elevate your quilting game:
- Consistent Seam Allowance: The 1/4-inch seam allowance is paramount in quilting. Invest in a 1/4-inch foot for your sewing machine or mark the exact 1/4-inch line on your machine bed to maintain consistency across all your seams.
- Pressing, Not Ironing: When pressing seams, lift and place your iron rather than sliding it. Sliding can stretch and distort your fabric, especially on bias edges.
- Chain Piecing: For efficiency, especially when making multiple identical units like flying geese or HSTs, use chain piecing. Stitch units one after another without cutting the thread in between, creating a “chain” of pieces. Then, snip them apart.
- Squaring Up: After constructing each unit (flying geese, HSTs) and the final block, always square them up to the correct dimensions. This ensures all your pieces are perfectly sized and will fit together without puckering or misalignment. A dedicated square-up ruler can be incredibly helpful.
- Test Your Stitch: Before starting, always test your stitch length and tension on a scrap piece of fabric. This ensures your machine is set correctly for strong, even seams.
- Use Good Lighting: Proper lighting can significantly reduce eye strain and help you see your lines and seams more clearly, leading to greater accuracy.
Why Choose the Helen Quilt Block for Your Next Project?
The Helen Quilt Block is more than just a pattern; it’s a gateway to mastering fundamental quilting techniques and unleashing your creativity. Here’s why this block is a fantastic choice:
- Versatile Design: The Helen Quilt Block can be incorporated into a myriad of larger quilt projects. Use it as part of a sampler quilt, repeat it to create a stunning full quilt top, or feature it prominently in a smaller project like a cushion cover or tote bag.
- Skill-Building: By creating flying geese units and half-square triangles, you’re practicing two of the most essential and widely used techniques in patchwork quilting. Mastering them here will open doors to countless other patterns.
- Visually Striking: The clever arrangement of light, dark, and background fabrics creates a dynamic, pinwheel-like effect that draws the eye and adds intricate detail to your finished piece.
- Beginner-Friendly: Despite its sophisticated look, the steps are straightforward and repetitive, making it an ideal project for those new to quilting or looking to build confidence.
Conclusion: Embrace the Joy of Quilting with the Helen Quilt Block
Congratulations! You’ve successfully navigated the steps to create your very own Helen Quilt Block. This project is a testament to the rewarding nature of quilting – the transformation of simple fabric pieces into a harmonious and beautiful design. Whether you’re crafting this block for a larger quilt, a decorative accent, or simply for the joy of creation, each stitch tells a story of patience, precision, and passion.
We extend our deepest gratitude to Carol Thelen on YouTube for sharing her expertise and making this wonderful quilt block accessible to everyone. We highly encourage you to visit and subscribe to her channel for more inspiring tutorials and creative quilting ideas!
Now that you’ve mastered the Helen Quilt Block, let your creativity soar. Experiment with different fabric combinations, colors, and arrangements. Share your creations with the quilting community, and continue to explore the endless possibilities that patchwork quilting offers. Happy quilting!