
Master the Art of No-Bake Soft and Fluffy Cheese Bread: Your Ultimate Stovetop Recipe!
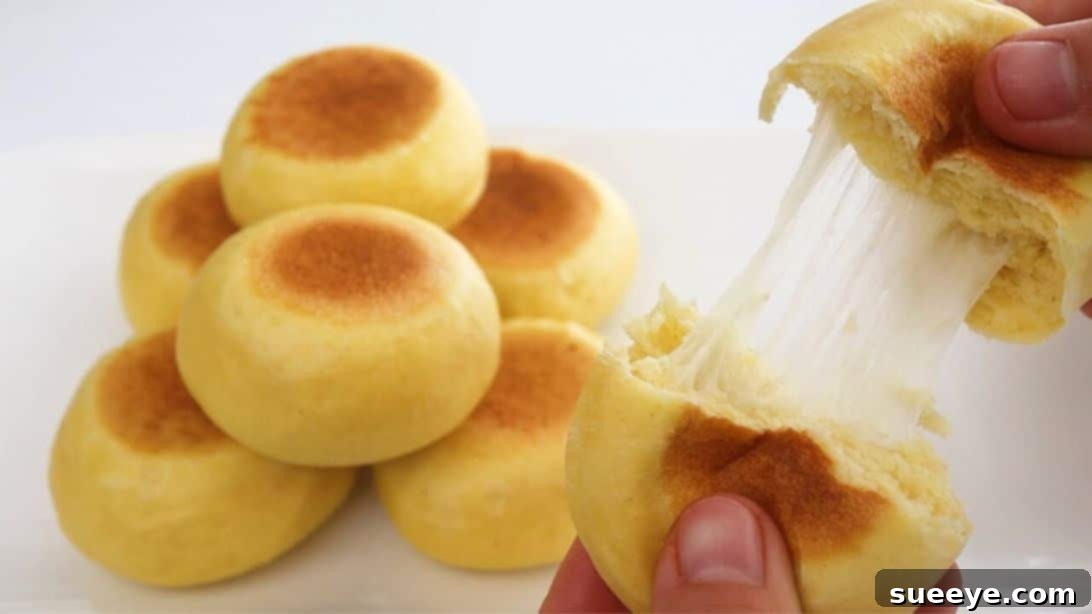
Are you yearning for the comforting aroma of freshly baked bread but dread the thought of turning on your oven? Or perhaps you simply don’t have an oven at all? Fret not, because this incredible no-bake soft and fluffy cheese bread recipe, inspired by the ingenious techniques of Qiong Cooking, is about to revolutionize your home baking experience! Prepare to be utterly amazed by how effortlessly you can create one of the most delicious, melt-in-your-mouth breads right on your stovetop. This isn’t just a recipe; it’s a game-changer for anyone looking for an easy, accessible, and utterly delightful bread-making journey.
Imagine sinking your teeth into a perfectly golden, incredibly soft, and wonderfully fluffy piece of bread, brimming with pockets of gooey, savory mozzarella cheese. Now, imagine achieving all of this with just 6 simple ingredients and without ever touching an oven! This recipe defies conventional baking wisdom, proving that incredible homemade bread is well within reach for every kitchen, regardless of its equipment. Whether you’re a seasoned baker looking for a new challenge or a complete novice taking your first steps into the world of bread making, this recipe is designed to be straightforward, rewarding, and absolutely foolproof. Get ready to impress yourself and your loved ones with this culinary masterpiece!
Our comprehensive guide will walk you through each step, ensuring your success from start to finish. We’ll dive deep into the nuances of ingredient selection, the art of dough preparation, and the secrets to achieving that perfect stovetop crispness. Beyond just the instructions, we’ll share valuable tips and tricks to elevate your cheese bread, offer creative variations to suit any palate, and even provide guidance on how to store your delectable creations. Forget complex techniques and extensive cleanup; this recipe focuses on simplicity without compromising on flavor or texture. Let’s embark on this exciting culinary adventure and discover the joy of making magnificent no-bake cheese bread!
Essential Ingredients for Your No-Bake Cheese Bread Masterpiece:
Crafting this exquisite no-bake cheese bread requires a surprisingly short list of readily available ingredients. Each component plays a crucial role in achieving the desired soft texture, rich flavor, and beautiful rise. Here’s what you’ll need:
- 3 Large Eggs: Eggs provide structure, richness, and help bind the dough. They also contribute to the bread’s tender crumb and a beautiful golden hue. For best results, use eggs at room temperature as they mix more evenly with other ingredients.
- 1/4 Cup of Neutral Oil: A quarter cup of oil, such as vegetable, canola, or sunflower oil, adds moisture to the dough, ensuring a soft and pliable texture. It also helps prevent the bread from drying out during cooking and contributes to its overall tenderness.
- 4 Tablespoons of Granulated Sugar: Sugar isn’t just for sweetness; it’s vital for activating the yeast, helping the dough rise beautifully. It also contributes to the browning of the bread on the stovetop and enhances the overall flavor profile, balancing the savory cheese.
- 1 Teaspoon of Instant Yeast: Instant yeast is a fantastic choice for this recipe as it can be added directly to the dry ingredients without prior proofing. It’s the magic ingredient that makes your bread wonderfully fluffy and light, giving it that characteristic rise and airy texture.
- 2 Cups of All-Purpose Flour: All-purpose flour forms the structural base of your bread. It’s versatile and provides the perfect balance for a soft yet sturdy dough. Sifting your flour can help ensure a lump-free dough and a lighter texture.
- Mozzarella Cheese (Shredded or Cubed): The star of the show! Mozzarella cheese is ideal for its melting properties, creating delightful pockets of gooey, savory goodness within the bread. Feel free to use pre-shredded or grate your own for an even fresher taste.
That’s it! Just these six foundational ingredients are all you need to create a bread that tastes like it came from a gourmet bakery. Ensure all your ingredients are fresh for the best possible outcome.
Step-by-Step Guide to Crafting Your Perfect No-Bake Cheese Bread:
Follow these detailed instructions carefully to ensure a successful and delicious batch of no-bake cheese bread. Each step is designed to be straightforward, making this recipe accessible to bakers of all skill levels.
Step 1: Preparing the Wet Ingredients and Activating the Yeast
Begin by cracking three large eggs into a spacious mixing bowl. For optimal mixing and dough consistency, it’s beneficial if the eggs are at room temperature. Next, measure and add 1/4 cup of a neutral-flavored oil, such as vegetable or canola oil. The oil contributes to the bread’s tenderness and keeps it from drying out. Follow this with 4 tablespoons of granulated sugar. The sugar is crucial not only for a hint of sweetness but also as nourishment for the instant yeast, aiding its activation and subsequent rise. Finally, sprinkle 1 teaspoon of instant yeast directly over these ingredients. Using a whisk, thoroughly combine all these components until the mixture is uniform and smooth. Ensure there are no visible lumps of sugar or unmixed yeast. This initial vigorous whisking helps dissolve the sugar and begins the yeast activation process. Once well combined, set the bowl aside and allow the mixture to rest for precisely 5 minutes. This brief resting period gives the yeast a head start, preparing it to work its magic when the flour is introduced.
Step 2: Forming the Initial Dough
After the 5-minute resting period, it’s time to introduce the foundational structure of our bread. Add 2 cups of all-purpose flour directly into your wet mixture. Avoid adding all the flour at once; it’s often best to add it gradually to prevent a dusty mess and ensure even incorporation. Using a sturdy silicone spatula or a wooden spoon, begin to mix the flour into the wet ingredients. Start by incorporating it gently from the center outwards. Continue mixing and folding until all the flour is hydrated and a rough, shaggy dough begins to form. At this stage, it might still look a bit crumbly, but the goal is to bring all the ingredients together into a cohesive mass before the hands-on kneading begins.
Step 3: Kneading for Smoothness and Initial Rest
Once you have a shaggy dough, transfer it to a clean, lightly floured work surface. Now, it’s time for the tactile art of kneading. Using your hands, begin to knead the dough. The initial few minutes will feel sticky, but as you continue to knead, the dough will become smoother and more elastic. Knead for about 5-7 minutes, or until the dough reaches a “medium firm” consistency. It should be soft and pliable, but not overly sticky, and should bounce back slightly when gently pressed. Over-kneading can make the bread tough, while under-kneading won’t develop the gluten sufficiently. Once kneaded, gather the dough into a smooth ball and place it back into the mixing bowl. Cover the bowl tightly with plastic wrap or a clean kitchen towel to prevent it from drying out. Allow the dough to rest in a warm spot for 20 minutes. This short rest allows the gluten to relax, making the dough easier to handle in the next step.
Step 4: The First Rise: Doubling in Size
After the initial 20-minute rest, return to your dough. Give it a few gentle kneads—just enough to smooth it out further and release any large air bubbles. This brief kneading helps to redistribute the yeast and nutrients. Once smoothed, reshape it into a ball and place it back into the bowl. Cover the bowl securely with plastic wrap once more, ensuring an airtight seal. This is crucial for creating a warm, humid environment that encourages yeast activity. Place the bowl in a warm, draft-free area of your kitchen. Now, allow the dough to rise for approximately 1 hour, or until it has visibly doubled in size. The exact time may vary based on your room temperature and the activity of your yeast. A warm kitchen will expedite the process, while a cooler one might require a bit more time. Patience is key during this stage, as a good rise is fundamental for a light and fluffy bread.
Step 5: Preparing the Dough for Filling
Once your dough has successfully doubled in size (typically after an hour), it’s time to test its readiness. Gently poke the dough with a floured finger. If the indentation remains and doesn’t spring back, your dough is perfectly proofed and ready to proceed. If it springs back too quickly, it might need a little more time. Carefully transfer the risen dough from the bowl to a lightly floured work surface. Gently deflate the dough by folding it a few times to release excess air. This process, known as “punching down” or “degassing,” helps create a finer, more even crumb in the finished bread. Shape the dough into a neat oval. Using a sharp knife or a dough scraper, divide the oval into 16 relatively equal small pieces. Consistency in size is important for even cooking. Immediately after dividing, cover the dough pieces with plastic wrap. This prevents them from drying out and forming a skin, which can hinder the final rise and make them difficult to work with. Work quickly to keep the dough fresh and pliable.
Step 6: Shaping and Filling Your Cheese Buns
Now comes the exciting part: filling your bread with cheesy goodness! Take one piece of the divided dough, keeping the others covered to prevent drying. On your lightly floured surface, gently roll out the dough into a small, thin oval or circle. The thinner you roll it, the easier it will be to seal later. Once rolled, fold the dough several times, almost like folding a small blanket. This step helps create layers, contributing to the bread’s soft and fluffy texture. After folding, roll it out again. Then, fold it in half. The goal is to create a piece of dough that is slightly thicker in the middle and thinner around the edges. This thicker center will perfectly cradle your cheese. Place a generous amount of mozzarella cheese (shredded or small cubes work best) in the center of the dough. Carefully bring the edges of the dough together over the cheese and pinch them firmly to seal, ensuring no cheese can escape during cooking. Once sealed, gently roll the dough in your palms and press it slightly to flatten it into a disc or a small bun shape. The goal is to have the cheese completely enclosed. Place the shaped cheese bun on a baking mat or a tray covered with plastic wrap, ensuring they don’t stick. Repeat this entire process for the remaining 15 pieces of dough, working efficiently to keep the dough from drying out.
Step 7: The Final Proofing for Maximum Fluffiness
After shaping and filling all your cheese buns, they need one final rise to achieve maximum fluffiness and lightness. This process is known as proofing. Cover the shaped dough pieces loosely with plastic wrap or a clean kitchen towel. It’s important not to cover them too tightly, as they need space to expand. Place them in a warm, draft-free spot in your kitchen. Allow the dough to rise for approximately 40 minutes. However, the exact timing can be flexible and largely depends on your room temperature. In a warmer environment, they might be ready in closer to 30-35 minutes, while a cooler room might require up to an hour. You’re looking for the buns to become visibly puffy and slightly larger than their initial shaped size. To test if they’re ready, gently press one with a floured finger; it should slowly spring back, leaving a slight indentation. If it springs back too quickly, it needs more time. If it doesn’t spring back at all and feels deflated, it might be over-proofed.
Step 8: Stovetop Cooking to Golden Perfection
This is where the “no-bake” magic truly happens! Place a large non-stick pan or a heavy-bottomed skillet over low heat. It’s crucial to use low heat to ensure the bread cooks through without burning the exterior. There’s no need to add any oil to the pan; we’re essentially pan-frying these buns dry. Once the pan is gently heated (you can test with a drop of water—it should sizzle softly), carefully place the proofed dough circles directly into the pan. Make sure not to overcrowd the pan; cook them in batches if necessary, leaving enough space between each bun for even cooking and easy flipping. Immediately cover the pan with a lid. This traps the heat and steam, creating an oven-like environment that helps the bread cook internally and ensures it becomes wonderfully soft and fluffy. Cook for 5 minutes, or until the bottom side is a beautiful golden brown. Carefully flip each cheese bun using a spatula, cover the pan again, and cook the other side for an additional 5 minutes, or until it’s also golden brown and cooked through. Once both sides are golden and the buns feel light, turn off the heat but keep the lid on for another 3 minutes. This crucial resting period prevents the bread from shrinking back and allows the internal temperature to equalize, resulting in an even softer, more stable bun. Transfer the cooked cheese bread to a wire rack to cool slightly before serving.
Tips for Success & Variations:
- Don’t Rush the Rise: Patience during the proofing stages is key for a truly fluffy bread. A warm environment can speed things up, but always check for the visual cues (doubled in size, spring-back test).
- Even Heat is Essential: Use a good quality non-stick pan and maintain low heat for cooking. High heat will burn the outside before the inside is cooked.
- Cheese Choices: While mozzarella is classic, feel free to experiment! Cheddar, Monterey Jack, or a blend of cheeses can add different flavor dimensions. For a spicy kick, add a pinch of red pepper flakes with your cheese.
- Herb Infusion: Incorporate finely chopped fresh herbs like chives, parsley, or dried oregano into your dough or sprinkled over the cheese for an aromatic twist.
- Sweet Delights: For a sweet version, omit the cheese and instead fill with a spoonful of fruit jam, Nutella, or a cinnamon-sugar mixture.
- Serving Suggestions: These cheese breads are perfect warm, straight from the pan. They make an excellent breakfast, a light lunch accompaniment, or a delightful snack. Serve them with soup, salad, or simply on their own.
- Storage: Store any leftover cheese bread in an airtight container at room temperature for up to 2 days, or in the refrigerator for up to 4 days. Reheat gently in a pan or microwave for best results.
Embrace the Joy of No-Bake Soft and Fluffy Cheese Bread!
There you have it – a comprehensive guide to creating truly exceptional no-bake soft and fluffy cheese bread right in your own kitchen! This recipe not only delivers incredible flavor and texture but also opens up a world of possibilities for those without traditional baking ovens or simply seeking a simpler approach to homemade bread. From the initial mixing of ingredients to the final golden sizzle on your stovetop, each step is a testament to the fact that culinary delights don’t always require complex equipment or extensive experience. The joy of pulling apart a warm, cheesy, incredibly soft bread, knowing you made it from scratch with such ease, is truly unparalleled.
This stovetop cheese bread is more than just a meal; it’s an experience. It’s perfect for a quick breakfast, a comforting snack, or an impressive addition to any meal. Its versatility means you can adapt it to your taste, whether you prefer extra cheese, a hint of herbs, or even a touch of sweetness. So, gather your ingredients, clear your countertop, and prepare to embark on a delightful baking adventure. We encourage you to try this recipe and discover firsthand how easy and rewarding homemade, no-bake bread can be. Share your creations, experiment with flavors, and most importantly, savor every soft, fluffy, cheesy bite. Happy cooking!