
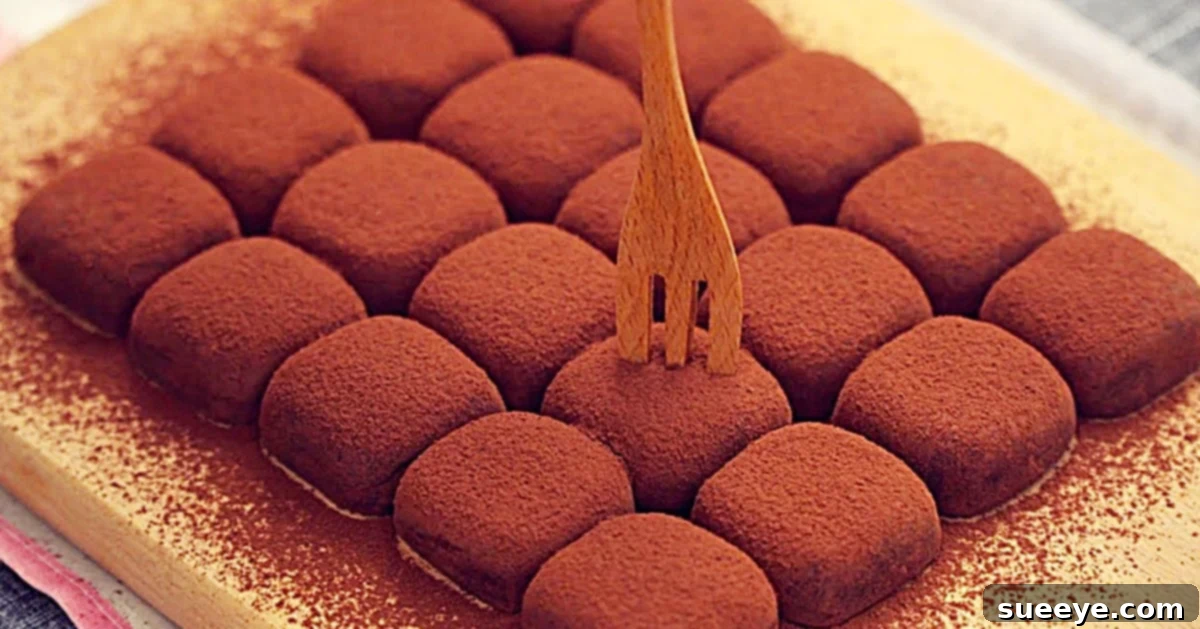
Indulge in the world of exquisite confectionery without the fuss! For many, the idea of making homemade truffles conjures images of complex techniques and specialized equipment. Yet, what if we told you that creating luscious, melt-in-your-mouth chocolate truffles could be incredibly simple, requiring only two staple ingredients? Prepare to be amazed by this unbelievably easy 2-ingredient condensed milk truffle recipe, a culinary secret that transforms pantry basics into a luxurious dessert.
Gone are the days of believing that rich, creamy truffles are reserved for professional chocolatiers. Thanks to brilliant culinary shortcuts, such as the video recipe tutorial by Nino’s Home on YouTube, you can now whip up these fabulous treats in your own kitchen with minimal effort. The true magic lies in the harmonious combination of just two humble components: sweetened condensed milk and good quality cocoa powder. It’s truly astounding how such a simple pairing can yield a dessert so intensely flavorful, wonderfully rich, and perfectly decadent. This recipe is a game-changer for anyone craving an impressive yet effortlessly achievable sweet treat.
Master the Easiest 2-Ingredient Condensed Milk Truffles Recipe (No-Bake)
Uncover the simplest path to creating delicious chocolate truffles that taste like they came from a gourmet confectionery. This no-bake recipe is perfect for beginners, busy home cooks, or anyone looking for a quick yet elegant dessert solution. Forget about tempering chocolate or elaborate preparations; with just two core ingredients, you’re mere steps away from a batch of homemade truffles that will undoubtedly impress.
Why This 2-Ingredient Truffle Recipe is a Game-Changer
In the vast world of desserts, finding a recipe that balances simplicity with sensational flavor is a rare gem. This 2-ingredient truffle recipe stands out for several compelling reasons, making it an absolute must-try:
- Unparalleled Simplicity: The most obvious advantage is the minimal ingredient list. Sweetened condensed milk and cocoa powder are often already in your pantry, eliminating the need for special grocery runs.
- Effortless Preparation: This is a no-bake recipe, meaning you won’t need to turn on your oven. The process involves simple mixing and chilling, making it perfect for novice bakers or those with limited kitchen experience.
- Quick to Assemble: While chilling time is required, the active preparation time for these truffles is incredibly short. You can have the mixture ready for refrigeration in under 15 minutes.
- Budget-Friendly Indulgence: Compared to store-bought gourmet truffles, making your own with just two ingredients is significantly more economical, allowing you to enjoy a luxurious treat without breaking the bank.
- Customizable & Versatile: Despite its simplicity, this basic truffle recipe serves as a fantastic foundation for various flavor additions and coatings, allowing you to personalize each batch to your preference.
- Perfect for Any Occasion: Whether you need a quick dessert for a weeknight craving, an impressive treat for a potluck, or a thoughtful homemade gift, these truffles fit every scenario.
This recipe demystifies the art of truffle making, proving that gourmet flavors can indeed be achieved with incredibly straightforward methods and ingredients. It’s a testament to the power of quality components and a smart technique.
The Magic Behind the Main Ingredients
At the heart of these delightful truffles are two powerhouse ingredients, each playing a crucial role in creating the perfect texture and flavor profile:
- Sweetened Condensed Milk: This thick, syrupy milk product is the unsung hero of many no-bake desserts. In this recipe, it acts as a binder, a sweetener, and the primary source of the truffle’s rich, creamy texture. Its high sugar content and viscosity contribute to the dense, fudgy consistency that is characteristic of a good truffle. Brands like Eagle Brand are well-known for their consistent quality, ensuring a reliable base for your dessert. The gentle heating process helps to further thicken the milk, preparing it to perfectly incorporate the cocoa.
- Cocoa Powder: The other half of this dynamic duo provides the essential chocolate flavor and contributes to the truffle’s firm structure. The type of cocoa powder you choose can subtly influence the final taste. Natural cocoa powder tends to have a more acidic, sharper chocolate flavor, while Dutch-processed cocoa (alkalized) is darker, less acidic, and has a smoother, milder chocolate taste. For a classic, deep chocolate truffle, Dutch-processed cocoa is often preferred. Sifting the cocoa powder is a critical step, ensuring a lump-free, smooth mixture and a silky final product.
Together, these two ingredients undergo a simple transformation, creating a rich, fudgy ganache-like mixture that solidifies into irresistible truffles. The sweetness of the condensed milk perfectly balances the slight bitterness of the cocoa, resulting in a harmonious and addictive flavor.
Essential Ingredients for Your Delicious Truffles
Gathering your ingredients is the first and easiest step in this delightful culinary adventure. Precision isn’t overly strict, but using good quality components will always yield the best results.
- 100 grams of unsweetened cocoa powder (sifted): While the original recipe specifies 100g, you might adjust slightly based on your desired chocolate intensity and the consistency of your condensed milk. Sifting is crucial to prevent lumps and ensure a smooth, uniform truffle mixture.
- 1 (240 gram) can of sweetened condensed milk: Brands like Eagle Brand are highly recommended for their consistent quality and creamy texture. Ensure it is *sweetened* condensed milk, as unsweetened evaporated milk will not work for this recipe.
That’s it! Just these two humble items are all you need to create a truly remarkable dessert. The simplicity of this list makes this recipe incredibly accessible and perfect for spontaneous sweet cravings.
Step-by-Step Directions to Master Your 2-Ingredient Truffles
Follow these straightforward steps, originally inspired by the Nino’s Home video recipe tutorial, to create your perfect batch of homemade truffles. Each step is designed to be simple and foolproof.
Step 1: Gently Heat the Condensed Milk
Begin by pouring the entire can of sweetened condensed milk into a medium-sized, heavy-bottomed saucepan. Place the saucepan over low to medium-low heat. The goal here is not to boil the milk, but rather to gently warm it through. This process helps to thin the condensed milk slightly, making it easier to incorporate the cocoa powder, and also aids in thickening the mixture for that desired fudgy texture later on. Stir continuously for about 5-7 minutes, ensuring the milk doesn’t scorch at the bottom. You’ll notice it becoming slightly thicker and more golden in color.
Step 2: Incorporate the Sifted Cocoa Powder
Once your condensed milk is warmed and slightly thickened, remove the saucepan from the heat. Gradually add the sifted cocoa powder to the warm condensed milk. It is essential to add the cocoa powder in stages, stirring vigorously after each addition to prevent lumps. A whisk works wonders here for achieving a smooth consistency. Continue stirring until the cocoa powder is completely blended into the condensed milk, forming a thick, uniform chocolate mixture. The mixture should be glossy, dense, and pull away from the sides of the pan slightly when stirred.
Step 3: Prepare for Chilling
Select a shallow baking dish or a small square pan (e.g., 8×8 inch or a loaf pan for thicker truffles). Line the dish with plastic wrap or parchment paper, ensuring there’s an overhang on all sides. This makes it incredibly easy to lift the set truffle mixture out later. Pour the warm chocolate mixture evenly into the prepared dish, using a spatula to spread it smoothly into an even layer. The thickness of this layer will determine the height of your truffles.
Step 4: Refrigerate Until Firm
Once the mixture is spread in the pan, cover it loosely with additional plastic wrap or foil. Transfer the dish to the refrigerator. Allow the mixture to chill for a minimum of 2-3 hours, or preferably until it is completely firm. The longer it chills, the easier it will be to cut and shape the truffles. For best results, overnight chilling is ideal.
Step 5: Cut and Dust Your Truffles
When the truffle mixture is thoroughly firm, remove the dish from the refrigerator. Use the plastic wrap or parchment paper overhang to carefully lift the entire slab of chocolate out of the pan and onto a cutting board. Using a sharp knife, cut the slab into desired shapes – typically small squares or rectangles. For a more traditional look, you can also roll the cut pieces into small balls between your palms (lightly dusted with cocoa powder if sticky). Finally, place additional sifted cocoa powder in a shallow dish and gently roll each truffle in it until thoroughly coated. This dusting not only enhances the chocolate flavor but also prevents the truffles from sticking together and adds a beautiful finish.
That’s it! Your homemade 2-ingredient condensed milk truffles are ready to be enjoyed. This recipe truly is one of the easiest and most satisfying dessert candy recipes you’ll ever encounter. The rich, creamy texture and intense chocolate flavor make them utterly irresistible, and the simplicity of their creation makes them even sweeter.
Pro Tips for Perfect 2-Ingredient Truffles Every Time
While the recipe is incredibly simple, a few expert tips can elevate your truffles from good to absolutely phenomenal:
- Always Sift Your Cocoa Powder: We cannot stress this enough. Sifting cocoa powder before adding it to the condensed milk ensures a silky-smooth mixture, free from any pesky lumps. This contributes significantly to the luxurious mouthfeel of your finished truffles.
- Gentle Heat is Key: When warming the condensed milk, keep the heat low to medium-low. Overheating can cause the milk to scorch or caramelize too quickly, altering the flavor and consistency of your truffles. Consistent, gentle stirring is also important during this phase.
- Achieve the Right Consistency: After mixing in the cocoa powder, the mixture should be thick, glossy, and pliable, almost like a very dense brownie batter. If it seems too sticky to handle even after chilling, you might need to add a tiny bit more sifted cocoa powder during the mixing stage, or simply chill it longer.
- Patience with Chilling: Do not rush the refrigeration step. A minimum of 2-3 hours is necessary, but chilling overnight will give you the firmest, easiest-to-handle truffle base. The colder and firmer the mixture, the cleaner your cuts will be, and the easier it will be to roll into balls if desired.
- For Rolling Truffles: If you opt to roll your truffles into balls instead of cutting squares, lightly dust your hands with a little extra cocoa powder or even powdered sugar to prevent sticking. Using a small cookie scoop or a melon baller can help create uniformly sized truffles.
- Use Quality Ingredients: Since there are only two ingredients, the quality of each shines through. Invest in a good brand of sweetened condensed milk (like Eagle Brand) and a high-quality cocoa powder for the best flavor.
Creative Variations and Coatings to Personalize Your Truffles
The beauty of this simple truffle base is its versatility. Once you’ve mastered the basic recipe, you can easily experiment with different flavors and coatings to create a diverse array of gourmet treats. Here are some ideas to spark your creativity:
Flavor Infusions (Add with condensed milk):
- Vanilla Extract: A teaspoon of good quality vanilla extract can enhance the chocolate flavor and add a warm, inviting aroma.
- Mint Extract: For a refreshing twist, add a few drops of peppermint extract to create mint chocolate truffles.
- Coffee or Espresso Powder: A teaspoon of instant espresso powder or strong coffee extract will deepen the chocolate flavor and add a subtle coffee kick.
- Almond or Orange Extract: These extracts offer distinct, sophisticated flavor profiles that pair wonderfully with chocolate.
- A Pinch of Salt: A tiny pinch of sea salt can magically enhance the sweetness and complexity of the chocolate.
- Liqueurs (for adult truffles): A tablespoon of your favorite liqueur, such as Kahlua, Bailey’s Irish Cream, Grand Marnier, or rum, can transform these into sophisticated adult treats. Add it after removing the condensed milk from heat, before adding cocoa.
Exciting Outer Coatings (Beyond Cocoa Powder):
- Powdered Sugar: For a delicate, sweet finish, roll truffles in sifted powdered sugar.
- Shredded Coconut: Toasted or untoasted shredded coconut adds a lovely texture and tropical flavor.
- Chopped Nuts: Finely chopped almonds, pistachios, hazelnuts, or walnuts provide a delightful crunch and nutty flavor.
- Colorful Sprinkles: Perfect for birthdays, holidays, or making them appealing to kids.
- Melted Chocolate Drizzle: Dip truffles halfway in melted tempered chocolate (dark, milk, or white) for an extra layer of chocolatey goodness, or simply drizzle artistically.
- Crushed Cookies: Crushed Oreos, graham crackers, or shortbread cookies add an interesting texture and flavor.
- Matcha Powder: For a unique, slightly bitter, and earthy coating that contrasts beautifully with the sweet chocolate.
- Cinnamon Sugar: A mix of cinnamon and granulated sugar for a warm, comforting spice note.
Feel free to mix and match these ideas! For example, try coffee-flavored truffles rolled in toasted almonds, or mint-flavored truffles dipped in white chocolate. The possibilities are truly endless, allowing you to tailor these simple treats to any palate or occasion.
Storing Your Homemade Truffles
Proper storage is key to maintaining the freshness, texture, and flavor of your delicious 2-ingredient truffles. Here’s how to keep them at their best:
- Airtight Container: Always store your truffles in an airtight container. This prevents them from drying out and absorbing any ambient odors from your refrigerator.
- Refrigeration is Best: Due to the condensed milk base, these truffles are best kept in the refrigerator. They firm up beautifully when chilled, making them easier to handle and enhancing their fudgy texture. They can last for up to 1-2 weeks when properly refrigerated.
- Layering: If you have multiple layers of truffles in your container, place a sheet of parchment paper between each layer to prevent them from sticking together.
- Serving Temperature: While stored in the fridge, truffles often taste best when allowed to come to room temperature for about 10-15 minutes before serving. This allows their flavors to open up and the texture to become slightly softer and more melt-in-your-mouth.
- Freezing for Longer Storage: These truffles freeze exceptionally well! Arrange them in a single layer on a parchment-lined baking sheet and freeze until solid. Once frozen, transfer them to a freezer-safe airtight container or freezer bag. They can be stored in the freezer for up to 2-3 months. Thaw them in the refrigerator overnight or at room temperature for about 30 minutes before serving.
With proper storage, you can enjoy these delightful treats for an extended period, making them perfect for meal prepping your desserts or having a quick indulgence ready whenever a craving strikes.
The Joy of Gifting Homemade Truffles
Beyond being a personal indulgence, these 2-ingredient truffles make truly thoughtful and impressive gifts. The effort (or lack thereof, in this case!) put into homemade treats always resonates with recipients. Here’s why they’re perfect for gifting and how to present them beautifully:
- Personal Touch: A batch of homemade truffles speaks volumes about your care and effort, even if the recipe was deceptively simple.
- Versatility: They are suitable for almost any occasion – holidays, birthdays, host gifts, thank-you tokens, or just a sweet gesture for a friend.
- Cost-Effective: You can create a gourmet-looking gift without spending a fortune on store-bought alternatives.
- Customizable for Recipients: With the various flavor and coating options, you can tailor a batch of truffles specifically to the recipient’s preferences, making the gift even more special.
Presentation Ideas:
- Small Gift Boxes: Line a small decorative box with tissue paper or mini paper cupcake liners, then arrange the truffles neatly inside.
- Cellophane Bags: Place a few truffles in clear cellophane bags, tie with a ribbon, and add a small personalized tag.
- Mini Cupcake Liners: If you’re using larger truffles or different shapes, individual mini cupcake liners can help protect them and make them look professional.
- Mix and Match: Create an assortment box with different flavors and coatings for a delightful variety.
Handing over a beautifully packaged box of your homemade truffles is sure to bring a smile to anyone’s face. It’s a delicious way to share a little bit of joy and your culinary creativity.
Frequently Asked Questions (FAQs) about 2-Ingredient Truffles
Even with a simple recipe, questions can arise. Here are answers to some common inquiries about making these condensed milk truffles:
- Can I use unsweetened cocoa powder?
Yes, the recipe specifically calls for unsweetened cocoa powder. However, ensure it’s high-quality for the best flavor. If you’re referring to using unsweetened *condensed milk* (i.e., evaporated milk), then no, you absolutely need sweetened condensed milk for this recipe to work as intended, as it provides both sweetness and the necessary thick consistency. - My mixture is too sticky, what should I do?
This usually means it hasn’t chilled long enough. Return it to the refrigerator for at least another hour or two. If it’s still too sticky after thorough chilling, you can try adding a tiny bit more sifted cocoa powder directly to the mixture and kneading it in slightly, or heavily dust your hands with cocoa powder when shaping. - Can I make these vegan?
Yes, with a few substitutions! You would need to use a sweetened condensed coconut milk or another plant-based sweetened condensed milk alternative, along with a vegan-friendly cocoa powder. The texture might vary slightly, but many have successfully made vegan versions. - How long do these truffles last?
When stored properly in an airtight container in the refrigerator, these truffles can last for up to 1-2 weeks. They can also be frozen for 2-3 months. - Can I use a different type of chocolate instead of cocoa powder?
This specific 2-ingredient recipe relies on cocoa powder for its unique fudgy texture. While other truffle recipes use melted chocolate, it changes the proportions and method significantly. Sticking to cocoa powder for this particular recipe is recommended for guaranteed success with the 2-ingredient claim. - Why is my condensed milk scorching when I heat it?
You’re likely using too high a heat. Always use low to medium-low heat and stir constantly to prevent the condensed milk from sticking to the bottom of the pan and burning.
Armed with these insights, you’re now fully equipped to tackle any questions or minor challenges that might arise during your truffle-making journey.
Conclusion: The Ultimate Easy Indulgence
The journey to creating homemade truffles, once thought to be daunting, has been brilliantly simplified with this 2-ingredient condensed milk recipe. It’s a testament to how humble pantry staples can be transformed into something truly extraordinary and luxurious. From the initial warming of the condensed milk to the final dusting of cocoa, every step is straightforward, yielding a dessert that is both visually appealing and incredibly delicious.
We hope this comprehensive guide has empowered you to step into your kitchen and experience the sheer joy of making these rich, creamy, and undeniably addictive chocolate truffles. Whether you’re making them for a personal treat, a quick party dessert, or a heartfelt gift, their simplicity and profound flavor will make them a staple in your recipe repertoire. So go ahead, gather your two ingredients, and prepare to delight your taste buds with the easiest gourmet indulgence you’ll ever create. Happy truffle making!