
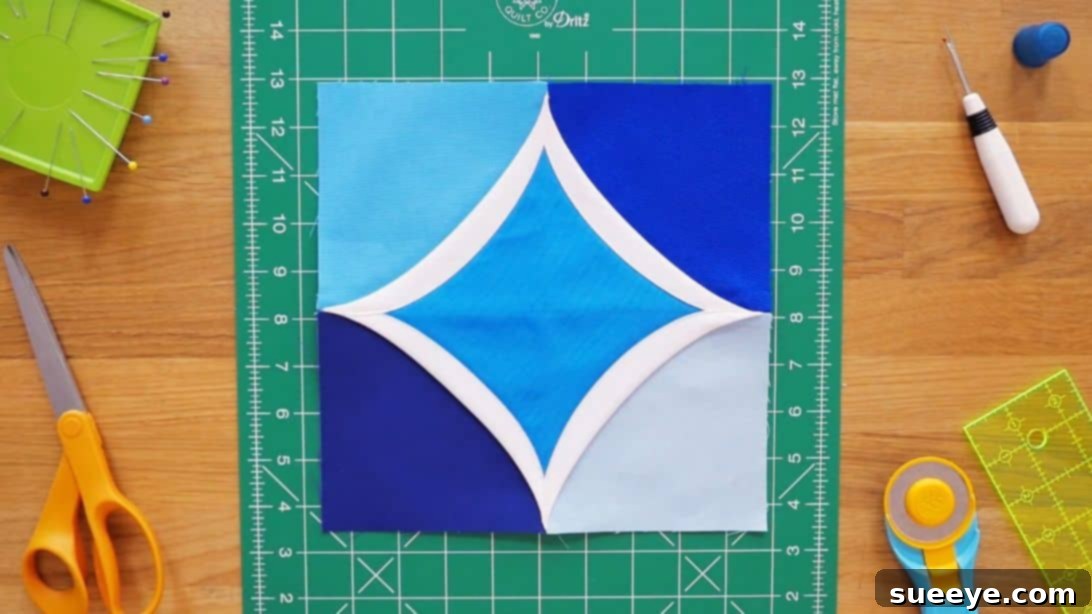
The Cathedral Window quilt block is a true masterpiece in the world of quilting, renowned for its intricate appearance yet surprisingly straightforward construction. Many quilters, upon first encountering its beautiful design, might assume it’s a project reserved for advanced sewers. However, this classic block is far more accessible than it looks, making it an ideal choice for quilters of all skill levels, including adventurous beginners. Its charm lies in its elegant simplicity and the stunning visual impact it creates, resembling the vibrant, leaded glass windows found in historic churches and cathedrals. We’re thrilled to guide you through the process of creating this captivating block, drawing inspiration and foundational techniques from the experts at Missouri Star Quilt Company, whose tutorials consistently simplify complex-looking designs.
RELATED: Cathedral Stars Quilt
The history of the Cathedral Window quilt block is as rich and colorful as the stained glass it emulates. Gaining significant popularity in the 1930s, this block offered quilters a way to create striking visual depth and texture without the need for traditional batting or elaborate quilting stitches for the “windows” themselves. Its enduring appeal stems from its unique three-dimensional quality and the way it beautifully showcases fabrics. Imagine light filtering through the “panes” of your quilt, creating a warm, inviting glow – a true testament to the timeless beauty of this design. Even today, the Cathedral Window remains a beloved pattern, celebrated for its versatility and the stunning results it consistently produces.
What makes the Cathedral Window block so special? Beyond its historical roots and visual appeal, it offers a distinct tactile experience. The technique involves folding and stitching fabric to create raised borders that frame smaller “window panes” of contrasting fabric. This method not only provides a wonderful texture but also means that the back of the quilt often looks just as neat and finished as the front, making it a fantastic choice for projects where both sides will be seen, such as throws or wall hangings. The construction method cleverly encases raw edges, resulting in a very durable and neat finish. Furthermore, it’s an excellent project for utilizing your favorite fabric scraps or showcasing a carefully curated collection of prints, as each window provides an opportunity for a miniature fabric display.
Essential Materials for Your Cathedral Window Quilt
Embarking on your Cathedral Window quilting journey requires only a few key materials, making it a budget-friendly and accessible project. The core components are fabric squares, typically pre-cut for convenience. Here’s what you’ll need:
- One pack of 5″ printed squares: These are often referred to as “charm packs.” Charm packs are wonderful because they come with a coordinated assortment of fabrics, usually 42 squares, making fabric selection incredibly easy. These squares will become the vibrant “windows” of your design.
- One pack of 5″ background squares: Also known as a charm pack, these squares provide the framework for your windows. Choosing a solid, light-colored fabric (like white, cream, or a pale neutral) for your background will allow your printed window fabrics to truly pop and create a striking contrast, much like the leaded lines in actual stained glass. While charm packs offer convenience, you can also easily cut your own 5-inch squares from yardage if you prefer to select specific fabrics. Ensure your fabric is pre-washed and pressed to prevent shrinking and achieve the best results.
In addition to your fabric squares, you’ll want to gather standard quilting tools to ensure a smooth and enjoyable process:
- Sewing Machine: A reliable machine with a straight stitch is essential.
- Rotary Cutter, Mat, and Ruler: For precise cutting, especially if you’re not using pre-cut squares.
- Quilting Pins or Clips: To hold fabric layers securely in place.
- Iron and Ironing Board: Crucial for pressing seams flat and crisp folds.
- Matching Thread: High-quality polyester or cotton thread that complements your fabrics.
- Fabric Scissors: For any necessary trimming.
Crafting Your Cathedral Window Quilt Block: A Step-by-Step Guide
The beauty of the Cathedral Window block lies in its repetitive, yet satisfying, construction. Each step builds upon the last to create the illusion of depth and intricate design. Let’s walk through the process in detail, ensuring you master each fold and stitch.
Step 1: Preparing Your Background Squares
Begin by taking one of your 5-inch background squares. The goal here is to create precise triangular units that will form the underlying structure of your window. Fold the square in half diagonally, aligning the corners perfectly to form a crisp triangle. Press this fold firmly with a warm iron to set the crease. Now, repeat this process with the resulting triangle: fold it in half again diagonally, creating a smaller triangle. Again, press firmly. When you unfold this twice-folded square, you should see clear creases that divide it into four smaller triangles, with the initial diagonal fold running through the center. Repeat this exact folding and pressing sequence with three more background squares, so you have a total of four identical, prepared background units.
Step 2: Constructing the Initial Half-Block Units
This step involves layering and sewing to create the foundation of your window. Take one of your vibrant print squares. Then, take two of the background squares you just prepared in Step 1. Stack these two folded background squares precisely on top of each other. Position this stack onto the bottom right side of your print square, ensuring that the raw, straight edges of the folded background squares align perfectly with the bottom and right raw edges of the print square. This alignment is critical for accuracy. Next, take another print square and place it directly on top of your layered fabrics, right sides together, ensuring all raw edges are perfectly aligned. Secure all layers with pins to prevent shifting during sewing. Carefully sew along the right side of this stacked unit with a precise 1/4-inch seam allowance. Once sewn, open the unit and press the seam flat. The goal is to create a seamless, flat foundation. For your quilt, you’ll need to create two of these initial half-block pieces. Consider using different color combinations or print fabrics for each to add variety and visual interest to your overall quilt design.
Step 3: Forming the Central Diamond
With your two half-block units created in Step 2, it’s time to bring them together to form the distinctive diamond shape that is central to the Cathedral Window design. Arrange these two pieces side-by-side, carefully orienting them so that when joined, the background fabric sections come together to create a symmetrical diamond in the middle. Pay close attention to how the points and edges align. Once you are satisfied with the alignment, pin the two units together along the seam where they will meet. Sew these two units together with a 1/4-inch seam allowance. Press the seam open or to one side, whichever you prefer, to ensure a flat and smooth finish. This diamond formation is the core of your Cathedral Window, providing the structure for the “window pane” to emerge.
Step 4: Placing the Window Fabric
Now for the exciting part – bringing the “window” into focus! Take another fresh 5-inch print square. This square will become the visible fabric within the diamond frame you just created. Carefully center this print square over the diamond shape formed by your background fabric. Ensure that it is perfectly aligned and covers the entire diamond area. This square will be secured by the folds of the background fabric in the next step, so precise placement now will lead to a beautifully framed window later. At this stage, you might lightly pin it in place to keep it from shifting as you prepare for the final folding.
Step 5: Creating the Window Panes with Topstitching
This is where the magic truly happens and your Cathedral Window block comes to life! Gently fold over the background fabric from one side, curling it over the edge of the print square you placed in Step 4. As you fold, create a smooth, curved edge that frames the print square. The raw edge of the background fabric should be neatly tucked underneath this fold, creating a clean, finished edge. Secure this fold with pins. Now, using a coordinating thread, carefully topstitch along this curved fold. Stitch close to the folded edge, ensuring your stitches are even and neat. This topstitching not only secures the fold but also creates the defining “window pane” effect. Repeat this precise folding and topstitching process for all four sides of the print square, working your way around the diamond. Take your time to achieve smooth curves and consistent stitching; this attention to detail will significantly enhance the final appearance of your block. Each topstitched curve will frame your chosen print fabric, creating a beautiful, dimensional window effect.
Assembling Your Quilt Top
Once you’ve completed one Cathedral Window block, the process is straightforward to create an entire quilt. Simply repeat the steps above for additional print squares and background squares to make as many blocks as needed for your desired quilt size. As you create more blocks, you’ll begin to see the intricate pattern emerge. The blocks are then joined together in rows, much like traditional quilting. Once all your rows are sewn, you’ll join the rows to each other to form the complete quilt top. The beauty of this method is that the “quilting” for the windows is already integrated into the block construction, resulting in a unique texture and finish.
Expert Tips for a Flawless Cathedral Window Quilt
To ensure your Cathedral Window quilt project is a resounding success, consider these expert tips:
- Precision is Paramount: Accurate cutting and a consistent 1/4-inch seam allowance are critical for ensuring your blocks fit together perfectly and your windows are symmetrical. Invest in a good rotary cutter and ruler.
- Press, Don’t Iron: When pressing seams, use an up-and-down motion rather than sliding the iron, which can distort your fabric. Pressing also helps to set folds and flatten seams beautifully.
- Fabric Selection: Choose fabrics with good contrast between your background squares and your print squares. This will make your “windows” stand out vibrantly. Don’t be afraid to experiment with different color palettes and fabric types, though 100% quilting cotton is always a reliable choice.
- Practice Your Topstitching: If you’re new to topstitching curves, practice on scrap fabric first. A walking foot on your sewing machine can also be incredibly helpful for maintaining even stitches on multiple layers and curves.
- Patience is a Virtue: The Cathedral Window block is not a race. Take your time with each fold, press, and stitch. Enjoy the process, and the beauty of your creation will reflect your care.
- Chain Piecing: If you’re making many blocks, consider chain piecing to speed up the sewing process. This involves sewing multiple units in a continuous chain without cutting threads between them.
Cathedral Window Variations and Creative Expressions
While the traditional Cathedral Window block is stunning on its own, its design lends itself beautifully to creative variations. Once you’ve mastered the basic technique, consider exploring different sizes for your initial squares. Larger squares will create bigger windows and a quicker finish, while smaller squares can yield a more intricate, mosaic-like appearance. You can also experiment with the arrangement of your finished blocks – rotating them can create entirely new secondary patterns. Instead of a single print fabric for the “window,” try using fussy-cut motifs or even small pieced squares to add another layer of detail. For a modern twist, consider using only two colors, or varying shades of a single color, to create a sophisticated monochromatic look. The design can also be adapted for bags, cushions, or other home decor items, showcasing its remarkable versatility.
The Cathedral Window quilt block is truly an exceptional design that combines historical charm with a satisfying, hands-on construction process. It’s a testament to the fact that some of the most beautiful quilt patterns are also among the most accessible. Don’t let its sophisticated appearance intimidate you; with this detailed guide and a little patience, you’ll be creating stunning, dimensional blocks that are sure to impress. So gather your beautiful fabrics, fire up your sewing machine, and prepare to embark on a truly rewarding quilting adventure. Happy quilting!