
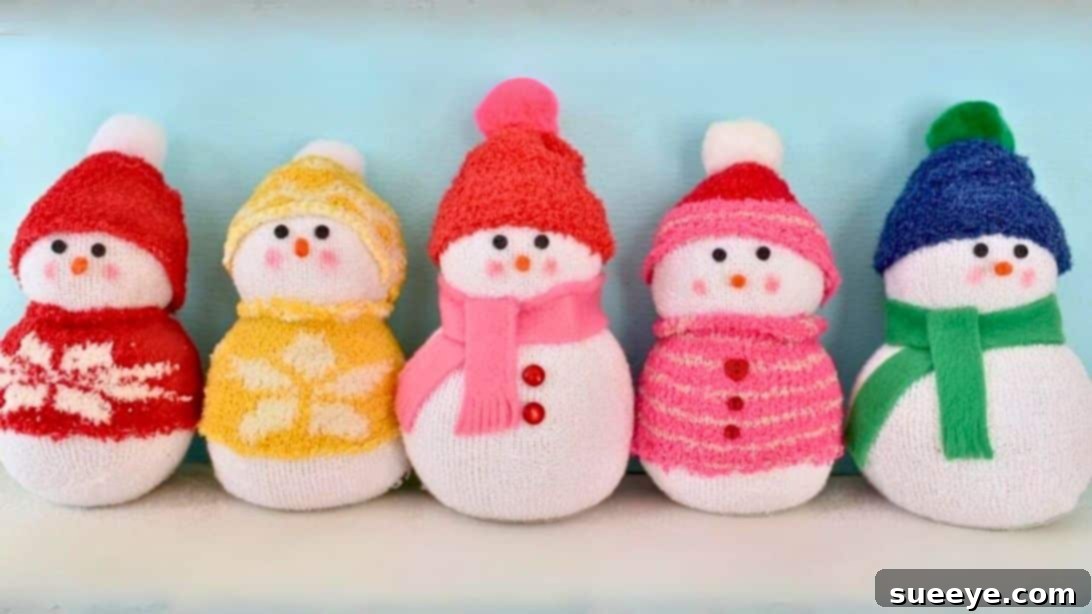
Welcome to the delightful world of DIY crafting, where creativity meets simplicity! These incredibly charming DIY sock snowmen, inspired by Make Life Lovely, are more than just festive decorations; they are heartwarming, personalized gifts perfect for anyone on your list. Imagine creating a cute, cuddly snowman in under 10 minutes – it’s entirely possible! The secret? A plain white men’s sock filled with rice transforms into an adorable winter companion. This project is an absolute must-try for the holiday season, offering a fantastic winter craft for both adults and children. Not only do they look incredibly sweet, but they are also wonderfully inexpensive to make, making them an ideal choice for bulk gifting or decorating your home with a handmade touch.
RELATED: 9 Simple Homemade Gift Ideas for the Holidays
One of the greatest joys of crafting these sock snowmen lies in their immense versatility. You can easily create them in various sizes, allowing you to tailor each snowman to a specific family member or friend. Think of the possibilities: a petite snowman for a desk, a medium-sized one for a shelf, or a larger one to act as a whimsical centerpiece. The true magic, however, comes with personalization. Let your imagination run wild as you adorn each snowman. Use their own socks for a truly unique and sentimental touch, or experiment with different patterns and textures. Add miniature sweaters, cozy scarves made from fabric scraps, or an assortment of colorful buttons to give each snowman its own distinct character. The beauty of this craft is that there are no strict rules – only endless opportunities for creative expression.
Essential Materials for Your DIY Sock Snowman Gift
Gathering your materials is the first exciting step in bringing your adorable sock snowman to life. Most of these items are readily available, perhaps even hiding in your craft bin or sock drawer! Here’s a comprehensive list to get you started:
- White Socks: Opt for clean, plain white men’s tube socks. These provide the perfect base for your snowman’s body. If you want a different aesthetic, you can experiment with cream or very light grey socks too.
- Fuzzy, Patterned, or Colored Socks: These will become the fashionable accessories for your snowman – think hats and sweaters. Choose fun patterns, vibrant colors, or soft, fuzzy textures to add personality.
- Rice (Approximately 3 cups per snowman): Long-grain white rice works perfectly as a filler, providing weight and shape. You can also experiment with lentils or other small grains, though rice is generally the most common and cost-effective.
- Rubber Bands: You’ll need several small rubber bands to secure the sock and create the snowman’s distinct head and body segments.
- Hot Glue Gun and Glue Sticks: An essential tool for securely attaching all the decorative elements. Always exercise caution when using a hot glue gun, especially if crafting with children.
- Fabric Scissors: Sharp scissors are crucial for clean cuts through the sock fabric.
- Tiny Black Buttons: These will form the snowman’s expressive eyes. Small beads or even permanent markers can be used as alternatives.
- Orange Pipe Cleaner: A small piece of this will be twisted and shaped into the classic carrot nose.
- Accent Buttons (Optional): For adding detail to the snowman’s “sweater” or as additional decorative embellishments. Look for small, colorful buttons that complement your chosen sock patterns.
- Fabric or Ribbon for Scarf: Scraps of felt, fleece, or decorative ribbon can be fashioned into a cozy scarf, adding another layer of charm.
- Pom Poms: These are ideal for topping off your snowman’s hat, giving it a playful finish.
- Pink Blush or Craft Paint: A tiny touch of pink blush (or diluted pink craft paint applied with a Q-tip) gives your snowman rosy cheeks, adding to its sweet demeanor.
Having all your materials organized before you begin will make the crafting process smooth and enjoyable.
Step-by-Step Guide: How to Craft Your Adorable Sock Snowman
Now that you have all your supplies, let’s dive into the fun part – assembling your very own sock snowman! Follow these simple steps for a magical crafting experience.
Step 1: Preparing the Snowman’s Body
Begin by taking one of your plain white socks. Lay it flat and use your fabric scissors to cut straight across the sock, just under the heel. This bottom section, which is essentially the foot part of the sock, will form the main body of your snowman. The top part of the sock can be saved for future crafts or for making more snowmen, ensuring no material goes to waste. A clean, even cut here will make for a neater base.
Step 2: Filling the Sock with Rice
Turn the cut sock inside out. This hides any raw edges or seams, giving your snowman a cleaner finish. Carefully place a funnel inside the open end of the sock. Begin to fill the sock with rice. For an average-sized snowman, you’ll need approximately 3 cups of rice. As you add the rice, especially after about 2 cups, gently lift the sock from the top and “plop” it down a couple of times onto your work surface. This helps the rice settle, stretches the sock slightly, and ensures a dense, even base for your snowman. Once filled, securely close the top opening of the sock with two rubber bands, wrapping them tightly to prevent any rice from escaping.
Step 3: Creating the Snowman’s Head
With the body filled and sealed, it’s time to give your snowman its distinct shape. About one-third of the way down from the top (the rubber-banded end), use another rubber band to cinch the sock tightly. This rubber band will separate the head from the body, giving your snowman its classic two-tiered look. Adjust the rice gently to create a nicely rounded head shape above this rubber band.
Step 4: Trimming Excess Fabric
After creating the head, you might notice a lot of extra sock fabric poking out above the head. To give your snowman a tidier appearance and to prepare for the hat, trim this excess fabric using your scissors. Be careful not to cut too close to the rubber bands holding the head, leaving just enough fabric to ensure everything stays secure.
Step 5: Preparing the Snowman’s Outfit (Hat and Sweater)
Now for the fun part of dressing your snowman! Take your colored or patterned sock. To make the hat, cut a straight line across the sock a few inches from the top (the toe end). This section will be slipped onto the snowman’s head. Next, to create the sweater, cut another straight line across the same sock, just underneath the toe seam. This larger tube of fabric will become the body’s sweater. Ensure your cuts are relatively straight for a neat finish.
Step 6: Attaching the Hat
Take the toe part of the patterned sock that you designated as the hat. Carefully place it over the snowman’s head, positioning it snugly. Once you’re happy with its placement, use a hot glue gun to secure the base portion of the hat on the inside, gluing it gently to the white sock material underneath. This will prevent the hat from slipping off. To add a final touch of whimsy, select a matching (or contrasting!) pom pom and hot glue it securely to the very top of the hat.
Step 7: Dressing with the Sweater
Slide the “sweater” piece of your patterned sock onto the body of the snowman. This part should comfortably cover the entire body section. It’s important to ensure that the top edge of the sweater adequately covers the rubber band that separates the head from the body, giving a seamless look. Once positioned correctly, apply a thin bead of hot glue along the top and bottom edges of the sweater to keep it in place, preventing it from riding up or down.
Step 8: Adding Facial Features
This is where your snowman truly comes to life! Carefully hot glue two tiny black buttons onto the snowman’s head to create the eyes. Position them evenly and symmetrically. For the nose, take a small piece of orange pipe cleaner and gently bend it into a short, pointed carrot shape. Apply a small dot of hot glue to the back of the pipe cleaner nose and carefully affix it between and slightly below the eyes. Take your time with these details to give your snowman the perfect expression.
Step 9: Giving Your Snowman Rosy Cheeks
To add an extra touch of cuteness and warmth, your snowman deserves some rosy cheeks! Dip a Q-tip very lightly into pink blush (or a tiny drop of diluted pink craft paint). Gently blot the Q-tip onto the “cheeks” of the snowman, just below the eyes. Start with a very small amount and build up the color if desired, creating a subtle, healthy glow.
Step 10: Final Touches and Customization
The final step allows for even more personalization. If you desire, tie a small fabric strip or ribbon around the snowman’s “neck” to create a cozy scarf. This not only adds charm but also helps conceal the seam where the head meets the body. Remember, this project is all about creativity! You can choose to skip the full sweater and simply add a scarf and a few decorative accent buttons directly onto the white body of the snowman for a different look. Experiment with different colors, patterns, and accessories to make each snowman truly unique.
Craft a Charming Sock Snowman in Just 10 Minutes!
One of the most appealing aspects of this DIY sock snowman project is its incredible speed. You can genuinely create one of these adorable figures in as little as 10 minutes, making it the perfect last-minute gift or a quick decorative addition when you’re short on time. The simplicity of using just a few common household items – primarily a sock and some rice – means you can easily whip up a whole family of snowmen in an afternoon. This rapid creation time also makes it an excellent craft for younger children, who might have shorter attention spans but still want the satisfaction of completing a project quickly.
Tips for Speed and Efficiency:
- Pre-cut your socks: If making multiple snowmen, cut all the white sock bodies and patterned sock hats/sweaters in advance.
- Set up an assembly line: Work in batches. Fill all the white socks with rice first, then tie all the rubber bands for the bodies, then for the heads. Move on to dressing them.
- Have all embellishments ready: Sort your buttons, cut your pipe cleaners, and prepare your scarf materials before you start gluing.
- Master the hot glue: A steady hand and quick application of hot glue will speed up the attachment of features and clothing.
Beyond the basic tutorial, there’s a world of possibilities for customizing your sock snowmen. Consider using different textures of socks for unique effects – chunky knit for a rustic look, or brightly colored striped socks for a playful vibe. For the eyes, instead of buttons, you could use small googly eyes for a comical expression, or embroider delicate black stitches for a more traditional feel. Instead of a pipe cleaner, a tiny bead or even a dab of orange paint could form the nose.
Think about adding tiny accessories: miniature earmuffs made from cotton balls and pipe cleaners, small fabric flags held by a toothpick, or even tiny gifts tied to their “hands” (if you add small fabric arms). You can also personalize them further by writing names on their scarves with a fabric marker or adding small tags with personalized messages. These snowmen make fantastic party favors, secret Santa gifts, or charming additions to holiday gift baskets.
Safety is always paramount, especially when crafting with children. Always supervise kids when using a hot glue gun, or opt for fabric glue or strong craft glue that doesn’t require heat. Be mindful of small buttons and other embellishments, as they can pose a choking hazard for very young children. Ensure all small parts are securely attached if the snowman is intended for a child’s play.
These DIY sock snowmen are more than just a craft; they’re a way to create lasting memories and heartfelt gifts. They embody the spirit of the season – warmth, creativity, and the joy of giving. So, gather your materials, invite your family and friends, and embark on this delightful crafting adventure. Share your beautiful creations with the world and inspire others to embrace the joy of handmade gifts!