
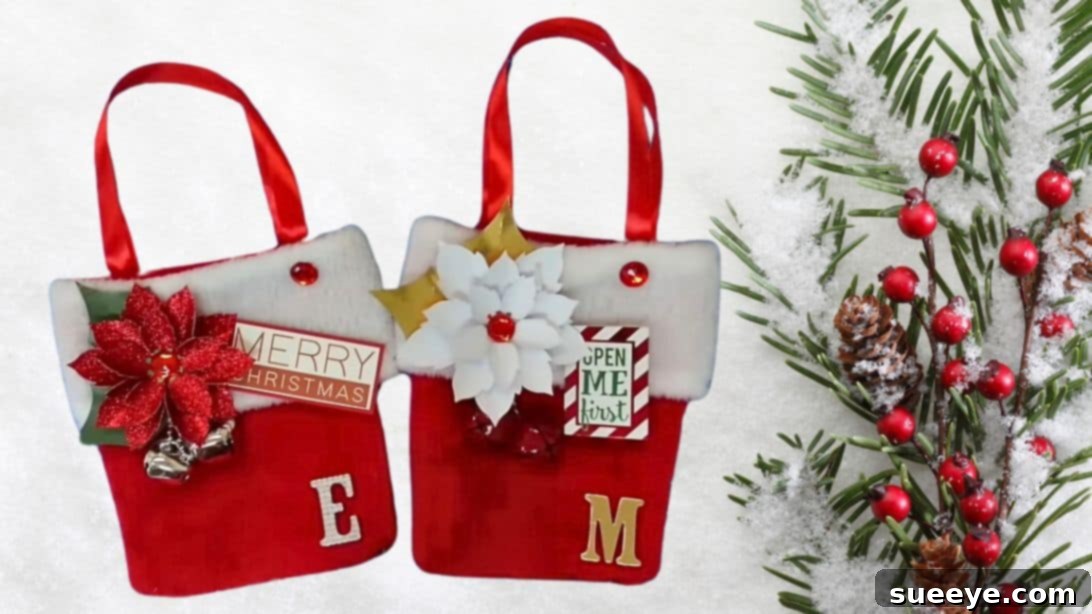
Transform Dollar Tree Stockings into Chic Reusable Christmas Gift Bags: The Ultimate DIY Hack
Are you looking to elevate your Christmas gift wrapping game this year, moving beyond the traditional paper and tape? If so, we have an incredibly simple yet brilliant DIY project that promises to add a touch of handmade charm and sustainability to your holiday presents. Inspired by the ingenious idea from The Posh Paper Lady, this Dollar Tree Christmas stocking hack will show you how to craft adorable, durable, and fully customizable gift bags perfect for the festive season.
Imagine your gifts nestled in these charming, fabric bags – they instantly look more presentable, thoughtful, and luxurious. But the benefits don’t stop there. Unlike flimsy paper bags that often end up crumpled and discarded after a single use, these fabric creations are designed for longevity. They are robust, reusable many times over, and a wonderful step towards more eco-conscious holiday celebrations, reducing waste and offering a sustainable alternative to conventional wrapping paper.
RELATED: Looking for more fabric gift bag ideas? Check out our guide on Easy DIY Fabric Gift Bags for additional inspiration!
Why Choose DIY Reusable Gift Bags This Christmas?
The holiday season is synonymous with giving, and while the thought counts most, the presentation can significantly enhance the experience. Opting for DIY reusable gift bags crafted from Christmas stockings brings a multitude of advantages:
- Eco-Friendly & Sustainable: Reduce your carbon footprint by ditching single-use wrapping paper. These bags can be reused year after year, or passed on with the gift, encouraging a cycle of sustainability and reducing holiday waste.
- Cost-Effective: Dollar Tree stockings are incredibly affordable, making this a budget-friendly project that yields high-impact results. You’ll save money on expensive wrapping paper, bows, and disposable gift bags, freeing up your budget for more meaningful gifts.
- Durability: Fabric bags are far more robust than paper, offering superior protection for your gifts and withstanding the hustle and bustle of holiday travel. They won’t tear, wrinkle, or easily get damaged, ensuring your presents arrive in pristine condition.
- Personalization & Charm: Each bag can be a unique reflection of your style or the recipient’s personality. Add glittery ribbons, festive flowers, jingle bells, or even personalized tags and alphabet stickers to make each gift truly special and one-of-a-kind.
- Versatility Beyond Gifts: These bags aren’t just for presents! They make fantastic treat bags for parties, thoughtful containers for homemade cookies or candies, or charming favor bags for any holiday gathering. Fill them with chocolates, small toys, or other festive delights for children or adult guests.
- Memorable Presentation: A beautifully presented gift shows extra care and thought. A handmade fabric bag elevates the unboxing experience, making your present stand out under the Christmas tree and creating a lasting impression.
Making these gift bags is super easy, and we’re confident you’ll have a blast getting creative with different embellishments and designs. Let’s dive into what you’ll need!
Materials You’ll Need for Your DIY Christmas Stocking Gift Bags
One of the best aspects of this DIY project is the accessibility and affordability of the materials. Most items can be found at your local Dollar Tree or craft store, ensuring a budget-friendly crafting session. Gather these essentials to begin transforming your stockings:
- Dollar Tree Christmas Stocking: This is the star of our project! Choose stockings with appealing patterns, colors, or textures. Dollar Tree offers a surprising variety, from classic red and green to glittery silver and gold, or even whimsical character designs. The size of the stocking will determine the size of your final gift bag, so consider the gifts you intend to wrap.
- Ribbon: Select ribbons that complement your stocking’s design. Think satin for elegance, glitter for sparkle, or grosgrain for a classic touch. You’ll need enough to create sturdy handles for your bags, typically about 18-24 inches per bag, depending on your desired handle length and desired drop.
- Small Artificial Flowers: These add a delicate and decorative touch. Festive options like miniature poinsettias, small roses, or winter-themed sprigs work wonderfully. Opt for colors that enhance your bag’s overall aesthetic and holiday theme.
- Small Bells: Jingle bells are perfect for adding a festive sound and a whimsical element to your bags. Choose colors like gold, silver, or red to match your holiday theme, or go for multi-colored bells for a playful look.
- Sticker Gems: For an extra touch of sparkle and sophistication. These come in various shapes, sizes, and colors and are incredibly easy to apply, instantly elevating the bag’s appearance.
- Tags (Christmas Tags): Essential for personalizing your gifts. Look for traditional Christmas tags or blank ones that you can decorate yourself. These allow you to add names, messages, or even a small drawing.
- Scissors: A sharp pair of fabric scissors will ensure clean, precise cuts through the stocking material, which is crucial for a professional-looking finish.
- Hot Glue Gun and Glue Sticks: Your primary adhesive for this project. Hot glue provides a strong, quick-drying bond, making assembly efficient. Remember to exercise extreme caution when using a hot glue gun to prevent burns.
- Alphabet Stickers: Ideal for personalizing each bag with names, initials, or festive messages like “Joy,” “Noel,” or “Merry & Bright.” They come in various fonts and colors to match your design.
With these materials in hand, you’re ready to start transforming simple stockings into extraordinary gift bags that will surely delight your loved ones!
Step-by-Step Guide: Crafting Your Own Elegant Christmas Gift Bags
Follow these easy instructions to create beautiful, reusable gift bags that will impress everyone on your holiday list. Remember, precision in cutting and careful gluing will result in a professional-looking finish that makes your handmade gifts truly shine.
Step 1: Preparing Your Christmas Stocking for Transformation
Begin by laying your Dollar Tree Christmas stocking flat on a clean, stable surface, ensuring there are no wrinkles or creases. Locate the curved toe section of the stocking. Using your sharp scissors, carefully cut across the stocking precisely where the curve begins to straighten out towards the main body. The objective here is to create a clean, straight edge that will form the bottom of your new gift bag. Strive for a cut that is as straight and even as possible to ensure a neat, professional-looking seam. Don’t discard the bottom, curved part of the stocking – it’s perfect for other small crafting projects, such as creating miniature ornaments, small pouches, or even festive appliques for future DIY endeavors.
Step 2: Removing the Stocking Handle
Next, identify the small loop or handle that is typically sewn onto the top of the stocking, originally designed for hanging it on a mantelpiece. Carefully cut this handle off flush with the stocking material using your scissors. Removing this handle is a small but important step, as it gives your new gift bag a cleaner, more refined silhouette, consistent with a traditional tote or gift bag rather than a stocking.
Step 3: Sealing the Bottom for a Sturdy Bag
Now, it’s time to form the crucial bottom seam of your gift bag. Turn the stocking inside out. Along the entire length of the newly cut straight edge at the bottom, apply a thin, even line of hot glue. Be careful to apply enough glue to create a strong, durable seal, but avoid using so much that it might seep through the fabric. Carefully press the two raw edges of the stocking together, ensuring they are perfectly aligned. Hold the seam firmly together for a few seconds until the hot glue sets and forms a strong bond. This step is absolutely critical for the bag’s integrity, ensuring it can securely hold your gifts without coming apart. Always exercise extreme caution when working with a hot glue gun to prevent painful burns.
Step 4: Attaching the Ribbon Handles
For the handles, cut two pieces of your chosen ribbon. Each piece should be approximately 18-24 inches long; you can adjust this measurement based on your desired handle length and how much of a drop you prefer. Once the bottom seam is secure, turn your bag right side out. On the inside of the bag, near the top edge, apply a small dab of hot glue to the front-left corner. Press one end of your first ribbon firmly onto the glue. Take the other end of the same ribbon and glue it to the front-right corner of the bag, forming a neat loop for your handle. Repeat this entire process on the back of the bag with your second ribbon. It’s essential to ensure that both sets of handles are aligned symmetrically and at a similar height for a balanced and professional appearance. Press firmly on all glued points to ensure the ribbons are securely attached and will hold the weight of your gifts.
Step 5: Embellishing Your Gift Bag with Festive Accents
Now comes the most creative and personal part – decorating your gift bag! Begin by adding your small bells. Apply a small amount of hot glue to the upper left side of the bag, just below where the ribbon handle is attached, and firmly press your bells into place. Next, carefully position your artificial flower on top of or slightly beside the bells, securing it with another dab of hot glue. Feel free to experiment with the placement of these embellishments or add more flowers, sprigs, or other festive elements for a fuller, more elaborate look. This step allows for immense creativity, so let your holiday spirit guide you!
Step 6: Personalizing Your Masterpiece
To add a final touch of sparkle and truly make your gift bag unique, stick your chosen sticker gems onto the outside part of the ribbon handles. You can place them along the length of the ribbon or just at the attachment points, both on the front and back sides. This adds a subtle yet elegant shimmer. Finally, select a festive Christmas tag and your desired alphabet stickers. You can use the alphabet stickers to spell out the recipient’s name, their initials, or a short, cheerful holiday message like “Joy,” “Noel,” or “Merry Christmas” directly onto the tag or even on the bag itself. Attach the personalized tag to one of the handles, or directly onto the bag with a small dab of hot glue, completing your custom-made Christmas gift bag!
Beyond the Basics: Tips for Customizing Your DIY Gift Bags
While the basic steps outlined above will create a beautiful and functional gift bag, there are countless ways to customize and enhance your creations further. Unleash your creativity with these additional tips:
- Experiment with Stocking Textures and Patterns: Dollar Tree offers stockings in a variety of materials—felt, faux fur, velvet, knit, and even sequined designs. Each material will give your finished bag a distinct feel and look. Mix and match different textures for a more eclectic collection.
- Theme Coordination: Create a cohesive set of bags that match a specific holiday theme or color palette. For instance, an “Arctic Wonderland” theme might use blue and silver stockings with white ribbons and snowflake embellishments. A “Rustic Christmas” theme could feature burlap stockings with twine handles and natural elements.
- Add a Liner for Extra Luxury or Protection: For gifts that might snag on the stocking material or if you simply want to add an extra layer of luxury, consider sewing or gluing a simple fabric liner inside the bag. A contrasting fabric can also add a delightful pop of color when the bag is opened.
- Different Handle Styles: Don’t limit yourself to ribbon. You could use braided fabric strips, decorative rope, twine, or even a small, festive chain for a more industrial or rustic look. Ensure your chosen material is strong enough for the gift’s weight.
- Incorporate Fabric Paint or Markers: For a truly unique touch, use fabric paints or markers to add freehand designs, stencils, monograms, or custom messages directly onto the stocking material before assembling the bag. This is a great way to personalize further.
- Scented Sachets: Place a small, fragrant sachet inside the bag along with the gift. Choose festive scents like cinnamon, pine, gingerbread, or orange clove to enhance the holiday experience and delight the recipient’s senses.
- Button and Bead Embellishments: Beyond flowers and bells, consider sewing or gluing on decorative buttons, beads, small sequins, or glitter for added texture, sparkle, and visual interest. Ensure they are securely attached.
- Varying Sizes: Don’t limit yourself to one size of stocking. Utilize larger stockings for bigger gifts and smaller ones for jewelry, gift cards, or treat bags. This versatility allows you to create a range of bags for all your holiday needs.
- Add a Cinch Top: For bags that will hold smaller items or if you want to keep contents more secure, you can add a drawstring channel near the top of the bag. Simply fold over the top edge, create a channel, and thread a ribbon or cord through it.
FAQs About Making Christmas Stocking Gift Bags
Here are answers to some common questions you might have about this fun and rewarding DIY project, ensuring your crafting experience is smooth and successful:
- Q: Can I use fabric glue instead of a hot glue gun?
- A: Yes, absolutely! Fabric glue can be a great alternative, especially if you prefer not to use a hot glue gun or if you’re crafting with children. Just ensure the fabric glue you choose is suitable for the stocking material (often felt or polyester blends) and allow ample drying time according to the product’s instructions. A hot glue gun offers a quicker setting time, which is why it’s often preferred for efficiency, but fabric glue can create a very strong bond.
- Q: How do I choose the right stocking at Dollar Tree?
- A: When selecting stockings, look for those with good fabric quality and minimal fraying at the edges. Consider the size of the gifts you’ll be putting inside – a larger stocking yields a larger bag. Also, think about the overall aesthetic: Do you want something glittery, a classic felt look, or a fun, patterned design? Pick colors and textures that appeal to you or match your holiday decor theme.
- Q: What if my cut isn’t perfectly straight?
- A: Don’t worry too much about absolute perfection! The beauty of DIY is its handmade charm. A slightly uneven cut can often be concealed effectively when you turn the stocking inside out and carefully glue the bottom seam. Just try your best, and remember that slight imperfections often add to the unique character of a handmade item. Precision tools can help, but aren’t strictly necessary.
- Q: How can I make the ribbon handles extra strong, especially for heavier gifts?
- A: To reinforce the handles for heavier items, you can apply a second, thin layer of hot glue over the ribbon ends once the first layer has dried and set. Alternatively, if your stocking material allows and you have basic sewing skills, you could stitch the ribbon ends to the bag in addition to gluing them for maximum durability. Using a strong, wider ribbon also contributes to handle strength.
- Q: How do I clean these reusable gift bags once they get dirty?
- A: The best cleaning method will depend on the specific stocking material and the type of embellishments you’ve used. For most Dollar Tree stockings and hot-glued decorations, spot cleaning with a damp cloth and a mild detergent (like dish soap diluted in water) is usually the safest approach. Gently dab the stained area. Avoid machine washing, as it might loosen the hot glue, damage delicate decorations, or cause the fabric to fray. Always air dry completely, away from direct heat.
The Dollar Tree Christmas Stocking Hack: A Creative Conclusion
This ingenious Dollar Tree Christmas stocking hack offers a delightful and practical way to elevate your holiday gift-giving. Not only do these reusable gift bags look incredibly charming and professional, but they also embody the spirit of thoughtful giving and environmental consciousness. Each bag becomes a small piece of art, personalized with love and creativity, making the act of giving even more special and memorable for both the giver and the receiver.
So, gather your materials, unleash your creativity, and embark on this fun and rewarding DIY journey. You’ll be amazed at how easily you can transform simple Dollar Tree stockings into elegant, durable, and highly personalized gift presentations. Share your beautiful creations with us, and enjoy a more personalized, sustainable, and joyful Christmas season!
Special thanks to The Posh Paper Lady for this fantastic inspiration and for sharing such a clever idea with the DIY community!