Organizing Ideas
26 Pantry Organizing Ideas That Actually Stick
Pantry organizing ideas that hold: rotating can racks, shiplap shelving, dollar store bins, door racks, labeled jars and a diagonal drawer divider.
html PUBLIC "-//W3C//DTD HTML 4.0 Transitional//EN" ""
Every pantry starts out beautiful and ends up a cupboard you close fast before anything falls out. I have done the beautiful version twice and the falling out version roughly forever, so this list leans hard on the projects that survive a real family rather than the ones that photograph well for a week. There are builds here: a rotating can rack, shiplap and stained wood shelving, a diagonal drawer divider a husband made in one evening for under five dollars. There are cheats too, because most of us are not renovating. Diaper boxes wrapped in paper, dollar store tubs, coffee creamer bottles rinsed out and refilled with popcorn kernels. Every outside project links back to the maker who worked it out, and the prices quoted are the ones they paid.
1. Create Adjustable Shelves
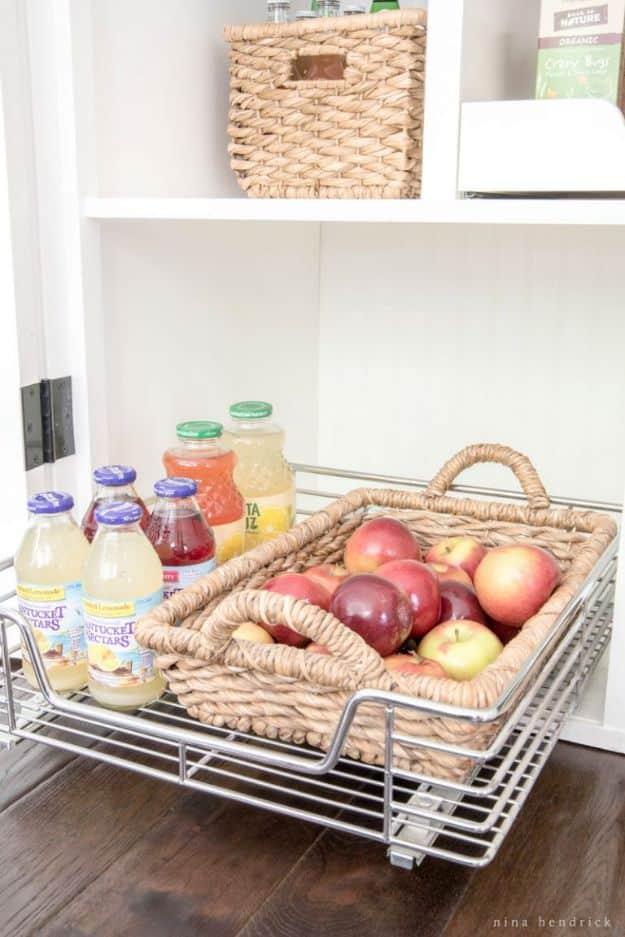
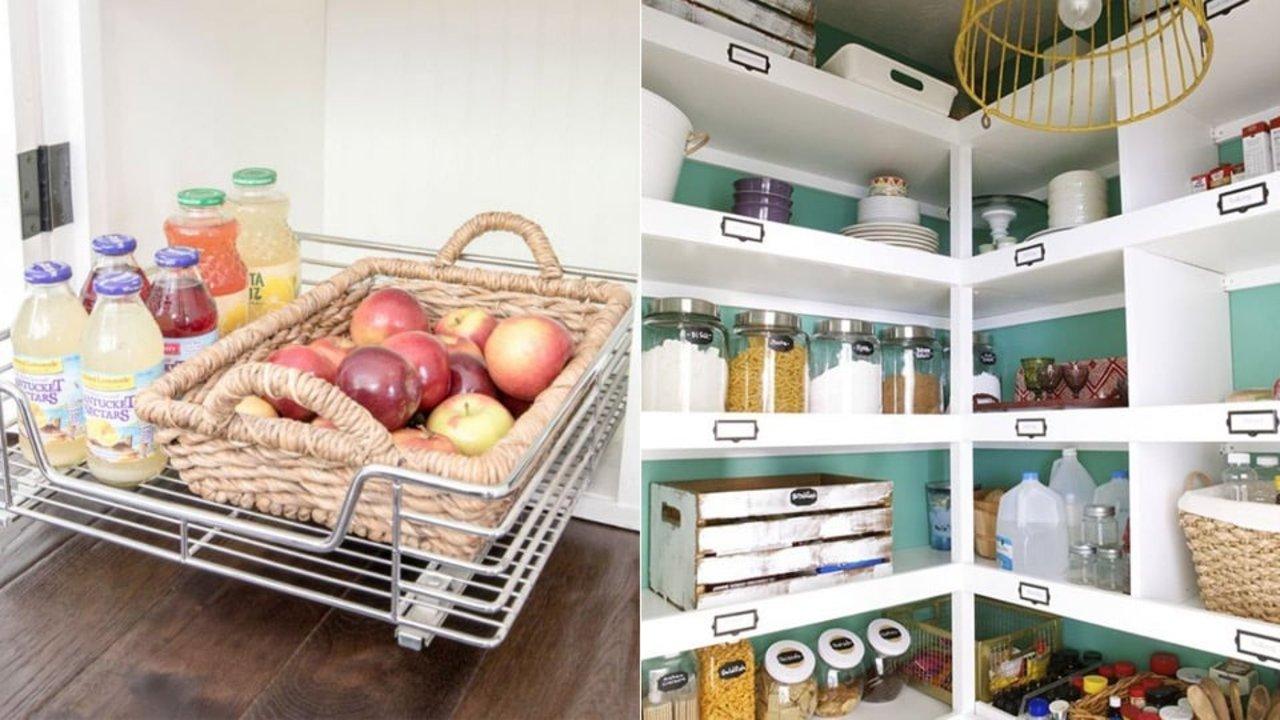
A chrome pull out basket that slides forward on runners, carrying a woven tray of apples and a row of juice bottles that would otherwise vanish behind everything else. The maker’s advice is worth more than the hardware: plan around the problems you actually have, because her old pantry was so deep that nothing at the back was reachable, so the upper shelves went in set back on purpose. Then run first in, first out, moving older stock to the front when new stock arrives. Decant dry goods into clear containers, and label only the things that genuinely need telling apart.
Get the full tutorial at Nina Hendrick Home.
2. Farmhouse Pantry Makeover
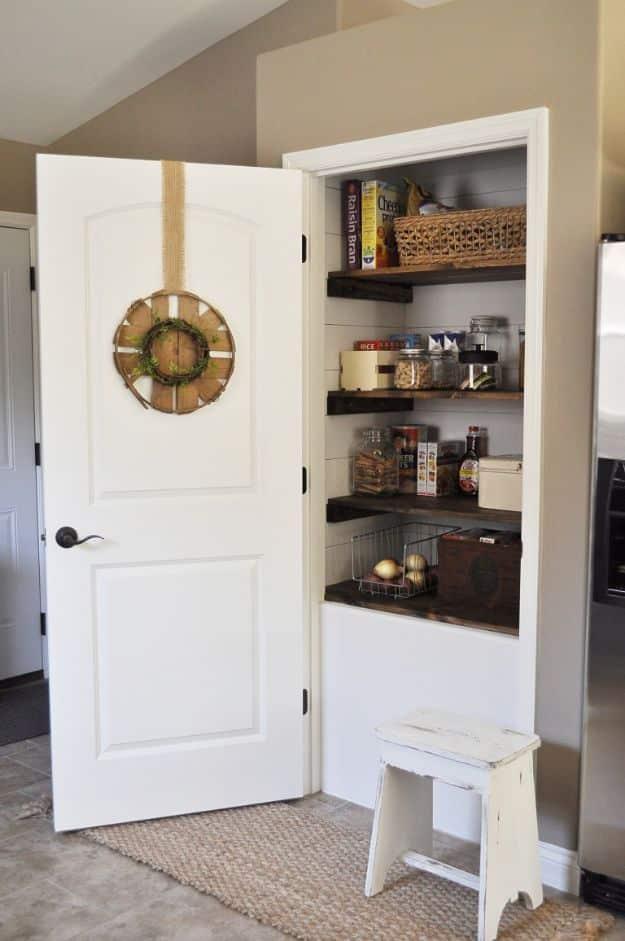
Two sheets of quarter inch plywood underlayment, cut into six inch strips at the hardware store cutting desk, become faux shiplap on all three pantry walls. A nail gun puts three nails at each end and three in the middle of every strip, and a nickel at each end sets the gap for the next one. Four coats of white paint went over the plywood before the shelves went in. The pantry measured 23 inches deep by 39 inches wide, so 2×3 side supports were cut to 18 inches and the tops are a 1×8, a 1×2 and another 1×8 laid side by side.
Get the full tutorial at Little Glass Jar.
3. Rotating Canned Food System Shelves
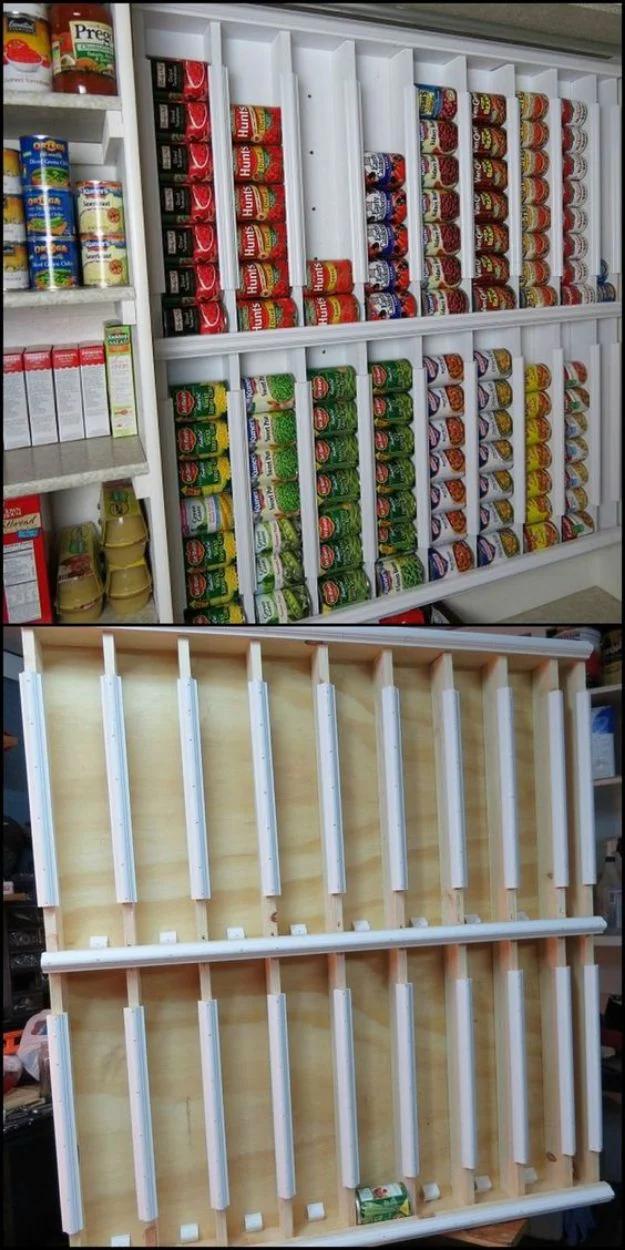
A wall of angled chutes that swallows cans at the top and delivers them at the bottom, so the oldest tin is always the next one out and nothing expires at the back of a shelf. The second photo is the honest one: a plain plywood frame with rails, which is all this is before the cans go in. The plans it points to include a full materials and tools list, step by step instructions and color photos of each stage, and the rack can be sized to the space you have. Even a small one holds several months of canned food.
Get the full tutorial at The Homestead Survival.
4. Frugal Way to Organize a Pantry
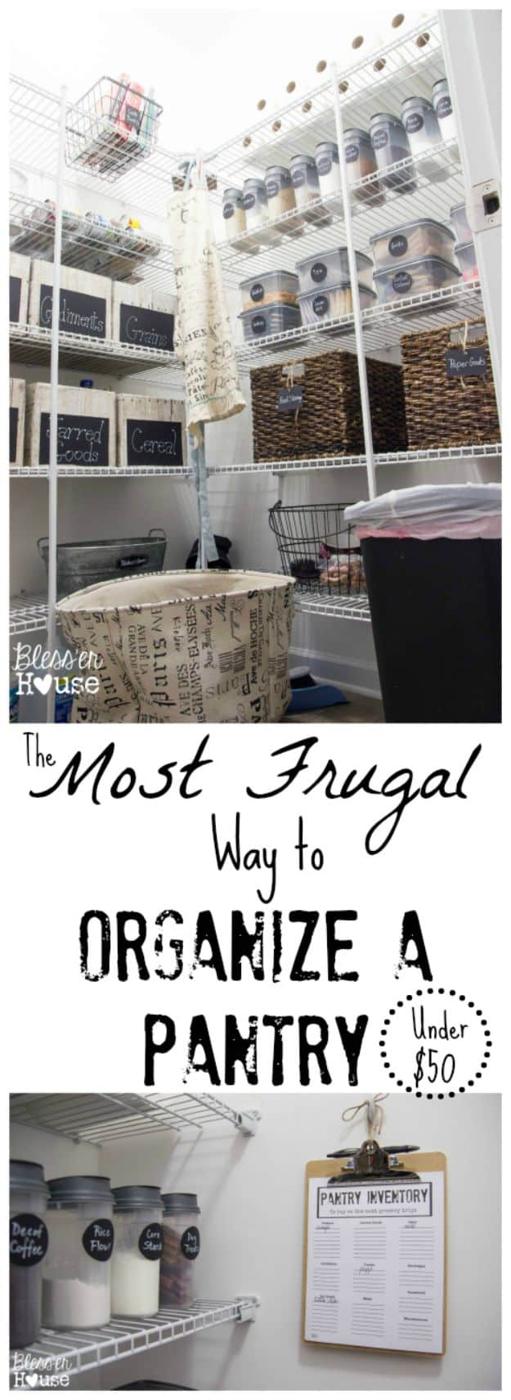
The whole pantry came in under fifty dollars and half of it started as rubbish. Diaper boxes were collected for months, wrapped in one eight dollar roll of paper and labeled, which gave ten large pantry boxes. Dollar Tree supplied eight tubs and ten pour spout containers for eighteen dollars, labeled with black cardstock and a white chalk marker rather than anything printed. Can dispensers were eighteen dollars for three from Walmart, and the baskets were pulled out of other rooms for nothing. The update at the bottom is the part that counts: eight months on, it was still mostly this tidy.
Get the full tutorial at Bless'er House.
5. Organize Your Pantry in 5 Easy Steps
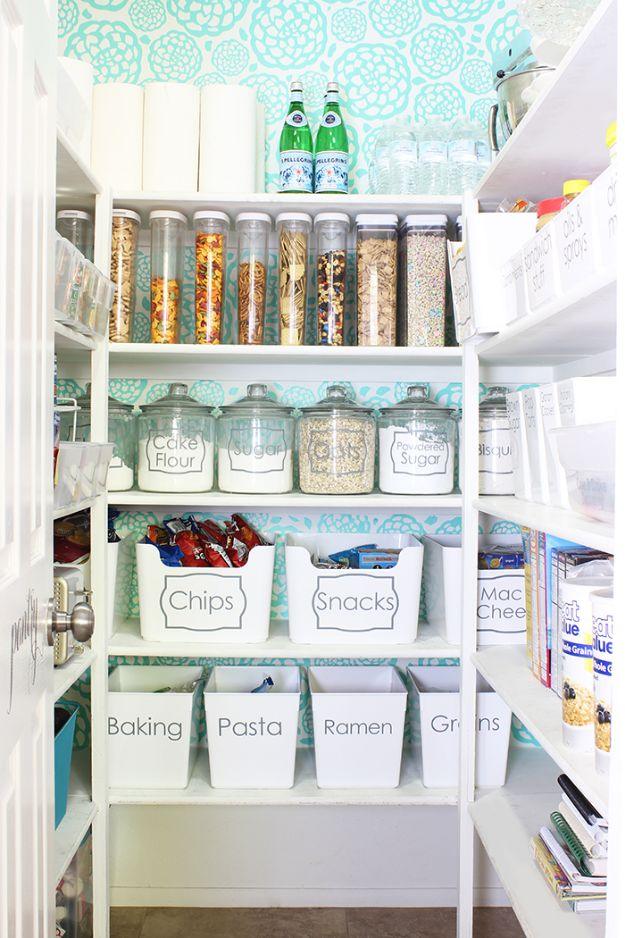
Five steps, and the first is the one everybody skips: empty the whole pantry out before buying a single bin. This one is a rental, so the walls stayed white and the pattern went on as faux floral wallpaper rather than paint. Then sort everything into groups, and only then buy containers, because the bins have to fit the shelf and not the other way round. The skinny canisters came from IKEA, the wider ones and the glass jars from Walmart. Cereal and snacks were deliberately left unlabeled, since they are clear and they turn over fast. Everything else gets a label.
Get the full tutorial at Classy Clutter.
6. Pantry Organization Made Easy
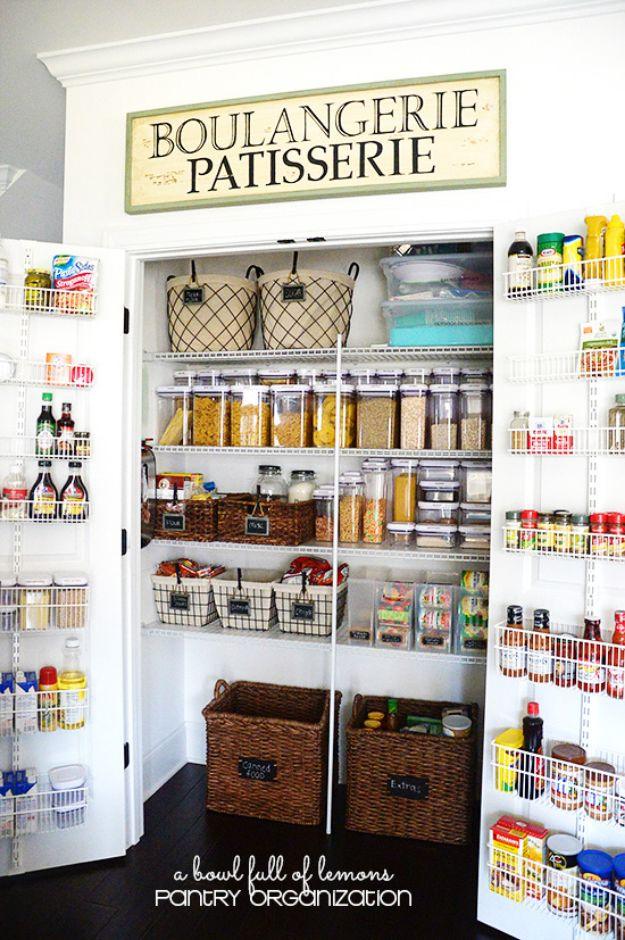
The version everyone pins: matching square canisters, wire bins, a French bakery sign over the door and rack shelving running up both sides of the door frame. The canisters are the expensive part and the maker’s advice is to buy them slowly from Marshall’s or TJ Maxx rather than all at once at full price. Wire shelves get a liner so nothing slides or falls through. Door racks hang from the top and tighten at the top and bottom, so no screws go into the door. Her trick for expiry dates is a small sticker on a side nobody looks at.
Get the full tutorial at A Bowl Full of Lemons.
7. Use Multi-Purpose Bins
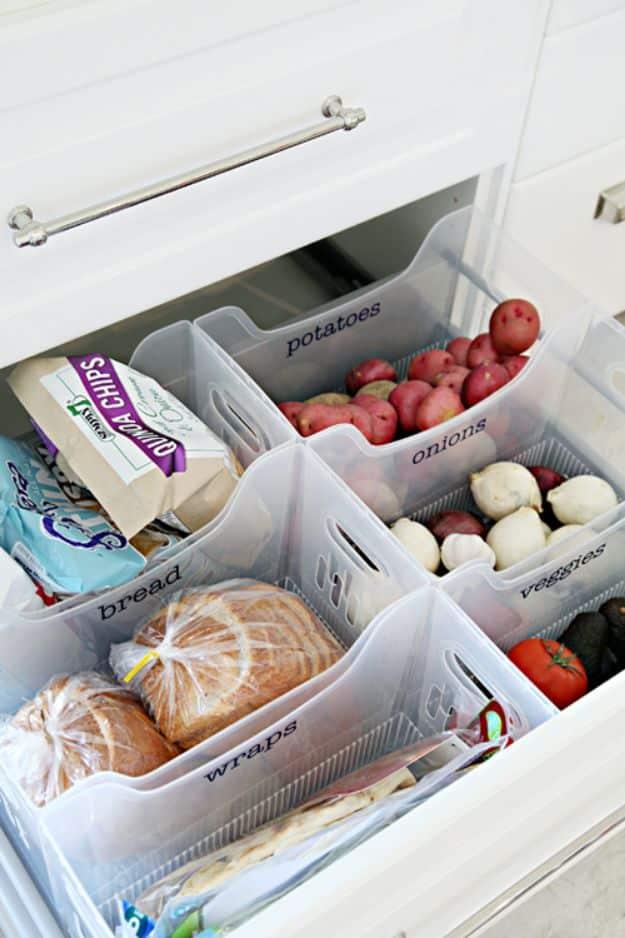
Pull out drawers inside a pantry, fitted out with clear handled bins labeled potatoes, onions, bread, wraps and veggies. The drawers themselves are IKEA Pax wardrobe drawers, bought because dedicated pantry pull outs were absurdly expensive, and made to fit a 30 inch opening by packing a quarter inch MDF strip behind each rail and then painting it white so it disappears. Woven and wire baskets were deliberately rejected here: produce leaks, flakes and drips, and a plastic bin goes in the sink. The heights were planned around who uses what, with the lowest drawer given to the children.
Get the full tutorial at IHeart Organizing.
8. Magazine Racks To Organize Canned Goods
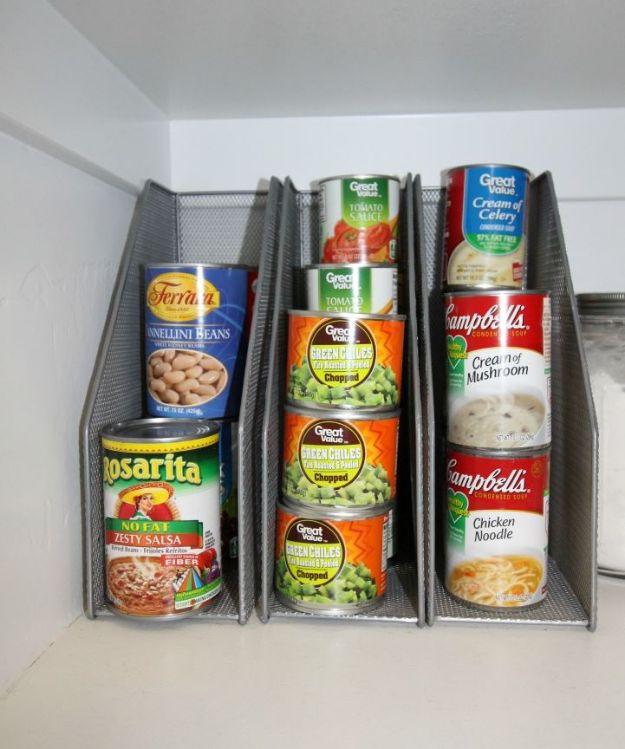
Three grey mesh magazine files stood on a shelf, each holding a stack of cans on their sides. It costs almost nothing, it stops the back row disappearing, and you pull one can without the other eleven sliding. Worth knowing before you buy: dollar store bins do not hold much weight, so keep those for packets and use something sturdier for tins. The same post puts glass jars from Walmart on baking staples, on the grounds that the things you handle constantly are the ones worth spending on, and everything else can be cheap.
Get the full tutorial at My Mommy Style.
9. Wire Shelving Organization
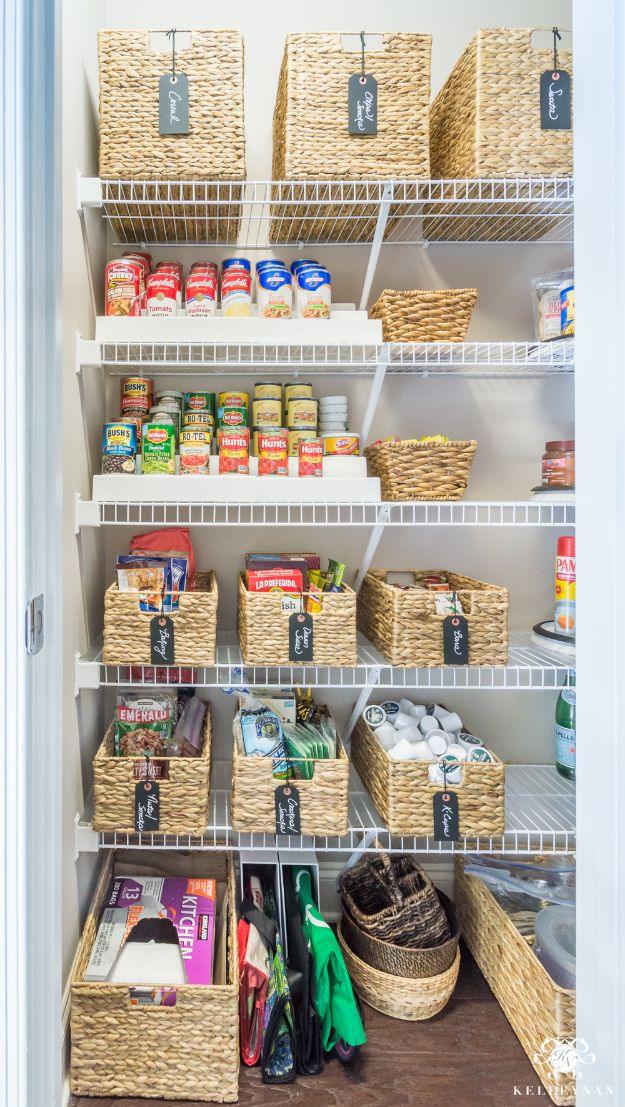
Builder grade wire shelving, kept rather than ripped out, and made to behave. Shelf liners give the wire a solid surface so packets and organizers stop tipping through the gaps. An expandable tiered shelf brings the back row of cans into view, and the large size matters because the standard one does not hold full sized tins properly. Lazy susans handle the corners nothing else reaches. Her labeling rule is the sane one: if a clear jar has pasta in it, it does not need a label saying pasta, but flours that look identical absolutely do.
Get the full tutorial at Kelley Nan.
10. Pantry Organization Makeover
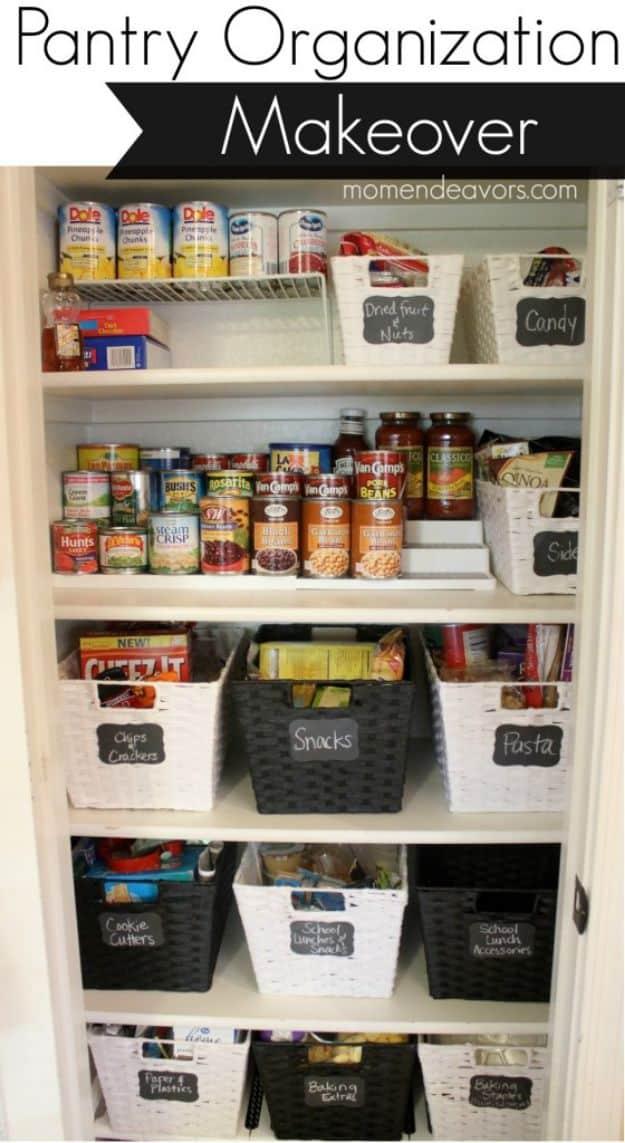
Woven baskets in black and white, alternated deliberately along every shelf so the eye reads a pattern instead of a jumble, each one wearing a chalkboard label. Alternating is a small decision that does a lot, because a shelf of identical baskets looks institutional and a shelf of mismatched ones looks like a jumble sale. An expandable tiered shelf lifts the back row of cans into view. The rest is ordinary supermarket food, which is the reassuring part: nothing here has been decanted into anything, the boxes and jars are simply corralled.
Get the full tutorial at Mom Endeavors.
11. Simple Pantry Makeover
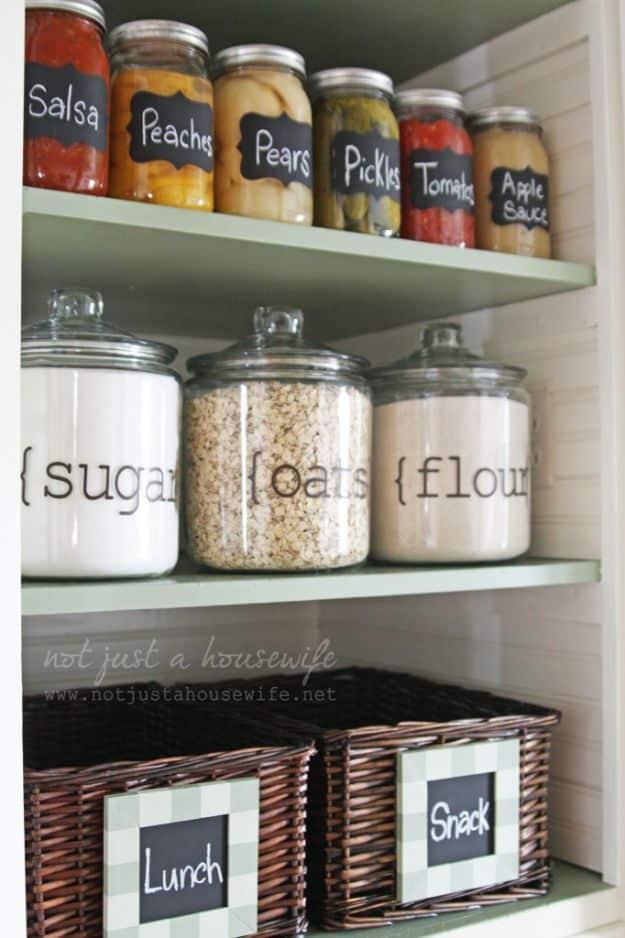
Home canned salsa, peaches, pears, pickles and tomatoes in labeled jars on mint green shelves, with sugar, oats and flour in glass canisters below and wicker baskets marked Lunch and Snack at the bottom. Those two baskets are the whole system. Crackers and snacks get split into bags the day the shopping arrives, the boxes get flattened and binned, and the children build their own lunches in the morning out of the basket. Less space used, fewer boxes, and nobody standing in the kitchen at half past seven asking where the crackers are.
Get the full tutorial at Stacy Risenmay, Not Just A Housewife.
12. Organize Pantry With IKEA Food Storage Containers
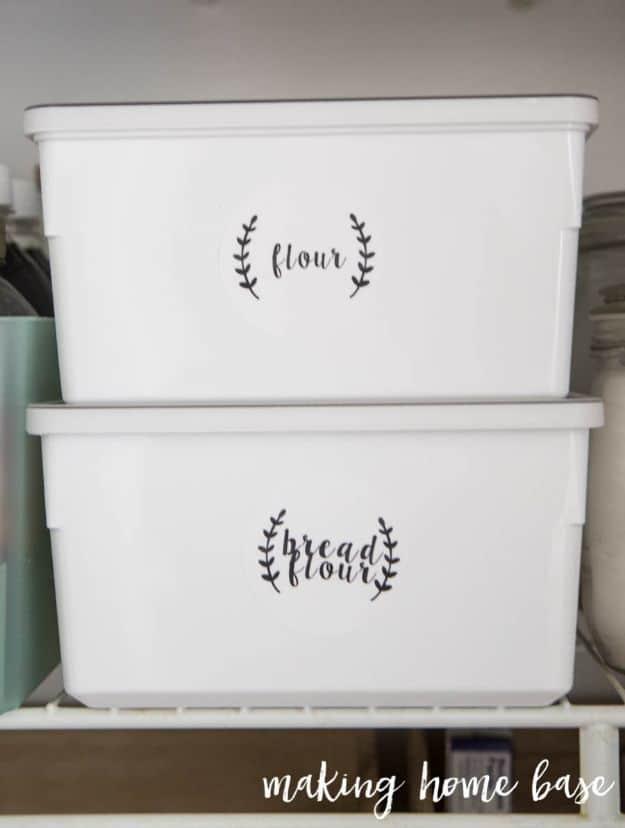
Two white lidded boxes stacked on a wire shelf, labeled flour and bread flour in script with a little laurel sprig either side, which tells you how cheap a printed round sticker makes something look expensive. The larger IKEA food containers were chosen for a specific reason: a five pound bag of flour fits in one, which most canisters cannot manage. The method behind it is six steps. Empty the pantry, measure the width, height and depth of every shelf, group everything into categories, then buy containers to fit the shelves rather than hoping.
Get the full tutorial at Making Home Base.
13. Label Jars For Pantry Storage
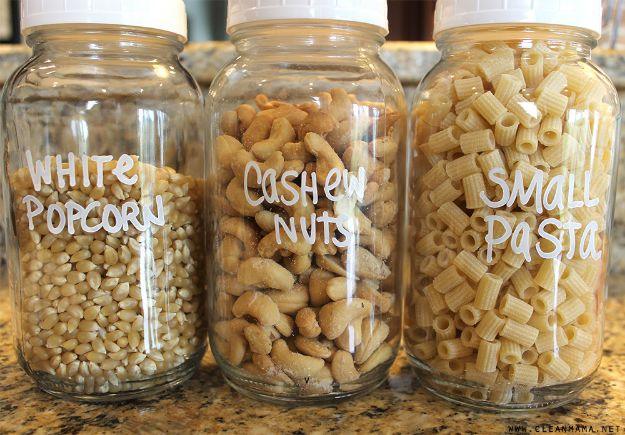
Mason jars with one piece plastic lids, hand labeled with an oil based paint marker, and the whole wall of dry storage worked out at about a dollar a jar with the lid. The jars were chosen for having no logos or embossing on the side, which is the only reason hand lettering looks this tidy. A white medium tip marker shows up against almost any contents. Use a ruler or a paper template so every label sits at the same height, put the food on the front and the cooking time and date on the back, and keep lemon oil nearby to lift off a mistake.
Get the full tutorial at Clean Mama.
14. Fabulously Organized Kitchen Pantry
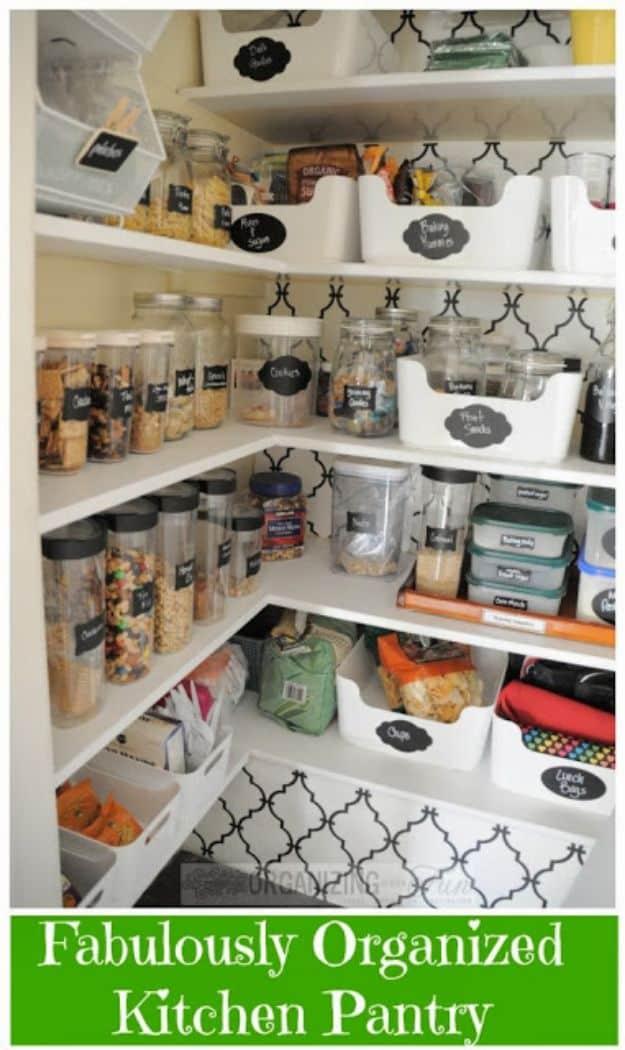
The back wall is wallpapered, and it is not pasted on. Double sided tape holds it, so it can come off the day the pattern stops being fun, which is a smart way to get a bold print into a rented or resale sensitive kitchen. The clever bit is on the door: the wire rack there lets small things slip straight through, so she cut up cardboard boxes, spray painted the pieces white and dropped them in as solid bases. Baking ingredients live together on a tray that comes out as a unit when she bakes.
Get the full tutorial at Organizing Made Fun.
15. Cutting Board Storage
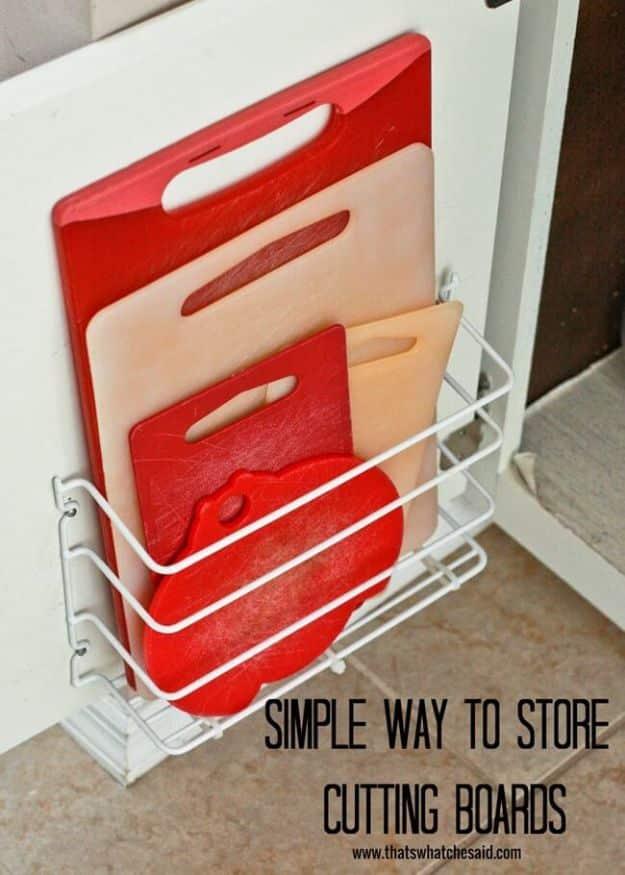
A wire rack meant for foil and cling film, screwed to the inside of a cabinet door and holding five cutting boards upright instead. Two dollars at Dollar Tree buys the rack and a bag of zip ties, and the zip ties are the part that makes it work: threaded across the open slats at the bottom, they stop the thin boards sliding out when you swing the door. Mount it low enough that the tallest board clears the shelf when the door shuts, and check the door actually closes before you drive the screws home.
Get the full tutorial at That's What Che Said.
16. Diagonal Drawer Divider
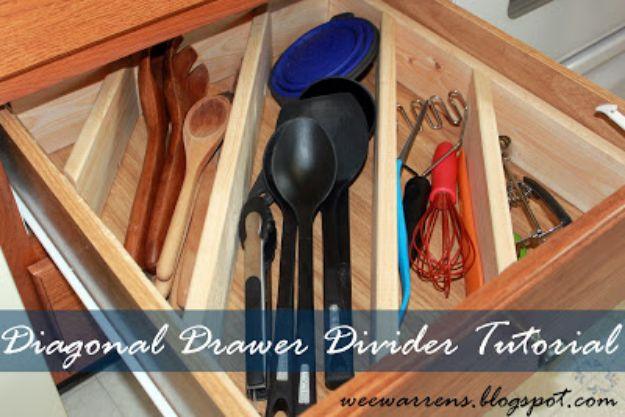
The showroom version of this costs seventy five dollars. This one cost under five and took one evening. A box is built to fit snugly inside the drawer from 1×4 boards, glued at the corners and nailed for strength, then slats cut at a 45 degree angle on a miter saw drop in as diagonal dividers. Cut one board, then use it to mark the next so the pairs match exactly, and check the box fits the drawer before you go any further. One section was deliberately made wider to take an unwieldy wooden spoon collection.
Get the full tutorial at Wee Warrens.
17. DIY Rolling Storage Bin
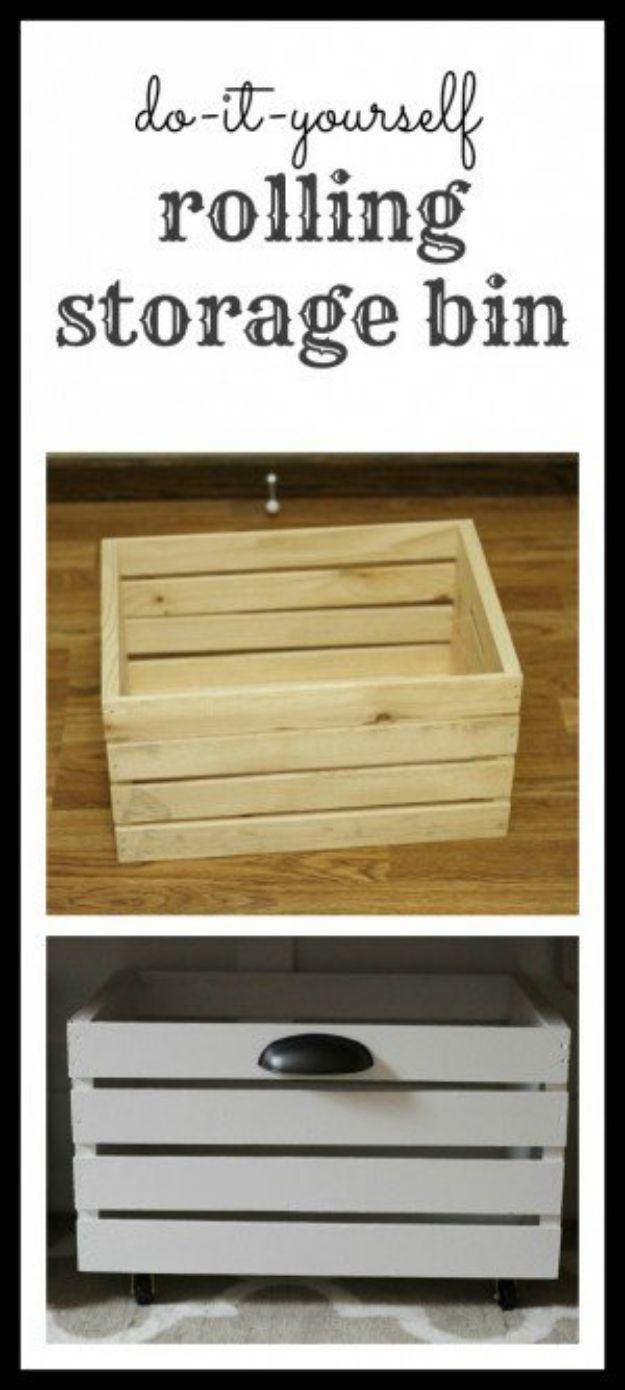
A plain wooden crate from the hardware store, painted and stood on casters, and suddenly it is the fifteen dollar version of the rolling bins that sell for three times that. Priming and painting is the slow part, because the slats need a small brush between them and the roller only covers the flat faces. The slats are thin, so the casters need short wood screws with a washer under each one or they will split through. Set the casters an inch and a half in from the edge, add a pull knob, and every pair of shoes has an address.
Get the full tutorial at I Can Teach My Child.
18. DIY Organized Pots and Pans Drawer
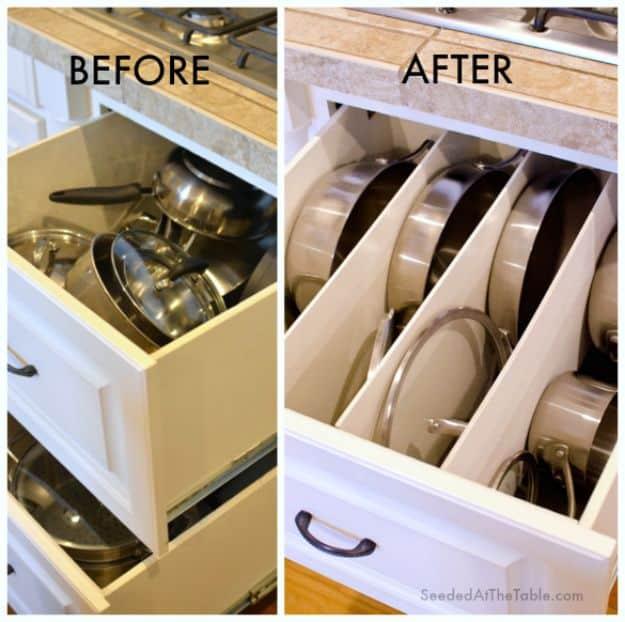
Pans stacked inside each other are how you end up unloading three to reach one. This drawer stands them on edge in adjustable bays instead. The bays are made from quarter inch panels sliding between strips of dentil molding glued along the top and bottom of the drawer sides, so the spacing moves as your pans change. Clamp the top strips while the glue sets and wedge the bottom ones with a spacer. Prime with an oil based primer, paint, and then build up a few coats of polyurethane, because bare paint in a pan drawer chips in a month.
Get the full tutorial at Seeded at the Table.
19. Organize A Kitchen Pantry With Free Printables
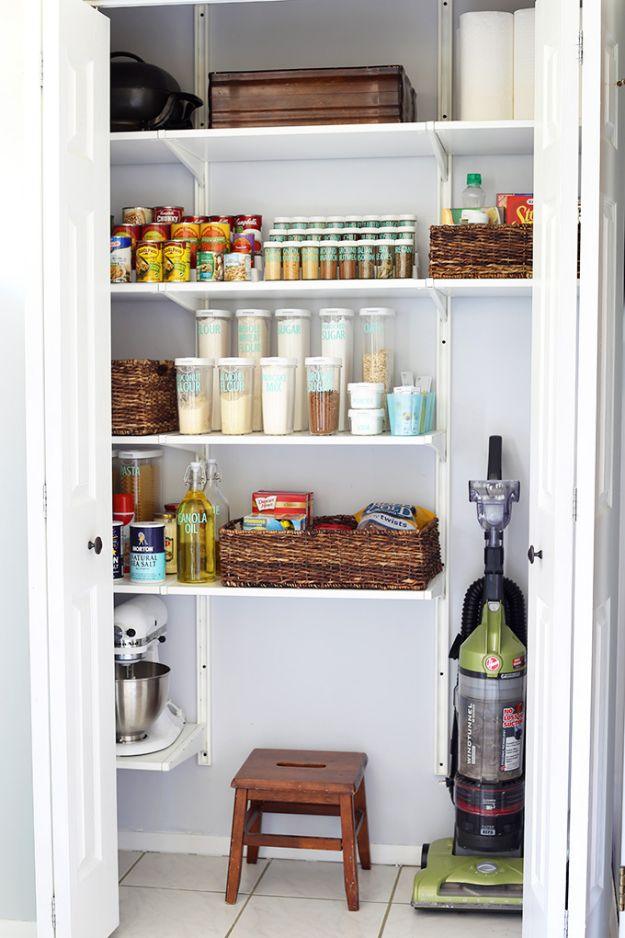
An entry coat closet turned into the pantry the kitchen never had, fitted out with IKEA shelving from the ALGOT range, since replaced by the near identical BOAXEL. Worth knowing before you go: those systems are sold as individual uprights, shelves, brackets and baskets rather than as a boxed kit, so take your measurements with you and know how many of each piece you need. The install took about half an hour. The order matters too. Empty it, sort like with like, plan what goes back before buying anything, then clean the shelves. Matching containers go in last.
Get the full tutorial at Abby Organizes.
20. Pantry Between the Studs
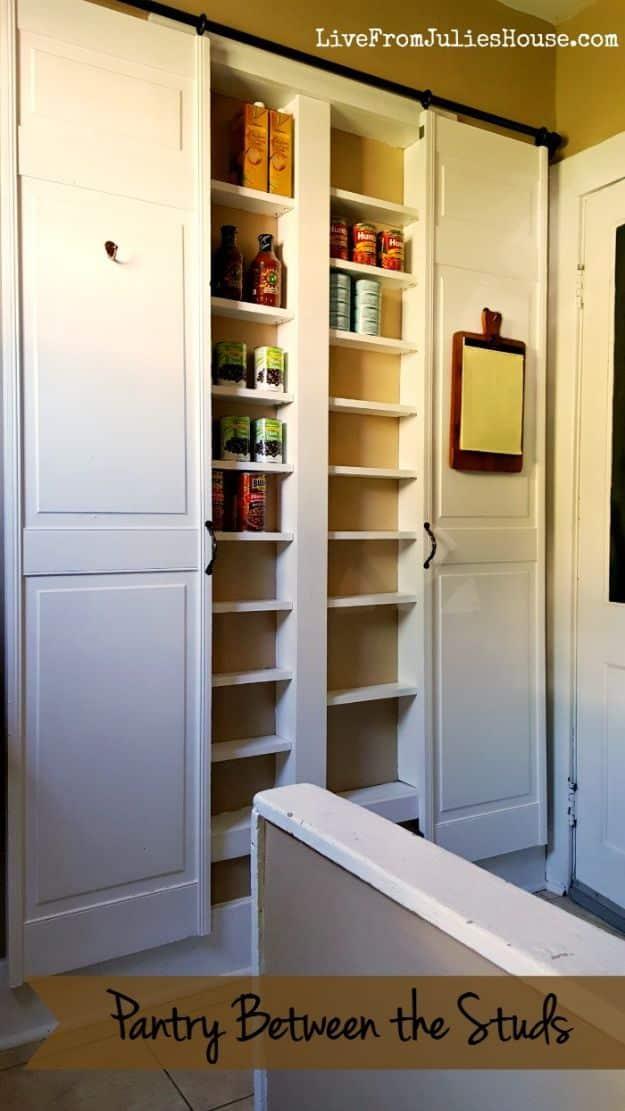
A ten by ten kitchen with no room for a pantry, so the pantry went into the wall just outside it. The width is not yours to choose: it is whatever the studs give you, which in an old house can be anything from twelve to sixteen inches apart. Behind the plaster here was knob and tube wiring, boxed in safely before the build began. The back of the box is luan, the shelves and molding are one by four and one by six boards, and the doors slide on black iron pipe from the plumbing aisle with a salvaged pair of doors hung on it.
Get the full tutorial at Live from Julie's House.
21. Designate A Baking Zone
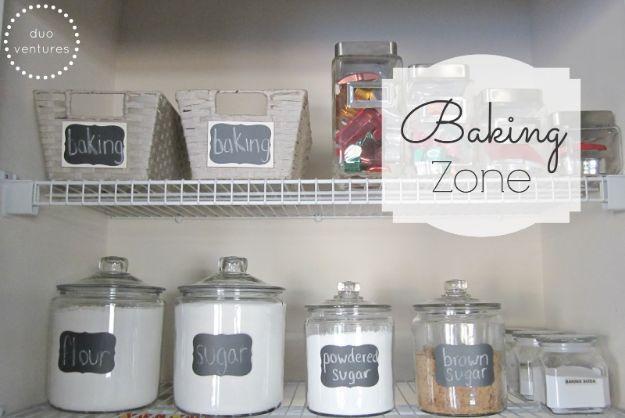
One shelf given over entirely to baking, so you stop assembling ingredients from four different places every time. Flour, sugar, powdered sugar and brown sugar go into big glass canisters with chalkboard labels, smaller jars take the baking soda, baking powder and cornstarch, and a couple of small baskets catch the fiddly things: food coloring, sprinkles, shortening, cupcake liners, extracts. The detail worth stealing is the brown sugar bear, a little ceramic disc that you soak and drop in the jar so the sugar never goes solid, which is the usual reason people avoid decanting it.
Get the full tutorial at Duo Ventures.
22. Cookware Storage
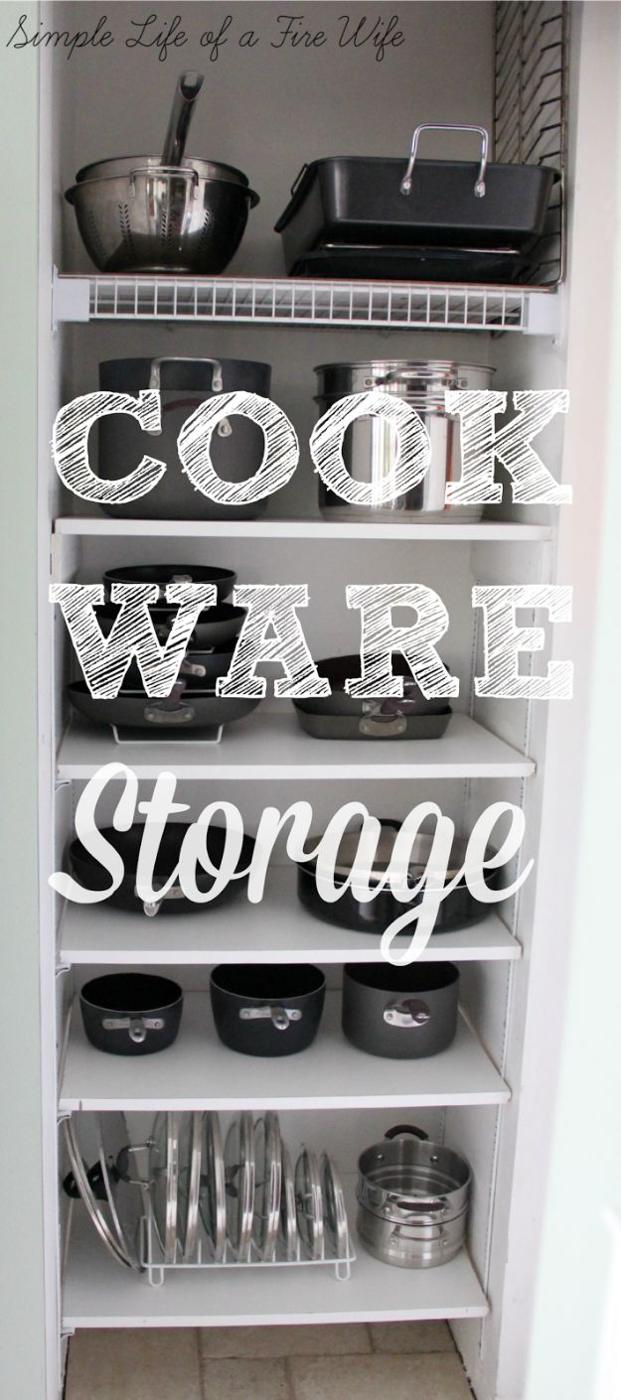
A second small pantry, no food in it at all, given over entirely to cookware. Top shelf takes the big awkward things, the colander and the roasting tin, and below that the pans sit one row deep on painted shelves with the baking tins and cake pans grouped by type. The two organizers doing the work are a skillet holder and a lid holder, both a few dollars and both findable in the kitchen section at Target, Walmart or a discount store. Aprons hang on hooks down one side. It solves the worst cabinet in any kitchen, the deep low one.
Get the full tutorial at Simple Life of a Fire Wife.
23. Grocery List and Weekly Menu Attached on the Door
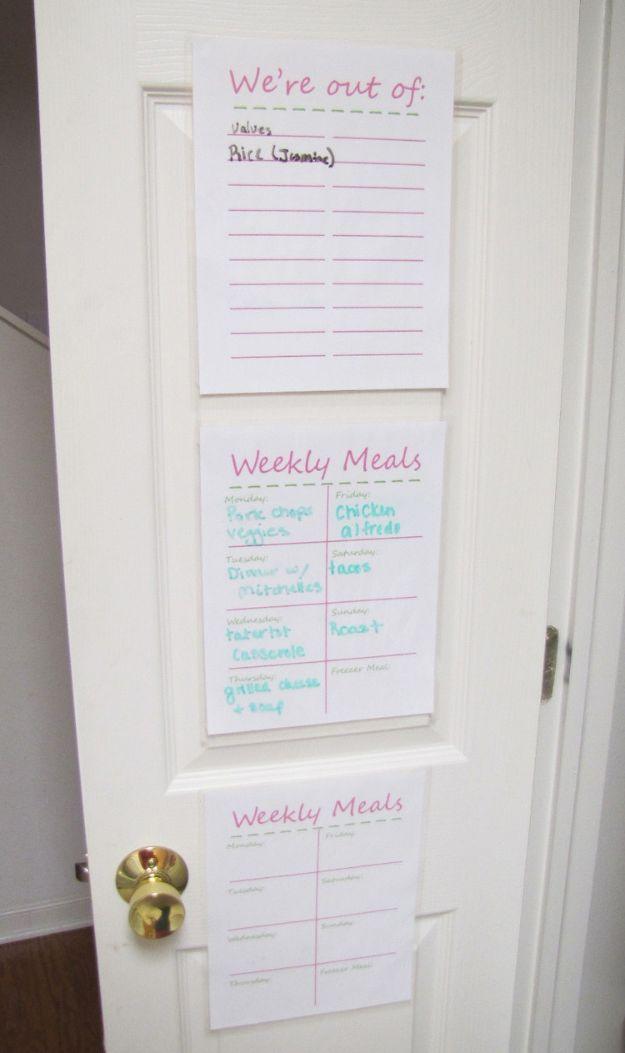
Two printed sheets on the inside of the pantry door, one headed We’re Out Of and one headed Weekly Meals, laminated and stuck on so they can be taken down, written on and put back. The original version used velcro circles, and the maker’s own update is the useful bit: she later switched to velcro command strips, which peel off without taking the paint with them. Everything else in that pantry was Walmart and Dollar Tree rather than the sixteen dollar containers she wanted, and she reckons the whole job doubled her usable space.
Get the full tutorial at Make Bake Celebrate.
24. Can Pantry Organizing
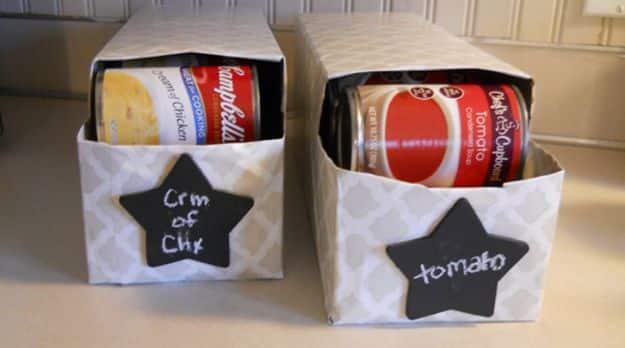
Two fabric storage bins, the collapsible kind, sitting on a shelf holding soup cans on their sides with chalkboard star labels tied to the front reading cream of chicken and tomato. Sorting tins by variety rather than stacking them by whatever came home first is a tiny change with a real payoff, because you stop discovering four cream of mushroom and no chicken stock at the moment you need it. Soft sided bins also suit a shallow shelf, since they squash to fit and do not rattle about the way a rigid tub does.
Get the full tutorial at Dump A Day.
25. Have A Rack Installed In Your Pantry Door
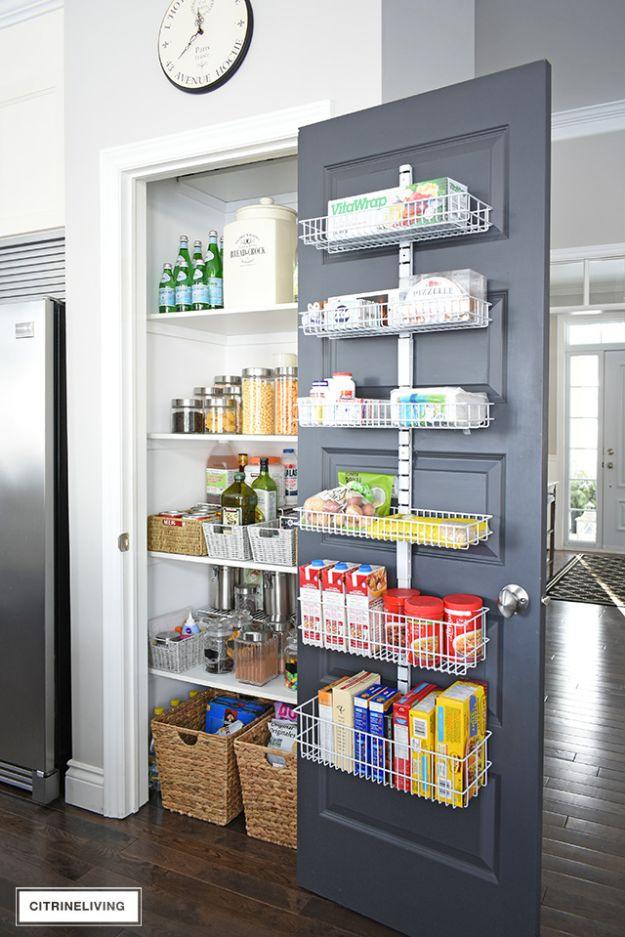
The door rack was the one real spend in this pantry, at a hundred and ten dollars, and the maker’s argument for it is that everything it carries is something that used to clutter a shelf: the big bottles, the chip clips, the sprinkles and cupcake liners. Almost everything else came from the dollar store. Glass jars with metal lids ran from a dollar twenty five to three dollars each depending on size, tall pasta jars were four, and that whole shelf came to $66.75. Wire riser shelves at the back were seven dollars each.
Get the full tutorial at Citrine Living.
26. Coffee Creamer Containers Reused into Storage Containers
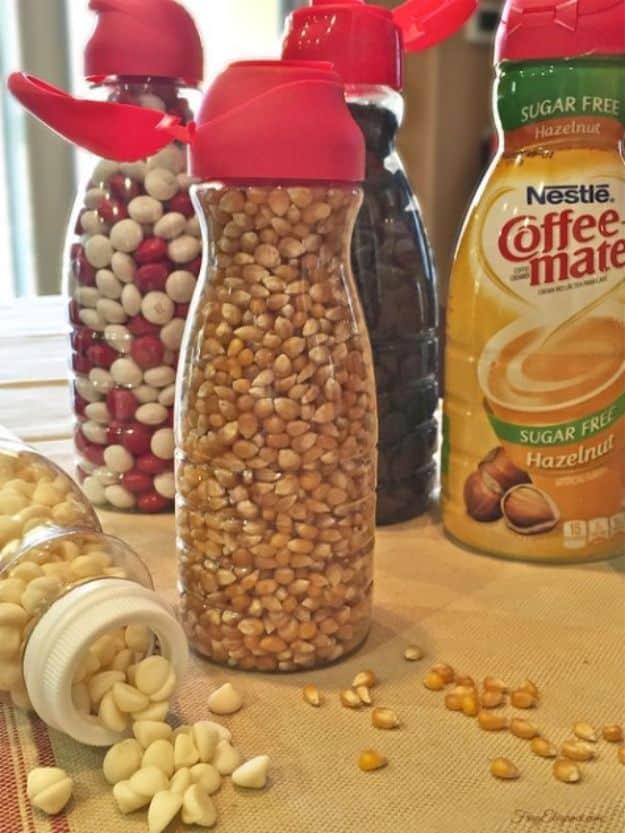
Coffee creamer bottles, washed out and refilled with popcorn kernels, nuts, chocolate chips and white chocolate chips. The flip up spout is the whole reason this works better than a jar, because you can pour a measured stream of kernels into a pan one handed without tipping a wide jar over your hob. Peel the outer label off, wash thoroughly, and they line up on a shelf looking like something you bought. The maker’s other idea is worth a go too: fill one with pancake mix, then add water straight into the bottle, shake and pour it onto the griddle.
Get the full tutorial at FrugElegance.