
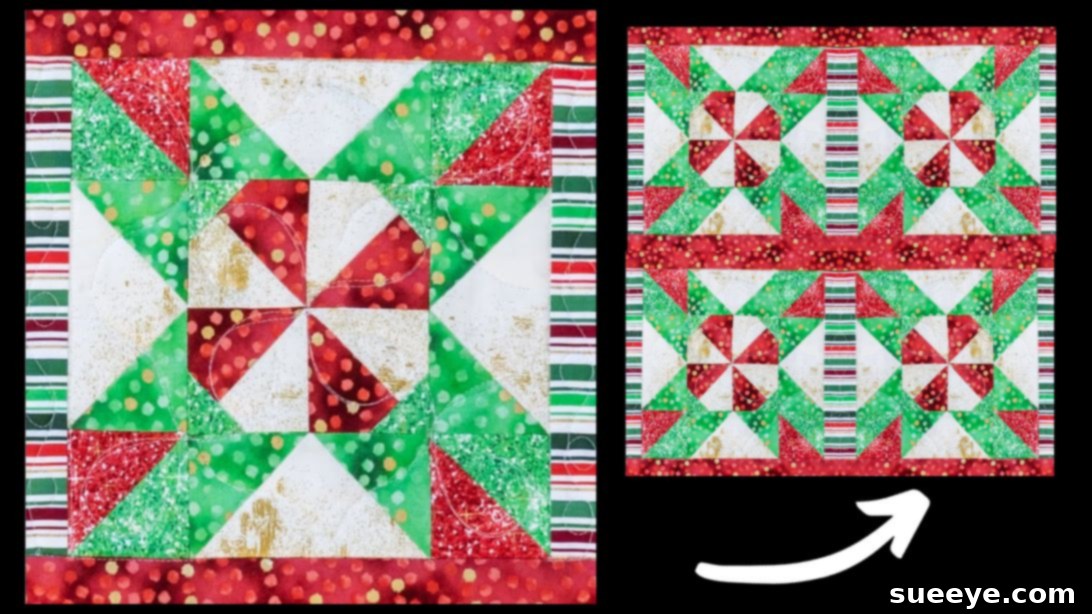
Transform your home into a festive wonderland this holiday season with a beautiful, handcrafted Peppermint Quilt Block! If you’re a quilting enthusiast looking for a delightful and surprisingly straightforward project, this design by Shabby Fabrics on YouTube is an absolute must-try. This charming quilt block is ingeniously constructed using simple half-square triangles, requiring just three distinct fabric colors to achieve its iconic candy-cane swirl. Its versatility makes it perfect for a myriad of festive applications, whether you envision a cozy table runner, a personalized place mat, decorative pillows, or incorporating multiple blocks into a larger, stunning holiday quilt.
Quilting offers a unique blend of creativity and comfort, allowing you to infuse your personal touch into every stitch. This particular peppermint design isn’t just visually appealing; it’s also incredibly rewarding to create. Shabby Fabrics is renowned for their clear, encouraging tutorials, making this project accessible for both seasoned quilters and enthusiastic beginners. We’ll guide you through each step, ensuring a smooth and enjoyable crafting experience from start to finish. Get ready to embark on a journey of fabric and thread that culminates in a truly special piece of holiday decor!
Beyond the Peppermint Block: Explore More Holiday Quilting Projects
Once you’ve mastered this delightful peppermint design, your holiday crafting possibilities are endless. Consider pairing it with other festive patterns to create a cohesive collection. For another charming holiday project that adds warmth and tradition to your home, check out our guide on How To Sew A Christmas Tree Skirt. Expanding your quilting repertoire during the festive season is a wonderful way to create lasting memories and beautiful keepsakes, truly personalizing your festive decor.
Essential Materials for Your Peppermint Quilt Block
Gathering your materials is the first exciting step towards bringing your Peppermint Quilt Block to life. While the design is simple, choosing the right fabrics and tools can significantly enhance your experience and the final outcome. For this project, you’ll need three contrasting fabric colors that evoke the festive spirit – typically vibrant red, a crisp green, and a neutral background fabric like white or cream. High-quality 100% cotton fabrics are recommended for their ease of use, durability, and how beautifully they press. Remember to pre-wash and press your fabrics before cutting to prevent shrinking and color bleeding after your quilt is complete, ensuring your finished piece remains vibrant for years to come.
- Red Fabric: A primary color for the “peppermint swirl” design.
- Green Fabric: The complementary color, adding depth and contrast to the festive motif.
- Background Fabric: Often a clean white or soft cream, providing a crisp backdrop and defining the peppermint shape.
- Marking Pen, Pencil, or Chalk: Essential for drawing precise lines on the fabric, especially for diagonal guides.
- Quilting Ruler: An indispensable tool for accurate measuring and cutting, ideally a clear acrylic ruler with clear markings.
- Needle and Thread: High-quality polyester or 100% cotton thread that complements your fabric colors and provides strong seams.
- Scissors or Rotary Cutter and a Cutting Mat: A sharp rotary cutter paired with a self-healing cutting mat offers superior speed and precision, crucial for intricate quilting.
- Iron and Ironing Board: Absolutely critical for pressing seams flat and ensuring block accuracy; a well-pressed seam is the hallmark of a professional-looking quilt.
- Sewing Machine: A reliable sewing machine with a quarter-inch foot attachment will make the stitching process smooth and efficient, ensuring consistent seam allowances.
Having all your tools organized and ready before you begin will ensure a seamless and enjoyable crafting experience. Don’t underestimate the importance of sharp blades, fresh needles, and a well-maintained sewing machine for achieving truly professional and precise results in your quilting endeavors.
Step-by-Step Guide: Crafting Your Peppermint Quilt Block
Creating this eye-catching Peppermint Quilt Block is a rewarding journey that unfolds through a series of precise steps. Attention to detail, especially in cutting, stitching, and pressing, is key to achieving that perfectly symmetrical and vibrant holiday design. Each stage builds upon the last, so taking your time and ensuring accuracy at every turn will lead to a beautiful outcome. Follow these detailed instructions, and feel free to reference the original Shabby Fabrics video tutorial for visual guidance and additional tips at any point.
Step 1: Preparing Your Half-Square Triangles (HSTs)
The foundation of many beloved quilt blocks, including our festive peppermint design, lies in accurately constructed Half-Square Triangles (HSTs). Begin by carefully cutting your selected red and green fabrics into the appropriate medium-sized squares as specified in the tutorial. Precision in this initial cutting stage is paramount, as even a slight deviation can impact the final shape and alignment of your entire block. On the wrong side of your lighter fabric squares (typically the background color if you were making more general HSTs, but for this specific design, follow the video’s guidance on which color to mark), use your marking tool and ruler to draw a crisp diagonal line from one corner to the opposite corner. This perfectly straight line will serve as your essential guide for stitching.
Next, take one red fabric square and one green fabric square, placing them right sides together, ensuring all edges align perfectly. Using your sewing machine, stitch a scant quarter-inch seam allowance on both sides of the drawn diagonal line. A “scant” quarter-inch (just slightly less than a full quarter-inch) is a common quilting technique that helps account for the fabric taken up by the thread, ensuring your finished HSTs are the correct size after pressing and trimming. Once both lines are stitched, use your rotary cutter and cutting mat (or sharp fabric scissors) to carefully cut directly along the drawn diagonal line, separating the two stitched units into individual HSTs. Finally, press these units open. Always press your seams thoughtfully; for HSTs, pressing seams open often helps reduce bulk in the finished block and creates a flatter, more precise result.
Step 2: Squaring Up and Assembling Larger Units
With your initial HSTs beautifully created, the next crucial step is to “square up” these units. This process involves trimming them to a precise, uniform size, ensuring all sides are perfectly straight and all angles are exactly 90 degrees. A specialized quilting ruler, often marked with a 45-degree diagonal line, is invaluable here. Place the ruler’s diagonal line directly over the seam line of your HST and trim the two raw edges, then rotate the unit and trim the remaining two sides. This meticulous squaring is vital for achieving a perfectly symmetrical quilt block later on, where all pieces fit together without distortion.
Now, let’s work on creating the larger, more complex units that form part of the peppermint swirl. Take your large red fabric square and a background fabric square, placing them carefully right sides together. Position your template (as demonstrated in detail in the Shabby Fabrics video tutorial) precisely on top of these layered fabrics, aligning it with the corners or edges as instructed. Pin these layers securely together to prevent any shifting or puckering during the stitching process, which is essential for accuracy. Stitch along the designated lines on the template, consistently maintaining your scant quarter-inch seam allowance. After stitching, carefully trim away any excess fabric around your stitched lines, leaving a clean seam. Then, use your rotary cutter to cut apart the individual units formed by your stitching lines. This template-based method allows for efficient and accurate production of multiple identical units, ensuring uniformity across your quilt block.
Step 3: Building the Central Block and Adding Corner Accents
After cutting apart your stitched units from the previous step, it’s time to press them open, just as you meticulously did with your HSTs. Always focus on creating flat, crisp seams that will lie perfectly within your block. Once pressed, take a moment to square up each of these newly formed block units to their specified dimensions. This continuous squaring process throughout the project is crucial; it ensures that all your individual components are perfectly sized and will fit together seamlessly in the end, preventing wavy seams, misaligned points, or an overall distorted block.
Now, it’s time to assemble the striking center of your Peppermint Quilt Block. Carefully arrange the squared units on a design wall or a flat surface according to the visual guide provided in the video tutorial by Shabby Fabrics. This step is incredibly important as it allows you to visualize the design taking shape and ensures you have the correct placement of each piece before you commit to stitching. Once you are completely satisfied with the arrangement and confident in your layout, begin stitching these units together to form the central square of the peppermint design. Press your seams thoughtfully as you go, often pressing opposing rows in opposite directions. This technique allows the seams to “nest” when they are joined later, minimizing bulk and creating beautifully flat intersections.
To add the final, defining touch to this central unit, take your small green squares. Place one small green square on each corner of your newly assembled central block, ensuring the fabrics are right sides together. Stitch diagonally across each small square from corner to corner. This clever technique, often referred to as “stitch and flip” or “snowballing,” creates precise points and adds a beautiful, clean framing element to your central block, enhancing the overall peppermint motif.
Step 4: Final Assembly and Finishing Touches
With the small green squares now stitched onto the corners of your central block, it’s time to refine these new additions. Carefully trim away the excess fabric from these corner units. Cut along the outside of your diagonal stitch line, leaving a clean quarter-inch seam allowance. Then, press these new corner units open, again ensuring flat, crisp edges that will lay nicely in the finished block. At this stage, the iconic peppermint design should be clearly emerging, ready for its final assembly!
The grand finale involves arranging all your individual block units – the central piece and the surrounding elements – together to form the complete Peppermint Quilt Block. Refer to the Shabby Fabrics tutorial for the exact layout and placement. Take your time to align each piece perfectly, paying exceptionally close attention to how the colors and patterns flow to create that instantly recognizable peppermint swirl. Once you’re confident in your arrangement and have double-checked everything, begin stitching the units together in rows. After completing each row, carefully press the seams. This intermediate pressing is crucial for maintaining accuracy and for achieving a professional, flat finish. Finally, stitch the assembled rows to each other, again pressing your final seams with utmost care. Pressing the seams of adjacent rows in opposite directions will allow them to lock together, creating smooth, bulk-free intersections. Your beautiful, festive Peppermint Quilt Block is now complete!
Embrace the Joy of Holiday Quilting!
Congratulations on completing your stunning Peppermint Quilt Block! This project is more than just sewing fabric together; it’s about creating something beautiful and meaningful with your own hands, especially during the festive season. The classic red, green, and white palette instantly brings to mind holiday cheer and the nostalgic charm of candy canes, but don’t hesitate to experiment with different color combinations to match your unique home decor style or other seasonal themes. Imagine a pastel peppermint for spring, or blues and silvers for a serene winter wonderland effect – the possibilities are truly endless!
The fundamental quilting skills you’ve honed through making this block – precise cutting, accurate stitching with a consistent seam allowance, and meticulous pressing – are invaluable and applicable to countless other quilting projects. You now possess a versatile block that can be the centerpiece of a festive table setting, a charming addition to a throw pillow, or a recurring motif in a larger holiday quilt. Share your finished creation with friends and family, or perhaps gift it as a heartfelt handmade present, knowing the love and effort put into it. The joy of quilting truly comes alive when you see your vision materialize into a tangible, beautiful piece that brings warmth and character to any space. We hope you’ve enjoyed this detailed tutorial as much as we enjoyed guiding you through it. Happy quilting and happy holidays!
All image credit belongs to Shabby Fabrics via YouTube. Follow and subscribe to their channel for more inspiring quilting tutorials and creative projects!