
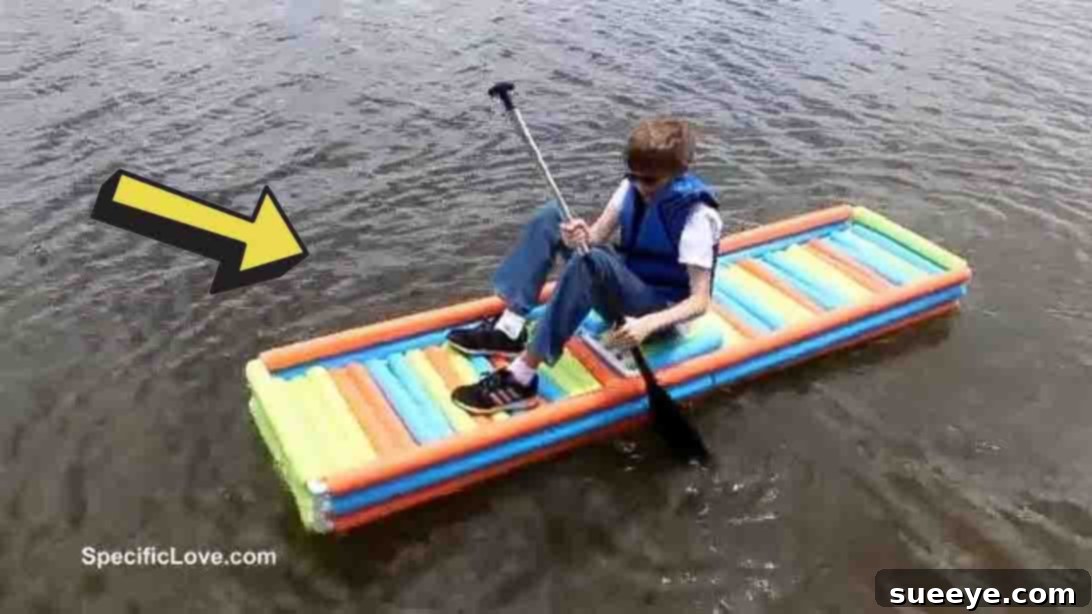
Summer is synonymous with sun, water, and endless outdoor adventures. What better way to make a splash and unleash your creativity than by constructing your very own pool noodle boat? This engaging and rewarding DIY project promises not only a fantastic way to beat the heat but also offers a memorable family bonding experience. Whether you’re aiming for a unique floating craft for the pool, a playful vessel for a calm lake, or simply an imaginative build for your little ones, this detailed tutorial will guide you through every step of creating a functional, buoyant, and endlessly entertaining boat using common, affordable materials like pool noodles and PVC pipes.
Embark on an exciting journey of engineering and fun, inspired by the innovative minds at Specific Love Creations on YouTube. They provide the foundational vision for this fantastic DIY pool noodle boat. This project is not just about building; it’s about exploring creativity, understanding basic physics, and enjoying the fruits of your labor on the water.
Looking for more creative ways to utilize pool noodles for summer relaxation? You might also enjoy our guide on the DIY Pool Noodle Mesh Sling Seat Float, another excellent project for maximizing your poolside comfort.
This pool noodle boat project stands out for its simplicity, cost-effectiveness, and the vast potential it offers for personalization. It’s an accessible craft for almost anyone, from eager beginners to seasoned DIY enthusiasts looking for a quick and satisfying build. Are you ready to dive in and construct your ultimate summer floating device? Continue reading for a comprehensive breakdown of materials and step-by-step instructions.
Why Build a DIY Pool Noodle Boat? Unleash Summer Fun & Creativity
Beyond the sheer enjoyment of having a custom-built floating craft, creating a DIY pool noodle boat offers a myriad of benefits. It’s an excellent way to engage children in STEM (Science, Technology, Engineering, Math) principles, teaching them about buoyancy, structure, and problem-solving in a hands-on environment. For adults, it’s a relaxing and rewarding escape, a chance to work with your hands and see a tangible result.
- Budget-Friendly Fun: Pool noodles and PVC pipes are inexpensive and readily available at most hardware or discount stores, making this an economical summer activity.
- Easy Construction: The design is straightforward, requiring no complex tools or advanced carpentry skills. Most steps involve cutting, connecting, and gluing.
- Family-Friendly Project: It’s an ideal activity for all ages, fostering teamwork and providing a sense of accomplishment for everyone involved.
- Endless Customization: From vibrant color schemes to unique additions like flags, seating, or even small paddle mounts, the design possibilities are limited only by your imagination.
- Versatile Use: Perfect for backyard pools, calm rivers, small ponds, or even as an imaginative play prop in the garden.
- Sustainable Crafting: Repurpose materials and learn about simple engineering concepts.
Essential Materials for Your DIY Pool Noodle Boat
Gathering your materials before you begin ensures a smooth and efficient building process. Here’s what you’ll need for constructing a sturdy and buoyant pool noodle boat, along with some considerations for each item:
- 10 Pool Noodles: These are the primary source of buoyancy. Opt for standard-sized noodles, preferably with a hollow core to easily insert the PVC pipes. You can choose a single color for a uniform look or mix and match for a vibrant, multi-colored boat.
- 10 – 10 ft PVC Pipes (½ inch or ¾ inch diameter): PVC pipes form the structural skeleton of your boat. The specific length (10 ft) and number ensure you have enough material for a stable frame. The diameter choice depends on the inner diameter of your pool noodles and the desired rigidity. Ensure they fit snugly inside the noodles.
- PVC T-Connectors: These connectors are crucial for joining PVC pipes at various points, creating the grid-like base and top frame of your boat. Purchase enough to form your desired structure, considering how many noodles you plan to connect side-by-side and lengthwise.
- PVC Corner Connectors: Essential for defining the boat’s corners, providing a clean finish and structural integrity.
- PVC Cement (and Primer, optional but recommended): This specialized adhesive creates a strong, permanent bond between PVC pipes and connectors. Always work in a well-ventilated area and follow manufacturer instructions.
- Paracord (or Strong Rope): Used for lashing and securing components, particularly where pool noodles might separate or require extra reinforcement. It adds structural integrity and helps distribute tension.
- Optional Tools & Supplies: A PVC pipe cutter or saw (for precise cuts), a measuring tape, a marker, and safety glasses are highly recommended for a safe and efficient build.
Step-by-Step Directions: Building Your Pool Noodle Boat
Now that you have all your materials, let’s begin the exciting construction phase. Follow these detailed instructions carefully to build a durable and fun pool noodle boat.
Step 1: Constructing the Sturdy PVC Frame
The first crucial step involves building the robust PVC skeleton that will support your entire boat and give it its shape.
- Measure and Cut PVC Pipes: Begin by measuring your pool noodles. Using a PVC pipe cutter or a saw, trim each 10-foot PVC pipe down to the exact length of your pool noodles. Precision here ensures a snug fit and a visually appealing finish.
- Insert PVC into Noodles: Carefully slide one cut PVC pipe into the hollow core of each pool noodle. This creates individual buoyant segments that are also structurally rigid.
- Assemble the Base Frame: Lay the noodle-wrapped PVC segments side-by-side on a flat surface. Take your T-connectors and begin connecting the bottom ends of these segments, creating a sturdy base grid. Imagine building a rectangular raft; the T-connectors will bridge the PVC pipes horizontally.
- Add Corner Connectors: At each of the four outer corners of your base frame, attach PVC corner connectors. These will define the boat’s perimeter and provide attachment points for the next layer.
- Build the Top Frame Segments: Above the corner connectors, add another T-connector on top of the PVC pipes extending upwards. Connect these new T-connectors with additional PVC segments. This starts to form the upper frame of your boat, creating a more robust, box-like structure rather than a flat raft.
- Repeat for Both Ends: Construct this intricate frame for both the front and rear ends of what will be your pool noodle boat. Essentially, you’re building two identical “U” or “H” shaped structures that will eventually be connected.
- Dry Fit and Cement: Before making any permanent bonds, perform a “dry fit” by assembling all the PVC pipes and connectors without cement. This allows you to check for proper alignment, fit, and make any necessary adjustments. Once you’re satisfied with the layout, carefully take everything apart. Apply PVC cement (and primer, if using) to all connecting surfaces. Work quickly as PVC cement dries fast. Reassemble all the pieces, twisting slightly to ensure a strong, even bond. Hold the joints firmly for a few seconds as the cement sets. Allow ample time for the cement to cure completely according to the manufacturer’s instructions before proceeding. This step is critical for the boat’s durability and structural integrity.
Step 2: Adding Buoyancy, Reinforcement, and Finishing Touches
With the PVC frame cemented and secure, it’s time to add the final layers of buoyancy and protection.
- Integrate Top PVC and Noodle: Before permanently gluing the upper PVC sections that will connect the two end frames (the ones you built in Step 1), carefully measure out a piece of pool noodle that fits this section. Slide the PVC pipe through this noodle before cementing it into place. This ensures that even the connecting top sections contribute to buoyancy and comfort.
- Install Sidebars for Stability: Enhance the boat’s lateral stability by adding sidebars. Connect two PVC pipes with pool noodles on each side of the boat’s main structure. These sidebars run along the length of the boat, parallel to the main body, significantly increasing its stability and creating a more defined boat shape. Cement these connections firmly.
- Interlace with Paracord for Enhanced Security: Where the pool noodles naturally separate or at critical junctions, use paracord (or a strong, synthetic rope) to interlace and tie them together. This step is vital for keeping everything nice and tight, preventing individual noodles from shifting or separating during use. The paracord acts as an extra layer of reinforcement, distributing stress and ensuring the entire structure remains cohesive.
- Protect the Bow (Front) of the Boat: To safeguard the front end of your DIY pool noodle boat from potential impacts with docks, rocks, or other objects, prepare a protective layer. Take another pool noodle and cut it lengthwise down one side. Slide this split noodle over the very front PVC pipe and noodle section of your boat frame. This acts as a bumper, absorbing shocks and protecting the core structure. Secure it with zip ties or additional paracord if needed.
Testing, Customization, and Safety Tips for Your New Boat
Congratulations! Your DIY pool noodle boat is almost ready for its maiden voyage. Before you launch, consider these important final steps and tips.
Testing Your Pool Noodle Boat
Once the PVC cement has fully cured (allow at least 24 hours, or as recommended by the manufacturer), it’s time for a preliminary test:
- Shallow Water Launch: Begin by testing your boat in shallow, calm water. This allows you to observe its buoyancy and stability without risk.
- Weight Distribution: Carefully get into the boat. Pay attention to how your weight is distributed. Does it feel stable? Are there any sections that seem to dip excessively? This will help you understand the boat’s capacity and where occupants should ideally sit.
- Leak Check: Although pool noodles provide buoyancy, check that all PVC connections are secure and holding. While minor water ingress into the PVC won’t sink the boat, a well-sealed frame ensures maximum structural integrity.
Unleash Your Creativity: Customization Ideas
This basic design is just the beginning! Here are some ideas to personalize your pool noodle boat:
- Seating Solutions: Add a small, lightweight plastic stool, a soft cushion, or even a mesh sling seat (similar to the DIY pool noodle sling float mentioned earlier) for more comfortable seating.
- Decorative Elements: Attach flags, colorful streamers, or waterproof stickers to give your boat a unique personality.
- Paddle Holders: Secure small loops of paracord or bungee cords to the sides to create convenient paddle holders.
- Storage: Consider adding a small waterproof bag or container tied to the frame for snacks, drinks, or small toys.
- Motor Mount (Advanced): For those with more experience, a small trolling motor mount could be designed for slow, calm water propulsion. Ensure the boat’s structure can support the motor’s weight and thrust.
- Themed Boats: Transform your boat into a pirate ship, a space vessel, or an animal-themed craft using additional pool noodles, foam sheets, and waterproof paint.
Important Safety Considerations
Safety should always be a top priority, especially when enjoying water activities:
- Adult Supervision: Children should always be supervised by an adult when using the pool noodle boat, regardless of their swimming ability or the depth of the water.
- Life Jackets: Ensure all occupants, especially children, wear properly fitted life jackets or personal flotation devices (PFDs) when on the boat.
- Weight Limits: Understand the inherent weight limitations of your DIY craft. Do not overload the boat, as this can compromise its stability and buoyancy. Test with varying weights in shallow water first.
- Calm Waters Only: This type of DIY boat is best suited for calm, shallow waters like swimming pools, kiddie pools, or very still lakes and ponds. Avoid fast-moving rivers, large open bodies of water, or areas with strong currents or waves.
- Tool Safety: Always use appropriate safety gear (like gloves and safety glasses) when cutting PVC pipes and handling PVC cement. Follow all product instructions carefully.
- Inspect Regularly: Before each use, quickly inspect the boat for any signs of wear and tear, loose connections, or damage to the pool noodles. Address any issues before launching.
Maintenance and Storage Tips for Longevity
To ensure your DIY pool noodle boat provides endless fun for many seasons, proper maintenance and storage are key:
- Rinse After Use: After each use, especially in chlorinated or saltwater, rinse the boat thoroughly with fresh water to prevent degradation of materials and buildup.
- Dry Completely: Allow the boat to air dry completely before storing it to prevent mildew and extend the life of the pool noodles and paracord.
- Store Indoors or Shaded: Store your boat in a cool, dry, and shaded area, such as a garage or shed. Prolonged exposure to direct sunlight can cause pool noodles to fade, crack, and become brittle over time.
- Check Connections: Periodically inspect all PVC cement joints and paracord lashings to ensure they remain strong and secure. Re-glue or re-tie if necessary.
Building your own pool noodle boat is more than just a craft project; it’s an investment in summer memories, a lesson in practical engineering, and a testament to the joy of DIY. From the initial cuts of PVC to the triumphant first float, every step is an opportunity for learning and fun. So, gather your materials, rally your team, and get ready to create a unique floating masterpiece that will be the envy of every backyard pool party! Watch the original video tutorial from Specific Love Creations again for a visual guide, and let your imagination set sail. Happy crafting and happy floating!