
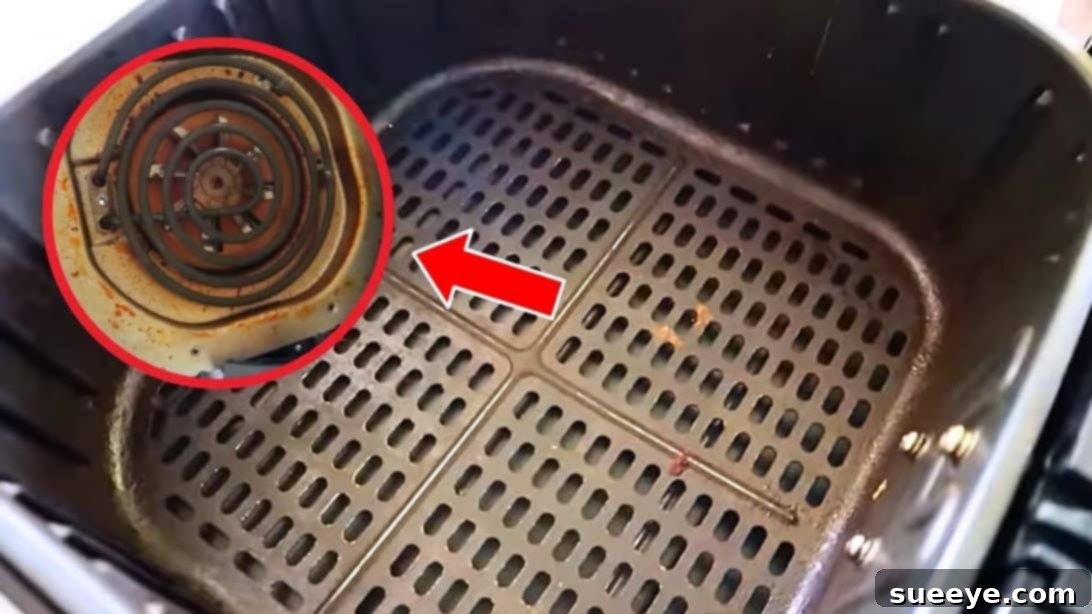
Air fryers have revolutionized home cooking, offering a convenient, quick, and often healthier way to prepare a vast array of dishes. From crispy fries to perfectly cooked chicken, the ease of use and versatility of these appliances have made them a staple in modern kitchens. However, with great convenience comes the responsibility of proper maintenance. Daily use can quickly lead to grease buildup, food residues, and even unpleasant odors, affecting both your food’s taste and your appliance’s longevity.
Regular air fryer cleaning isn’t just about aesthetics; it’s crucial for hygiene, optimal performance, and extending the lifespan of your valuable kitchen gadget. Ignoring cleaning can lead to smoky operations, uneven cooking, and a breeding ground for bacteria. This comprehensive guide will walk you through everything you need to know about keeping your air fryer spotless, from tackling those initial “new appliance” smells to mastering the art of deep cleaning.
RELATED: Looking for more quick tips? Check out our Quick Air Fryer Cleaning Hack!
Why Regular Air Fryer Cleaning is Crucial
Maintaining a clean air fryer offers multiple benefits that enhance your cooking experience and protect your investment:
- Ensures Food Safety and Hygiene: Food particles and grease can harbor bacteria. Regular cleaning prevents this, ensuring that your meals are not only delicious but also safe to eat.
- Optimizes Performance and Efficiency: A build-up of grime on the heating element or within the basket can hinder airflow, leading to uneven cooking and longer cooking times. A clean air fryer cooks more efficiently and consistently.
- Extends Appliance Lifespan: Accumulated grease and food residue can damage internal components over time. By keeping your air fryer clean, you reduce wear and tear, significantly prolonging its operational life.
- Prevents Unpleasant Odors and Smoke: Burnt-on food and stale grease are common culprits behind foul odors and excessive smoke during operation. Cleaning prevents these issues, ensuring your kitchen remains fresh.
- Maintains Food Flavor: Lingering residues from previous meals can transfer flavors to your new dishes, altering their taste. A clean air fryer ensures each meal tastes exactly as intended.
Tackling the New Air Fryer Smell: First-Use Preparation
It’s not uncommon for brand-new air fryers to emit a distinct, sometimes chemical-like odor during their first few uses. This smell typically comes from manufacturing oils or protective coatings burning off. There’s no need to worry, as this can be easily remedied with a simple, all-natural solution, ensuring your first meal in your new appliance is a pleasant one. For an excellent visual guide, Empowered Cooks demonstrates effective cleaning methods.
How to Remove New Air Fryer Smell (Step-by-Step)
This method not only eliminates manufacturing odors but also primes your air fryer for its inaugural cooking session.
- Gather Your Ingredients: You’ll need white vinegar, water, and fresh lemon juice (or a few lemon slices).
- Prepare the Solution: In an oven-safe dish or bowl that fits comfortably inside your air fryer basket, combine equal parts water and white vinegar. Add a generous splash of lemon juice or a few lemon wedges. Lemon is a natural deodorizer and leaves a refreshing scent.
- Run the Air Fryer: Place the dish with the solution inside the air fryer basket. Set your air fryer to 400°F (200°C) and let it run for 10 to 20 minutes. The heat will cause the solution to steam, neutralizing odors.
- Cool Down and Wipe: Once the cycle is complete, unplug the air fryer and allow it to cool completely. Carefully remove the dish. Wipe down the interior of the basket and drawer with a damp cloth, then dry thoroughly.
This process effectively removes any factory odors, leaving your air fryer fresh and ready for cooking delicious meals.
Essential Tools for Air Fryer Cleaning
Before diving into the cleaning process, ensure you have the right tools on hand. These items will make your cleaning routine much more efficient and effective:
- Soft sponges or microfiber cloths
- Non-abrasive brushes (e.g., silicone brushes, soft-bristled scrubbers)
- Paper towels
- Dish soap (a grease-cutting formula like Dawn Powerwash is highly effective)
- White vinegar
- Lemon juice or fresh lemons
- Baking soda (for tougher stains)
- A spray bottle (optional, for custom cleaning solutions)
- Warm water
Maintaining a Clean Air Fryer: Daily and Weekly Tips
Consistent, minor cleaning efforts after each use prevent major headaches down the line. Here’s how to maintain a sparkling clean air fryer with ease:
1. Leverage Parchment Paper and Liners
Using liners is a game-changer for reducing cleaning time. They catch drips and crumbs, protecting your air fryer basket from direct contact with food and grease.
- Parchment Paper with Holes: Ideal for most dishes, these liners allow hot air to circulate freely around the food, ensuring even cooking and crispiness. They prevent food from sticking and keep your basket significantly cleaner.
- Parchment Paper without Holes (Bowl-shaped): These are excellent for foods with sauces, marinades, or anything that might leak, turning your air fryer into a mini-oven. However, exercise caution when cooking fatty or frozen foods with these, as they can restrict airflow, potentially leading to less crispy results or uneven cooking if the food isn’t elevated. Always ensure adequate air circulation.
- Silicone Liners: Reusable and eco-friendly, silicone liners are another excellent option. They come in various shapes and sizes and are perfect for containing mess. Always check if they are rated for high temperatures and ensure they don’t block too much airflow.
Remember to always place parchment paper or silicone liners *under* the food and *never* preheat your air fryer with an empty liner inside, as it can float up and hit the heating element, posing a fire risk.
2. Clean After Every Use: The Golden Rule
As soon as your air fryer cools down after cooking, make it a habit to clean it. This prevents grease and food particles from hardening, making cleanup much simpler.
- Allow to Cool: Always unplug your air fryer and let it cool completely before cleaning. Attempting to clean a hot appliance is dangerous and less effective.
- Initial Wipe Down: Once cooled, use a paper towel to wipe out any visible drippings, crumbs, or loose food particles from the basket and drawer.
- For Light Residue: If there are only a few crumbs or light grease, a quick wipe with a damp paper towel or a soft sponge soaked in warm, soapy water will often suffice.
- For Dirtier Baskets/Drawers:
- After wiping away loose debris, spray the basket and drawer thoroughly with a grease-cutting cleaner, such as Dawn Powerwash or a mixture of dish soap and water.
- Let the cleaner sit for about 10 minutes. This allows it to penetrate and break down the grease and stuck-on food.
- Use a soft sponge or a non-abrasive brush to scrub away the grime. Pay attention to corners and crevices.
- Rinse the basket and drawer thoroughly under warm running water to remove all soap residue. Ensure no soapy film remains, as it can burn during the next use.
- Dry completely with a clean cloth or let air dry before reassembling.
3. Don’t Forget the Heating Element and Interior
While the basket and drawer get the most direct contact with food, the internal components, especially the heating element and fan, also accumulate grease and dust. Cleaning these parts is crucial for preventing smoke and maintaining efficiency.
- Unplug and Cool: Always ensure your air fryer is unplugged and completely cool before attempting to clean the interior.
- Access the Interior: Depending on your air fryer model, you might be able to tilt it upside down or simply look into the main cavity once the basket is removed.
- Wipe the Heating Element: Use a damp (not dripping wet) washcloth or sponge with a small amount of dish soap to gently wipe down the heating coil. Be careful not to bend or damage it. This removes accumulated grease that could cause smoke during cooking.
- Clean the Interior Walls: Wipe the inside walls of the air fryer with the damp cloth. For stubborn spots, a paste made of baking soda and water can be applied, left for a few minutes, then wiped away.
- Dry Thoroughly: Use a dry cloth to wipe away any moisture, ensuring all internal components are completely dry before plugging the air fryer back in.
Deep Cleaning Your Air Fryer: For Stubborn Grime
Even with regular cleaning, sometimes baked-on grease or stubborn stains can accumulate. A monthly or quarterly deep clean is essential to keep your air fryer in top condition.
- Disassemble Components: Remove the basket, crisper plate, and any other removable parts.
- Soak for Stubborn Stains: For heavily soiled baskets or crisper plates, fill your sink with hot water and a generous amount of dish soap. You can also add a cup of white vinegar for extra grease-cutting power. Submerge the removable parts and let them soak for at least 30 minutes, or even overnight for very stubborn grime.
- Scrub Thoroughly: After soaking, use a non-abrasive sponge or brush to scrub away all softened food residues and grease. For particularly tough spots, a paste of baking soda and a little water can be applied directly, left to sit, and then scrubbed off.
- Clean the Exterior: While the interior components are soaking, wipe down the exterior of your air fryer with a damp cloth and a mild cleaner. Pay attention to the control panel and handle, where fingerprints and grease can accumulate.
- Address the Fan and Vent: If accessible, carefully clean around the fan area. Some models have a removable cover for the fan, allowing for a more thorough cleaning of this often-overlooked spot. A soft brush or even a vacuum cleaner hose attachment can help remove dust and grease from the vents.
- Rinse and Dry: Rinse all removable parts thoroughly to remove any soap or cleaning solution. Ensure they are completely dry before reassembling them back into the air fryer.
Common Air Fryer Cleaning Mistakes to Avoid
To ensure your air fryer stays in excellent working order, avoid these common cleaning errors:
- Cleaning While Hot: Always wait until your air fryer is completely cool before attempting to clean it. This prevents burns and potential damage to the appliance.
- Using Abrasive Scrubbers or Chemicals: Harsh sponges, steel wool, or aggressive chemical cleaners can scratch the non-stick coating of your basket and drawer, making food stick more easily and potentially releasing harmful fumes. Stick to soft sponges, brushes, and mild detergents.
- Submerging the Main Unit: Never submerge the main air fryer unit in water, as it contains electrical components. Only the removable parts (basket, crisper plate) are typically safe for soaking or dishwasher cleaning (check your manual).
- Forgetting to Unplug: Before any cleaning, especially when dealing with the heating element or interior, always unplug your air fryer for safety.
- Not Drying Thoroughly: Leaving moisture in the air fryer can lead to rust or mildew. Ensure all components are completely dry before reassembling or storing.
- Ignoring the Manual: Your air fryer’s manual contains specific cleaning instructions and warnings. Always refer to it for model-specific advice.
The Best Way to Keep Your Air Fryer Clean and Performing Optimally
Ultimately, the “best way” to keep your air fryer clean is through a combination of consistent habits and a proactive approach. It’s not about one magic solution, but rather incorporating simple steps into your routine.
- Clean After Every Use: This is the single most effective strategy. A quick wipe down prevents small messes from becoming major cleaning challenges.
- Utilize Liners: Parchment paper or silicone liners are your best friends for minimizing direct contact between food and the basket, significantly reducing cleanup time.
- Regular Deep Cleans: Schedule a thorough deep clean every few weeks or months, depending on your usage, to tackle any hidden grime or buildup.
- Address Odors Promptly: Don’t let smells linger. Use natural deodorizers like lemon and vinegar to keep your air fryer smelling fresh.
- Safety First: Always unplug your appliance and ensure it’s cool before starting any cleaning process.
By following these guidelines, you’ll not only ensure your air fryer remains a hygienic and efficient cooking tool but also protect your investment for years to come. Enjoy healthier, perfectly cooked meals without the hassle of a dirty appliance!