
Craft Stunning DIY Citrus Slice Coasters for a Zesty Summer Vibe
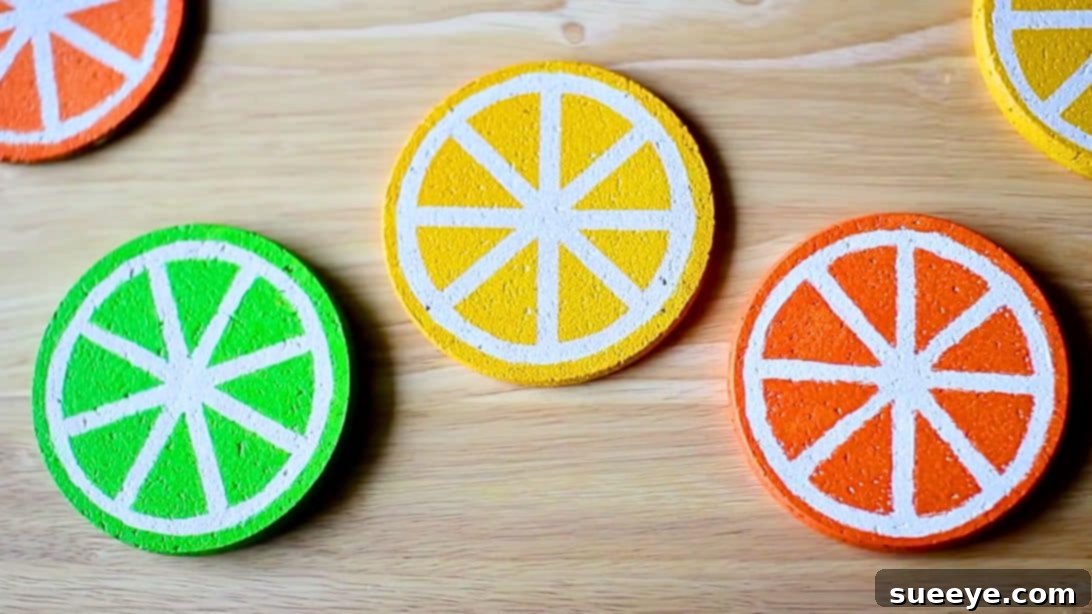
Are you ready to infuse your summer gatherings with a burst of vibrant charm and personality? This incredibly easy DIY citrus slice coaster set is the perfect project to add a refreshing, handmade touch to your home decor, making your next summer party truly unforgettable. Imagine your guests admiring your beautifully handcrafted coasters, each one a miniature work of art resembling a fresh lemon, lime, orange, or grapefruit slice. This delightful craft is not only remarkably simple to make, requiring just a few readily available and affordable materials, but it also offers a fantastic opportunity to personalize your living space or create thoughtful, one-of-a-kind gifts.
Even if you consider yourself a complete crafting novice, this comprehensive step-by-step guide will walk you through the entire process, ensuring a successful and satisfying creative experience. You’ll be amazed at how quickly you can transform simple cork circles into eye-catching accessories that protect your surfaces with style. Inspired by the brilliant tutorial from HGTV Handmade on YouTube, creating these charming coasters has never been more accessible or fun. Get ready to add a splash of summer zest to your tabletops!
Why DIY Citrus Coasters Are a Must-Have This Season
Summer is a season synonymous with bright colors, refreshing beverages, and lively outdoor entertaining. What better way to complement this vibrant time of year than with home accessories that echo its cheerful spirit? DIY citrus slice coasters bring a unique blend of functionality and aesthetic appeal to any setting, whether it’s a casual backyard barbecue, an elegant brunch, or just your everyday coffee table.
Beyond their practical role of protecting your furniture from condensation rings and heat, these handmade coasters double as cheerful decorative accents. They instantly brighten a room, drawing the eye and adding a whimsical touch that perfectly captures the essence of summer. The beauty of this DIY project lies in its immense potential for personalization. You are not limited to just one type of citrus; you can choose your favorite fruits, experiment with different color shades and combinations, and even add subtle textures to make each coaster truly unique. This level of customization allows you to match your existing decor or create a bold new statement.
Furthermore, crafting your own coasters is incredibly cost-effective compared to purchasing mass-produced alternatives. With just a few basic craft supplies, you can produce multiple sets, making them an excellent choice for budget-conscious decorators or anyone looking to create numerous gifts. Engaging in DIY crafts like this can also be a wonderfully relaxing and rewarding activity, providing a creative outlet and a tangible sense of accomplishment that store-bought items simply cannot offer. Embrace the joy of handmade and elevate your summer aesthetic with these delightful citrus coasters!
Essential Materials You’ll Need for Your Citrus Coaster Project
One of the most appealing aspects of this DIY project is its accessibility. All the necessary materials are standard craft supplies, easily found at any craft store, art supply shop, or even through online retailers. Gathering these items before you begin will ensure a smooth and uninterrupted crafting session, allowing you to focus purely on the creative process.
- Cork Circles: These will form the sturdy and absorbent base of your coasters. Look for pre-cut cork circles, typically sold in packs, which are perfectly sized for standard drinkware (around 3.5 to 4 inches in diameter is ideal). Cork’s natural texture is excellent for absorbing moisture and providing a non-slip surface, crucial for effective coasters.
- White Acrylic Paint: This serves as the foundational layer for your design. A good quality, opaque white acrylic paint will provide excellent coverage, ensuring that the vibrant citrus colors you apply later will truly pop and appear true to their shade, rather than being dulled by the cork’s natural brown hue.
- Acrylic Paint (in your chosen citrus colors): This is where the fun begins! Select shades that vividly mimic your favorite citrus fruits. Think bright lemon yellow, vibrant orange, lively lime green, or even a pale, sunny pink for grapefruit. Having a few different shades allows for a more realistic and varied set, adding visual interest.
- Foam Brush: This tool is perfect for applying an even, smooth, and streak-free coat of the white base paint quickly and efficiently. Its soft, absorbent texture helps to prevent visible brush strokes, leaving a flawless foundation.
- Small Paintbrush (for precision or detailing work): Absolutely essential for refining edges, meticulously filling in small gaps, and adding any intricate details that truly bring your citrus slices to life. A fine-tipped brush or an artist’s detail brush will be invaluable for achieving clean, sharp lines.
- Foam Pouncer: This unique tool is excellent for applying paint in a dabbing motion, which creates a textured, almost spongy appearance. This effect is particularly useful for mimicking the pulpy flesh of a fruit slice, adding depth and realism to your coaster design.
- Sticker Paper: Opt for a strong adhesive sticker paper. This will be used to create a temporary stencil for the central part of your citrus design, ensuring a clean, crisp, and unpainted border. You can use full sheets and cut them down, or even pre-cut circular labels if they match your sizing needs.
- Thin Circular Object (to trace): Find a household item with a diameter slightly smaller than your cork circles, such as a bottle cap, a small glass, or even a large coin. This will be used to accurately trace the inner circle of your citrus design onto the sticker paper.
- Pen or Pencil: For tracing the circular object onto your sticker paper with precision.
- Thin Tape: Crucial for sectioning off your coaster to create the distinct individual fruit segments. Washi tape, painter’s tape, or artist’s tape is ideal as it provides clean lines and is less likely to pull up your base paint when carefully removed.
Step-by-Step Guide: Crafting Your Own Vibrant Citrus Slice Coasters
Now that you have all your materials meticulously gathered and ready, let’s dive into the exciting creative process. Take your time with each step, paying attention to detail, and remember that even small, charming imperfections can add character and a unique handmade touch to your finished items!
Step 1: Preparing Your Coaster Base and Designing the Core
Begin by selecting a clean, smooth cork circle to be your first coaster. Using your foam brush, apply a single, even, and relatively thin coat of white acrylic paint across the entire top surface of the cork. This foundational white layer is absolutely crucial; it ensures that the vibrant citrus colors you apply in later steps will appear bright, true, and opaque, rather than being dulled or absorbed by the natural brown hue of the cork. Allow this base coat to dry completely. Depending on the thickness of the paint application and the ambient humidity, drying time typically ranges from 15 to 30 minutes. You can use this waiting period efficiently.
While your first coaster is drying, prepare your sticker stencil. Take your thin circular object (such as a bottle cap or a small lid) and place it onto your sticker paper. Using your pen or pencil, carefully trace around both the outside and inside edges of the object to create a perfect donut-like shape. Meticulously cut out this traced shape. Once the white paint on your cork circle is fully dry to the touch, gently peel off the backing paper from your newly cut sticker stencil. Carefully center this sticker precisely onto the cork circle, pressing it down firmly and smoothly to create a neat, unpainted white border around the inner edge. This inner circular area will represent the distinctive, slightly translucent core of your citrus slice.
Step 2: Adding the Zesty Citrus Segments
With your coaster base prepared and its core defined, it’s now time to add the iconic, segmented appearance of your citrus slice. Take your thin tape and cut four equal pieces. Carefully lay these pieces of tape onto the coaster, extending each strip from the outer edge of the inner circular sticker to the very outer edge of the cork circle. Arrange them in a way that creates four roughly even sections or “wedges,” radiating outwards from the center, precisely mimicking the natural divisions of a fruit like an orange or lemon. Envision slicing a pie into perfectly equal segments to guide your placement. Ensure that each strip of tape is pressed down very firmly and smoothly along its entire length to prevent any paint from seeping underneath, which would compromise the clean lines of your design.
Once your tape is perfectly positioned and secured, dip your foam pouncer into your chosen vibrant citrus color acrylic paint. Gently but firmly start dabbing the paint onto the exposed sections of the coaster – specifically, in the areas between the tape strips and around the inner white sticker. Continue this dabbing motion until the desired opacity and color vibrancy are achieved, ensuring the paint coverage is even across all the segments. The distinctive pouncing motion helps to create that subtle, slightly textured effect reminiscent of fruit pulp, adding an authentic touch to your coaster. Work your way methodically around all the exposed segments until they are fully painted to your satisfaction.
Step 3: Perfecting Your Citrus Masterpiece
With all your segments painted, the moment of truth arrives for revealing your design! Carefully and slowly peel off all the tape strips from the coaster. It’s best to pull the tape at a sharp angle, almost parallel to the coaster surface, as this can help prevent inadvertently lifting any of the underlying paint. You should now see crisp, unpainted lines where the tape once was, forming the distinct divisions between your vibrant citrus segments. Don’t be discouraged if there are any minor imperfections, or if a tiny bit of paint has bled slightly under the tape; this is perfectly normal in crafting and easily rectifiable!
This is where your small paintbrush becomes indispensable. Use it to meticulously fill in any small gaps with your citrus color and to straighten the edges of the white border you created with the sticker, ensuring a clean and defined separation between the core and the segments. Take your time with these detailing steps to achieve crisp, professional-looking lines. Finally, using your small paintbrush and your chosen citrus color, carefully paint around the entire outer edge or rim of the cork coaster. This completes the full fruit slice look, giving your coaster a polished and finished appearance that truly mimics the peel of a citrus fruit. Once you are satisfied with your detailing and the overall look, set the coaster aside in a well-ventilated area to dry completely. Depending on the thickness of the paint and environmental conditions, this could take several hours. Once fully dry, your vibrant and unique DIY citrus slice coaster is ready to adorn your home and impress your guests!
Creative Variations and Customization Tips
While the classic citrus slice design is undeniably charming and universally appealing, don’t hesitate to let your imagination soar and explore various creative adaptations! This tutorial provides an excellent foundation for a plethora of fruit-themed coaster designs. For instance, you could easily create vibrant watermelon slices by using green for the outer rind, bright red for the juicy flesh, and carefully adding small black dots with a fine brush for seeds. Or perhaps a tropical kiwi slice, with its distinctive green flesh and concentric ring of tiny black seeds, would add a unique touch to your collection.
Consider varying the colors within your coaster set itself; a delightful assortment featuring lemons, limes, and oranges creates a visually appealing and cohesive theme. For an extra layer of protection, especially against condensation from icy cold drinks, and to achieve a lovely glossy finish, apply a clear acrylic sealant or a suitable craft varnish (like Mod Podge) once your coasters are completely dry. This will significantly enhance their durability and water resistance. You might also experiment with different shapes of cork bases, if available, to create truly unique coaster designs that stand out. These versatile handmade coasters also make fantastic personalized gifts for housewarmings, birthdays, or as a thoughtful gesture for any occasion. Package a beautifully crafted set with a charming ribbon, and they are ready to delight friends and family!
Maintaining Your DIY Citrus Coasters
To ensure your beautiful DIY citrus slice coasters continue to bring a splash of summer joy and functionality to your home for many years to come, a little care and attention go a long way. If you’ve taken the wise step of applying a clear sealant, cleaning them is remarkably simple: just wipe them down with a damp cloth after use to remove any spills or rings. For unsealed coasters, it’s important to avoid prolonged exposure to moisture, as cork can absorb liquids over time, potentially leading to warping or staining. Promptly wipe away any spills immediately. When not in use, store your coasters in a dry place, away from direct sunlight or extreme temperature fluctuations, to prevent any warping or damage to the cork and paintwork. With proper maintenance, your handcrafted coasters will remain vibrant and protective, serving as cheerful reminders of your creative prowess.
Frequently Asked Questions About DIY Coasters
- Q: Can I use different types of paint for this project?
A: While acrylic paint is highly recommended for its versatility, quick drying time, and excellent adhesion to cork, you could experiment with other types. However, acrylic offers good opaque coverage and is water-resistant once dry (especially if sealed). For best results and durability, sticking to good quality acrylics is advised. - Q: How can I make my coasters more durable and water-resistant?
A: Applying a clear, waterproof sealant is the key to longevity. Products like Mod Podge Outdoor, clear acrylic spray sealants (e.g., clear varnish), or even a thin layer of resin can significantly enhance their durability, making your coasters highly resistant to water rings and general wear and tear. Always follow the specific sealant manufacturer’s instructions for application, curing, and safety. - Q: What if I don’t have a foam pouncer? Are there alternatives?
A: Yes, absolutely! If a foam pouncer isn’t available, you can achieve a similar textured, dabbed effect using alternatives. A small piece of a kitchen sponge, a crumpled paper towel held with tweezers, or even a cotton ball can work. Just be mindful of how much paint you load onto your improvised tool to avoid oversaturation and ensure even application. - Q: Can children participate in making these coasters?
A: This is a fantastic and engaging craft for older children and teenagers, provided there is adult supervision. They can certainly help with painting the base coats, applying the tape, and dabbing the citrus colors. Adult assistance might be needed for intricate cutting of the sticker paper and precise detailing with the small brush, ensuring safety and the best outcome. - Q: Where is the best place to find cork circles for this project?
A: Cork circles are widely available and easy to source. You can find them at most craft stores, hobby shops, art supply retailers, and major online marketplaces like Amazon or Etsy. They often come in multi-packs and various sizes, so be sure to select a diameter appropriate for coasters, typically ranging from 3.5 to 4 inches.
Conclusion: Elevate Your Home Decor with Handmade Charm
Creating your very own DIY citrus slice coasters is a delightful and deeply rewarding project that perfectly balances aesthetic appeal with practical functionality. With minimal materials, straightforward steps, and a dash of creativity, you can easily craft a set of unique, vibrant coasters that will undoubtedly become a charming conversation starter at your next gathering or simply brighten your everyday. Whether your goal is to spruce up your own home, prepare for an exciting summer party, or craft thoughtful, personalized gifts for loved ones, these handmade treasures are sure to impress and bring a smile.
So, gather your supplies, unleash your inner artist, and get ready to add a zesty, personalized touch to your living space this season. Embrace the satisfaction that comes from creating something beautiful and functional with your own hands. Happy crafting, and enjoy the cheerful ambiance your new citrus coasters bring!
*All image and tutorial credit belongs to HGTV Handmade via YouTube. Follow and subscribe to their channel for more inspiring DIY projects and creative tutorials!