
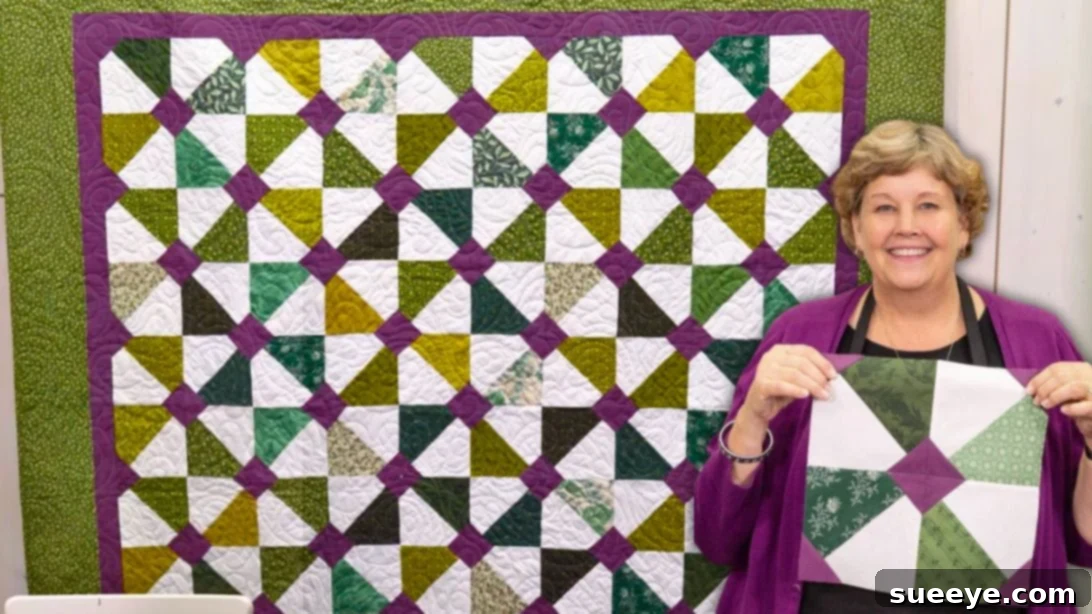
Are you searching for a quilting project that is both captivating and wonderfully achievable? Look no further than the charming pinwheel quilt patterns, and specifically, this delightful English Garden Quilt. Brought to life by the masterful quilters at Missouri Star Quilt Company, this pattern offers a refreshing take on the classic pinwheel design, transforming simple shapes into a complex and beautiful tapestry. While each block features the familiar spinning pinwheel, the clever addition of corner triangles and a central square completely reimagines the traditional layout, creating an entirely new aesthetic that evokes the serene beauty of an English garden.
RELATED: Missouri Crossroads Quilt With Jenny Doan
What makes the English Garden Quilt truly special is its deceptive simplicity. Viewed individually, the blocks appear straightforward, yet when artfully arranged together, they coalesce into a stunning, intricate pattern that will leave onlookers in awe. This quilt is not only visually appealing but also incredibly satisfying to construct, offering a rewarding experience for quilters of all skill levels. Whether you are taking your very first steps in the world of quilting or seeking a quick, gratifying project to complete over a weekend, this pattern is an ideal choice. Its clear instructions and manageable steps ensure a smooth creative journey, promising a fun and successful outcome. Prepare to immerse yourself in the joy of making this beautiful block!
For more beginner-friendly inspiration, explore another wonderful design: Beginner-Friendly Four Seasons Quilt
Discover the Enchanting English Garden Quilt: A Beginner-Friendly Journey
The English Garden Quilt pattern, championed by the quilting experts at Missouri Star, stands out as a true gem for its blend of elegance and accessibility. This design ingeniously builds upon the beloved pinwheel motif, adding unique elements that elevate its visual appeal without complicating the construction process. The result is a quilt that looks far more intricate than it actually is, making it a fantastic choice for anyone eager to create something impressive without feeling overwhelmed.
Why Choose the English Garden Quilt Pattern?
- Perfect for Beginners: The pattern utilizes fundamental quilting techniques such as half-square triangles (HSTs) and precise seam allowances, presented in an easy-to-follow sequence. This structure allows new quilters to build confidence with essential skills.
- Quick to Construct: For those who love to see their projects come to fruition swiftly, this quilt is a dream. The repetitive nature of block creation, combined with clear steps, ensures that you can progress rapidly from cutting fabric to assembling your quilt top.
- Stunning Visual Impact: The genius of this design lies in how simple individual blocks combine to form a complex, interwoven pattern. The corner triangles and central square create a striking contrast and depth, reminiscent of a meticulously curated garden landscape.
- Versatility in Fabric Choices: While the traditional “English Garden” might suggest florals and soft hues, this pattern truly shines with any fabric collection. Experiment with vibrant prints, subdued solids, or a mix of both to create a quilt that perfectly reflects your personal style.
Essential Materials for Your English Garden Quilt Project
Gathering your materials is the first exciting step in any quilting adventure. For the English Garden Quilt, you’ll find the requirements straightforward, often utilizing pre-cut fabric bundles that simplify the process and offer cohesive fabric collections.
- 1 Pack of 10″ Print Squares: These pre-cut squares, often referred to as ‘Layer Cakes’, provide a fantastic variety of prints that are pre-coordinated, saving you time and effort in fabric selection. They will form the primary design elements of your pinwheel blocks.
- 1 Pack of 10″ Background Squares: Complementing your print squares, these background squares will create the contrast necessary for your pinwheels to truly pop. Opt for a solid or tone-on-tone fabric that harmonizes with your chosen prints.
- 1 3/4 Yards of Coordinating Solid (Includes Inner Border): This fabric will be used for the crucial corner triangles within each block and potentially for a subtle inner border, framing your quilt blocks beautifully and adding an elegant touch.
- 1 1/2 Yards of Outer Border: The outer border provides a finishing frame for your quilt, enhancing its overall dimensions and visual appeal. Choose a fabric that either contrasts or complements your block fabrics, offering a polished edge.
- 3/4 Yard of Binding: Binding is essential for neatly finishing the edges of your quilt, protecting them from wear and tear, and adding a professional touch. Select a durable fabric that matches your quilt’s aesthetic.
- 6 Yards of Backing: The backing fabric provides the “other side” of your quilt. It’s an opportunity to use a lovely, comfortable fabric that complements the quilt top and adds to its overall coziness.
- Clearly Perfect Slotted Trimmer A: This specialized tool is highly recommended for accurately trimming your half-square triangles, ensuring consistent sizing and perfectly sharp points. Precision in trimming is key to a professional-looking quilt.
Crafting Your English Garden Quilt: A Step-by-Step Guide
With your materials ready, let’s embark on the delightful journey of creating each block for your English Garden Quilt. Follow these detailed instructions to assemble your stunning quilt top.
Step 1: Preparing Your Initial Squares for Half-Square Triangles
Begin by selecting one 10″ background square and one 10″ print square. These will be the foundation of your half-square triangle units. Place these two squares right sides together, ensuring all edges are perfectly aligned. Using a sewing machine, sew a precise 1/4″ seam allowance all the way around the perimeter of the combined squares. Maintaining a consistent seam allowance is crucial for accurate block construction, so take your time and aim for precision.
Step 2: Cutting into Half-Square Triangle Units
Once you have sewn around the square, it’s time to transform it into multiple half-square triangle units. Carefully cut the sewn square in half diagonally from corner to corner in both directions. You will essentially be cutting an “X” across the square. This precise cutting process will yield four individual half-square triangle blocks from each pair of initial squares, each composed of one background and one print triangle.
Step 3: Squaring Up and Pressing for Perfection
Now, take each of the four half-square triangle units you just created. Using your Clearly Perfect Slotted Trimmer A (or a standard quilting ruler and rotary cutter), carefully square each unit to a precise 6 1/2″ square. Squaring up is a vital step that ensures all your blocks are uniform in size, which is essential for accurate quilt assembly later on. After trimming, press each unit flat. Pressing your seams either open or to one side (consistently) helps to reduce bulk and creates crisp, flat blocks, making subsequent steps much easier.
Step 4: Preparing the Corner Accent Squares
Next, you will need your coordinating solid fabric. From this fabric, accurately cut several 2 1/2″ squares. These small squares will form the distinct corner accents of your English Garden blocks, adding visual interest and defining the unique pattern. Once cut, take each 2 1/2″ square and fold it neatly in half diagonally. You can press this fold to create a crisp line, which will serve as a reliable guide for your stitching.
Step 5: Attaching the Signature Corner Details
Take one of your 6 1/2″ half-square triangle units. Place two of the folded 2 1/2″ solid squares onto two adjacent corners of the half-square triangle unit. Position them meticulously so that the folded line of each small square runs precisely across the seam line of the half-square triangle. This exact placement is critical for achieving the distinctive “English Garden” effect. Sew directly along the folded lines. After stitching, carefully trim away the excess fabric, leaving a 1/4″ seam allowance. Press the new seams flat, making sure the small solid triangles now form neat, well-defined corners on your half-square triangle unit. Repeat this process for all of your remaining half-square triangles, ensuring consistency across all units for a harmonious quilt.
Step 6: Assembling the English Garden Quilt Block
Now it’s time to bring four of your newly embellished half-square triangle units together to form a complete English Garden block. Arrange four of these units in a 2×2 grid, much like a traditional four-patch block. Pay close attention to the orientation of the pinwheels and the solid corner triangles. The key is to arrange them so that the pinwheel elements appear to spin in a cohesive direction, and the solid corners contribute to the overall intricate pattern. Refer to the provided photo below for the correct arrangement. Once you are satisfied with the layout, sew the units together in pairs, and then sew the two pairs together to form your completed block. Press the block flat, making sure your seams are neat and your points are sharp for a professional finish.
Step 7: Arranging Your Quilt Top Rows
With all your beautiful English Garden blocks complete, the final step in assembling your quilt top is arranging them into rows. For a standard throw quilt, the pattern suggests creating 6 rows with 5 blocks each. As you arrange each block, it is essential to ensure that the pinwheel elements within each block consistently face the same direction. This careful attention to detail will create a harmonious flow across your entire quilt top, giving it a polished and professional appearance. Once you are satisfied with your layout, sew the blocks together to form each row, then join the rows to complete your stunning English Garden Quilt top. Remember to press your seams meticulously after joining each section for a smooth, flat finish.
Beyond the Quilt Top: Finishing Your English Garden Masterpiece
Once your quilt top is beautifully assembled, the creative journey continues with adding borders, quilting, and binding. While these steps are not detailed in the core block instructions, they are integral to completing your English Garden Quilt and transforming it into a functional and artistic piece.
- Adding Borders: The material list thoughtfully includes fabric for both an inner and outer border. These borders serve multiple purposes: they frame your intricate pieced blocks, enhance the overall size of the quilt, and provide a visual transition from the detailed blocks to the binding. Careful measurement and precise attachment of borders ensure a flat and square quilt, preventing distortion.
- Quilting: This crucial step involves creating a quilt sandwich by layering your finished quilt top, a soft batting layer, and your chosen backing fabric. You then stitch through all three layers, which holds them securely together, prevents shifting, and adds wonderful texture and dimension to your quilt. You can opt for simple straight-line quilting, creative free-motion designs, or even send it to a professional longarmer for elaborate, custom patterns.
- Binding: The final touch, binding, neatly encases the raw edges of your quilt. This not only protects them from fraying and wear but also gives your entire project a finished, polished, and professional look. Binding is often sewn onto the front by machine and then meticulously hand-stitched to the back for a clean, seamless finish that truly elevates the craftsmanship of your quilt.
The English Garden Quilt with Jenny Doan: A Legacy of Simple Beauty
The English Garden Quilt pattern truly embodies the philosophy of Jenny Doan and the Missouri Star Quilt Company: making quilting accessible, enjoyable, and successful for everyone. Jenny Doan’s clear, encouraging tutorials and her dedication to breaking down complex patterns into manageable steps have inspired countless quilters to tackle new designs and embrace the joy of fabric arts. This English Garden pattern, with its delightful blend of traditional pinwheel charm and unique modern accents, is a testament to how small, thoughtful design changes can create a significant visual impact and transform a simple block into something extraordinary.
It’s more than just a pattern; it’s an invitation to explore your creativity, refine your quilting skills, and ultimately, create a cherished heirloom that tells a story. Whether you’re crafting this English Garden Quilt for yourself to snuggle under, for a loved one as a heartfelt gift, or as a decorative piece for your home, it promises not just a finished product, but a delightful and rewarding journey through the art of quilting. Embrace each step, enjoy the creative process, and soon you’ll have a magnificent quilt that speaks volumes of your skill, dedication, and love for this timeless craft. Happy quilting!