
Crafting the Sweet Blend Quilt: A Beginner-Friendly Journey with Missouri Star
Are you ready to take your quilting skills to the next level? If you’ve mastered the foundational straight-line blocks and are eager to explore the elegance of curved patterns, then the Sweet Blend Quilt is your perfect next project. Don’t let curves intimidate you; this beautiful design, brought to life by the quilting experts at Missouri Star Quilt Company, is surprisingly beginner-friendly. With Jenny Doan’s clear instructions, you’ll find it incredibly easy to follow and enjoy every step of the creative process. Get ready to transform fabric into a stunning, cozy masterpiece!
This comprehensive guide will walk you through each stage of creating your very own Sweet Blend Quilt, from gathering your materials to assembling the final blocks. We’ll demystify curved piecing, perfect your half-square triangles, and ensure your quilt top comes together beautifully. Let’s dive in and start stitching your way to a gorgeous new quilt!
Essential Materials for Your Sweet Blend Quilt
Before you begin your quilting adventure, gather these necessary materials. High-quality fabric and precise tools are key to a successful and enjoyable project.
- Solid Fabric: 3 1/4 yards. This will be your primary design fabric, creating the distinctive curved elements. Choose a color that complements your background fabric beautifully.
- Background Fabric: 5 1/4 yards of yardage OR a packet of 10″ pre-cut squares (approximately 42 squares) paired with 2 1/2 yards of coordinating background fabric. The background fabric provides contrast and allows your design fabric to truly pop.
- Backing Fabric: 4 1/2 yards. Select a soft, durable fabric for the back of your quilt that will enhance its comfort and longevity.
- Easy Circle Cut Ruler and Cutter: This specialized tool is indispensable for accurately cutting the perfect circles needed for the curved blocks. Its design makes the process smooth and precise, even for newcomers to curved cutting.
- Fusible Web: 3 1/4 yards of 24″ wide fusible web. This material is crucial for stabilizing your fabric, making the curved pieces easier to handle and ensuring a crisp, clean finish.
- Standard Quilting Supplies: Rotary cutter, self-healing cutting mat, quilting ruler, sewing machine, thread (matching or coordinating with your fabrics), iron, ironing board, pins or fabric clips.
Step-by-Step Guide to Making Your Sweet Blend Quilt
Follow these detailed instructions to construct your beautiful Sweet Blend Quilt. Take your time with each step, focusing on precision for the best results.
Step 1: Preparing Your Main Fabric Squares
Begin by preparing your solid design fabric. Take your 3 1/4 yards of solid fabric and carefully cut it into 8-inch wide strips. For accuracy, use your rotary cutter and a quilting ruler, ensuring your strips are perfectly straight. Once you have your strips, sub-cut them into 8-inch squares. These 8″ colored squares will form the core of your curved blocks, so precision here is paramount.
Step 2: Applying Fusible Web for Stability
Next, prepare your fusible web. Cut the fusible web into 8-inch squares, matching the size of your colored fabric squares. Carefully fuse one 8-inch fusible square to the wrong side of each 8-inch colored fabric square. Follow the manufacturer’s instructions for your specific fusible web, typically involving a warm iron and light pressure. The fusible web adds stability to your fabric, preventing distortion when you cut and sew the curved pieces, which is particularly helpful for beginners.
Step 3: Creating the Signature Curved Elements
Now, it’s time to create the beautiful curved shapes that define this quilt. Take one of your fused 8-inch colored squares and fold it in half, then fold it in half again to create a smaller, four-layered square. Lay your easy circle cut ruler on top of the folded fabric, aligning it according to the ruler’s instructions to cut a 7 1/2-inch diameter circle. Carefully use your rotary cutter to cut along the edge of the ruler. This technique ensures a perfect circle. Once cut, unfold your fabric to reveal a beautiful fabric circle. Repeat this process for all your fused 8-inch squares.
Next, take a 10-inch background square. Carefully center one of your newly cut 7 1/2-inch circles onto the right side of the 10-inch background square. Gently press with an iron to fuse the circle into place, ensuring it is perfectly centered. The fusible web will temporarily hold it, preparing it for the next step.
Step 4: Stitching and Dividing Your Curved Blocks
With your circle fused onto the background square, it’s time to secure it permanently. Using your sewing machine, execute a decorative blanket stitch all the way around the outer edge of the fabric circle. This not only secures the circle but also adds a beautiful textural element to your quilt. Choose a thread color that either matches your circle fabric for a subtle look or contrasts for added visual interest. Ensure your stitches are even and consistent for a polished finish.
Once the blanket stitching is complete, lay the square flat and carefully cut it into fourths. You can do this by finding the center of the square and cutting vertically and horizontally through the center, effectively creating four quarter-circle units from each stitched square. Accuracy in this step is important for the final assembly of your blocks.
Step 5: Mastering Half-Square Triangles (HSTs)
Half-Square Triangles (HSTs) are a versatile quilting staple, and this quilt uses them beautifully. From your remaining colored and background yardage, cut 3-inch wide strips. Then, sub-cut these strips into 3-inch squares. You will need an equal number of colored and background 3-inch squares. Take one colored square and one background square. Stack them right sides together, with the background square on top. Using a fabric marker or pencil, draw a diagonal line from one corner to the opposite corner on the top (background) square.
Next, sew a quarter-inch seam on either side of this drawn line. This creates two seam lines. Once sewn, carefully cut directly on the drawn diagonal line. Open up your two new fabric units and press the seams open or to one side, whichever you prefer for a flatter block. These are your Half-Square Triangles! Finally, trim each HST unit down to a precise 2 1/2-inch square. This squaring-up step is critical for ensuring your blocks fit together perfectly later on.
Step 6: Assembling the Quarter-Circle Units with HSTs
Now, let’s combine your beautiful quarter-circle units with your freshly made Half-Square Triangles. Take one quarter-circle unit and two 2 1/2-inch HSTs. You will attach the HSTs to the straight edges of your quarter-circle. Pay close attention to the orientation and color placement: generally, you want the background portion of the HST to align with the background portion of the quarter-circle, and the colored portion of the HST to align with the colored portion of the quarter-circle. This creates a cohesive look and ensures the curved design flows smoothly. You are aiming for a sew line that visually extends across two different fabrics (the background and the colored fabric).
Sew the HSTs to the straight sides of the quarter circle with a consistent quarter-inch seam allowance. Once sewn, press your seams open or towards the HSTs to reduce bulk. Then, trim any excess fabric, ensuring a clean quarter-inch seam from the raw edge. Repeat this process for all your quarter-circle units.
Step 7: Assembling Your Quilt Blocks and Top
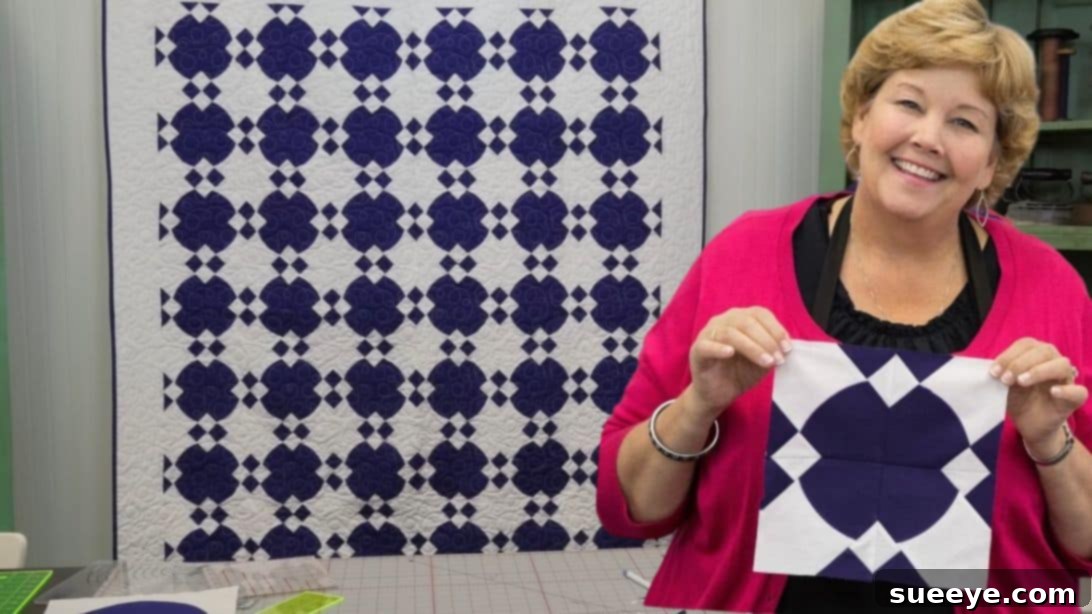
With all your individual units prepared, it’s time to assemble them into the beautiful Sweet Blend quilt blocks. Refer to the photo above or the tutorial video for the precise arrangement. Each block typically consists of four quarter-circle units, arranged to form a larger design. Lay out your units on a design wall or a flat surface to visualize the pattern and ensure correct orientation before sewing.
Once you are happy with your arrangement, sew the units together in rows first. For instance, sew the top two units together, and then the bottom two units together. When pressing your seams, try to press them in opposite directions for the top row versus the bottom row. This technique, known as “nesting seams,” helps the seams interlock perfectly when you join the rows, reducing bulk and ensuring flat, accurate blocks. Once your rows are complete, sew them together, much like you would assemble a traditional four-patch block. Press the final block open, admiring your creation!
For a standard Sweet Blend Quilt, you will need a total of 42 blocks. These blocks are typically arranged six across and seven down to form a generously sized quilt top. Carefully lay out all your completed blocks to ensure the pattern flows seamlessly and the colors are balanced. Then, sew your blocks into rows, pressing seams as you go, and finally, join your rows to create the complete quilt top.
Why You’ll Love Crafting the Sweet Blend Quilt
The Sweet Blend Quilt is more than just a sewing project; it’s an opportunity to expand your quilting horizons and create something truly unique. Under the expert guidance of Jenny Doan from Missouri Star, this pattern introduces you to the joy of curved piecing in an approachable way. It’s a fantastic stepping stone for beginners looking to challenge themselves gently, while still achieving professional-looking results. The finished quilt boasts a delightful blend of playful curves and crisp lines, making it a beautiful addition to any home.
Essential Tips for a Flawless Sweet Blend Quilt
- Precision is Key: While the pattern is beginner-friendly, accuracy in cutting and seam allowances (especially the 1/4-inch seam) is vital for the curves and blocks to align perfectly. Take your time with your rotary cutter and ruler.
- Pressing Matters: Pressing after each seam, rather than ironing, helps to set stitches and keep your fabric from distorting. Experiment with pressing seams open or to the side for the flattest possible blocks.
- Starch for Stability: A light spray of fabric starch on your yardage before cutting can add extra crispness, making your fabric easier to handle and cut accurately, especially with curves.
- Test Your Stitch: Before starting on your quilt, do a few practice stitches on scrap fabric to ensure your sewing machine’s tension is correct and your blanket stitch is consistent.
- Embrace the Process: Quilting is a journey, and every stitch is part of the story. Don’t be afraid to try new techniques, and remember that slight imperfections often add character to a handmade item.
Finishing Your Sweet Blend Quilt
Once your quilt top is assembled, you’re on the home stretch! The next steps involve layering your quilt top with batting and backing fabric, quilting it (whether by machine or hand), and finally, adding a beautiful binding. These finishing touches will transform your quilt top into a cozy, durable, and cherished heirloom. Consider different quilting patterns that complement the curves of your Sweet Blend design, or opt for simple straight-line quilting to emphasize the piecing.
Embark on Your Quilting Journey with Confidence
The Sweet Blend Quilt is a testament to the idea that beautiful, intricate-looking quilts can indeed be accessible to everyone. By following Jenny Doan’s clear instructions and embracing the joy of creativity, you’ll not only craft a stunning quilt but also gain valuable skills and confidence in your quilting abilities. So, gather your fabrics, fire up your sewing machine, and get ready to create a Sweet Blend Quilt that you’ll be proud to display and enjoy for years to come!