
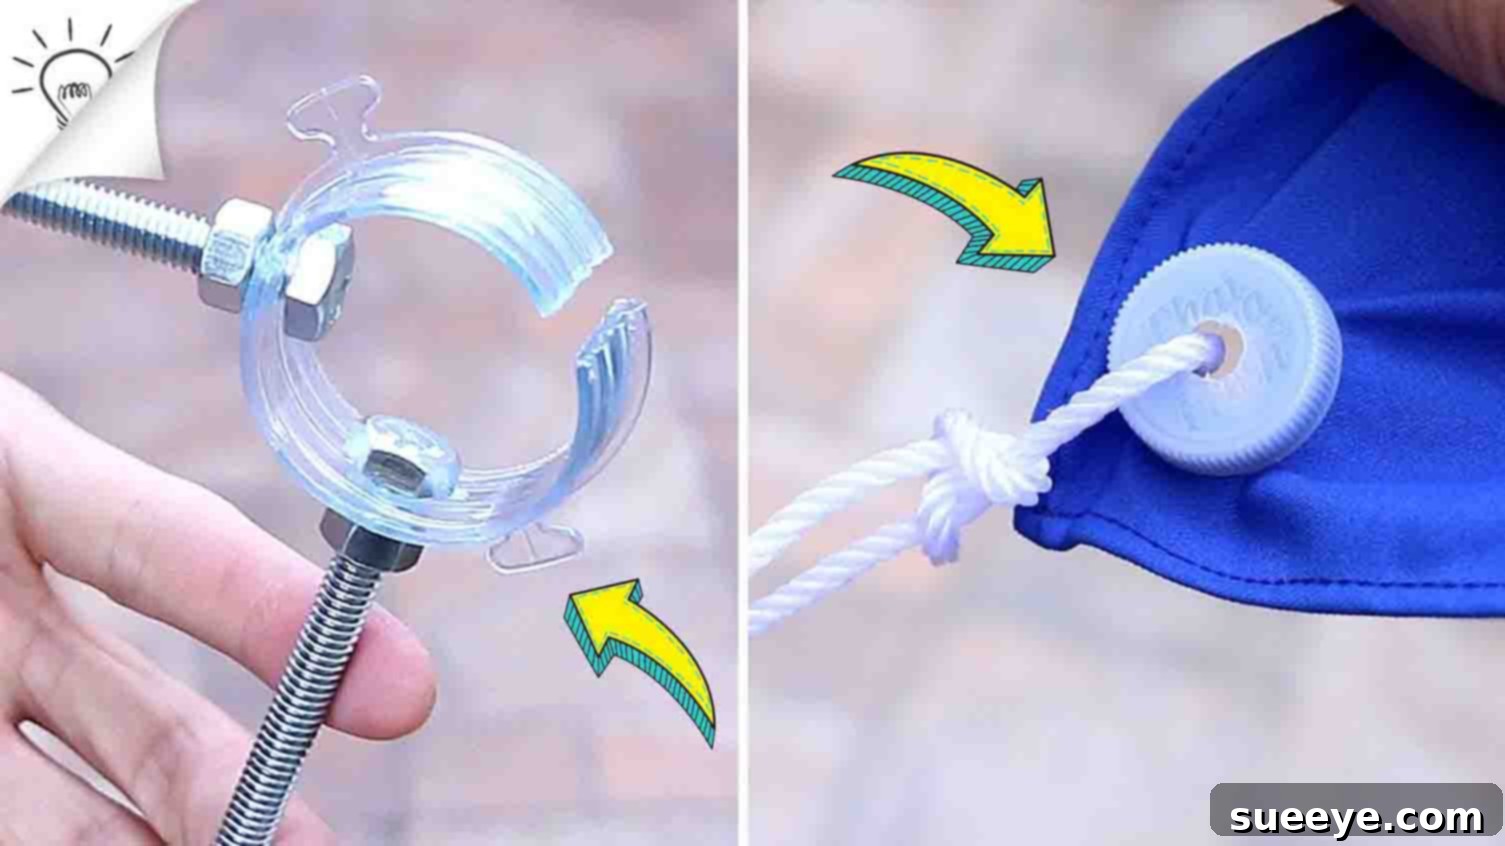
Do you often find yourself with a growing collection of empty plastic bottles at home? Instead of discarding them, imagine transforming these everyday items into ingenious tools and useful household aids. Plastic pollution is a monumental global challenge, with bottles taking hundreds of years to decompose, leaching harmful chemicals into our environment. By embracing the spirit of recycling and upcycling, we not only reduce waste but also unleash our creativity and save money. The incredible minds at Thaitrick on YouTube have shared some truly brilliant ideas that breathe new life into your discarded plastic. Get ready to discover three remarkably creative and practical ways to reuse plastic bottles, turning potential trash into valuable treasure!
Transform Your Trash: 3 Creative DIY Projects to Reuse Plastic Bottles
Plastic bottles are ubiquitous in our daily lives, from mineral water to cleaning products. While recycling programs are essential, giving these materials a second life through upcycling is an even more direct and impactful way to combat waste. These DIY projects not only keep plastic out of landfills but also empower you with functional items that you can craft yourself, often saving you a trip to the store and some hard-earned cash. Join us as we explore these innovative ideas, starting with a must-have for any aquarium enthusiast.
#1 The Ingenious DIY Aquarium Siphon
For anyone who maintains an aquarium, a reliable siphon is an indispensable tool. It’s crucial for regular water changes, removing unsightly debris, and cleaning the gravel without disturbing your aquatic inhabitants. Commercial siphons can vary in price and effectiveness, but what if you could craft your own custom-fit, highly efficient siphon using nothing more than a plastic bottle and a few common items? This DIY project offers an excellent solution, providing an eco-friendly and cost-effective alternative.
Materials You’ll Need:
- One clean, empty plastic bottle (preferably 500ml to 1-liter size, depending on your tank size)
- The bottle cap
- A silicone air hose or flexible tubing (approximately 3-5 feet long, or to your desired length)
- A drill with appropriate drill bits (matching the diameter of your tubing)
- Hot glue gun and glue sticks
Step-by-Step Guide to Crafting Your Siphon:
- Prepare Your Bottle: Ensure your plastic bottle is thoroughly cleaned and dry. Remove any labels.
- Drill the Bottom Hole: Carefully drill a hole near the very bottom edge of the plastic bottle. This hole should be just wide enough for one end of your silicone tubing to fit snugly. Avoid drilling directly on the center of the bottom, as a side-bottom placement is often more effective for scooping debris.
- Drill the Cap Hole: Take the bottle cap and drill a second hole precisely in its center. Again, ensure this hole provides a snug fit for the second piece of your silicone tubing.
- Insert the Tubing (Bottom): Take one end of your silicone air hose and insert it through the hole you drilled in the bottom of the bottle. Push it through so that a few inches of tubing are inside the bottle.
- Insert the Tubing (Cap): Take the other end of your silicone air hose and insert it through the hole in the bottle cap. Push it through so that a few inches of tubing are on the outside of the cap, and the rest is ready to be connected to the bottle.
- Secure with Hot Glue: This is a critical step for creating a watertight seal. Apply a generous amount of hot glue around the tubing where it enters the bottle’s bottom. Do the same for the tubing where it enters the bottle cap, both inside and out. Allow the glue to cool and harden completely. This ensures no water leakage and creates a strong bond.
- Assemble the Siphon: Screw the prepared cap back onto the bottle. Your DIY siphon is now ready!
Using Your DIY Siphon and Pro Tips:
To use your new siphon, submerge the bottle end into your aquarium. Place the open end of the tubing (the one coming from the cap) into a bucket placed lower than your aquarium. Gently squeeze the bottle a few times to start the siphoning action. The two tubes create a simple yet effective pressure differential that draws water and debris out of the tank.
- Water Change Efficiency: This siphon is excellent for targeted gravel cleaning and partial water changes.
- Fish Safety: Be gentle when cleaning around your fish. The plastic bottle acts as a good visual barrier to prevent accidental sucking of small fish or fry.
- Alternative Uses: While perfect for aquariums, this simple siphon design can also be adapted for other small liquid transfer tasks, such as draining a small pond or transferring water from one container to another without lifting heavy buckets.
By investing a little time and creativity, you’ve transformed a discarded plastic bottle into an essential and custom-made tool, significantly reducing waste and showcasing the incredible potential of upcycling.
#2 Repurposed Plastic Bottle Cap Eyelets
Eyelets, those small reinforced rings, are incredibly useful for a multitude of applications – from hanging curtains and banners to securing tarpaulins and organizing cables. They provide a strong, clean edge that prevents tearing and wear. However, buying specialty eyelets can add up, especially for larger projects. This innovative hack uses the humble plastic bottle cap to create surprisingly robust and functional eyelets, perfect for adding durability and a touch of DIY flair to your fabrics and covers.
Materials You’ll Need:
- Several clean, empty plastic bottle caps (from water bottles, soda bottles, or even larger juice/milk bottle caps for bigger eyelets)
- A drill with a drill bit (the size of the bit will determine the inner diameter of your eyelet)
- A craft knife or strong scissors
- The fabric or curtain material you intend to use the eyelet on
- A marker or pen
Step-by-Step Guide to Crafting Your Eyelets:
- Prepare the Bottle Caps: Begin by collecting clean plastic bottle caps. If you want a more substantial eyelet, you can cut the entire cap part of the bottle – meaning the threaded neck portion along with the cap still attached – this provides a longer ‘tube’ for the eyelet. For simpler, flatter eyelets, just the cap itself will suffice. For this project, we’ll assume using the cap along with a small section of the bottle’s neck for added strength, as implied by “Cut the cap part of the bottle.” Carefully cut around the neck of the bottle, leaving a small collar of plastic attached to the cap.
- Drill the Center Hole: With the cap (or cap and neck section) ready, drill a hole precisely in the center of the cap. The size of this drill bit will determine the size of the opening through your eyelet. Make sure the hole is clean and free of burrs.
- Prepare Your Fabric: Take the fabric or curtain you want to reinforce. Decide where you want your eyelet to be placed. Use a marker to draw a small circle, slightly smaller than the outer rim of your bottle cap.
- Integrate the Eyelet: Carefully cut out the marked circle from your fabric. Push the neck of your prepared bottle cap (with the drilled hole) through this opening from the front of the fabric. The cap should now be on the back side of the fabric, with the collar of plastic creating a reinforced edge on the front.
- Secure (Optional): For extra security, especially on thicker fabrics, you can use a strong adhesive (like E6000 or hot glue) to bond the plastic collar to the fabric on the front side, around the opening.
Applications and Usage Tips:
These DIY eyelets are incredibly versatile:
- Shower Curtains: Replace flimsy plastic shower curtain rings with these sturdier, upcycled eyelets.
- Lawn or Garden Covers: Use them to create strong anchor points on tarps, ground covers, or outdoor fabrics, preventing tearing when tied down.
- Craft Projects: Incorporate them into homemade banners, storage bags, or even unique clothing alterations.
- Organization: Great for creating reinforced holes in fabric storage bins for handles or attaching to tool rolls.
The beauty of this method lies in its simplicity and the ability to customize the eyelet size based on the bottle cap you choose. Give your fabrics a durable upgrade while giving plastic a new purpose!
#3 The Robust DIY Plastic Gallon Clamp
Clamps are the unsung heroes of many DIY, crafting, and woodworking projects. They hold pieces together while glue dries, secure components during assembly, or provide an extra hand when you need one most. Quality clamps, however, can be surprisingly expensive and often bulky. What if you could fashion a useful, albeit miniature, clamp from an ordinary plastic gallon bottle? This ingenious project offers a simple, effective solution for light-duty clamping tasks, proving that even a milk jug has more to offer.
Materials You’ll Need:
- One sturdy plastic gallon bottle (e.g., from milk, water, or juice – heavier plastic is better)
- A craft knife or heavy-duty scissors
- A drill with a drill bit (suitable for the hex bolts you’ll use)
- Two hex bolts with matching nuts and washers (preferably lock nuts for extra security)
Step-by-Step Guide to Crafting Your Clamp:
- Select Your Gallon Bottle: Choose a plastic gallon bottle that has relatively rigid plastic, especially around the neck. Clean and dry it thoroughly.
- Cut the Neck Section: Carefully use your craft knife or scissors to cut out the top section of the gallon bottle. You want to create a C-shaped piece that includes the threaded neck of the bottle. This threaded part will effectively form one ‘jaw’ of your clamp. Trim the other side of the ‘C’ to be a straight edge or a slightly curved edge, leaving a gap suitable for clamping. Ensure the edges are smooth to avoid cuts.
- Shape the Clamp Body: Refine the C-shape. The opening of the ‘C’ is where the clamping action will occur. The two ends of the ‘C’ should be roughly parallel to each other. The threaded part of the bottle neck is one end, and the piece you cut from the bottle body forms the other.
- Drill Holes for Handles: On the upper, curved arch of your C-shaped clamp body (the part opposite the open jaws), drill two holes. Ensure these holes are far enough apart to comfortably fit the hex bolts and provide a good grip for handling. The original instruction “Drill two holes on top, making sure that the holes are not too close to each other” specifically points to this area.
- Attach the Hex Bolts: Insert a hex bolt through each of the drilled holes. On the other side, secure each bolt with a washer and a nut. If you have lock nuts, use them to prevent loosening with use. These hex bolts will serve as sturdy handles, providing leverage to squeeze the clamp and secure items.
Using Your DIY Clamp and Practical Tips:
This plastic gallon clamp is best suited for lighter applications where a strong, heavy-duty clamp might be overkill or unavailable:
- Crafting Projects: Hold small pieces of wood, fabric, or paper together while glue dries.
- Temporary Secures: Use it to temporarily hold wires, cables, or light components in place.
- Holding Templates: Great for securing stencils or templates to work surfaces.
- Light Repair Work: Perfect for holding small parts during soldering or minor repairs.
While it won’t replace a heavy-duty workshop clamp, this DIY version is incredibly handy for quick tasks, and best of all, it’s virtually free to make! It’s another fantastic example of how discarded plastic can be reimagined into a functional household tool.
Embrace Sustainable Creativity: The Broader Impact of Upcycling
These three creative ideas from Thaitrick are more than just clever hacks; they represent a powerful shift towards more sustainable living. Every plastic bottle we reuse is one less bottle contributing to overflowing landfills and polluting our oceans. The environmental benefits are immense: reducing waste, conserving natural resources, and decreasing the energy required to produce new plastic items.
Beyond the ecological advantages, upcycling fosters a spirit of innovation and resourcefulness. It encourages us to look at “waste” not as an end product, but as a raw material with untapped potential. These projects demonstrate that functional, useful items don’t always need to be bought; they can be crafted with a little imagination and effort.
We encourage you to try these fantastic plastic bottle projects for yourself. Whether it’s keeping your aquarium pristine, hanging a new shower curtain, or assisting with a small repair, these DIY creations offer practical solutions. But don’t stop there! Let these ideas inspire you to discover even more ways to repurpose plastic bottles and other household waste. Think outside the bin: could a large bottle become a planter? A smaller one, a bird feeder? The possibilities are truly endless.
By making small changes in how we view and handle our waste, we can collectively make a significant positive impact on our planet. Start your upcycling journey today and contribute to a healthier, more sustainable future, one plastic bottle at a time!