

Are you a crafter, sewer, or artist constantly misplacing your scissors? Do you struggle to keep your various cutting tools organized and protected, especially when on the go? Look no further! This comprehensive guide introduces you to an incredibly charming and highly functional DIY scissors pouch holder tutorial by Sewingtimes on YouTube. Renowned for their clear and accessible instructions, Sewingtimes delivers a beginner-friendly project that promises to bring order and style to your crafting essentials. This adorable pouch isn’t just about storage; it’s about safeguarding your tools, enhancing your workflow, and adding a personal touch to your sewing kit.
What makes this particular scissors pouch stand out is its clever design. It’s thoughtfully crafted to accommodate multiple scissors – typically three different sizes – with distinct slits for each, ensuring they stay secure and separate. Whether you need to store your fabric shears, embroidery snips, or paper-cutting scissors, this pouch provides a dedicated spot for each. The simplicity of its construction, utilizing just a few folds of A4 paper for the pattern, makes it an ideal project for those new to sewing or anyone looking for a quick and satisfying craft. Imagine creating a beautiful, custom pouch using your favorite fabric designs, transforming a practical item into a delightful accessory.
Why a DIY Scissors Pouch is a Must-Have for Every Crafter
In the world of crafting, organization isn’t just a preference; it’s a necessity. Sharp tools, especially scissors, require proper storage not only for safety but also to maintain their sharpness and longevity. Leaving scissors exposed can lead to dull blades, accidental nicks, or even injury. A dedicated scissors pouch solves all these problems, offering a secure and stylish solution for every type of crafter.
Protecting Your Precious Tools
Quality scissors are an investment. Fabric shears, for instance, should never be used on paper, and keeping them separated and protected is crucial. This DIY pouch ensures that each pair of scissors has its own snug compartment, preventing blades from rubbing against each other or other tools, which can cause dullness or damage. The added layer of fabric also shields them from dust and accidental drops, preserving their precision for years to come.
Enhanced Portability and Convenience
Are you attending a sewing class, a craft retreat, or simply moving your projects from one room to another? A portable scissors pouch makes transporting your essential cutting tools incredibly easy and safe. No more rummaging through a cluttered bag or worrying about sharp points poking through. This compact design allows you to neatly pack your scissors, ensuring they are always at hand and ready for your next creative endeavor. Its lightweight nature means you can carry it anywhere without added bulk.
A Touch of Personal Style and Creativity
Beyond its practical benefits, crafting your own scissors pouch offers an opportunity for personal expression. You get to choose the fabrics, colors, and patterns, making a piece that truly reflects your aesthetic. This personalization can turn a simple organizational tool into a beloved item that brings joy every time you use it. It’s a fantastic way to utilize those beautiful fabric scraps you’ve been saving for the perfect project!
Supplies: Gathering Your Materials for Success
One of the beauties of this DIY project is that it requires a relatively small list of common sewing supplies. Most items are likely already in your craft stash, making it an accessible project for almost everyone. Here’s a detailed breakdown of what you’ll need, along with a brief explanation of each item’s role:
- Plain Weave Cotton Outer Layer Fabric: This will be the exterior of your pouch, visible to the world. Cotton is recommended for its durability, ease of sewing, and wide variety of patterns. Choose a fabric that inspires you and matches your personal style.
- Plain Weave Cotton Lining Fabric: This fabric will form the interior of your pouch, providing a neat finish and often a subtle contrast to the outer fabric. It also adds a layer of protection for your scissors.
- A4 Paper: Essential for creating your pattern template. Its standard size makes it easy to fold and manipulate into the required shape for the pouch.
- Scissors: Of course! You’ll need a pair for cutting your fabric and paper.
- Fusible Fleece: This material is key to giving your pouch structure, body, and a soft, protective padding. It’s an interfacing that has an adhesive on one side, allowing it to be ironed directly onto your fabric for stability.
- Sewing Machine: While some parts could potentially be hand-sewn, a sewing machine will make the process much faster and result in stronger, more professional-looking seams.
- Iron and Ironing Board: Crucial for adhering the fusible fleece and pressing seams for a crisp, professional finish. Proper pressing is a secret to high-quality sewing projects.
- Fabric Marker or Chalk: For transferring your pattern onto the fabric accurately and marking sewing lines.
- Snap Button Clasps Fasteners with Press Stud: These provide a secure and easy-to-use closure for your pouch, keeping your scissors safely inside.
- Needle and Thread: For attaching the snap buttons by hand and for any small touch-ups or detail work that might be easier done manually.
Directions: Your Step-by-Step Guide to a Beautiful Scissors Pouch
The beauty of the Sewingtimes tutorial lies in its visual clarity. While we’ll outline the general steps here, we highly recommend watching the video for a detailed, step-by-step demonstration that brings the project to life. SewingTimes excels at guiding beginners through each stage with precision and ease, ensuring a successful outcome.
Step 1: Creating Your Pattern with A4 Paper
The foundation of your scissors pouch begins with a simple yet ingenious pattern made from A4 paper. Following the video instructions, you will fold the A4 paper a few times to achieve the precise shape and dimensions for the pouch. This method eliminates the need for printing complex patterns and makes the project incredibly accessible. Take your time with the folds to ensure accuracy, as this will directly impact the final shape of your pouch. Once the paper is folded correctly, you’ll have your master template ready for the next phase.
Step 2: Preparing Your Fabrics
With your paper pattern in hand, it’s time to prepare your materials. Lay out your fusible fleece and trace the pattern onto it using your fabric marker. Next, carefully cut out the fusible fleece piece. Now, take your chosen outer layer fabric. Position the fusible fleece piece onto the wrong side of your outer fabric, ensuring it’s centered and aligned. Using your iron, firmly press the fusible fleece onto the fabric, following the manufacturer’s instructions for temperature and time. This step is crucial for bonding the fleece to the fabric, providing stability and body to your pouch. Once bonded, cut around the fused fabric, creating the outer layer of your pouch. The video will show you how to create any necessary small slits or notches around the edges that might be part of the design for easy turning or shaping later on.
Step 3: Constructing the Pouch Body and Lining
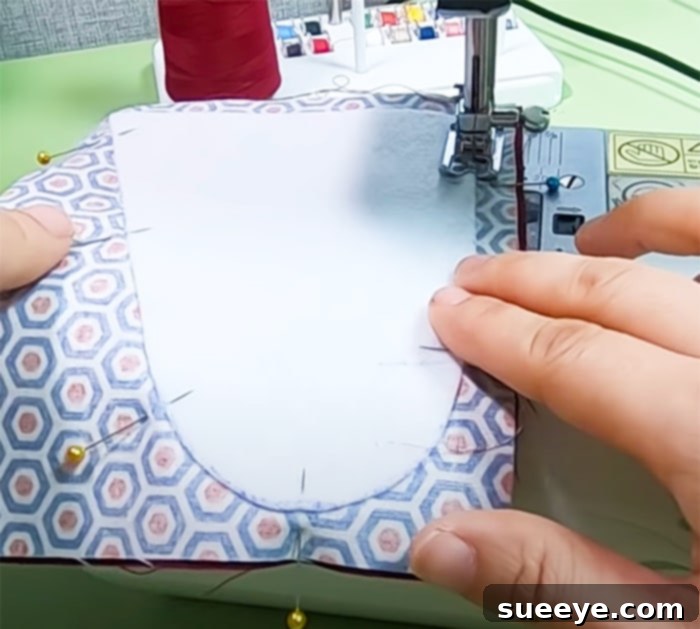
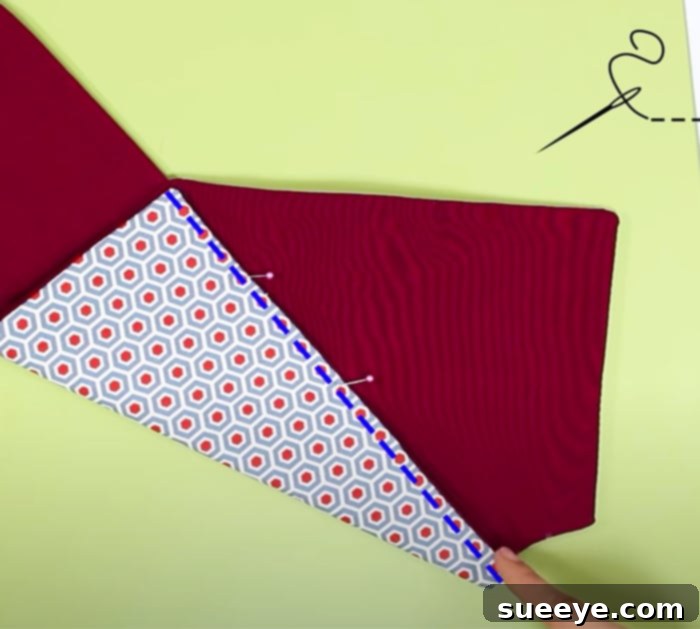
This stage involves bringing your fabric pieces together. Referencing the Sewingtimes tutorial closely, you will learn how to sew the prepared outer fabric piece, often involving precise stitching along the folded lines established by your paper pattern. The video will guide you on how to incorporate the lining fabric, ensuring clean seams and a professional finish both inside and out. Typically, this involves sewing the outer fabric and lining fabric separately, then joining them right sides together, leaving an opening for turning. Once sewn and trimmed, you’ll turn the pouch right side out, gently pushing out all corners and edges to create a crisp shape. Pressing again at this stage will help flatten the seams beautifully.
Step 4: Adding the Snap Button Closures
A secure closure is essential for keeping your scissors safe. The final step in assembling your pouch is attaching the snap buttons. Position the snap components precisely where indicated in the tutorial, usually on the flap and the main body of the pouch. Using your needle and thread, carefully hand-stitch each snap button clasp into place. Take your time with this step to ensure the snaps are firmly attached and perfectly aligned for a smooth and secure closure. This detail adds both functionality and a polished look to your finished pouch.
Personalize Your Pouch: Unleash Your Creativity
One of the most rewarding aspects of any DIY project is the opportunity for customization. This scissors pouch is a blank canvas for your creativity. Consider these ideas to make your pouch truly unique:
- Fabric Combinations: Experiment with contrasting outer and lining fabrics, perhaps a bold print for the exterior and a complementary solid for the interior. Quilt cottons, linen blends, or even denim scraps can work wonderfully.
- Embellishments: Add a small embroidered motif, an iron-on patch, or decorative stitching to the front flap. This can elevate the pouch from functional to truly artistic.
- Size Variations: While the tutorial provides a standard size, you could adapt the pattern slightly to create pouches for different types of tools – perhaps a longer one for rotary cutters or a smaller one for thread snips.
- Gift Giving: A handmade scissors pouch makes an incredibly thoughtful and practical gift for any fellow crafter, sewing enthusiast, or student. Personalize it with their favorite colors or a monogram.
The Joy of DIY: Crafting a Sense of Accomplishment
Beyond the practical benefits, undertaking a DIY sewing project like this scissors pouch offers immense personal satisfaction. There’s a unique joy in creating something useful and beautiful with your own hands. It’s a fantastic way to develop new skills, hone existing ones, and enjoy the therapeutic process of crafting. Each stitch brings you closer to a tangible item that you can proudly say you made yourself.
Furthermore, engaging in DIY projects promotes resourcefulness and can be a more sustainable alternative to mass-produced items. You can often use fabric scraps, upcycle old clothes, or choose eco-friendly materials, reducing waste and contributing to a more sustainable lifestyle. It’s an empowering experience that fosters creativity and self-reliance.
Conclusion: Your Next Favorite Sewing Project Awaits!
Overall, this DIY scissors pouch holder by Sewingtimes is much more than just a sewing project; it’s an invitation to better organization, tool protection, and creative expression. Its beginner-friendly nature, combined with the clear guidance from Sewingtimes, makes it an accessible and enjoyable craft for anyone. I love how practical and adorable this pouch is, especially its ability to neatly house multiple scissors and securely close with a snap button. It’s a wonderful addition to any crafter’s toolkit, ensuring your valuable scissors are always organized, safe, and ready for your next project.
So, gather your supplies, pick out some delightful fabrics, and head over to the Sewingtimes YouTube channel. You’ll be amazed at how quickly and easily you can create this essential and charming accessory. Happy sewing!