
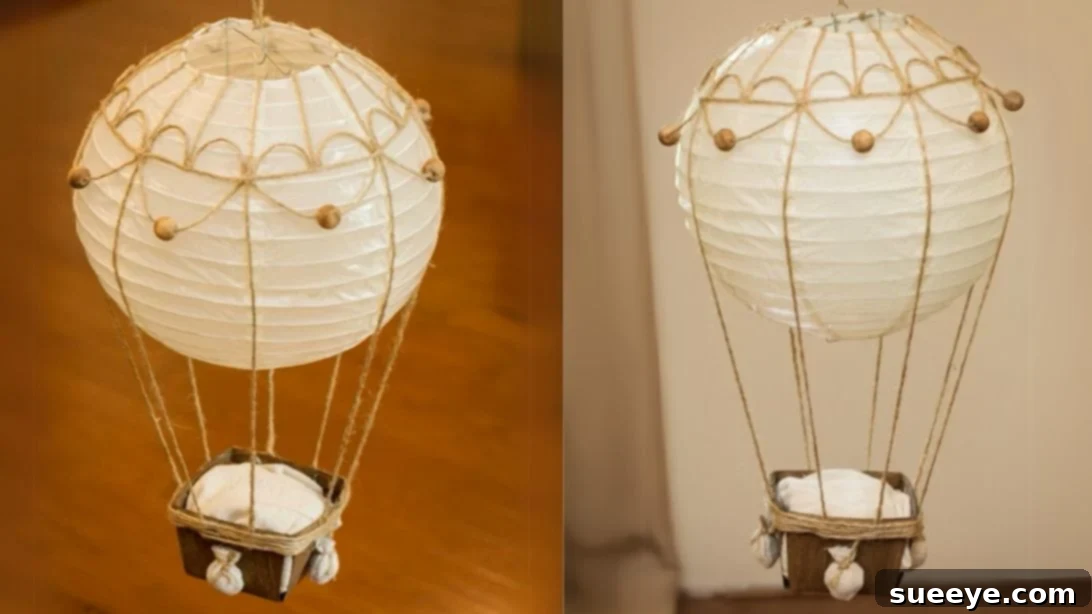
There’s an undeniable charm and sense of wonder that hot air balloons evoke. They transport us to a simpler time, hinting at adventures in the sky and a timeless elegance. Watching one gracefully ascend is a captivating sight, especially when adorned with classic designs. If you, like us, are captivated by these magnificent airborne vessels, then prepare for a delightful and surprisingly simple craft project! We discovered this fantastic tutorial for a DIY decorative hot air balloon from the ingenious minds at Craft Classy‘s YouTube channel, and we instantly knew it was a project worth sharing.
RELATED: DIY Soda Can Hot Air Balloons
What makes this particular project so appealing is its incredible ease of execution. You don’t need advanced crafting skills or specialized tools. More importantly, it offers a vast canvas for your creativity. Imagine a vibrant, colorful balloon made with a bright lantern and playful yarns instead of jute twine, or a rustic, vintage-inspired piece with subtle tones and natural textures. The possibilities are truly endless, allowing you to tailor this charming decor to perfectly match your personal style and existing home aesthetic. Let your imagination soar as you bring this miniature hot air balloon to life. For a complete visual guide and step-by-step instructions, be sure to watch the video below.
Looking for another fun and ingenious project? Check out this guide: How to Blow Up Balloons With A Plastic Bottle
Why Choose This DIY Decorative Hot Air Balloon?
In a world saturated with mass-produced decor, there’s something truly special about a handmade item. This DIY hot air balloon project offers numerous advantages:
- Budget-Friendly: Most materials are inexpensive and readily available at craft stores or even around your home, making it a perfect project for any budget.
- Easy for All Skill Levels: Whether you’re a seasoned crafter or just starting, the steps are straightforward and achievable, guaranteeing a rewarding experience.
- Endless Customization: From the color of the lantern to the type of twine and embellishments, every element can be personalized to suit your taste or a specific theme.
- Unique & Charming Decor: This piece adds a unique, whimsical touch to any room, sparking conversation and bringing a smile to anyone who sees it. It’s a wonderful alternative to generic store-bought decorations.
- Versatile Placement: Perfect for a child’s nursery, a whimsical living room accent, a charming office desk item, or even as part of party decorations.
- Thoughtful Gift Idea: A handmade decorative hot air balloon makes a heartfelt and personal gift for baby showers, birthdays, or housewarmings.
Budget-Friendly Hot Air Balloon Decor Materials
Gathering your materials is the first exciting step in any DIY adventure. For this charming hot air balloon, you’ll find that most items are affordable and easy to source. Here’s what you’ll need:
- 10″ Ivory Paper Lantern: This will form the main “balloon” structure. An ivory lantern provides a neutral base, but feel free to choose any color or size that inspires you. Larger lanterns make a bolder statement, while smaller ones are perfect for subtle accents.
- Small Wooden Basket: This will be the “gondola” of your hot air balloon. Look for a miniature woven basket that is proportionate to your lantern. Its rustic charm adds authenticity to the design.
- Brown Paint: A small amount of brown acrylic or craft paint to give your basket an aged, authentic look.
- Jute Twine: Essential for connecting the basket to the balloon and adding decorative details. Its natural texture contributes to the rustic aesthetic. You could also experiment with colored yarns or thinner ropes for a different feel.
- Scrap Fabric for Sandbags: Small pieces of fabric (burlap, linen, cotton) to create miniature decorative “sandbags” that traditionally weigh down a real hot air balloon.
- A Lightweight Object to Weigh Down the Basket: Small pebbles, rice, or beads can be used to add a little stability to the basket, preventing it from swinging too much.
- Outdoor Mod Podge: While the original suggests outdoor Mod Podge for durability, any clear-drying craft glue or sealant will work if your balloon is for indoor display only. This protects the paper lantern and adds a slight sheen.
- Wooden Beads: These add a lovely decorative touch, mimicking structural elements or simply adding visual interest. Choose beads that complement your twine and color scheme.
- Battery-Operated Light (Optional): A small LED tea light or fairy lights can be placed inside the lantern to create a beautiful, warm glow, especially enchanting in the evenings.
How to Make a Hot Air Balloon Decor: A Step-by-Step Guide
Follow these detailed instructions to assemble your stunning decorative hot air balloon. Take your time with each step, and don’t be afraid to add your personal flair!
Step 1: Assemble the Paper Lantern
Carefully unpack your paper lantern. Most lanterns come with a wire frame that you insert to expand and hold its spherical shape. Follow the specific instructions provided with your lantern’s packaging to ensure it’s assembled correctly and securely. Handle the paper gently to avoid tearing or creasing.
Step 2: Coat the Lantern with Mod Podge
Once your lantern is assembled, it’s time to apply a protective layer. Using a soft brush or sponge, apply a thin, even coat of Mod Podge (or your chosen sealant) over the entire surface of the paper lantern. This step serves multiple purposes: it adds durability to the delicate paper, provides a subtle protective barrier against dust and minor wear, and can give the lantern a slightly more refined finish. Allow it to dry completely, which may take an hour or two depending on humidity.
Step 3: Prepare the Wooden Basket
Take your small wooden basket. Pour a small amount of brown paint onto a palette. Dip a wet tissue or a damp sponge into the paint, then gently dab and wipe it onto the basket. This technique helps to thin out the paint, allowing the natural wood grain to show through and creating a more distressed, natural, and aged appearance rather than a solid, opaque coat. Experiment with how much paint you apply to achieve your desired rustic effect. Let the basket dry thoroughly.
Step 4: Measure and Cut the Jute Twine for Suspension
Hold the assembled lantern a few inches (approximately 3-5 inches or 8-12 cm) above the painted basket. This gap allows for the visual separation that mimics a real hot air balloon. Now, carefully measure the distance from the very top of the lantern to the top edge of the basket. Add an extra inch or two for gluing allowance. Using this precise measurement, cut 8 identical pieces of jute twine. These will be the ropes connecting your balloon to its basket.
Step 5: Attach the Vertical Jute Twine
Take one piece of your pre-cut jute twine. Apply a strong craft glue to one end and securely attach it to the top of a seam on the paper lantern. Paper lanterns typically have vertical seams where the paper panels meet; these are ideal points for strong adhesion. Guide the twine along the seam, applying small dots of glue intermittently, until you reach approximately halfway down the lantern. Repeat this process for all 8 pieces of jute twine, attaching them evenly around the lantern, ideally aligning with the existing seams. Once all vertical pieces are glued onto the lantern, apply glue to the free ends of these twines and attach them evenly spaced around the top edge of the wooden basket. Ensure the lantern is centered above the basket and the twines are taut but not overly strained. Let the glue set completely.
Step 6: Wrap the Basket Edge with Jute Twine
To give the basket a finished and more integrated look, begin wrapping jute twine around its top edge. Start by gluing one end of the twine securely to the inside rim of the basket. Then, carefully wrap the twine around the entire circumference of the top edge, applying small dots of glue as you go to hold it firmly in place. Continue wrapping for 2-3 layers to create a visually appealing border. This step adds texture and strengthens the connection points for the vertical strings. Trim any excess twine and glue the end neatly.
Step 7: Add Horizontal Twine and Decorative Beads
Enhance the “balloon” structure with a horizontal band of jute twine. Measure approximately 1/3 of the way down from the top of the lantern and glue a piece of jute twine horizontally around its circumference, ensuring it forms a neat, straight ring. Next, cut smaller pieces of jute twine (about 3-4 inches long). Thread a wooden bead onto each piece, centering the bead. Now, fold the twine in half, creating a loop with the bead at the bottom. Glue the ends of these beaded twines between the vertical strings, attaching them to both the top of the lantern and the newly placed horizontal twine. These add decorative weight and detail. Refer to the image below to visualize the placement of the horizontal twine and the beaded accents.
Step 8: Craft and Attach Miniature Sandbags
Using your scrap fabric, cut out four small squares or rectangles, roughly 1.5 x 1.5 inches (or proportionate to your basket). Place a tiny amount of lightweight material inside each (e.g., a few grains of rice, small beads, or cotton stuffing) to give them a bit of form. Gather the edges of the fabric and tie them securely with a small piece of jute twine, forming miniature “sandbags.” These are purely decorative and add to the authentic hot air balloon aesthetic. Once made, glue these four tiny sandbags evenly around the four sides of your wooden basket, typically near the top rim or where the vertical strings attach.
Step 9: Final Touches and Display
To give your basket a little more stability and ensure it hangs straight, place a small, lightweight object inside. This could be a few decorative pebbles, a small bean bag, or even a small weight hidden beneath some decorative moss. If you opted for the battery-operated light, carefully place it inside the lantern opening at the top, ensuring it’s secure and easily accessible for battery changes. Now, find the perfect spot to hang your magnificent creation! Ensure it’s hung safely away from heat sources and where it can be admired.
Customization Ideas for Your DIY Hot Air Balloon
While the basic tutorial provides a beautiful result, the true magic lies in making it uniquely yours. Here are some ideas to spark your creativity:
- Color Palette: Instead of ivory, use a lantern in a bold color like red, blue, or yellow. Match or contrast your jute twine with colored yarns or ribbons for a completely different vibe.
- Basket Variations: Experiment with small tin buckets, painted mini terra cotta pots, or even intricately woven tiny baskets for different styles.
- Embellishments: Add delicate lace, miniature fabric flags, artificial flowers, tiny charms, or even little painted wooden figures peeking out of the basket.
- Themed Balloons:
- Nursery Decor: Use pastel colors, add baby animal cutouts, or soft fabric clouds.
- Travel Theme: Attach mini suitcases, maps, or tiny globes.
- Vintage Charm: Incorporate aged papers, sepia tones, and antique-looking trinkets.
- Seasonal Decor: Decorate with mini pumpkins and autumn leaves for fall, or small ornaments and holly for Christmas.
- Lighting Effects: Beyond a simple LED tea light, consider weaving a string of tiny fairy lights inside the lantern for a more dramatic and enchanting glow. Choose warm white for a cozy feel or colored lights for a festive mood.
- Different Twine Materials: Explore cotton string, embroidery floss, or thin wire for different textures and appearances.
Where to Display Your Charming Hot Air Balloon
Once your DIY decorative hot air balloon is complete, finding the perfect place to showcase it is key. Its whimsical nature makes it suitable for a variety of settings:
- Children’s Rooms and Nurseries: A classic choice! It adds a dreamy, imaginative touch, inspiring thoughts of adventure and faraway lands. Hang it above a crib, changing table, or play area.
- Living Room Accent: Suspend it in a corner, near a window, or as a focal point on a bookshelf or mantelpiece to introduce an element of unexpected charm.
- Home Office: Bring a sense of whimsy and creativity to your workspace, making the environment more inviting and inspiring.
- Party Decorations: Perfect for baby showers, birthday parties (especially travel or adventure themes), or even garden parties. Create several in varying sizes for a stunning display.
- Hallways and Entryways: Welcome guests with a unique piece that instantly sets a warm and inviting tone.
- Seasonal Displays: Integrate it into holiday decor – imagine a hot air balloon adorned with mini string lights for Christmas or tiny flowers for spring.
Care and Maintenance for Your DIY Decor
To ensure your beautiful decorative hot air balloon remains a cherished piece of decor for years to come, a little care goes a long way:
- Dusting: Gently dust your lantern regularly with a soft, dry cloth or a feather duster. Avoid using wet cloths directly on the paper lantern.
- Placement: Keep your hot air balloon away from direct sunlight, which can fade colors over time, and high humidity, which might affect the paper or glue. Also, avoid placing it near heat sources like radiators or open flames.
- Battery Replacement: If you’ve included a battery-operated light, remember to change the batteries as needed to keep your balloon glowing brightly.
- Storage: If you need to store your balloon, ideally keep it in a sturdy box in a dry, cool place to protect it from dust and damage.
DIY Decorative Hot Air Balloon: Your Next Whimsical Project
Crafting this DIY decorative hot air balloon is more than just a project; it’s an opportunity to infuse your home with personality, charm, and a touch of whimsical adventure. It’s an easy, budget-friendly way to create a truly unique piece of decor that will bring joy and spark conversation. Whether you choose to follow the classic design or unleash your creativity with vibrant colors and unique embellishments, the result will be a delightful testament to your crafting spirit. So, gather your materials, let your imagination take flight, and enjoy the process of bringing this enchanting hot air balloon to life for your home or as a thoughtful gift. Happy crafting!