
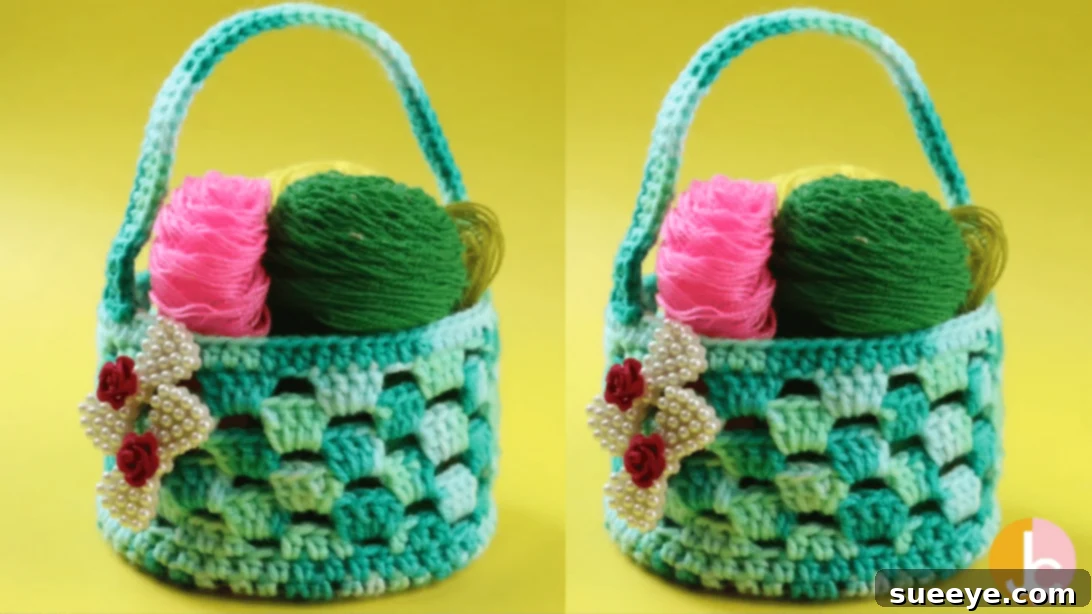
DIY Upcycled CD Crochet Storage Basket: An Easy & Eco-Friendly Tutorial
Are you searching for a delightful and practical crochet project that’s perfect for your home and kind to the environment? Look no further! This fantastic easy crochet storage basket tutorial, brought to you by Just Crochet, offers a brilliant way to breathe new life into an item often discarded: your old CDs. In an age where digital media reigns supreme, those stacks of compact discs often sit unused, collecting dust. Why not transform them into something beautiful and functional? This guide will walk you through creating a charming, sturdy basket that’s not only a joy to make but also incredibly versatile.
This unique crafting idea is designed to combat boredom and ignite your creative spark. If you’ve ever thought that crochet projects like this might be too challenging, think again! This particular tutorial is genuinely beginner-friendly, proving that even novice crafters can achieve impressive results. The finished baskets are perfect for a multitude of purposes: they make thoughtful handmade gifts for friends and family, adorable baby shower presents, cute summer bags for essentials, charming accessories for kids’ rooms, or stylish decorative accents around your house. For those with an entrepreneurial spirit, these cute and colorful handmade baskets are excellent items to sell on platforms like Etsy, eBay, or other online marketplaces. People truly appreciate handmade items with a unique story, and an upcycled CD basket definitely fits the bill. Dive into the world of sustainable crafting and learn how to make your very own by following the detailed instructions below.
Why Craft an Upcycled CD Crochet Basket? Benefits Beyond Beauty
Beyond the sheer joy of creating something with your own hands, crafting an upcycled CD crochet basket offers numerous advantages:
- Eco-Friendly Upcycling: This project is a fantastic example of repurposing. Instead of sending old CDs to a landfill, you’re transforming them into a useful and beautiful item, contributing to a more sustainable lifestyle.
- Affordable Crafting: You’re using readily available and often free materials (old CDs!), making this a highly economical craft. You only need yarn and a hook, making it accessible to almost anyone.
- Functional Home Organization: These baskets are incredibly versatile for storage. Use them to organize small items like keys, jewelry, office supplies, craft notions, hair accessories, or even as decorative planters for small succulents (just ensure proper drainage).
- Personalized Home Decor: With an endless array of yarn colors, textures, and embellishments, you can customize each basket to perfectly match your home decor style or reflect your personal taste.
- Perfect for Gifting: A handmade gift carries a special sentiment. These baskets are thoughtful presents for birthdays, holidays, housewarmings, or baby showers, showing the recipient you put time and love into their gift.
- Skill Development & Relaxation: Crochet is known for its calming and meditative qualities. It’s a wonderful way to unwind, improve fine motor skills, and build confidence in your crafting abilities, especially for beginners.
- Potential for Income: As mentioned, these unique, handmade items are popular sellers online and at craft fairs. Turn your hobby into a side hustle and share your creations with a wider audience.
Getting Started: Materials You’ll Need
Before you begin your creative journey, gather these simple materials. The beauty of this project lies in its accessibility and the fact that you might already have most of what you need at home!
- 2.5 mm Crochet Hook: This size is recommended to achieve a tight, sturdy stitch that effectively covers the CD and holds the basket’s shape. If you prefer a slightly looser fabric, you could go up to a 3.0 mm hook, but ensure it’s still firm enough.
- Yarn of Your Choice: The type of yarn you select will significantly influence the look and feel of your basket.
- Cotton Yarn: A popular choice for baskets due to its durability, stiffness, and easy-to-clean nature. It provides excellent stitch definition.
- Acrylic Yarn: A versatile and affordable option, available in a vast array of colors. It’s soft, easy to work with, and holds its shape well.
- T-Shirt Yarn (Fabric Yarn): For a more robust, chunky basket, T-shirt yarn (recycled fabric strips) is an excellent eco-friendly choice. It creates a very sturdy basket with a modern aesthetic. You may need a larger hook if using T-shirt yarn.
- Worsted Weight (Aran/Medium): A common and versatile yarn weight that works well for this project, providing a good balance of durability and flexibility.
Choose colors that inspire you! A single solid color can be elegant, while multiple colors can create vibrant, playful patterns.
- Old CD: This is the unique base for your basket! Dig through your old media collection. Any standard-sized CD or DVD will work. Ensure it’s clean and free of sharp edges.
- Embellishments like Clips (Optional): To add a personal touch, consider decorating your finished basket with small wooden clips, fabric flowers, buttons, ribbons, beads, or even small charms. Let your creativity guide you!
Step-by-Step Instructions: Crafting Your CD Crochet Basket
Follow these detailed steps carefully to bring your upcycled CD crochet basket to life. Take your time, and don’t be afraid to rewind the video by Just Crochet if you need to review a step.
Phase 1: Preparing the CD Base – Creating a Sturdy Foundation
- Begin with a Slip Knot: Hold your yarn and crochet hook. Create a slip knot on your 2.5 mm hook. This is your starting point for all crochet projects.
- Insert Yarn Through CD: Take your old CD. Insert your working yarn through the center hole of the CD, guiding it from the back side to the front side. This positions your yarn to begin crocheting around the CD’s core.
- First Single Crochet (SC): With the yarn secured through the CD’s center, make your first single crochet stitch. This stitch will begin to anchor the yarn to the CD.
- Crochet Around the CD Edge: Continue to make single crochet stitches around the entire circumference of the CD. You’ll be working into the space around the CD’s edge, effectively covering the CD’s surface with yarn. Aim for a consistent tension to ensure an even base. The goal here is to completely encase the CD’s outer edge, creating a firm, crocheted rim. Continue until you have crocheted around the whole CD, making sure the CD is fully covered and the base feels sturdy.
Phase 2: Building the Basket Walls – Creating Shape and Height
Now that your base is secure, it’s time to build the walls of your basket. This phase introduces various stitches to create a beautiful and structured pattern.
- First Round of Basket Wall:
- After completing the single crochet stitches around the CD, make a slip stitch to join the round.
- Chain 2 (this counts as your first half double crochet).
- Then, work half double crochet (hdc) stitches into each stitch around, until you reach the last stitch of the round. This establishes the initial height and firmness of the basket’s wall.
- Introducing Patterned Stitches (Shell/Cluster Pattern):
- Chain 2 (this will create a space for the next stitch pattern).
- Skip 1 half double crochet stitch from the previous round.
- In the next stitch, make 3 half double crochet (hdc) stitches. This creates a small cluster or ‘shell’ effect.
- Repeat this pattern – “chain 2, skip 1 hdc, make 3 hdc in the next stitch” – all the way around the basket. This begins to define the textured pattern of your basket walls.
- Transition to Double Crochet Stitches:
- Next, make a single crochet (sc) stitch.
- Chain 2.
- In the chain space you just created (from the previous round’s chain 2), work 3 double crochet (dc) stitches. This further develops the pattern and adds height.
- Continuing the Pattern for Height:
- Chain 2.
- In the next chain space (from the previous round), work 4 double crochet (dc) stitches. This variation in the number of DCs creates an interesting texture.
- Repeat this sequence – “chain 2, 4 dc in the next chain space” – until your basket reaches your desired height. Remember to keep your tension consistent for a uniform look.
Phase 3: Adding the Handle and Finishing Touches
The final steps involve creating a sturdy handle and tidying up your beautiful basket.
- Top Edge Finishing:
- Once your basket has reached the desired height, chain 2.
- Work one half double crochet (hdc) in each stitch around, until you reach the last stitch. This creates a clean and neat finish for the top edge of your basket.
- Slip stitch to join the round.
- Creating the Handle:
- From your current position, chain 44. This chain will form the length of your basket’s handle. Adjust the number of chains if you desire a shorter or longer handle.
- Working back along this chain, make double crochet (dc) stitches in each chain stitch until you reach the end of the chain. This will create a sturdy and comfortable handle.
- Slip stitch the end of the handle to the opposite side of the basket’s rim, ensuring it’s securely attached and centered.
- Final Touches:
- Cut your yarn, leaving a tail of about 6 inches.
- Fasten off by pulling the tail through the loop on your hook.
- Weave in all loose ends using a tapestry needle to ensure a neat and professional finish.
- Add any optional embellishments like clips, bows, or charms to personalize your basket even further.
And just like that, you are done! How incredibly cute and functional is this tiny basket? Take a moment to admire your handmade creation. The possibilities for customization are endless. Explore different colors and sizes of this basket by adjusting your yarn thickness or even using larger CD/DVDs (though standard CDs are ideal for small baskets). Don’t hesitate to invite your friends to join you in this fun crochet project! It’s a fantastic way to spend an afternoon, bond over a shared hobby, and create something beautiful together. Whether you’re looking for a relaxing pastime or a productive hobby, this CD crochet basket project is a perfect choice.
Tips for Success & Customization
Making it Your Own: Personalizing Your Basket
- Color Play: Experiment with variegated yarns for a dynamic look, or use multiple solid colors to create stripes, color blocks, or a gradient effect.
- Textural Variations: Beyond basic cotton or acrylic, try chenille yarn for a soft, plush basket or jute/hemp for a rustic, natural feel (though these may be harder on your hands).
- Different Handles: Instead of a crocheted handle, consider adding a leather strap, a rope handle, or even two small handles on opposite sides for a different look.
- Embellish Creatively: Besides clips, think about sewing on fabric patches, adding embroidered details, or attaching small crochet appliques like flowers or leaves.
Troubleshooting Common Crochet Challenges
- Uneven Stitches: Practice maintaining consistent yarn tension. Over time, your stitches will become more uniform.
- Holes Appearing: Ensure you’re inserting your hook into the correct part of the stitch. Missing a stitch or working into the wrong loop can create gaps.
- Basket Leaning: If your basket leans or isn’t perfectly straight, it might be due to inconsistent tension or skipping/adding too many stitches. Double-check your stitch count per round, especially when starting a new pattern.
- Yarn Splitting: This often happens with certain yarn types or when your hook isn’t sharp enough. Try a hook with a slightly different tip or a different brand of yarn.
Caring for Your Handmade Crochet Basket
To ensure your beautiful upcycled CD crochet basket lasts for years to come, proper care is essential. The cleaning method will largely depend on the type of yarn you used:
- Cotton & Acrylic Baskets: Most cotton and acrylic yarns are machine washable on a gentle cycle with cold water. It’s often best to place the basket in a mesh laundry bag to protect its shape. Lay flat to dry, reshaping as needed, to prevent stretching or damage to the CD base. Avoid high heat from dryers.
- T-Shirt Yarn Baskets: These are generally quite durable and can often be machine washed cold on a gentle cycle. Again, lay flat to dry.
- Delicate or Blended Yarns: For more delicate yarns or if you’re unsure, hand washing is always the safest option. Gently submerge the basket in cool, soapy water, rinse thoroughly, gently squeeze out excess water (do not wring), and then lay flat on a towel to air dry.
- Spot Cleaning: For minor spills, spot clean with a damp cloth and mild soap.
Always avoid soaking the basket for extended periods, especially if the CD base is exposed or not completely encased, as prolonged moisture could potentially warp the CD over time, although it’s usually well-protected.
More Crochet Inspiration & Community
We hope this detailed tutorial has inspired you to pick up your hook and yarn! Crocheting is a rewarding craft that offers endless possibilities for creativity and personal expression. Once you’ve mastered this easy CD storage basket, you’ll feel confident tackling more complex projects. Don’t forget to share your finished creations online using relevant hashtags – the crafting community loves to see new ideas and beautiful handmade items. If you have any questions or need further guidance, the original video by Just Crochet is an invaluable visual resource, and online crochet forums are always a great place to find support and inspiration.
Happy crocheting, and enjoy your beautiful, handmade, and eco-friendly storage solution!