
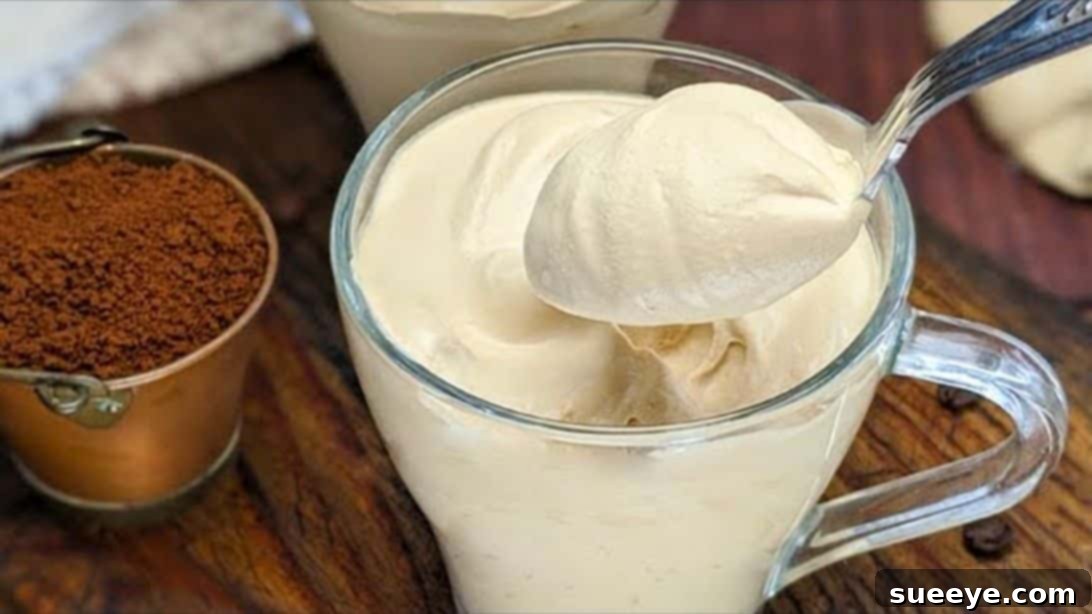
Irresistible Homemade Coffee Cream: A Quick & Delicious Recipe for Coffee Lovers
For many of us, the day truly begins with that first glorious sip of coffee. There’s an undeniable magic in its rich aroma and comforting taste that sets the perfect tone. As a dedicated coffee enthusiast, I’m always on the lookout for new ways to infuse that beloved flavor into my day. That’s why I was absolutely thrilled to discover this incredibly simple yet profoundly delicious coffee cream recipe by One Day One Recipe. This isn’t just a dessert; it’s a revelation – a velvety, luscious cream that’s utterly addicting and truly heavenly.
What makes this recipe so special is its remarkable versatility. You can savor it as a light, airy dessert on its own, perhaps garnished with fresh berries or a sprinkle of cocoa powder. But the real magic happens when you transfer it to the freezer. After a short wait, it transforms into an unbelievably smooth and creamy coffee ice cream, rivaling any gourmet scoop you’ve ever tasted. Imagine enjoying a homemade, intensely flavored coffee ice cream with minimal effort and just a handful of ingredients!
This delightful creation is surprisingly easy to make, requiring just five basic ingredients that you likely already have in your pantry. If you share my passion for coffee and crave a quick, satisfying, and utterly delicious treat, then this recipe is an absolute must-try. I promise, you won’t regret it. Continue reading for the detailed instructions, helpful tips, and creative variations, and prepare to elevate your dessert game.
Why You’ll Love This Quick & Delicious Coffee Cream
Beyond its incredible taste, there are numerous reasons why this coffee cream recipe will become a staple in your kitchen. It’s designed for simplicity and maximum flavor impact, making it perfect for busy weeknights or impromptu dessert cravings.
- Effortlessly Delicious: With minimal steps and common ingredients, you can whip up a sophisticated dessert in no time.
- Incredibly Versatile: Enjoy it chilled as a creamy dessert, frozen as an indulgent ice cream, or use it as a luxurious topping for various pastries and beverages.
- Perfect for Coffee Lovers: Delivers a robust and authentic coffee flavor that truly satisfies your deepest coffee cravings.
- Customizable: Easily adaptable to your taste preferences, whether you like it sweeter, less sweet, or with added flavors and textures.
- Crowd-Pleaser: Its unique texture and rich flavor make it an instant hit with guests, often leaving them surprised by how easy it was to make.
Key Ingredients for Your Heavenly Coffee Cream
The beauty of this recipe lies in its simplicity and the quality of its few components. Each ingredient plays a crucial role in achieving that perfect balance of flavor and texture. Here’s what you’ll need to create this delightful coffee cream:
- 2 tablespoons of Instant Coffee: This is the star of our show. Instant coffee provides a concentrated coffee flavor without the need for brewing. You can choose between regular caffeinated for a morning kick or decaffeinated if you prefer to enjoy this treat late in the evening. Adjust the quantity slightly if you desire a stronger or milder coffee presence. For an extra rich flavor, consider using espresso powder.
- 3 tablespoons of Full Cream (for the coffee base): This small amount of cream helps to dissolve the instant coffee and create a smooth, rich base. Full cream, also known as heavy cream or whipping cream, typically has a fat content of 35-40%, which significantly contributes to the creaminess and luscious texture.
- 2 teaspoons of Vanilla Extract: A good quality vanilla extract enhances the coffee flavor, adding warmth, depth, and a subtle sweetness that rounds out the overall taste. Don’t underestimate its power to elevate the overall taste profile. Vanilla bean paste can also be used for an even more pronounced vanilla aroma and visual appeal with its tiny flecks.
- 1 cup and 1 teaspoon of Full Cream (for whipping): This larger quantity of cold heavy cream is absolutely essential for creating the light, airy, and voluminous cream that forms the body of our dessert. Ensure it’s well-chilled for optimal whipping results – cold cream whips up much better and holds its shape longer.
- 1/4 cup of Icing Sugar: Also known as powdered sugar or confectioners’ sugar, icing sugar not only sweetens the cream but also contains a small amount of cornstarch. This cornstarch is key, as it helps stabilize the whipped cream, giving it a smoother, more consistent texture that holds up well.
For best results, always use high-quality ingredients. With so few components, the quality of each ingredient truly shines through in the final product!
Essential Equipment for a Smooth Preparation Process
Having the right tools can make the cooking process much more enjoyable and efficient, especially when whipping cream to perfection. For this coffee cream, you’ll need just a few standard kitchen items, most of which you likely already own:
- Small Pot: Ideal for gently heating the coffee and cream mixture, ensuring even dissolution without scorching.
- Whisk (or Heat-Resistant Spatula): To combine ingredients thoroughly, especially during the initial stages and while heating, preventing lumps.
- Hand Mixer (Electric): Crucial for whipping the cream to the desired consistency quickly and effectively. An electric hand mixer provides the necessary power and aeration. A stand mixer with a whisk attachment also works perfectly for hands-free convenience.
- Mixing Bowls: You’ll need at least two – one small bowl for the coffee base and a larger, preferably chilled, bowl for whipping the main cream. Chilling the bowl helps the cream whip faster and more effectively.
- Freezer-Safe Container (optional but recommended): If you plan to transform your delightful cream into ice cream, a shallow, airtight container (like a loaf pan with a lid or a plastic freezer container) will be indispensable for proper freezing and storage.
Step-by-Step Instructions: Crafting Your Coffee Dream
Step 1: Preparing the Rich Coffee Base
Begin by combining two tablespoons of your chosen instant coffee with three tablespoons of full cream in a small pot. It’s important to mix these two ingredients thoroughly at this stage, ensuring the instant coffee granules are fully dissolved and no lumps remain. A small whisk or even a sturdy spoon can be used for this. This initial mixing creates a smooth, concentrated coffee essence that will form the backbone of our delicious cream, promising a deep and authentic coffee flavor.
Step 2: Gently Heating for Perfect Fusion
Place the pot with your coffee and cream mixture over low heat on your stovetop. Continuously stir the mixture as it warms. The goal here is not to bring it to a boil, but rather to gently heat it until it becomes perfectly smooth and all components are well combined. This process helps to further dissolve any stubborn coffee particles and integrate the flavors beautifully, creating a silky base. Once you achieve a silky, uniform consistency with no graininess, remove the pot from the heat immediately to prevent it from scorching or reducing too much.
Step 3: Infusing Vanilla and Rapid Chilling
Now, add two teaspoons of good quality vanilla extract to the warm coffee mixture. Stir it in thoroughly until the vanilla is fully incorporated, lending its fragrant and warming notes to the coffee base. Once mixed, transfer this vanilla coffee mixture into a clean bowl. To prepare it for the next step, place the bowl in the freezer for about three to four minutes. This rapid chilling step is absolutely crucial as it quickly cools down the mixture, preventing it from melting the delicate whipped cream we’ll be adding later, and helps achieve a thicker, more stable consistency when combined.
Step 4: Whipping the Cream to Light & Fluffy Perfection
In a separate, large mixing bowl, pour one cup and one teaspoon of very cold full cream. For the best results, ensure your cream is as cold as possible; you can even chill your mixing bowl and hand mixer beaters beforehand for optimal whipping performance. Next, add 1/4 cup of icing sugar to the cold cream. Using a hand mixer on medium-high speed, begin to whisk the mixture. Continue whisking until the cream lightly thickens and holds soft peaks. This means when you lift the beaters, the peak of cream should gently flop over. Be careful not to over-whisk at this stage, as we still need to incorporate the coffee mixture without curdling the cream.
Step 5: Combining for a Luxurious & Foamy Texture
Once your main cream has reached the desired light and airy thickness, gently fold in the chilled vanilla coffee mixture from Step 3. Continue to whisk for about one minute, or slightly longer, using your hand mixer on a medium setting. The goal is to fully combine the two mixtures and achieve a beautiful, uniform color, and a wonderfully foamy and thick cream with a consistent texture. You’ll notice the cream gaining volume and becoming wonderfully aerated, resulting in that irresistible velvety mouthfeel that is characteristic of this delightful dessert.
Step 6: Serve Immediately or Freeze for Homemade Coffee Ice Cream
Your delectable coffee cream is now ready to enjoy! You have several fantastic options for serving. You can savor it as is, perhaps spooned into elegant dessert glasses, or serve it alongside fresh fruits like berries or sliced bananas for a refreshing contrast. For an even more indulgent experience, you can easily turn this exquisite cream into homemade coffee ice cream. Simply transfer the entire mixture into a freezer-safe container, cover it tightly, and place it in the freezer for approximately 24 hours. The longer chilling time allows it to set completely into a scoopable, creamy ice cream. When ready, just scoop and enjoy the rich, frosty goodness. Whichever way you choose to enjoy it, prepare for a truly satisfying treat that will impress everyone!
Creative Variations & Customizations for Your Coffee Cream
This basic coffee cream recipe is a fantastic starting point, but don’t hesitate to get creative and customize it to your personal taste! Here are a few ideas to spark your imagination and add even more flair to this already delightful dessert:
- Chocolate Swirl Coffee Cream: Gently fold in a few tablespoons of melted dark chocolate or a rich chocolate syrup during Step 5 for a mocha-inspired treat.
- Spiced Coffee Cream: Add a pinch of cinnamon, nutmeg, or cardamom along with the vanilla extract for a warm, aromatic twist. These spices pair beautifully with coffee.
- Liqueur-Infused Cream (Adults Only): For a sophisticated dessert, incorporate a tablespoon or two of coffee liqueur (like Kahlua), Irish cream (like Baileys), or rum during Step 5.
- Nutty Crunch: Sprinkle chopped toasted nuts (almonds, walnuts, pecans) over the top just before serving, or fold them into the cream for added texture and a delightful crunch.
- Caramel Drizzle: A generous swirl of salted caramel sauce on top or folded into the cream creates an irresistible sweet and salty combination.
- Dairy-Free Option: While the recipe calls for full cream, you can experiment with full-fat coconut cream (chilled overnight, just the thick cream scooped out) as a dairy-free alternative for whipping.
- Less Sweet: Adjust the amount of icing sugar to your preference. If you prefer a less sweet dessert, simply reduce the quantity slightly. Taste and adjust as you go!
Wonderful Serving Suggestions for Any Occasion
Once you’ve made this incredible coffee cream, the possibilities for enjoying it are truly endless. Its versatile nature makes it suitable for almost any occasion. Here are some of my favorite ways to serve this versatile dessert:
- Standalone Dessert: Simply spooned into elegant ramekins or dessert glasses, perhaps with a dusting of cocoa powder or a few whole coffee beans for garnish.
- With Fresh Fruit: Pair it with a medley of fresh berries (strawberries, blueberries, raspberries), sliced bananas, or tropical fruits for a refreshing and vibrant contrast.
- Coffee & Hot Chocolate Topping: A generous dollop of this cream is an exquisite topping for your morning coffee, latte, or a luxurious homemade hot chocolate.
- Alongside Pastries & Cakes: Serve it as a delightful accompaniment to warm brownies, chocolate cake, apple pie, or even a simple pound cake for an elevated experience.
- Parfait Layers: Create stunning parfaits by layering the coffee cream with crushed cookies (like oreos or digestive biscuits), granola, or a fruit compote in a tall glass.
- Filled Choux Pastry: Use it as a decadent and unique filling for homemade cream puffs or éclairs for a truly impressive and gourmet dessert.
- Breakfast Treat: A small scoop can even elevate your pancakes, waffles, or French toast on a special morning, turning breakfast into a dessert-like experience.
Storage Tips to Keep Your Cream Fresh and Delicious
Proper storage ensures you can enjoy this delicious coffee cream for longer, whether in its creamy form or as a frozen treat. Following these tips will help maintain its best texture and flavor:
- Refrigerated Cream: If you’re keeping it as a cream, transfer it to an airtight container and store it in the refrigerator. It will maintain its best texture and flavor for up to 2-3 days. The cream may lose some of its aeration over time, so give it a gentle whisk by hand before serving if needed to fluff it up.
- Frozen Ice Cream: For the ice cream version, ensure it’s in a well-sealed, freezer-safe container to prevent ice crystals from forming and absorbing freezer odors. It can be stored in the freezer for up to 2-3 weeks. For optimal scoopability, you might want to let it sit at room temperature for 5-10 minutes before serving.
- Preventing Freezer Burn: When freezing, press a piece of plastic wrap directly onto the surface of the cream before putting on the lid. This minimizes air exposure and helps prevent freezer burn, keeping your ice cream tasting fresh.
Troubleshooting Common Issues
Even with simple recipes, sometimes things don’t go exactly as planned. Don’t worry, these common issues are usually easy to fix. Here are some solutions to problems you might encounter while making your coffee cream:
- My Cream Isn’t Thickening: Ensure your cream is very cold, and preferably, your mixing bowl and beaters are also chilled. Full cream (heavy cream) needs a minimum of 35% fat content to whip properly. If it’s too warm or has a lower fat content, it won’t whip well. Be patient and keep whisking on medium-high speed; it sometimes just takes a little longer.
- My Coffee Mixture is Lumpy: This usually happens if the instant coffee wasn’t fully dissolved in Step 1. Make sure to mix thoroughly before heating. Gently re-heat and stir until smooth, or if lumps persist, you can pass it through a fine-mesh sieve after chilling to remove any remaining granules.
- My Ice Cream is Too Hard/Icy: This can occur if too much water is present or if it freezes too slowly. Ensure your cream is well-whipped and airy before freezing. Adding a tiny amount of alcohol (like a teaspoon of vodka or coffee liqueur, for adult versions) can also help prevent ice crystals and keep it softer, as alcohol has a lower freezing point. Make sure your freezer is set to a sufficiently cold temperature.
- Over-whipped Cream: If you whip the cream too long, especially after adding the coffee mixture, it can become grainy or even start to separate, turning into butter. If it’s just slightly over-whipped, you can sometimes rescue it by gently folding in a tablespoon or two of unwhipped cold cream by hand.
Your New Favorite Coffee Indulgence Awaits
This quick and delicious coffee cream is more than just a recipe; it’s an invitation to treat yourself to something truly special, a delightful escape for your taste buds. Whether you prefer it as a light and airy cream, a rich topping for other desserts, or a decadent homemade ice cream, its robust coffee flavor and velvety texture are sure to delight. It’s proof that you don’t need complex techniques or exotic ingredients to create something truly extraordinary and satisfying right in your own kitchen.
So, gather your ingredients, follow these simple steps, and prepare to embark on a delightful culinary journey. Share this heavenly treat with friends and family, or keep it all to yourself – we won’t tell! Enjoy every spoonful of your homemade coffee bliss, and let this simple recipe become your go-to for a perfect coffee-infused delight.