
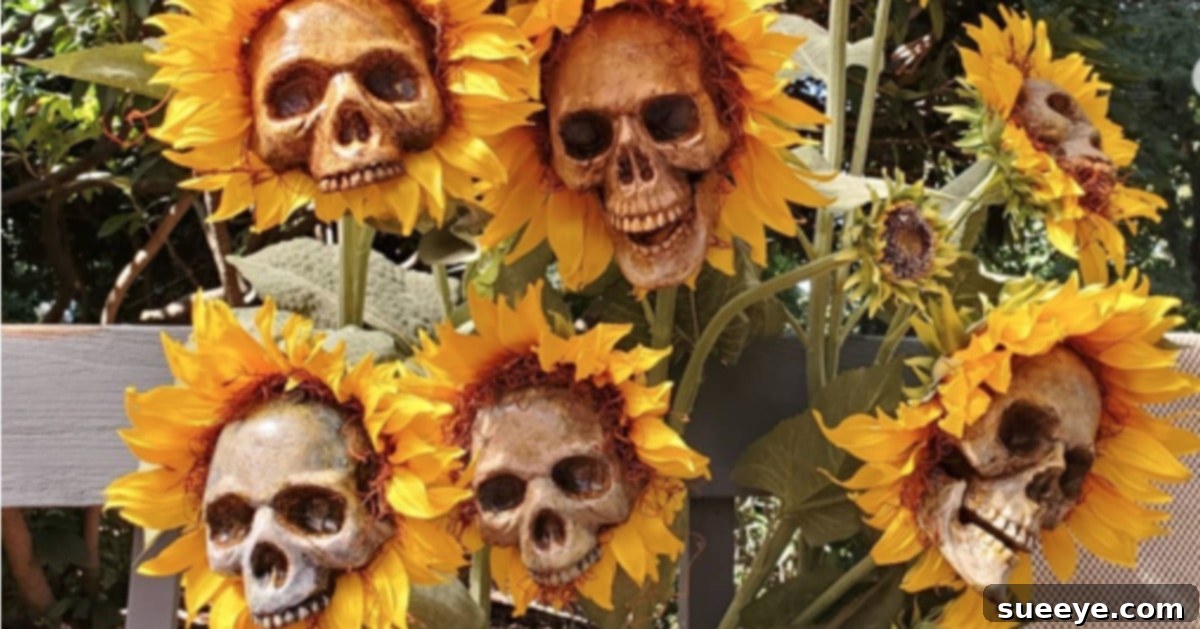
Spooky Chic: Crafting Elegant DIY Sunflower Skull Arrangements for Halloween
The crisp autumn air often brings with it a delightful dilemma: how to embrace the spooky spirit of Halloween while maintaining an air of sophistication. This was precisely the challenge I faced when planning the decor for my office’s annual Halloween party. Originally, a casual buffet had been on the table, promising a relaxed atmosphere. However, my boss had a change of heart, envisioning a more structured, sit-down dinner. This shift was her way of expressing profound gratitude and appreciation to her valued employees, intending to recognize each team member individually for their contributions and present them with a special gift. This thoughtful gesture meant we definitely needed elegant, yet festive, arrangements on every table.
My quest for the perfect centerpiece began with a vision: something that could bridge the gap between Halloween’s playful macabre and the refined setting of a corporate dinner. I needed decor that was understated yet impactful, charmingly eerie but undeniably chic. It was during this creative exploration that I stumbled upon a truly captivating idea on YouTube: a DIY Sunflower Skull Arrangement. The concept immediately resonated with me. The unexpected juxtaposition of vibrant, warm sunflowers against the stark, ghostly white of tiny skulls offered precisely the unique blend of “spooky chic” I was searching for. It promised to be both seasonally appropriate and surprisingly elegant, fitting perfectly with the elevated tone our boss desired for the event.
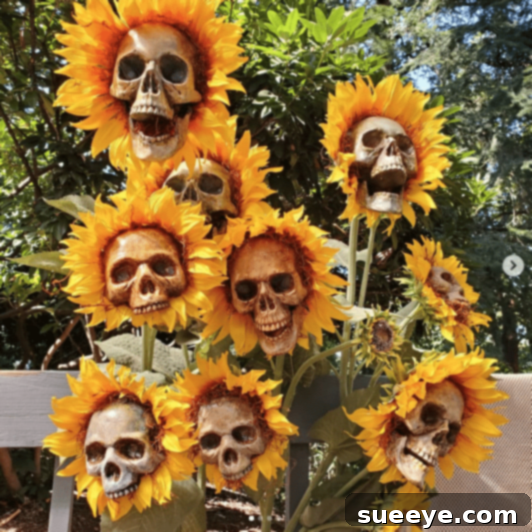
The Hunt for Hauntingly Beautiful Supplies: Turning Vision into Reality
With the perfect concept in mind, the next step was gathering the materials. I had a stroke of luck, remembering seeing those exact same tiny plastic skulls at Dollar Tree during a previous visit. This discovery was a huge win, promising an affordable and accessible starting point for the project. A quick trip back secured a couple of bags of these essential spooky elements. The sunflowers, another key component, were already in my crafting stash – a collection of beautiful artificial sunflowers repurposed from an old autumn bouquet project I had completed the previous year. This not only saved money but also gave a second life to existing decor, aligning with a sustainable crafting mindset. To house these unique creations, I picked up some lovely, simple vases from Michaels Craft Store, envisioning how they would gracefully hold the arrangements. With all the pieces in place, my Halloween vision was ready to take shape.
The beauty of this project lies in its simplicity and the ability to source many items affordably. The combination of budget-friendly finds and repurposed materials meant that creating these sophisticated centerpieces wouldn’t break the bank, proving that stunning decor doesn’t always require a hefty investment. This approach allowed me to focus more on the creative process and less on the financial strain, making the entire experience even more enjoyable.
Transforming Tables: The Event Day Unveiling
On the day of the event, I brought my completed DIY Sunflower Skull arrangements into the conference room, where the tables were already impeccably set. My friend Joanne, a true maestro of fabric, had been tasked with creating the tablecloths. She had chosen a sophisticated foundation of Black Symphony Broadcloth, topped with two layers of flowing tulle – one in vibrant orange and another in a rich yellow. This combination wasn’t just functional; it was a stroke of genius, creating a stunning visual depth and a warm, inviting “Harvest Autumn” vibe that perfectly complemented the seasonal theme. The layers of tulle shimmered subtly, adding an ethereal touch to the elegant black base.
As I carefully placed my DIY Sunflower Skull arrangements onto the tables, a moment of serendipitous magic occurred. Joanne’s reaction was priceless; she “went crazy” with delight. The arrangements were not just suitable; they were absolutely perfect with her tulle selection. It was as if we had shared the exact same creative mindset while making our choices in completely different parts of town. The warm, inviting glow of the sunflowers combined with the subtly eerie skulls and the rich, layered tablecloths created an atmosphere that was both elegant and enchantingly festive. The party was a roaring success, a truly memorable evening that culminated in our boss delighting us all with a $100 bonus, a testament to her appreciation and the overall festive spirit. I cannot recommend this project enough; it was understated, yet undeniably elegant, and truly made the entire event more beautiful and cohesive.
Why Choose DIY Halloween Decor?
Beyond the cost savings, opting for DIY Halloween decor offers a multitude of benefits. Firstly, it allows for unparalleled personalization. Mass-produced decorations often lack the unique character and charm that a handcrafted item possesses. With DIY, you can tailor every detail to your specific vision, theme, and color scheme, ensuring your decor is truly one-of-a-kind. Secondly, there’s an immense sense of satisfaction that comes from creating something with your own hands. Seeing your artistic vision come to life and receiving compliments on your work is incredibly rewarding. It’s an opportunity to tap into your creativity, destress, and engage in a fun, productive activity. Finally, DIY projects like these often lend themselves to repurposing and sustainability, utilizing existing craft supplies or items that might otherwise be discarded. This thoughtful approach not only reduces waste but also challenges you to see potential in everyday objects, transforming them into something extraordinary.
Crafting Your Own Spooky Chic: Step-by-Step Guide
Creating these elegant DIY Sunflower Skull Arrangements is a delightful and straightforward process that yields impressive results. Here’s how you can bring your own spooky chic vision to life, step by step.
Items You Will Need:
- Skull Heads (Dollar Tree): Look for small, lightweight plastic skulls. Their compact size makes them ideal for floral arrangements.
- Artificial Sunflowers (Dollar Tree or Craft Store): Choose sunflowers with sturdy stems and a good quality, realistic appearance. Artificial flowers ensure longevity and ease of arrangement.
- Skeleton Hand Champagne Flutes (Optional, Dollar Tree): These can be used as additional thematic elements on the table or as a fun, functional prop.
- Green Floral Moss (Dollar Tree or Craft Store): Essential for covering floral foam or the base of your vase, adding a natural, finished look to the arrangement.
- Apple Barrel Paint – White (Walmart): This will be your base coat for the skulls, providing a clean canvas.
- Apple Barrel Paint – Khaki (Walmart): Used for adding subtle depth and an aged, bone-like appearance to the skulls.
- Apple Barrel Paint – Jet Black (Walmart): For detailing the eye sockets and other crevices, enhancing the eerie effect.
- Craft Glue (Dollar Tree): All-purpose craft glue is good for initial placements and less stress-intensive bonds.
- Hot Glue Sticks (Dollar Tree): Crucial for strong, immediate bonds, especially when attaching skulls to sunflower stems or securing elements within the vase.
- Mini Hot Glue Gun (Walmart): A compact tool perfect for precise application of hot glue, minimizing mess.
- Vases (Michaels Craft Store or similar): Simple, clear glass vases or rustic ceramic ones work wonderfully to display your arrangements.
DIY Sunflower Skulls Assembly Instructions:
- Prepare Your Skulls: Begin by giving your plastic skulls a new personality. While the Dollar Tree skulls are charming on their own, a coat of paint can elevate their look dramatically. Start with the Apple Barrel White paint as a base. This helps to unify the surface and brightens the plastic. Once dry, use the Khaki paint to add subtle shadows and definition, especially around the eye sockets, nose, and jawline, giving them an aged, bone-like appearance. For an even more dramatic effect, a touch of Jet Black can be lightly brushed into the deepest crevices, enhancing the eerie depth. Remember to apply thin, even coats and allow each layer to dry completely before proceeding to the next to avoid streaks or clumping. This attention to detail will transform simple plastic into a more convincing, albeit miniature, anatomical marvel.
- Integrate Sunflowers with Skulls: Once your painted skulls are completely dry, it’s time to marry them with the sunflowers. Carefully remove the sunflower heads from their stems if they are too large or rigid to work with directly. You’ll want to position a skull either in the center of a sunflower, replacing its natural center, or nestled amongst the petals. Use a strong craft glue or a small dab of hot glue to secure the skull firmly to the back of the sunflower head or directly onto the stem. Ensure the bond is solid, as these will be the focal point of your arrangement. You might need to gently bend or shape the sunflower petals around the skull for a natural, integrated look.
- Assemble Your Arrangements: With your skull-sunflower hybrids ready, it’s time to create the arrangement within your chosen vases. If using floral foam, trim it to fit snugly within the vase and secure it. Begin by inserting the main sunflower stems, varying their heights to create visual interest. Then, strategically place your skull-integrated sunflowers throughout the arrangement. Aim for a balanced distribution, ensuring the skulls are visible and add to the overall aesthetic rather than being hidden. You can also incorporate additional plain sunflowers or other autumnal foliage to fill out the arrangement.
- Add Finishing Touches: To complete the look, fill the base of the vase with green floral moss. This not only conceals any visible floral foam or stems but also adds a touch of natural elegance, enhancing the contrast with the artificial elements. If you have chosen to use the skeleton hand champagne flutes, arrange them artfully on the table around the centerpieces, perhaps holding small candles or simply as decorative elements. Step back and assess your arrangement, making any final adjustments to ensure balance and visual appeal.
Variations and Customization for Your Unique Style
The beauty of DIY lies in its adaptability. While the sunflower skull arrangement is stunning as is, feel free to put your own spin on it:
- Color Palettes: Instead of traditional sunflowers, consider using deep red roses for a gothic romance vibe, or stark white flowers for a more ghostly aesthetic. Skulls can also be painted in metallic colors like gold or silver for an opulent touch, or even glow-in-the-dark paint for an extra spooky effect when the lights go down.
- Flower Choices: Experiment with different autumnal flowers such as chrysanthemums, dahlias, or even dried grasses and faux branches for a rustic or witchy feel. Mixing textures and heights can add significant depth.
- Vase Styles: The vase itself can set the tone. Use clear apothecary jars for a laboratory feel, ornate black vases for classic Halloween, or rustic wooden boxes for a farmhouse autumn theme.
- Additional Elements: Incorporate faux cobwebs, small plastic spiders, glitter, or even tiny LED fairy lights wrapped around the stems for added enchantment. Consider adding small autumn leaves, acorns, or mini pumpkins around the base of the vase to further tie into the season.
- Different Themes: Adapt this concept for other events. Perhaps tiny glitter skulls with pastel roses for a spooky-chic bridal shower, or pirate-themed skulls with tropical flowers for a unique summer party.
Embrace the Elegance of DIY Halloween
In conclusion, creating these DIY Sunflower Skull Arrangements was not just a craft project; it was an investment in making a special event truly memorable. The blend of vibrant sunflowers and subtle, eerie skulls proved to be the perfect harmony of autumn charm and Halloween spirit, elevating the entire atmosphere of the office party. It’s a testament to the fact that Halloween decor doesn’t always have to be overtly gory or childish; it can be sophisticated, elegant, and deeply personal. This project taught me that with a little creativity, accessible materials, and a clear vision, you can transform simple items into stunning centerpieces that captivate and delight. So, if you’re looking to infuse your next Halloween gathering with a touch of unique elegance, I wholeheartedly encourage you to try your hand at these charmingly spooky sunflower skull arrangements. They are sure to be a conversation starter and a beautiful addition to your festive decor.