
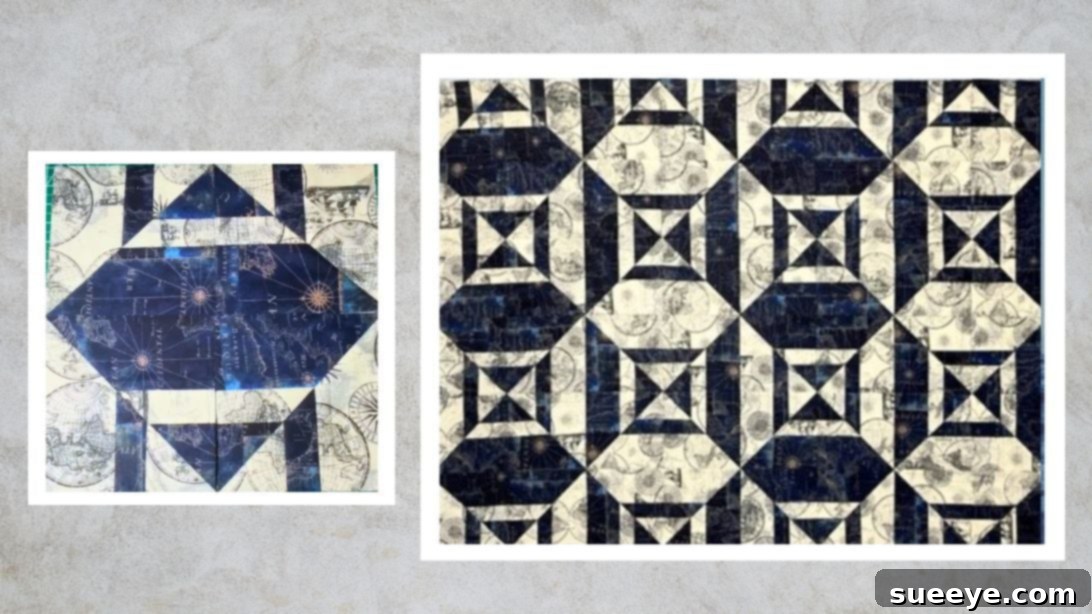
Master the Classic Sailor’s Song Quilt Pattern: A Beginner-Friendly DIY Guide
Embark on a delightful quilting journey with the timeless “Sailor’s Song Quilt Pattern.” This captivating design, made popular by Revelation Quilts on YouTube, might appear intricate at first glance, but you’ll be pleasantly surprised by its straightforward construction. Perfect for quilters of all skill levels, from complete novices to seasoned stitchers looking for a quick and satisfying project, this pattern uses fundamental techniques to create a visually striking result.
The beauty of the Sailor’s Song pattern lies in its clever use of contrasting fabrics and simple geometric shapes, which come together to form a dynamic, interlocking design. It’s a fantastic way to practice your precision cutting and piecing skills, particularly half-square triangles (HSTs) and strip piecing, which are cornerstones of many quilting projects. With our detailed, step-by-step tutorial, you’ll gain confidence in your quilting abilities and soon have a beautiful, handmade quilt to cherish or gift. Prepare your fabrics, fire up your sewing machine, and let’s dive into creating a stunning quilt that sings of tradition and craftsmanship.
Essential Materials for Your Sailor’s Song Quilt
Gathering your materials before you begin is key to a smooth and enjoyable quilting process. For this particular pattern, the magic happens with just two contrasting fabrics, allowing the design to truly pop.
- Two yards of light-colored fabric: Choose a high-quality quilting cotton. This will form the lighter elements of your design, providing contrast.
- Two yards of dark-colored fabric: Again, opt for quilting cotton that complements or starkly contrasts your light fabric. Ensure both fabrics are pre-washed and pressed to prevent shrinking and dye bleeding after your quilt is finished.
Beyond the fabric, you’ll also need standard quilting tools:
- Rotary cutter, cutting mat, and quilting ruler: Essential for accurate and efficient fabric cutting.
- Sewing machine: In good working order, threaded with a neutral-colored, high-quality polyester or cotton thread.
- Iron and ironing board: Crucial for pressing seams, which is just as important as sewing them accurately.
- Fabric scissors: For trimming threads and other small cuts.
- Straight pins or fabric clips: To hold fabric pieces together securely before sewing.
- Seam ripper: Every quilter’s essential “un-sewing” tool!
Step-by-Step Instructions to Create Your Sailor’s Song Quilt
Follow these detailed steps carefully, paying close attention to your measurements and seam allowances. Precision is your best friend in quilting!
Step 1: Preparing Your Fabric for the Blocks
Begin by laying out your pre-washed and pressed fabrics smoothly on your cutting mat. From your light fabric, cut two 10-inch squares. Repeat this for your dark fabric, cutting two 10-inch squares as well. You will now have a total of four 10-inch squares – two light and two dark. These squares form the foundation of your initial block units. Next, from your remaining fabrics, cut two 4-inch wide strips and one 2-inch wide strip from each color. So, you’ll have two 4″ light strips, one 2″ light strip, two 4″ dark strips, and one 2″ dark strip. The length of these strips should ideally be the full width of your fabric (WOF), typically 42-44 inches, but for this pattern, you’ll be cutting specific lengths from them later.
Step 2: Constructing the Strip Sets for Contrast
This step utilizes strip piecing, a technique that speeds up quilt block creation. Take your 2-inch wide light strip and place it between the two 4-inch wide dark strips, aligning all raw edges. Pin generously to keep them in place. Using your sewing machine, sew along both long edges with a precise 1/4-inch seam allowance. This creates your first strip set (dark-light-dark). Repeat this process for the second strip set: place the 2-inch wide dark strip between the two 4-inch wide light strips, sewing with a 1/4-inch seam allowance (light-dark-light). After sewing, it’s critical to press your seams. For the dark-light-dark block, press the seams *away* from the center (towards the dark strips). For the light-dark-light block, press the seams *towards* the center (towards the dark strip). Pressing in opposite directions for the two sets allows the seams to “nest” neatly when you join them later, reducing bulk and improving accuracy.
Step 3: Pairing Your Strip Sets for Future Cuts
Now that you have two distinct strip sets, it’s time to pair them up. Take the dark-light-dark strip set (where seams were pressed away from the center) and pair it with the light-dark-light strip set (where seams were pressed towards the center). Lay them on top of each other with right sides together, ensuring all raw edges are aligned. The opposing pressing directions will help these two layers sit flat against each other. Pin them securely along the raw edges that are currently unsewn – these will be the edges you’re about to cut. This pairing prepares your fabric for the next critical trimming step, setting the stage for the unique elements of the Sailor’s Song design.
Step 4: Precision Trimming for Consistent Blocks
With your two paired strip sets (right sides together), gently turn them so that the stripes run horizontally. Using your quilting ruler and rotary cutter, trim an inch off one end of each paired set. This isn’t about precise measurement for a specific block size yet, but rather about squaring up the ends and creating a clean starting point for subsequent cuts. After trimming, turn the paired sets back so that the stripes are now running vertically again. This ensures you have perfectly aligned, clean edges ready for the next phase of cutting, which will involve creating your half-square triangle units.
Step 5: Creating the Half-Square Triangle (HST) Units
This step is where the magic of the Sailor’s Song pattern truly begins to take shape, utilizing the versatile half-square triangle (HST) technique. On each of your stacked fabric pairs from Step 4, use a fabric marker or pencil to draw a diagonal line from one corner to the opposite corner. This line will serve as your guide. Next, sew a seam 1/4-inch away from both sides of this drawn diagonal line. Ensure your stitches are consistent. Once both seams are sewn, carefully cut directly along the diagonal line you drew. This action will yield two units from each stack. Press these units open, revealing two beautiful half-square triangle squares. Now, it’s crucial to square up these newly formed HSTs. Trim them down to 8 1/2-inch squares, making sure your 3-inch line on your quilting ruler intersects precisely with the seam that forms the “little half-square triangle” within your block. This meticulous squaring ensures all your blocks will be uniform and fit together perfectly.
Step 6: Assembling Your Quilt Blocks
You now have a collection of 8 1/2-inch HST units. The final step for each block is to arrange them to form the distinctive Sailor’s Song design. Lay out your individual HST units on a design wall or a flat surface, referring to the photo provided below for the correct orientation. This visual aid is incredibly helpful in ensuring your points align and your design flows seamlessly. Once you are satisfied with the arrangement, begin sewing the units together into rows, using a consistent 1/4-inch seam allowance. Then, sew your rows together to complete your individual quilt blocks. Take your time to match up seams and points, pinning carefully as you go. Press your seams open or to one side, whichever you prefer, aiming to reduce bulk. Repeat this process until you have enough blocks for your desired quilt size. With each block, you’ll see the captivating Sailor’s Song pattern emerge!
Why You’ll Love the Sailor’s Song Quilt Pattern
The Sailor’s Song Quilt Pattern is more than just a collection of fabric squares; it’s a testament to timeless design and the joy of quilting. You’ll adore this pattern for its:
- Beginner-Friendliness: It introduces core quilting techniques like strip piecing and half-square triangles in an accessible way.
- Classic Appeal: Its simple yet dynamic design ensures it remains a favorite, blending seamlessly into various home decors, from traditional to modern.
- Versatility in Fabric Choices: Whether you opt for bold, contrasting colors or subtle, harmonious tones, the pattern adapts beautifully, allowing your personal style to shine through.
- Quick Construction: Despite its sophisticated look, the use of strip sets and standardized block sizes makes this a relatively quick project, offering satisfying results in a shorter timeframe.
- Skill Building: Each block you make refines your precision, seam allowance consistency, and pressing techniques, building a strong foundation for future quilting endeavors.
Tips for Quilting Success with Your Sailor’s Song Project
To ensure your Sailor’s Song quilt turns out beautifully, keep these expert tips in mind:
- Accurate Cutting is Paramount: Take your time with the rotary cutter, mat, and ruler. Even a slight discrepancy in your initial cuts can lead to misaligned seams later.
- Pressing, Not Ironing: When joining fabric, gently *press* your seams with an up-and-down motion, rather than sliding the iron, which can stretch and distort your fabric.
- Chain Piecing: To save time and thread, sew multiple units one after another without lifting the presser foot or cutting the thread in between. This is particularly useful for sewing your HSTs.
- Use a Quarter-Inch Foot: Many sewing machines come with a special presser foot designed for a perfect 1/4-inch seam, which is crucial in quilting.
- Test Your Seam Allowance: Before starting, sew a few test strips to ensure your 1/4-inch seam is accurate. Adjust your needle position if necessary.
- Don’t Be Afraid to Unpick: If a seam isn’t right, use your seam ripper. It’s better to fix it early than to have a crooked block.
Final Thoughts on Your Sailor’s Song Quilt
The Sailor’s Song Quilt Pattern is a true delight to create, offering a harmonious blend of simplicity and stunning visual impact. From the initial fabric selection to the final assembly of your beautiful blocks, each step is a rewarding part of the quilting journey. This pattern is not just about making a quilt; it’s about building confidence in your skills, enjoying a creative process, and ultimately crafting a piece that tells a story of your dedication and artistry.
Whether you’re making a throw for your couch, a cozy baby quilt, or a thoughtful gift for a loved one, the Sailor’s Song pattern delivers elegance and charm every time. We hope this comprehensive guide has inspired you to pick up your fabrics and start stitching. Remember, every stitch adds to the unique character of your handmade quilt. If you loved following this simple block tutorial and are eager for more quilting inspiration, make sure to visit Revelation Quilts on Youtube and subscribe to her channel. She offers a wealth of video tutorials that will undoubtedly fuel your passion for quilting!