
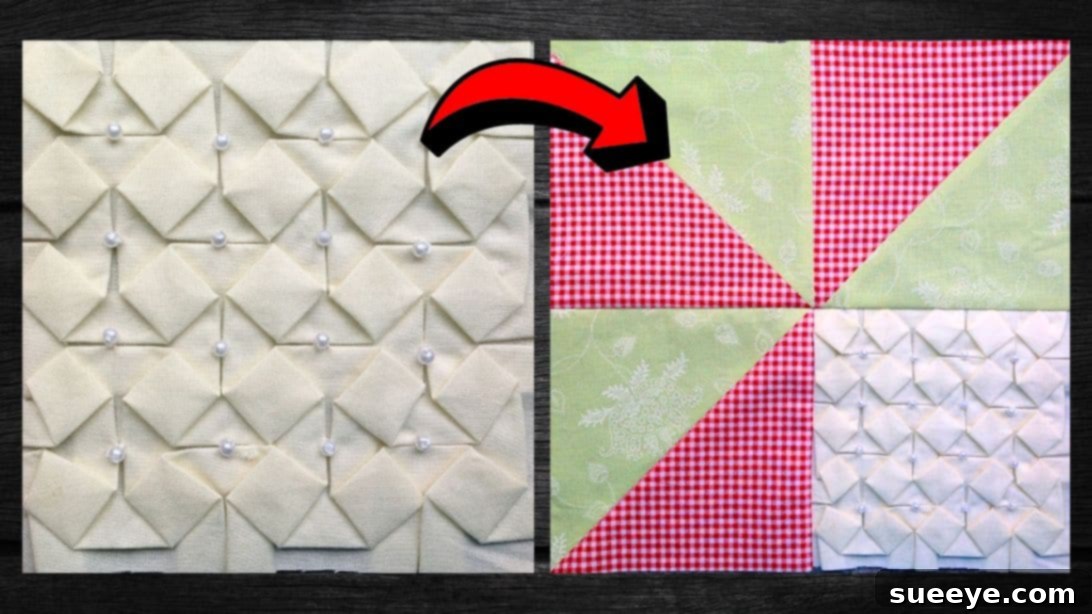
Mastering the Origami Quilt Block: An Easy Fabric Manipulation Guide
Embark on a creative journey into the fascinating world of fabric manipulation, a technique that transforms flat fabric into captivating three-dimensional designs. Often perceived as complex, this art form, particularly the creation of an origami quilt block, is surprisingly accessible for crafters of all skill levels. Inspired by the brilliant tutorial from Teresa DownUnder on YouTube, this guide will demystify the process, helping you achieve stunning results that will elevate your quilting projects.
Initially, the intricate appearance of these blocks might suggest a steep learning curve. However, this guide aims to prove that with clear instructions and a willingness to try, you can bring these beautiful shapes to life. This project is not only creatively stimulating but also incredibly satisfying, offering a unique blend of challenge and reward. Watching the fabric morph under your hands into a distinct sculptural form is a truly delightful experience, and it’s a technique you’ll be eager to incorporate into many future endeavors. Get ready to discover how to create your very own origami quilt block by following our detailed instructions and supplementary video tutorial.
RELATED: Easy Origami Pinwheel Quilt Block Tutorial
What is Fabric Manipulation and Origami Quilting?
Fabric manipulation is a broad term encompassing various techniques used to alter the surface of fabric, giving it texture, dimension, and sculptural qualities. This can involve pleating, tucking, ruching, smocking, gathering, and, in this specific case, a form of controlled stitching that creates geometric patterns resembling traditional Japanese origami. Origami quilting specifically refers to this textile art where fabric is folded, stitched, and pressed to form three-dimensional shapes, adding depth and visual interest to an otherwise flat surface.
This technique moves beyond conventional patchwork, introducing an element of sculptural design that can transform a simple piece of fabric into a work of art. The beauty of origami quilting lies in its ability to create intricate designs using relatively simple steps, making it an excellent skill for both novice and experienced quilters alike. It’s a wonderful way to infuse your projects with a unique, handcrafted touch that stands out.
Why You Will Love This Origami Quilt Project
There are numerous reasons why this particular origami quilt block project is a fantastic choice for your next creative endeavor. Firstly, the “aha!” moment when the three-dimensional shape begins to emerge from your flat fabric is incredibly gratifying. It’s a testament to the power of simple stitches and careful folding.
Secondly, the resulting texture and visual depth are unparalleled. Unlike flat quilting, these blocks add a dynamic element that catches the light and draws the eye, making your finished piece truly distinctive. This technique allows for a highly personalized touch, turning ordinary fabric into something extraordinary. Moreover, it’s a versatile skill that can be applied to a wide array of items beyond traditional quilts, such as decorative pillows, tote bags, wall hangings, or even accent pieces on garments. The sense of accomplishment you’ll feel upon completing one of these beautiful blocks is immense, encouraging you to explore more advanced fabric manipulation techniques in the future. It’s an ideal project for those looking to expand their creative repertoire and add a professional, artisanal touch to their crafts.
Essential Materials for Your Origami Quilt Block
Gathering the right tools is the first step towards a successful project. Here’s a breakdown of the materials you’ll need and why each one is important:
- White Fabric: A medium-weight cotton fabric is ideal for beginners. Its stability makes it easy to handle, mark, and press, ensuring your folds hold their shape. White fabric is often recommended for initial learning, as it clearly shows the markings and stitches, but feel free to experiment with solid colors or subtle patterns once you’re comfortable with the technique.
- Small Buttons or Beads: These are used as decorative accents to finish the center of your origami diamonds. Choose buttons or beads that complement your fabric color and add a touch of sparkle or texture. They also serve to secure the folds more firmly.
- Marking Pen or Pencil: A fabric-specific marking tool that is easily erasable or disappears with heat/water is crucial. Accuracy in marking your grid is paramount for the symmetry of your design.
- Needle and Thread: A sharp hand-sewing needle and strong, good-quality polyester or cotton thread are essential. Choose a thread color that matches or subtly contrasts with your fabric, depending on whether you want your stitches to be visible or blend in.
- Scissors: A sharp pair of fabric scissors will ensure clean, precise cuts, especially when preparing your initial fabric square and trimming threads.
- Ruler: A clear quilting ruler is highly recommended for accurate measurements and drawing straight lines for your grid. Precision here directly impacts the quality of your finished block.
- Iron, for pressing: An iron is indispensable for this project. Pressing at various stages sets the seams, sharpens the folds, and gives your origami quilt block a crisp, professional finish.
- Fabric Pins: Pins are invaluable for holding fabric layers and folds in place, especially when creating the tucks and securing them before final stitching.
How to Make an Origami Quilt Block: A Detailed Step-by-Step Tutorial
This section provides a comprehensive breakdown of each step, ensuring you can follow along with confidence and precision.
Step 1: Fabric Preparation and Initial Stitching
Begin by taking your chosen white fabric and carefully cutting it into an 18-inch square. Precision at this stage is crucial for ensuring your final block is symmetrical and well-proportioned. Use your ruler and marking pen to draw a grid across the entire fabric square, with lines spaced at 2-inch intervals. This grid will serve as your guide for all subsequent stitching and folding.
Once your grid is marked, you will begin the foundational stitching. Identify four adjacent grid intersections (dots) that form a small square. With your needle and thread, pick up a small stitch at each of these four dots. Ensure your stitches are secure but not too tight. Once you have picked up all four stitches, gently pull all the threads together simultaneously. This action will gather the fabric, causing it to pucker and form a distinct tuck. Carefully do a double stitch to anchor these gathered stitches firmly in place. This step creates the initial dimension that will eventually blossom into your origami design.
Step 2: Continuing the Pattern and Shaping the Tucks
After anchoring your first set of stitches, carefully cut off any excess thread close to the knot. Now, continue this process of stitching four dots together across your entire grid, working systematically row by row or in a pattern that feels comfortable to you. As you create more tucks, you will notice that extra folds of fabric will naturally form. It is essential to gently push these excess folds to the back of the piece, ensuring the front remains clean and smooth.
Once all the initial tucks are stitched and the extra fabric pushed to the back, it’s time to define your folds. Carefully fix the folds at the back of your fabric and then meticulously crease the seams properly with your fingers, or better yet, a hot iron. Sharp creases are vital for a crisp, professional look. Next, you will take two adjacent tucks and fold them together so that their peaks meet precisely in the middle. Pin them securely in place. This action begins to form the characteristic diamond shape of the origami quilt block.
Step 3: Unveiling the Diamond Shapes and Finishing Touches
With the tucks folded and pinned, you will now alternate the folding direction for subsequent tucks. This means if one pair of tucks meets in the middle from the top, the next pair will meet from the bottom, creating a beautiful alternating pattern. As you continue this process, you will visibly see the distinct diamond shapes begin to emerge across your fabric. It’s a truly magical transformation!
Occasionally, you might find that a specific diamond shape isn’t emerging as clearly as others. This can sometimes be due to residual tension from the thread at the back. In such cases, carefully inspect the back of your piece and, if necessary, snip a small thread at the back to release tension and allow the diamond shape to fully form. Exercise caution here to avoid unraveling your stitches. Once all the diamonds are formed and you are satisfied with the overall pattern, it’s crucial to press the entire piece well with a hot iron. This final pressing will set all the folds and give your origami quilt block a refined, finished look. To complete your exquisite block, stitch the small buttons or beads you gathered earlier into the center of each diamond shape. These not only add a decorative touch but also further secure the fabric manipulation, ensuring the enduring beauty of your unique creation.
Tips for Success in Origami Quilting
To ensure your origami quilt blocks turn out beautifully, consider these helpful tips:
- Precision is Key: Accurate measuring and marking of your grid lines are fundamental. Even slight deviations can affect the symmetry of your final design. Use a clear ruler and a fine-tipped fabric marker.
- Press, Press, Press: Never underestimate the power of your iron. Pressing at each stage – after marking, after creating initial tucks, and especially after forming the diamonds – will result in sharper folds and a more polished appearance.
- Thread Choice and Tension: Use a strong, good-quality thread. For hand stitching, ensure your thread tension is even – not too loose that the stitches don’t hold, and not too tight that the fabric puckers excessively.
- Patience and Practice: If your first block isn’t perfect, don’t be discouraged. Fabric manipulation is a skill that improves with practice. Take your time with each step, and enjoy the process of watching the fabric transform.
- Experiment with Fabric: While cotton is recommended for beginners, once you’re comfortable, try different fabric types. Lightweight silks or satins can create a more delicate, flowing effect, while thicker fabrics might give a bolder, more structured look.
- Consider Your End Use: Think about where your origami quilt block will go. For items that will be laundered frequently, ensure all stitches are very secure and any embellishments are washable.
Applications and Project Ideas
The versatility of the origami quilt block extends far beyond a traditional quilt. Once you’ve mastered this technique, a world of creative possibilities opens up:
- Quilts: Combine multiple blocks to create stunning, textured quilts that are true works of art. You can integrate them with traditional flat quilt blocks for contrast.
- Decorative Pillows: An origami quilt block makes an exquisite centerpiece for a throw pillow, adding a sophisticated, designer touch to any room.
- Tote Bags and Purses: Embellish the front panel of a tote bag or clutch with an origami block for a unique accessory that stands out.
- Wall Hangings: Frame a single, beautifully made origami block or combine several into a larger textile art piece for your walls.
- Garment Accents: Use smaller origami elements as decorative accents on clothing, such as a jacket lapel, a dress bodice, or a skirt hem.
- Table Runners or Placemats: Add a touch of elegance to your dining experience with textured table linens.
By exploring these applications, you can infuse your everyday items with the artistic flair of fabric manipulation, making them truly one-of-a-kind.
Easy Origami Quilt Block Tutorial: Your Next Creative Adventure
The art of fabric manipulation, particularly crafting an origami quilt block, is a rewarding skill that brings unique dimension and texture to your textile projects. What might seem daunting at first reveals itself to be a series of manageable steps that culminate in a truly spectacular result. This tutorial, drawing inspiration from the clear guidance provided by Teresa DownUnder on YouTube, aims to empower you to create your own beautiful, three-dimensional fabric art.
From precisely marking your fabric grid to the satisfying moment the diamond shapes emerge and the final embellishment of buttons, each stage of this project offers a chance for creativity and precision. Remember the importance of meticulous pressing, accurate stitching, and a little patience. Whether you’re a seasoned quilter looking for a fresh technique or a beginner eager to explore the wonders of textile art, this easy origami quilt block tutorial is designed to inspire and guide you. Don’t hesitate to give this delightful fabric manipulation technique a try; you’ll be amazed at what you can create!
*All image credit belongs to Teresa DownUnder via YouTube. Follow and subscribe to her channel for more inspiring DIY projects and tutorials!